Remote debugging in Linux using the GDB-gdbserver bundle
As we all know, the debugging process is such a thing, the importance of which is difficult to overestimate. Moreover, understanding the importance of such methods as flashing LEDs and displaying debug messages to the port, I remain in the opinion that nothing has been more effective than step-by-step debugging. However, the step-by-step debugging task becomes not so trivial in the case of programming under Linux on embedded systems (such as rasbery pi, virt2real or industrial processor modules).
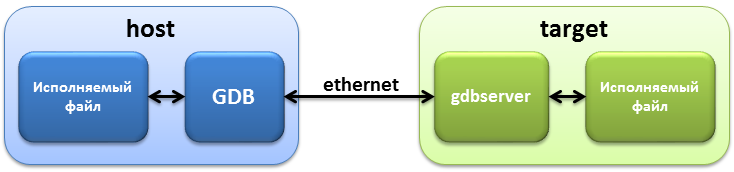
This task in Linux is designed to solve a standard bundle of GDB and gdbserver programs . The idea is that you write a program on a computer ( host in GDB terminology), compile it and upload it to the target device ( target ). Next, you run on the target device ( target ) the file being debugged and gdbserver , and on the GDB host and forward.
The interaction scheme of such debugging can be summarized as follows:
')
The executable file is the program we want to remotely debug. To work correctly, a copy of the program must be located not only on the target device, but also on the computer (host) from which the debugging is going.
GDB is a program that directly performs the debugging process. Usually, it is part of the GCC toolchain and is located in the same place as the compiler.
gdbserver is the GDB response part that runs the executable file in debug mode. Since gdbserver runs on the remote side (target), it should be compiled under the target device, using a cross compiler. Actually, this article is mainly devoted to building gdbserver from sources.
At my disposal there is a virt2real board, as well as a processor module based on a processor from the TI series AM335x . Below, the sequence of actions will be shown on the example of virt2real , however, I have done the same thing successfully (and what is important - in a similar way) with the AM335x chip.
Note: The host operating system is Ubuntu.12.04.
Create a gdb folder in your home directory, in which we will perform all our manipulations. Inside we create a subfolder downloads :
Download the sources we need and unpack them. We need GDB itself, as well as the termcap library (GDB uses it).
Usually they are collected directly in the source folder, but we will not do that in order to leave the source code intact. This is useful in case you have not one, but several varieties of target platforms. Then the same downloaded sources can be used several times.
Accordingly, we start with the termcap library , because it will be needed later when building gdbserver itself. Create a builds folder into which we will build our programs. Inside we create the v2r folder, put all the results for the virt2real platform in it . Well, there already is the termcap folder for building the termcap library. Go to the created directory.
We specify to the system the compiler and ranlib which we will use. In my case it is:
Now we configure. You will need to specify 2 parameters: --host and --prefix.
If everything is done correctly and passed without errors, a Makefile will be created in the ~ / gdb / builds / v2r / termcap folder.
Next, collect the library:
Create a folder in which we will build the server and go to it:
Specify where to get the termcap library:
Configuring as termcap. It is important to note here that we build gdbserver (and not GDB), so the configure file is specified from the /gdb-7.8/gdb/gdbserver folder:
If everything is correct, a Makefile will be created. Further standard:
To test the debugging process, create a short Hello world and compile it under the target platform.
The source code for the hello.cpp file is :
Fill the hello executable and our gdbserver on the target board.
I upload to the / usr / folder using SCP:
Now we launch the second terminal instance and connect to the target board via ssh and go to the / usr / folder:
We start on the target board gdbserver, and with its help our executable (debugged) file hello. Then we open the debug session at the port we like:
Go back to the host and run the debugged hello file using GDB
In response, you should see an invitation from GDB:
Connect to the remote gdbserver using the above port:
We receive the answer and the invitation to enter the following command:
At the same time, the remote side (gdbserver on target represented by virt2real) should see the installation of the session session:
This step-by-step debugging example is complete. I will note:
For GDB to work correctly, it needs the so-called debugging symbols , which can be read from the libraries of the remote operating system (target). Their absence is, for example, the cause of such messages:
And potentially cause other debugging troubles.
To fix the GDB problem on the host, you need to specify where to get these same libraries using the command:
If you have an image of your target's Linux Linux somewhere on your host, you need to specify the path to the folder with the libraries.
Or preload these libraries to the host:
We return to the folder with the project, run GDB again and specify the path to the libraries:
Now, periodically messages like will appear:
You can view the list of currently used libraries as follows:
PS: this article does not claim scientific novelty, but is an attempt to gather in one place detailed information on assembling and configuring the GDB-gdbserver bundle. It is likely that for advanced Linux users, the material will seem commonplace and “clumsy”, but for those people who are more “hardware workers” or for programmers of microcontrollers, switching to Linux is not a simple matter (judging by itself). So, I hope, the material will serve someone a useful service.
This task in Linux is designed to solve a standard bundle of GDB and gdbserver programs . The idea is that you write a program on a computer ( host in GDB terminology), compile it and upload it to the target device ( target ). Next, you run on the target device ( target ) the file being debugged and gdbserver , and on the GDB host and forward.
The interaction scheme of such debugging can be summarized as follows:
')
The executable file is the program we want to remotely debug. To work correctly, a copy of the program must be located not only on the target device, but also on the computer (host) from which the debugging is going.
GDB is a program that directly performs the debugging process. Usually, it is part of the GCC toolchain and is located in the same place as the compiler.
gdbserver is the GDB response part that runs the executable file in debug mode. Since gdbserver runs on the remote side (target), it should be compiled under the target device, using a cross compiler. Actually, this article is mainly devoted to building gdbserver from sources.
At my disposal there is a virt2real board, as well as a processor module based on a processor from the TI series AM335x . Below, the sequence of actions will be shown on the example of virt2real , however, I have done the same thing successfully (and what is important - in a similar way) with the AM335x chip.
Note: The host operating system is Ubuntu.12.04.
Training
Create a gdb folder in your home directory, in which we will perform all our manipulations. Inside we create a subfolder downloads :
mkdir -p ~/gdb/downloads cd ~/gdb/downloads Download the sources we need and unpack them. We need GDB itself, as well as the termcap library (GDB uses it).
wget ftp://ftp.gnu.org/gnu/termcap/termcap-1.3.1.tar.gz wget ftp://ftp.gnu.org/gnu/gdb/gdb-7.8.tar.gz tar xvzf termcap-1.3.1.tar.gz tar xvzf gdb-7.8.tar.gz Usually they are collected directly in the source folder, but we will not do that in order to leave the source code intact. This is useful in case you have not one, but several varieties of target platforms. Then the same downloaded sources can be used several times.
Build termcap library
Accordingly, we start with the termcap library , because it will be needed later when building gdbserver itself. Create a builds folder into which we will build our programs. Inside we create the v2r folder, put all the results for the virt2real platform in it . Well, there already is the termcap folder for building the termcap library. Go to the created directory.
mkdir -p ~/gdb/builds/v2r/termcap cd ~/gdb/builds/v2r/termcap We specify to the system the compiler and ranlib which we will use. In my case it is:
export CC=/opt/virt2real-sdk/codesourcery/arm-2013.05/bin/arm-none-linux-gnueabi-gcc export RANLIB=/opt/virt2real-sdk/codesourcery/arm-2013.05/bin/arm-none-linux-gnueabi-ranlib Now we configure. You will need to specify 2 parameters: --host and --prefix.
What to specify as parameters
- I admit, I still do not understand whether it matters what to specify in --host. I got the impression that no. In any case, I could not find a clear explanation of what exactly should be specified in this parameter, therefore I indicated the compiler prefix. Those. my compiler is called arm-none-linux-gnueabi-gcc, so I specified arm-none-linux-gnueabi as the --host.
- As the parameter --prefix we specify the folder in which we want to put the results of the work (configuration), i.e. the folder in which we are now.
../../../downloads/termcap-1.3.1/configure --host=arm-none-linux-gnueabi --prefix=~/gdb/builds/v2r/termcap If everything is done correctly and passed without errors, a Makefile will be created in the ~ / gdb / builds / v2r / termcap folder.
Makefile check
I recommend to be safe, open the Makefile and see that the variables CC and RANLIB are those that we mentioned above. The fact is that during my first attempts to build gdbserver, I was stuck for a long time because of this moment, because everything seemed to be going fine, but the resulting file didn’t want to run on the target board. It turned out that for reasons unknown to me, the standard compiler was stubbornly used in the Makefile. If you find that the compiler in the Makefile is not the same, you can simply replace it with your hands (it helped me). Although, when I repeated the whole procedure before writing the article, I did not have such a problem.
Next, collect the library:
make make install We collected gdbserver
Create a folder in which we will build the server and go to it:
mkdir -p ~/gdb/builds/v2r/gdbserver cd ~/gdb/builds/v2r/gdbserver Specify where to get the termcap library:
export LDFLAGS="-static -L~/gdb/builds/v2r/termcap/lib" export CFLAGS="-g -O2 -I~/gdb/builds/v2r/termcap/include" Configuring as termcap. It is important to note here that we build gdbserver (and not GDB), so the configure file is specified from the /gdb-7.8/gdb/gdbserver folder:
../../../downloads/gdb-7.8/gdb/gdbserver/configure --host=arm-none-linux-gnueabi --prefix=/home/den1s/gdb/builds/v2r/gdbserver --disable-werror # && Note
No matter how hard I tried nowhere to indicate absolute paths, so that the instruction could be used at all without adjusting for myself, I did not succeed. Since The configure file swears at the attempt to specify the path starting with ~ as --prefix. Therefore, here you need to enter the name of your user.
If everything is correct, a Makefile will be created. Further standard:
make make install We try
To test the debugging process, create a short Hello world and compile it under the target platform.
mkdir -p ~/virt2real/hello_test/ cd ~/virt2real/hello_test/ /opt/virt2real-sdk/codesourcery/arm-2013.05/bin/arm-none-linux-gnueabi-g++ hello.cpp -O0 -g -o hello The source code for the hello.cpp file is :
#include <iostream> int main(int argc, char* argv[]) { std::cout << "Hello,\n" << std::endl; std::cout << "debugged\n" << std::endl; std::cout << "World!!!" << std::endl; return 0; } Fill the hello executable and our gdbserver on the target board.
I upload to the / usr / folder using SCP:
scp ~/gdb/builds/v2r/gdbserver/bin/gdbserver root@192.168.3.1:/usr/ scp ~/virt2real/hello_test/hello root@192.168.3.1:/usr/ Now we launch the second terminal instance and connect to the target board via ssh and go to the / usr / folder:
ssh root@192.168.3.1 cd /usr/ We start on the target board gdbserver, and with its help our executable (debugged) file hello. Then we open the debug session at the port we like:
[root@virt2real usr]# ./gdbserver :123 hello Process hello created; pid = 5680; listening on port 123 Go back to the host and run the debugged hello file using GDB
/opt/virt2real-sdk/codesourcery/arm-2013.05/bin/arm-none-linux-gnueabi-gdb hello Headline
In order to be able not to specify the full path to GDB all the time, you can set the environment variable:
export PATH=$PATH:/opt/virt2real-sdk/codesourcery/arm-2013.05/bin/ In response, you should see an invitation from GDB:
GNU gdb (Sourcery CodeBench Lite 2013.05-24) 7.4.50.20120716-cvs Copyright (C) 2012 Free Software Foundation, Inc. License GPLv3+: GNU GPL version 3 or later <http://gnu.org/licenses/gpl.html> This is free software: you are free to change and redistribute it. There is NO WARRANTY, to the extent permitted by law. Type "show copying" and "show warranty" for details. This GDB was configured as "--host=i686-pc-linux-gnu --target=arm-none-linux-gnueabi". For bug reporting instructions, please see: <https://sourcery.mentor.com/GNUToolchain/>... Reading symbols from /home/den1s/virt2real/hello_test/hello...done. (gdb) Connect to the remote gdbserver using the above port:
(gdb) target remote 192.168.3.1:123 We receive the answer and the invitation to enter the following command:
Remote debugging using 192.168.3.1:123 warning: Unable to find dynamic linker breakpoint function. GDB will be unable to debug shared library initializers and track explicitly loaded dynamic code. 0x36fd7e30 in ?? () (gdb) At the same time, the remote side (gdbserver on target represented by virt2real) should see the installation of the session session:
Remote debugging from host 192.168.3.10 # 192.168.3.10 - IP host' | Comment | host | target |
|---|---|---|
| We set breakpoint on main | | |
| Go to Breakpoint | | |
| Go to the next line | | |
| Go to the next line | | |
| Go to the next line | | |
| Go to the next line (which, however not) | | |
| Run the program to the end, which leads to its completion | | |
This step-by-step debugging example is complete. I will note:
- for a complete list of commands, you can use the help command, as well as read a book on debugging with GDB (see the link at the end of the article)
- “Manual” debugging with GDB is very tedious, so I recommend using Eclipse for this purpose. Unfortunately, the description of such a debugging in this article would increase it to indecent size. At the end of the article there is a link to a very good English-language description of this topic.
Sysroot installation
For GDB to work correctly, it needs the so-called debugging symbols , which can be read from the libraries of the remote operating system (target). Their absence is, for example, the cause of such messages:
(gdb) next Cannot access memory at address 0x0 Cannot access memory at address 0x0 0x36d1f040 in ?? () Use the "info sharedlibrary" command to see the complete listing. Do you need "set solib-search-path" or "set sysroot"? And potentially cause other debugging troubles.
To fix the GDB problem on the host, you need to specify where to get these same libraries using the command:
set sysroot [Directory] If you have an image of your target's Linux Linux somewhere on your host, you need to specify the path to the folder with the libraries.
Or preload these libraries to the host:
mkdir -p ~/virt2real/sysroot cd ~/virt2real/sysroot scp -r root@192.168.3.1:/lib lib We return to the folder with the project, run GDB again and specify the path to the libraries:
cd ~/virt2real/hello_test/ arm-none-linux-gnueabi-gdb hello (gdb) set sysroot ~/virt2real/hello_test/ Now, periodically messages like will appear:
Reading symbols from ~/virt2real/sysroot/lib/libgcc_s.s...done. You can view the list of currently used libraries as follows:
(gdb) info sharedlibrary From To Syms Read Shared Object Library 0x36fd77a0 0x36ff24d0 Yes (*) ~/virt2real/sysroot/lib/ld-linux.so.3 No /usr/lib/libstdc++.so.6 0x36e70e00 0x36ed107c Yes (*) ~/virt2real/sysroot/lib/libm.so.6 0x36e51028 0x36e63154 Yes (*) ~/virt2real/sysroot/lib/libgcc_s.so.1 0x36d1cb00 0x36e11ae8 Yes (*) ~/virt2real/sysroot/lib/libc.so.6 (*): Shared library is missing debugging information. Bibliography"
- Debugging methods in Embedded Linux. In Russian.
- Description of the gdbserver assembly. In Russian.
- Description of the gdbserver assembly. In English.
- Install sysroot. In English.
- R. Stolmen Debugging with GDB. In English.
- Configure GDB in Code Composer Studio (the same Eclipse). In English.
- Instruction1) cd ~ / gdb / downloads
2) wget ftp.gnu.org/gnu/termcap/termcap-1.3.1.tar.gz
3) wget ftp.gnu.org/gnu/gdb/gdb-7.8.tar.gz
4) tar xvzf termcap-1.3.1.tar.gz
5) tar xvzf gdb-7.8.tar.gz
6) mkdir -p ~ / gdb / builds / v2r / termcap
7) cd ~ / gdb / builds / v2r / termcap
8) export CC = / opt / virt2real-sdk / codesourcery / arm-2013.05 / bin / arm-none-linux-gnueabi-gcc
9) export RANLIB = / opt / virt2real-sdk / codesourcery / arm-2013.05 / bin / arm-none-linux-gnueabi-ranlib
10) ../../../downloads/termcap-1.3.1/configure --host = arm-none-linux-gnueabi --prefix = ~ / gdb / builds / v2r / termcap
11) make
12) make install
13) mkdir -p ~ / gdb / builds / v2r / gdbserver
14) cd ~ / gdb / builds / v2r / gdbserver
15) export LDFLAGS = "- static -L ~ / gdb / builds / v2r / termcap / lib"
16) export CFLAGS = "- g -O2 -I ~ / gdb / builds / v2r / termcap / include"
17) ../../../downloads/gdb-7.8/gdb/gdbserver/configure --host = arm-none-linux-gnueabi --prefix = / home / den1s / gdb / builds / v2r / gdbserver - -disable-werror # &&
18) make
19) make install
PS: this article does not claim scientific novelty, but is an attempt to gather in one place detailed information on assembling and configuring the GDB-gdbserver bundle. It is likely that for advanced Linux users, the material will seem commonplace and “clumsy”, but for those people who are more “hardware workers” or for programmers of microcontrollers, switching to Linux is not a simple matter (judging by itself). So, I hope, the material will serve someone a useful service.
Source: https://habr.com/ru/post/251053/
All Articles