Transparent encryption: advantages and disadvantages
This article will talk about transparent encryption, implemented using CyberSafe Top Secret. In addition to CyberSafe Top Secret itself, it will be shown how to decrypt files encrypted using EFS.
')
Earlier in our articles , it was shown how to use CyberSafe Top Secret to encrypt physical disks and create virtual encrypted disks. However, such encryption is not always convenient.
First, it is not always possible to encrypt the entire physical disk. Secondly, if you use virtual disks, then container files, as a rule, occupy hundreds of megabytes of disk space and it is quite easy for an attacker to locate them. Yes, there are methods for hiding data, but human laziness is winning. Thirdly, the encrypted folder can constantly grow, and the size of the cryptodisk is limited to the value specified when creating it.
Everyone wants and is comfortable working with files, and so that the files are reliably protected. There is such a compromise - this is transparent file encryption when files are encrypted and decrypted “on the fly” - in the process of working with them. Files remain encrypted, and you work with them as with ordinary files. For example, if you encrypted the C: \ Documents folder and placed your documents in it, then when you open a document from this folder, Word or Excel starts and they do not even suspect that they are encrypted. You work with encrypted files, as with the most common, without thinking about encryption, mounting, virtual disks, etc.
In addition to ease of use, transparent encryption has another significant advantage. As a rule, a large number of files are stored on virtual encrypted disks. To work even with one of them, you need to connect the entire cryptodisk. As a result, all other files become vulnerable. Of course, you can create many small cryptodisks, assign each one a separate password, but this is not very convenient.
In the case of transparent encryption, you can create as many encrypted folders as you need and put different groups of files into each of them - documents, personal photos, etc. In this case, only those files that are accessed are decrypted, and not all cryptodisc files at once.
In Windows (starting with Windows 2000 and in addition to Home editions), it is traditional to use transparent encryption with the Encrypting File System (EFS).
EFS is designed so that one user cannot access the files (encrypted) of another user. Why was it necessary to create EFS if NTFS supports differentiation of access rights? Although NTFS is a fairly secure file system, over time, various utilities appeared (one of the first was NTFSDOS, which allows you to read files located on an NTFS partition from a DOS environment) that ignore NTFS access rights. There is a need for additional protection. This protection was supposed to be EFS.
Essentially, EFS is an add-on over NTFS. EFS is convenient because it is included in Windows and you do not need any additional software to encrypt files - everything you need is already in Windows. To start encrypting files, you do not need to take any preliminary steps, because when you first encrypt a file, an encryption certificate and private key are automatically created for the user.
Another advantage of EFS is that when you move a file from an encrypted folder to any other, it remains encrypted, and when you copy a file to an encrypted folder, it is automatically encrypted. No need to perform any additional actions.
This approach, of course, is very convenient, and it seems to the user that from the EFS only benefit. But it is not. On the one hand, under unfavorable circumstances, the user can generally lose access to encrypted files. This can happen in the following cases:
When users (especially beginners) start using EFS, few people think about it. But, on the other hand, there is special software (and later it will be demonstrated in the work), which allows access to the data, even if the system was reinstalled, and some keys were lost. And I don’t even know the advantages or disadvantages of this fact - this software allows you to restore access to data, but at the same time it can be used by an attacker to gain unauthorized access to encrypted files.
It would seem that the data using EFS encrypted is very reliable. After all, files on the disk are encrypted using the FEK (File Encryption Key) key, which is stored in the file attributes. The FEK itself is encrypted with a master key, which, in turn, is encrypted with the keys of the system users who have access to this file. User keys are encrypted with password hashes of these users, and password hashes are also encrypted with SYSKEY.
It would seem that such an encryption chain should have provided reliable data protection, but everything is trivially reduced to a login and password. Once the user has reset the password or reinstall the system, access to the encrypted data will no longer work.
EFS developers were reinsured and implemented recovery agents (EFS Recovery Agent), that is, users who can decrypt data encrypted by other users. However, using the EFS RA concept is not very convenient or even difficult, especially for novice users. As a result, these same novice users know how to encrypt files using EFS, but they do not know what to do in an emergency situation. It's good that there is special software that can help in this situation, but the same software can also be used for unauthorized access to data, as already noted.
The disadvantages of EFS can also include the impossibility of network encryption (if you need it, you must use other data encryption protocols, for example, IPSec) and the lack of support for other file systems. If you copy the encrypted file to a file system that does not support encryption, for example, on FAT / FAT32, the file will be decrypted and can be viewed by anyone. There is nothing surprising in this, EFS is just an add-on for NTFS.
It turns out that from EFS harm more than good. But, not to be unsubstantiated, I will give an example of using the Advanced EFS Data Recovery program to gain access to encrypted data. The script will be the simplest: first I will log in with another user and try to access the encrypted file that the other user has encrypted. Then I will model the real situation when the certificate of the user who encrypted the file was deleted (this can happen, for example, if Windows is reinstalled). As you will see, the program will cope with this situation without any problems.
Let's see how you can decrypt files encrypted with EFS. The first step is to enable encryption for one of the folders. For the demonstration, I specifically created the EFS-Crypted folder. To enable EFS encryption for a folder, you just need to enable the corresponding attribute in its properties (Fig. 1).
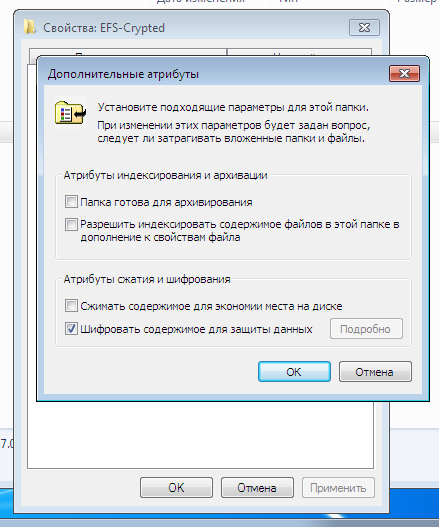
Fig. 1. Enable Encryption for Folder
The name of the encrypted folder and all files placed in it (which will automatically be encrypted) in Explorer displays in green. As shown in fig. 2, I added a text file config.txt to the encrypted folder, the contents of which we will try to view by logging in with another user. For the test, another user was created with administrator rights (such rights are needed by the Advanced EFS Data Recovery program (AEFSDR) of ElcomSoft), see fig. 3

Fig. 2. The contents of the encrypted folder

Fig. 3. New user created
Naturally, if you go under a different user and try to read the config.txt file, it will not work for you (Fig. 4).

Fig. 4. Access denied
But it doesn't matter - we run the Advanced EFS Data Recovery program and go directly to Expert mode (you can, of course, use the wizard that opens when you first start (fig. 5)), but I like the expert mode more.

Fig. 5. Wizard when running Advanced EFS Data Recovery
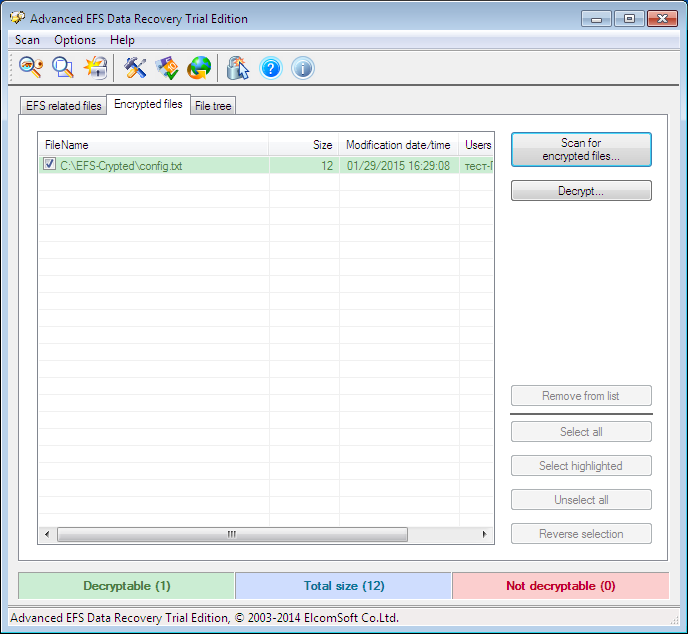
Fig. 6. Expert Mode Advanced EFS Data Recovery
So, go to the Encrypted files tab and click the Scan for encrypted files button. In fig. 6 already shows the scan result - our only encrypted file C: \ EFS-Crypted \ config.txt was found. Select it and click the Decrypt button. The program will ask you to select the directory into which you need to decrypt the files (Fig. 7).
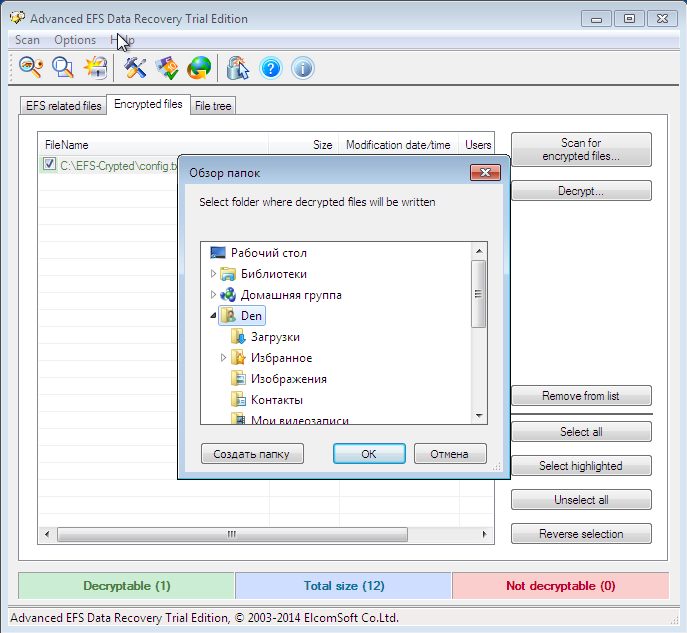
Fig. 7. Select the directory to which files will be decrypted.
Since I have a trial version of the program, to continue, you need to click Continue (Fig. 8). The decrypted files are placed in the AEFS_ <drive_name> _DECRYPTED subfolder (Fig. 9). Please note that our config.txt file is no longer highlighted in green and we can view its contents (Fig. 10).
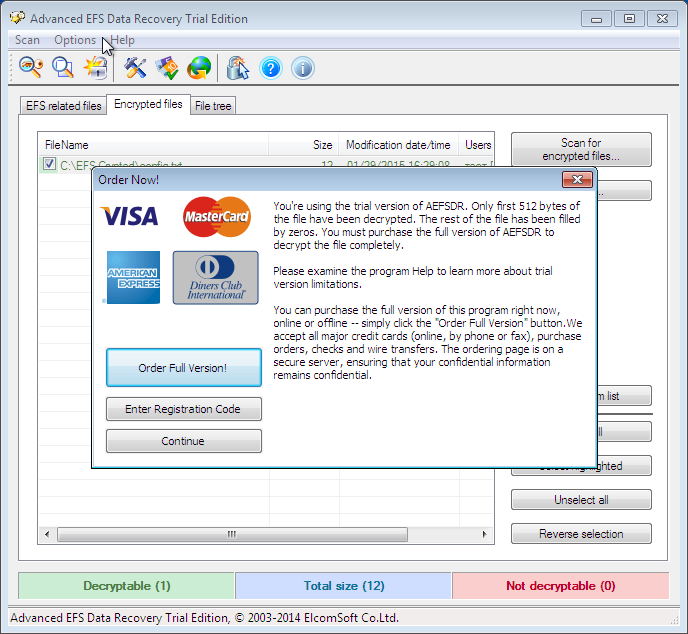
Fig. 8. Click Continue.

Fig. 9. Decrypted files
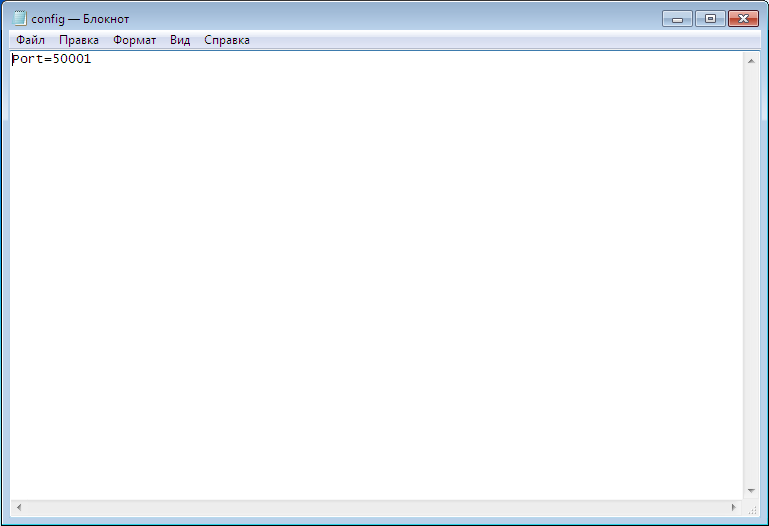
Fig. 10. Contents of the config.txt file
Now let's complicate the task of the Advanced EFS Data Recovery program, namely, delete the personal certificate. Log in as the user who created the encrypted folder and launch the mmc console, select the menu command File, Add or Remove Snap-in . Next, select the Certificates snap-in and click the Add button (Figure 11). In the window that appears, select my user account (Fig. 12).

Fig. 11. Add a snap

Fig. 12. Equipment Certificate Manager
Next, click OK and in the window that appears, go to Certificates, Personal, Certificates . You will see the created certificates for the current user (Fig. 13). In my case, the user is called a test . Right-click on its certificate and select Delete to delete the certificate. You will see a warning that it will no longer be possible to decrypt data encrypted with this certificate. Well, we'll check it out soon.
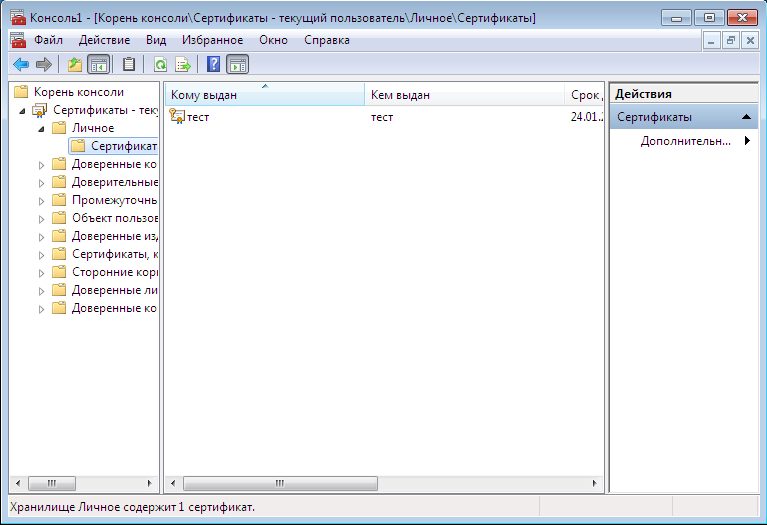
Fig. 13. Personal certificates

Fig. 14. Warning when deleting certificate
Then follow these steps:

Fig. 15. Search for keys
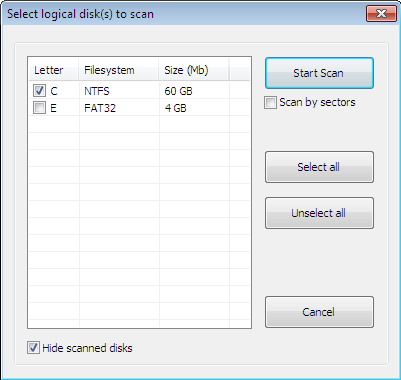
Fig. 16. Scan window
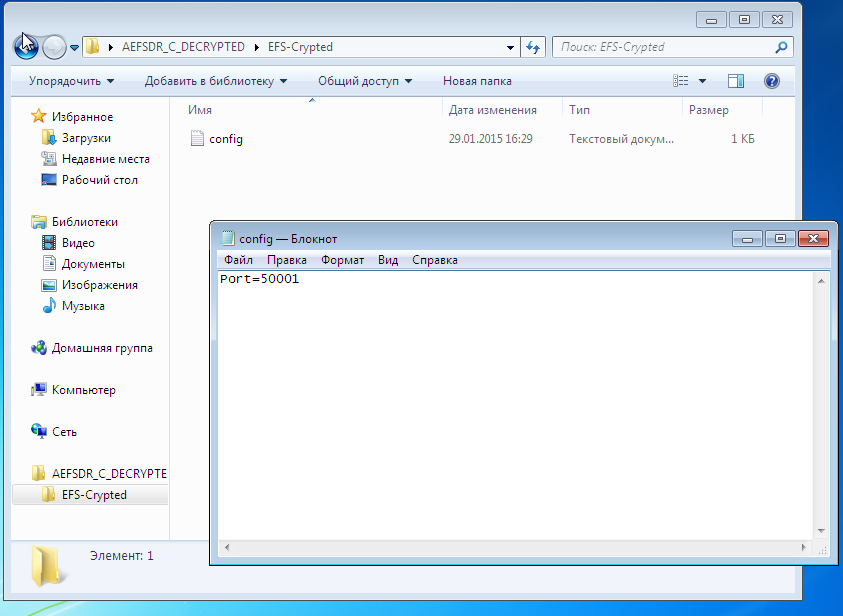
Fig. 17. The file is decrypted again.
To the shame of EFS or to the credit of Advanced EFS Data Recovery, in both cases the file was decrypted. At the same time, as you can see, I did not need any special knowledge or skills. It is enough to run a program that does all the work for you. How the program works can be found on the developers website (http://www.elcomsoft.ru/); we will not discuss in detail the principle of its work in this article, since AEFSDR is not the subject of the article.
To be fair, we must say that specialists can configure the system so that Advanced EFS Data Recovery will be powerless. However, we considered the most common use of EFS for the vast majority of users.
Consider how transparent encryption is implemented in CyberSafe. For transparent encryption, the Alfa Transparent File Encryptor driver (http://www.alfasp.com/products.html) is used, which encrypts files using the AES-256 algorithm or the GOST 28147-89 algorithm (when using Crypto Pro).
An encryption rule (file mask, allowed / prohibited processes, etc.) and an encryption key are transferred to the driver. The encryption key itself is stored in the ADS folder (Alternate Data Streams, eb.by/Z598 ) and encrypted using OpenSSL (RSA algorithm) or GOST R 34.10-2001 — certificates are used for this.
The logic is as follows: we add a folder, CyberSafe creates a key for the driver, encrypts it with selected public certificates (they must be previously created or imported into CyberSafe). When any user attempts to access a folder, CyberSafe opens the ADS folders and reads the encrypted key. If this user has a private certificate key (he may have one or more of his certificates) that was used to encrypt the key, he can open this folder and read the files. It should be noted that the driver decrypts only what is needed, and not all files when providing access to the file. For example, if a user opens a large Word document, only the part that is being loaded into the editor is decrypted; the rest is loaded as needed. If the file is small, then it is decrypted completely, but the remaining files remain encrypted.
If the folder is network shared, then the files in it remain encrypted, the client driver decrypts only the file or part of the file in memory, although this is also true for the local folder. When editing a file, the driver encrypts changes in memory and writes to a file. In other words, even when the folder is turned on (it will be shown later on what it is), the data on the disk always remains encrypted.
It is time to consider the practical use of the CyberSafe Top Secret program. To encrypt a folder, go to the Transparent Encryption section of the program ( File Encryption tab), see fig. 18. Then from Explorer, drag the folders that you want to encrypt to the working area of the program. You can also use the Add button . folder . I added one folder - C: \ CS-Crypted.
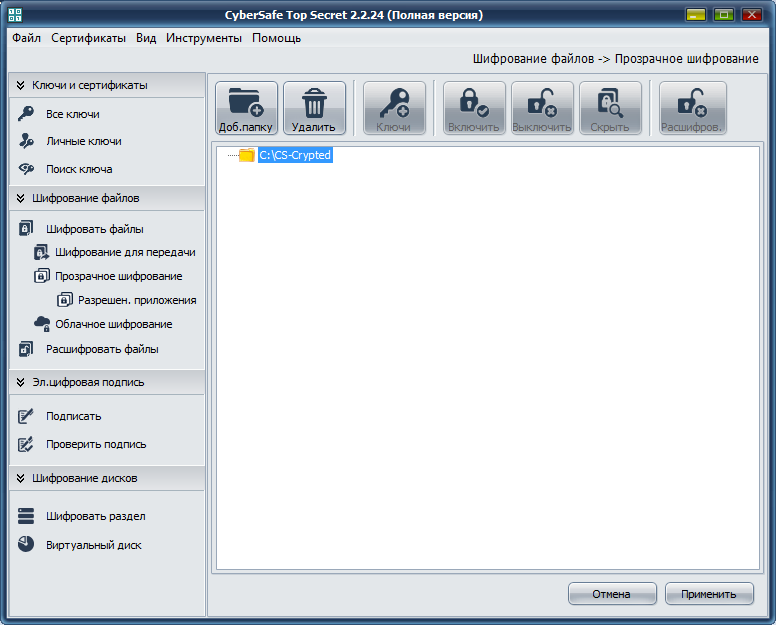
Fig. 18. CyberSafe Top Secret Program
Click the Apply button. In the window that appears (fig. 19), click the Yes or Yes button for all x (if you are trying to encrypt several folders at once). Next you will see a window for selecting certificates, the keys of which will be used for transparent folder encryption (Fig. 20). As a rule, certificates are created immediately after installing the program. If you have not done so already, you will have to go back to the Private Keys section and click the Create button.

Fig. 19. Click Yes.

Fig. 20. Selection of certificates for transparent encryption
The next question of the program is whether you need to install an administrator key for this folder (Fig. 21). Without an administrator key, you will not be able to make changes to the folder, so click Yes .

Fig. 21. Click Yes again.
After that, you will return to the main program window. Before you start working with an encrypted folder, select it and click the Enable button. The program will ask for the password of the certificate (fig. 22) specified for encryption of this folder. After that, working with an encrypted folder will not differ from working with a regular folder. In the CyberSafe window, the folder will be marked as open, and the lock icon will appear to the left of the folder icon (Figure 23).
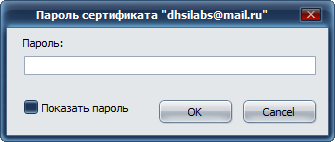
Fig. 22. Enter the certificate password
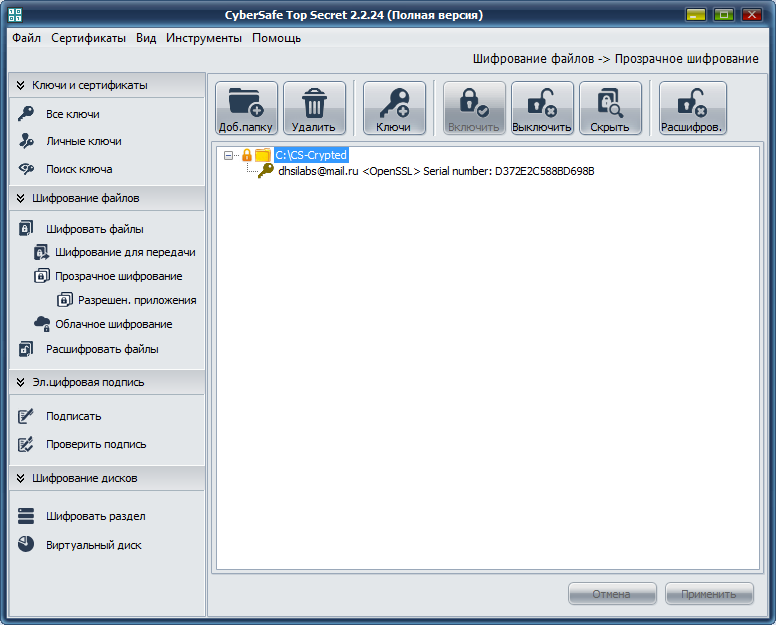
Fig. 23. Encrypted folder is connected
In Explorer, neither the encrypted folder nor the encrypted files are marked in any way. Outwardly, they look the same as other folders and files (unlike EFS, where the names of encrypted files / folders are highlighted in green), see fig. 24
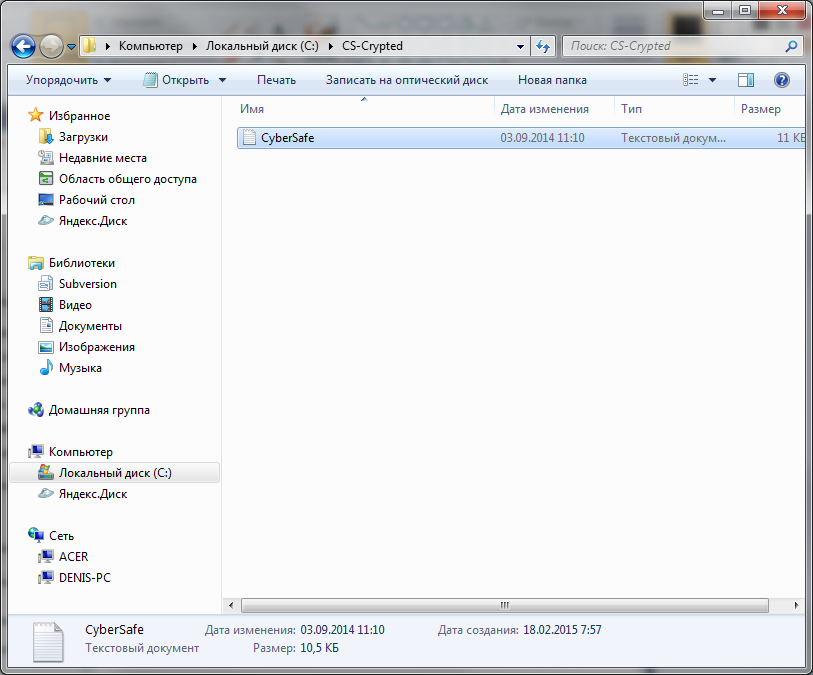
Fig. 24. Encrypted CS-Crypted folder in Explorer
It should be noted that in a similar way you can encrypt a network folder. At the same time, CyberSafe program should be located only on the users computer, and not on the file server. All encryption is carried out on the client, and already encrypted files are transferred to the server. Such a decision is more than justified. First, already encrypted data is transmitted over the network. Secondly, even if the server administrator wants to get access to the files, it will not work, because only users whose certificates were specified during encryption can decrypt the files. But the administrator, if necessary, can back up encrypted files.
When the encrypted folder is no longer needed, go to the CyberSafe program, select the folder and click the Shut Down button. Such a solution may not seem to be as convenient as EFS - you need to press the on / off buttons. But this is only at first glance. First, the user has a clear understanding that the folder is encrypted and he will not forget about this fact when he reinstalls Windows. Secondly, when using EFS, if you need to move away from the computer, you need to log out, because during your absence, anyone can go to the computer and access your files. All he needs to do is copy your files to a device that does not support encryption, for example, on a FAT32 flash drive. Then he will be able to view files outside of your computer. With CyberSafe, everything is a little more convenient. Yes, you need to do an additional action (“turn off” the folder) and all encrypted files will become inaccessible. But on the other hand, you will not need to re-launch all programs and open all documents (including unencrypted ones) - as after re-entering the system.
However, each product has its own characteristics. CyberSafe is no exception. Imagine that you encrypted the C: \ CS-Crypted folder and put the report.txt file there. When the folder is turned off, of course, you can not read the file. When the folder is included , you can access the file and, accordingly, copy it to any other, unencrypted folder. But after copying the file to an unencrypted folder, he continues to live his own life. On the one hand, it is not as convenient as in the case of EFS, on the other hand, knowing this feature of the program, the user will be more disciplined and will keep their secret files only in encrypted folders.
Now we will try to find out which is faster - EFS or CyberSafe Top Secret. All tests are performed on a real machine - no virtual machines. The configuration of the laptop is as follows - Intel 1000M (1.8 GHz) / 4 GB of RAM / WD WD5000LPVT (500 GB, SATA-300, 5400 RPM, 8 MB / Windows 7 64-bit buffer). The machine is not very powerful, but what is.
The test will be extremely simple. We will copy files to each folder and see how long it will take to copy. To figure out which transparent encryption tool is faster, the following simple script will help us:
You don't need to be a programming guru to figure out what this script is doing. It is no secret that we often work with relatively small files with sizes ranging from several tens to several hundred kilobytes. This script copies the Joomla! 3.3.6, in which there are 5580 of such small files, first in the EFS-encrypted folder, and then in the CyberSoft-encrypted folder. Let's see who will be the winner.
The robocopy command is used to recursively copy files, including empty ones (the / E parameter), and its output is deliberately redirected to a text file (if you wish, you can see what was copied and what is not), so as not to clutter the script output.
The results of the second test are shown in Fig. 25. As you can see, EFS handled this task in 74 seconds, and CyberSoft in just 32 seconds. Given that in most cases, users work with many small files, CyberSafe will be more than two times faster than EFS .

Fig. 25. Test results
Now let's summarize. The advantages of transparent CyberSafe encryption include the following facts:
The last two benefits deserve special attention. To protect yourself from access to your private keys, you can protect the CyberSafe program itself. To do this, execute the command Tools, Settings (fig. 26). In the Settings window on the Authentication tab, you can enable either password authentication or two-factor authentication. Details on how to do this can be found in the CyberSafe software manual on page 119.
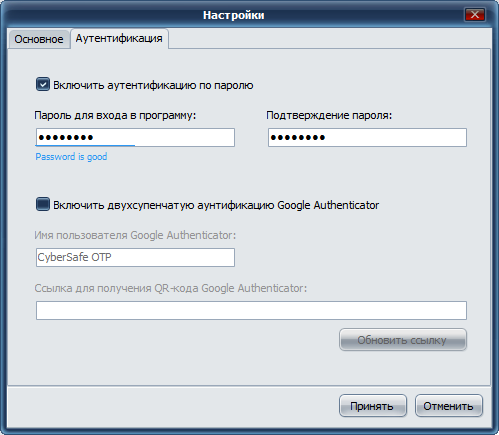
Fig. 26. Protecting CyberSafe itself
On the Allowed tab . applications, you can define trusted applications that are allowed to work with encrypted files. By default, all applications are trusted. But for more security, you can specify applications that are allowed to work with encrypted files. In fig. 27 I have specified MS Word and MS Excel as trusted applications. If any other program tries to access the encrypted folder, it will be denied access. Additional information can be found in the article “Transparent file encryption on a local computer using CyberSafe Files Encryption” (http://habrahabr.ru/company/cybersafe/blog/210458/).

Fig. 27. Trusted Applications
That's all. We recommend to read the following articles:
Transparent file encryption on the local computer using CyberSafe Files Encryption
Transparent encryption of network folders in the corporate space
Information hiding methods
Encryption of cloud services in companies and organizations
')
A few words about transparent encryption
Earlier in our articles , it was shown how to use CyberSafe Top Secret to encrypt physical disks and create virtual encrypted disks. However, such encryption is not always convenient.
First, it is not always possible to encrypt the entire physical disk. Secondly, if you use virtual disks, then container files, as a rule, occupy hundreds of megabytes of disk space and it is quite easy for an attacker to locate them. Yes, there are methods for hiding data, but human laziness is winning. Thirdly, the encrypted folder can constantly grow, and the size of the cryptodisk is limited to the value specified when creating it.
Everyone wants and is comfortable working with files, and so that the files are reliably protected. There is such a compromise - this is transparent file encryption when files are encrypted and decrypted “on the fly” - in the process of working with them. Files remain encrypted, and you work with them as with ordinary files. For example, if you encrypted the C: \ Documents folder and placed your documents in it, then when you open a document from this folder, Word or Excel starts and they do not even suspect that they are encrypted. You work with encrypted files, as with the most common, without thinking about encryption, mounting, virtual disks, etc.
In addition to ease of use, transparent encryption has another significant advantage. As a rule, a large number of files are stored on virtual encrypted disks. To work even with one of them, you need to connect the entire cryptodisk. As a result, all other files become vulnerable. Of course, you can create many small cryptodisks, assign each one a separate password, but this is not very convenient.
In the case of transparent encryption, you can create as many encrypted folders as you need and put different groups of files into each of them - documents, personal photos, etc. In this case, only those files that are accessed are decrypted, and not all cryptodisc files at once.
Advantages and disadvantages of EFS
In Windows (starting with Windows 2000 and in addition to Home editions), it is traditional to use transparent encryption with the Encrypting File System (EFS).
EFS is designed so that one user cannot access the files (encrypted) of another user. Why was it necessary to create EFS if NTFS supports differentiation of access rights? Although NTFS is a fairly secure file system, over time, various utilities appeared (one of the first was NTFSDOS, which allows you to read files located on an NTFS partition from a DOS environment) that ignore NTFS access rights. There is a need for additional protection. This protection was supposed to be EFS.
Essentially, EFS is an add-on over NTFS. EFS is convenient because it is included in Windows and you do not need any additional software to encrypt files - everything you need is already in Windows. To start encrypting files, you do not need to take any preliminary steps, because when you first encrypt a file, an encryption certificate and private key are automatically created for the user.
Another advantage of EFS is that when you move a file from an encrypted folder to any other, it remains encrypted, and when you copy a file to an encrypted folder, it is automatically encrypted. No need to perform any additional actions.
This approach, of course, is very convenient, and it seems to the user that from the EFS only benefit. But it is not. On the one hand, under unfavorable circumstances, the user can generally lose access to encrypted files. This can happen in the following cases:
- Hardware problems, for example, the motherboard has failed, the boot loader is corrupted, system files are damaged due to a hard disk failure (bad sectors). As a result, the hard drive can be connected to another computer to copy files from it, but if they are encrypted with EFS, nothing will work out for you.
- The system is reinstalled. Windows can be reinstalled for a variety of reasons. In this case, access to encrypted data, of course, will be lost.
- Removed user profile. Even if you create a user with the same name, he will be assigned a different ID, and it will still not be possible to decrypt the data.
- The system administrator or the user himself has reset the password. After that, access to EFS data will also be lost.
- Invalid user transfer to another domain. If the user has been transferred illiterately, he will not be able to access his encrypted files.
When users (especially beginners) start using EFS, few people think about it. But, on the other hand, there is special software (and later it will be demonstrated in the work), which allows access to the data, even if the system was reinstalled, and some keys were lost. And I don’t even know the advantages or disadvantages of this fact - this software allows you to restore access to data, but at the same time it can be used by an attacker to gain unauthorized access to encrypted files.
It would seem that the data using EFS encrypted is very reliable. After all, files on the disk are encrypted using the FEK (File Encryption Key) key, which is stored in the file attributes. The FEK itself is encrypted with a master key, which, in turn, is encrypted with the keys of the system users who have access to this file. User keys are encrypted with password hashes of these users, and password hashes are also encrypted with SYSKEY.
It would seem that such an encryption chain should have provided reliable data protection, but everything is trivially reduced to a login and password. Once the user has reset the password or reinstall the system, access to the encrypted data will no longer work.
EFS developers were reinsured and implemented recovery agents (EFS Recovery Agent), that is, users who can decrypt data encrypted by other users. However, using the EFS RA concept is not very convenient or even difficult, especially for novice users. As a result, these same novice users know how to encrypt files using EFS, but they do not know what to do in an emergency situation. It's good that there is special software that can help in this situation, but the same software can also be used for unauthorized access to data, as already noted.
The disadvantages of EFS can also include the impossibility of network encryption (if you need it, you must use other data encryption protocols, for example, IPSec) and the lack of support for other file systems. If you copy the encrypted file to a file system that does not support encryption, for example, on FAT / FAT32, the file will be decrypted and can be viewed by anyone. There is nothing surprising in this, EFS is just an add-on for NTFS.
It turns out that from EFS harm more than good. But, not to be unsubstantiated, I will give an example of using the Advanced EFS Data Recovery program to gain access to encrypted data. The script will be the simplest: first I will log in with another user and try to access the encrypted file that the other user has encrypted. Then I will model the real situation when the certificate of the user who encrypted the file was deleted (this can happen, for example, if Windows is reinstalled). As you will see, the program will cope with this situation without any problems.
Using Advanced EFS Data Recovery to Decrypt Encrypted EFS Files
Let's see how you can decrypt files encrypted with EFS. The first step is to enable encryption for one of the folders. For the demonstration, I specifically created the EFS-Crypted folder. To enable EFS encryption for a folder, you just need to enable the corresponding attribute in its properties (Fig. 1).
Fig. 1. Enable Encryption for Folder
The name of the encrypted folder and all files placed in it (which will automatically be encrypted) in Explorer displays in green. As shown in fig. 2, I added a text file config.txt to the encrypted folder, the contents of which we will try to view by logging in with another user. For the test, another user was created with administrator rights (such rights are needed by the Advanced EFS Data Recovery program (AEFSDR) of ElcomSoft), see fig. 3
Fig. 2. The contents of the encrypted folder
Fig. 3. New user created
Naturally, if you go under a different user and try to read the config.txt file, it will not work for you (Fig. 4).
Fig. 4. Access denied
But it doesn't matter - we run the Advanced EFS Data Recovery program and go directly to Expert mode (you can, of course, use the wizard that opens when you first start (fig. 5)), but I like the expert mode more.
Fig. 5. Wizard when running Advanced EFS Data Recovery
Fig. 6. Expert Mode Advanced EFS Data Recovery
So, go to the Encrypted files tab and click the Scan for encrypted files button. In fig. 6 already shows the scan result - our only encrypted file C: \ EFS-Crypted \ config.txt was found. Select it and click the Decrypt button. The program will ask you to select the directory into which you need to decrypt the files (Fig. 7).
Fig. 7. Select the directory to which files will be decrypted.
Since I have a trial version of the program, to continue, you need to click Continue (Fig. 8). The decrypted files are placed in the AEFS_ <drive_name> _DECRYPTED subfolder (Fig. 9). Please note that our config.txt file is no longer highlighted in green and we can view its contents (Fig. 10).
Fig. 8. Click Continue.
Fig. 9. Decrypted files
Fig. 10. Contents of the config.txt file
Now let's complicate the task of the Advanced EFS Data Recovery program, namely, delete the personal certificate. Log in as the user who created the encrypted folder and launch the mmc console, select the menu command File, Add or Remove Snap-in . Next, select the Certificates snap-in and click the Add button (Figure 11). In the window that appears, select my user account (Fig. 12).
Fig. 11. Add a snap
Fig. 12. Equipment Certificate Manager
Next, click OK and in the window that appears, go to Certificates, Personal, Certificates . You will see the created certificates for the current user (Fig. 13). In my case, the user is called a test . Right-click on its certificate and select Delete to delete the certificate. You will see a warning that it will no longer be possible to decrypt data encrypted with this certificate. Well, we'll check it out soon.
Fig. 13. Personal certificates
Fig. 14. Warning when deleting certificate
Then follow these steps:
- Close the snap-in and try accessing the encrypted file. It will not work for you, despite the fact that you have encrypted this file. After all, the certificate is deleted.
- Change the user, run the program Advanced EFS Data Recovery. Try to decrypt the file, as shown earlier. First, the program will report that the certificate was not found. Therefore, you need to go to the EFS related files tab and click the Scan for keys button. After some time, the program will inform you that it has found the keys, but probably not all (Fig. 15). The program recommends that you scan the keys again, but this time with the Scan by sectors option enabled (Figure 16), but I did not do this and immediately went to the Encrypted files tab. The program successfully found and decrypted the file. In fig. 17 shows that I have already saved the decrypted file to the desktop.
Fig. 15. Search for keys
Fig. 16. Scan window
Fig. 17. The file is decrypted again.
To the shame of EFS or to the credit of Advanced EFS Data Recovery, in both cases the file was decrypted. At the same time, as you can see, I did not need any special knowledge or skills. It is enough to run a program that does all the work for you. How the program works can be found on the developers website (http://www.elcomsoft.ru/); we will not discuss in detail the principle of its work in this article, since AEFSDR is not the subject of the article.
To be fair, we must say that specialists can configure the system so that Advanced EFS Data Recovery will be powerless. However, we considered the most common use of EFS for the vast majority of users.
Transparent encryption system implemented in CyberSafe Top Secret
Consider how transparent encryption is implemented in CyberSafe. For transparent encryption, the Alfa Transparent File Encryptor driver (http://www.alfasp.com/products.html) is used, which encrypts files using the AES-256 algorithm or the GOST 28147-89 algorithm (when using Crypto Pro).
An encryption rule (file mask, allowed / prohibited processes, etc.) and an encryption key are transferred to the driver. The encryption key itself is stored in the ADS folder (Alternate Data Streams, eb.by/Z598 ) and encrypted using OpenSSL (RSA algorithm) or GOST R 34.10-2001 — certificates are used for this.
The logic is as follows: we add a folder, CyberSafe creates a key for the driver, encrypts it with selected public certificates (they must be previously created or imported into CyberSafe). When any user attempts to access a folder, CyberSafe opens the ADS folders and reads the encrypted key. If this user has a private certificate key (he may have one or more of his certificates) that was used to encrypt the key, he can open this folder and read the files. It should be noted that the driver decrypts only what is needed, and not all files when providing access to the file. For example, if a user opens a large Word document, only the part that is being loaded into the editor is decrypted; the rest is loaded as needed. If the file is small, then it is decrypted completely, but the remaining files remain encrypted.
If the folder is network shared, then the files in it remain encrypted, the client driver decrypts only the file or part of the file in memory, although this is also true for the local folder. When editing a file, the driver encrypts changes in memory and writes to a file. In other words, even when the folder is turned on (it will be shown later on what it is), the data on the disk always remains encrypted.
Use CyberSafe Top Secret to transparently encrypt files and folders
It is time to consider the practical use of the CyberSafe Top Secret program. To encrypt a folder, go to the Transparent Encryption section of the program ( File Encryption tab), see fig. 18. Then from Explorer, drag the folders that you want to encrypt to the working area of the program. You can also use the Add button . folder . I added one folder - C: \ CS-Crypted.
Fig. 18. CyberSafe Top Secret Program
Click the Apply button. In the window that appears (fig. 19), click the Yes or Yes button for all x (if you are trying to encrypt several folders at once). Next you will see a window for selecting certificates, the keys of which will be used for transparent folder encryption (Fig. 20). As a rule, certificates are created immediately after installing the program. If you have not done so already, you will have to go back to the Private Keys section and click the Create button.
Fig. 19. Click Yes.
Fig. 20. Selection of certificates for transparent encryption
The next question of the program is whether you need to install an administrator key for this folder (Fig. 21). Without an administrator key, you will not be able to make changes to the folder, so click Yes .
Fig. 21. Click Yes again.
After that, you will return to the main program window. Before you start working with an encrypted folder, select it and click the Enable button. The program will ask for the password of the certificate (fig. 22) specified for encryption of this folder. After that, working with an encrypted folder will not differ from working with a regular folder. In the CyberSafe window, the folder will be marked as open, and the lock icon will appear to the left of the folder icon (Figure 23).
Fig. 22. Enter the certificate password
Fig. 23. Encrypted folder is connected
In Explorer, neither the encrypted folder nor the encrypted files are marked in any way. Outwardly, they look the same as other folders and files (unlike EFS, where the names of encrypted files / folders are highlighted in green), see fig. 24
Fig. 24. Encrypted CS-Crypted folder in Explorer
It should be noted that in a similar way you can encrypt a network folder. At the same time, CyberSafe program should be located only on the users computer, and not on the file server. All encryption is carried out on the client, and already encrypted files are transferred to the server. Such a decision is more than justified. First, already encrypted data is transmitted over the network. Secondly, even if the server administrator wants to get access to the files, it will not work, because only users whose certificates were specified during encryption can decrypt the files. But the administrator, if necessary, can back up encrypted files.
When the encrypted folder is no longer needed, go to the CyberSafe program, select the folder and click the Shut Down button. Such a solution may not seem to be as convenient as EFS - you need to press the on / off buttons. But this is only at first glance. First, the user has a clear understanding that the folder is encrypted and he will not forget about this fact when he reinstalls Windows. Secondly, when using EFS, if you need to move away from the computer, you need to log out, because during your absence, anyone can go to the computer and access your files. All he needs to do is copy your files to a device that does not support encryption, for example, on a FAT32 flash drive. Then he will be able to view files outside of your computer. With CyberSafe, everything is a little more convenient. Yes, you need to do an additional action (“turn off” the folder) and all encrypted files will become inaccessible. But on the other hand, you will not need to re-launch all programs and open all documents (including unencrypted ones) - as after re-entering the system.
However, each product has its own characteristics. CyberSafe is no exception. Imagine that you encrypted the C: \ CS-Crypted folder and put the report.txt file there. When the folder is turned off, of course, you can not read the file. When the folder is included , you can access the file and, accordingly, copy it to any other, unencrypted folder. But after copying the file to an unencrypted folder, he continues to live his own life. On the one hand, it is not as convenient as in the case of EFS, on the other hand, knowing this feature of the program, the user will be more disciplined and will keep their secret files only in encrypted folders.
Performance
Now we will try to find out which is faster - EFS or CyberSafe Top Secret. All tests are performed on a real machine - no virtual machines. The configuration of the laptop is as follows - Intel 1000M (1.8 GHz) / 4 GB of RAM / WD WD5000LPVT (500 GB, SATA-300, 5400 RPM, 8 MB / Windows 7 64-bit buffer). The machine is not very powerful, but what is.
The test will be extremely simple. We will copy files to each folder and see how long it will take to copy. To figure out which transparent encryption tool is faster, the following simple script will help us:
@echo off echo " 5580 EFS-Crypted" echo %time% robocopy c:\Joomla c:\EFS-Crypted /E > log1 echo %time% echo " 5580 CS-Crypted" echo %time% robocopy c:\Joomla c:\CS-Crypted /E > log2 echo %time% You don't need to be a programming guru to figure out what this script is doing. It is no secret that we often work with relatively small files with sizes ranging from several tens to several hundred kilobytes. This script copies the Joomla! 3.3.6, in which there are 5580 of such small files, first in the EFS-encrypted folder, and then in the CyberSoft-encrypted folder. Let's see who will be the winner.
The robocopy command is used to recursively copy files, including empty ones (the / E parameter), and its output is deliberately redirected to a text file (if you wish, you can see what was copied and what is not), so as not to clutter the script output.
The results of the second test are shown in Fig. 25. As you can see, EFS handled this task in 74 seconds, and CyberSoft in just 32 seconds. Given that in most cases, users work with many small files, CyberSafe will be more than two times faster than EFS .
Fig. 25. Test results
Benefits of transparent cybersafe encryption
Now let's summarize. The advantages of transparent CyberSafe encryption include the following facts:
- When you turn off the folder files can be copied in an encrypted form anywhere, which allows you to organize cloud encryption .
- CyberSafe program driver allows you to work on the network, which makes it possible to organize corporate encryption .
- To decrypt a folder, not only need to know the password, you must have the appropriate certificates. When using Crypto Pro, the key can be transferred to a token.
- The CyberSafe application supports the AES-NI instruction set, which has a positive effect on the program's performance (as proved by the tests above).
- You can protect yourself from unauthorized access to your private keys using two-factor authentication.
- Trusted application support
The last two benefits deserve special attention. To protect yourself from access to your private keys, you can protect the CyberSafe program itself. To do this, execute the command Tools, Settings (fig. 26). In the Settings window on the Authentication tab, you can enable either password authentication or two-factor authentication. Details on how to do this can be found in the CyberSafe software manual on page 119.
Fig. 26. Protecting CyberSafe itself
On the Allowed tab . applications, you can define trusted applications that are allowed to work with encrypted files. By default, all applications are trusted. But for more security, you can specify applications that are allowed to work with encrypted files. In fig. 27 I have specified MS Word and MS Excel as trusted applications. If any other program tries to access the encrypted folder, it will be denied access. Additional information can be found in the article “Transparent file encryption on a local computer using CyberSafe Files Encryption” (http://habrahabr.ru/company/cybersafe/blog/210458/).
Fig. 27. Trusted Applications
That's all. We recommend to read the following articles:
Transparent file encryption on the local computer using CyberSafe Files Encryption
Transparent encryption of network folders in the corporate space
Information hiding methods
Encryption of cloud services in companies and organizations
Source: https://habr.com/ru/post/251041/
All Articles