Navigation Drawer in Material Design style in 5 minutes
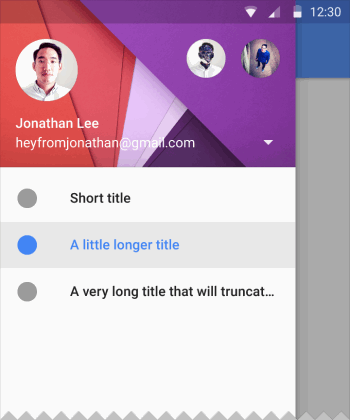 In this article, I will explain how to quickly add a side menu (aka Navigation Drawer) in the Material Design style to your Android application. To do this, we will use the library , kindly provided by Mike Penz .
You will have Navigation Drawer, which:
- Complies with the latest design guidelines (Google Material Design Guidelines);
- Supports the use of multiple Drawer (you can push the second one to the right);
- Supports the use of badges;
- It has a simple and intuitive interface (API);
- It can crawl out both under and over the Status Bar;
- Allows you to change icons, colors, badges at runtime;
- Uses AppCompat support library;
- Works starting from API 14.
In addition, newcomers will learn to integrate third-party libraries into their project, which is extremely useful, given their immense diversity on Github.
')
Project creation
The example will use Google’s integrated development studio Android Studio, based on IntelliJ IDEA, which the corporation itself is actively promoting. All actions can be played using other environments, such as Eclipse. However, the article is aimed at beginners, and they will mostly use Android Studio, since Google now offers it to Google when downloading the Android SDK from developer.android.com (Eclipse could be downloaded before).
So, choose in the menu “File” -> “New Project ...”:

Fill in the name of the application package, select the SDK.
We will create the project with the support of a minimum API Level of 14, which corresponds to Android 4.0 Ice Cream Sandwich, since everything below is less than 8% of the audience and introduces a disproportionately more headache:

In the last two windows, leave everything by default, click "Finish".
Android Support Library
In order for the beautiful Navigation Drawer to work on Android versions below 5.0 and look like Material Design, you need to include in the project a Google support library called the v7 appcompat library . In the current version of Android Studio (1.0.2), the library is connected by default when creating a project. Check this in the project file \ app \ build.gradle, in the dependencies section there should be a line (the numbers may not necessarily be "21.0.3"):
compile 'com.android.support:appcompat-v7:21.0.3' and the class MainActivity should be inherited from ActionBarActivity
public class MainActivity extends ActionBarActivity { Also check in \ res \ values \ styles.xml for the application theme to inherit from Theme.AppCompat or its variations without an ActionBar (we will replace the ActionBar with the ToolBar), for example:
<style name="AppTheme" parent="Theme.AppCompat.Light.NoActionBar"> Connection of MaterialDrawer library
Add lines \ app \ build.gradle to the dependencies section
compile('com.mikepenz.materialdrawer:library:0.9.5@aar') { transitive = true } and click the “Sync Now” button that appears at the top of the window to synchronize your project.
Preparing Markup for Navigation Drawer
In the main layout of the application you need to add a ToolBar. Give activity_main.xml to this view:
<RelativeLayout xmlns:android="http://schemas.android.com/apk/res/android" xmlns:tools="http://schemas.android.com/tools" android:layout_width="match_parent" android:layout_height="match_parent" tools:context=".MainActivity"> <android.support.v7.widget.Toolbar android:id="@+id/toolbar" android:layout_width="match_parent" android:layout_height="wrap_content" android:background="?attr/colorPrimary" android:elevation="4dp" android:minHeight="?attr/actionBarSize" android:paddingTop="@dimen/tool_bar_top_padding" android:transitionName="actionBar" /> </RelativeLayout> Create a file in the layout folder file drawer_header.xml with the following content
<?xml version="1.0" encoding="utf-8"?> <ImageView xmlns:android="http://schemas.android.com/apk/res/android" android:layout_width="match_parent" android:layout_height="wrap_content" android:adjustViewBounds="true" android:orientation="vertical" android:scaleType="fitCenter" android:src="@drawable/header"></ImageView> this file is a markup for the top of Drawer, in which the picture is located. Now put in the \ res \ drawable \ folder any image with the name header.jpg, which will be displayed in the upper part of the Drawer, for example this:

File \ res \ strings.xml, containing string resources, lead to the following form
<?xml version="1.0" encoding="utf-8"?> <resources> <string name="app_name">My Application</string> <string name="action_settings">Settings</string> <string name="drawer_item_home">Home</string> <string name="drawer_item_free_play">Free Play</string> <string name="drawer_item_custom">Custom</string> <string name="drawer_item_settings">Settings</string> <string name="drawer_item_help">Help</string> <string name="drawer_item_open_source">Open Source</string> <string name="drawer_item_contact">Contact</string> </resources> Initializing Navigation Drawer
In the onCreate method of your MainActivity, we initialize the ToolBar, add the following code after setContentView:
// Handle Toolbar Toolbar toolbar = (Toolbar) findViewById(R.id.toolbar); setSupportActionBar(toolbar); getSupportActionBar().setDisplayHomeAsUpEnabled(true); Then we initialize the Navigation Drawer itself, add it below:
new Drawer() .withActivity(this) .withToolbar(toolbar) .withActionBarDrawerToggle(true) .withHeader(R.layout.drawer_header) .addDrawerItems( new PrimaryDrawerItem().withName(R.string.drawer_item_home).withIcon(FontAwesome.Icon.faw_home).withBadge("99").withIdentifier(1), new PrimaryDrawerItem().withName(R.string.drawer_item_free_play).withIcon(FontAwesome.Icon.faw_gamepad), new PrimaryDrawerItem().withName(R.string.drawer_item_custom).withIcon(FontAwesome.Icon.faw_eye).withBadge("6").withIdentifier(2), new SectionDrawerItem().withName(R.string.drawer_item_settings), new SecondaryDrawerItem().withName(R.string.drawer_item_help).withIcon(FontAwesome.Icon.faw_cog), new SecondaryDrawerItem().withName(R.string.drawer_item_open_source).withIcon(FontAwesome.Icon.faw_question).setEnabled(false), new DividerDrawerItem(), new SecondaryDrawerItem().withName(R.string.drawer_item_contact).withIcon(FontAwesome.Icon.faw_github).withBadge("12+").withIdentifier(1) ) .build(); In case of errors, make sure that your import section in MainActivity looks like this:
Import Section in MainActivity
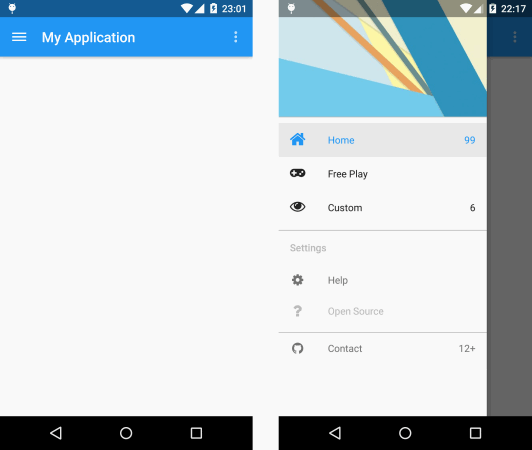
import android.support.v7.app.ActionBarActivity; import android.os.Bundle; import android.support.v7.widget.Toolbar; import android.view.Menu; import android.view.MenuItem; import com.mikepenz.iconics.typeface.FontAwesome; import com.mikepenz.materialdrawer.Drawer; import com.mikepenz.materialdrawer.model.DividerDrawerItem; import com.mikepenz.materialdrawer.model.PrimaryDrawerItem; import com.mikepenz.materialdrawer.model.SecondaryDrawerItem; import com.mikepenz.materialdrawer.model.SectionDrawerItem; Now you can run the application and evaluate the result:
Navigation Drawer Improvements
To make Navigation Drawer more closely follow Google’s recommendations, you can make the following improvements (see the full listing MainActivity at the end of the article):
- Hide keyboard when opening NavigationDrawer:
.withOnDrawerListener(new Drawer.OnDrawerListener() { @Override public void onDrawerOpened(View drawerView) { InputMethodManager inputMethodManager = (InputMethodManager) MainActivity.this.getSystemService(Activity.INPUT_METHOD_SERVICE); inputMethodManager.hideSoftInputFromWindow(MainActivity.this.getCurrentFocus().getWindowToken(), 0); } @Override public void onDrawerClosed(View drawerView) { } }) - Close NavigationDrawer by pressing the “Back” system button:
@Override public void onBackPressed(){ if(drawerResult.isDrawerOpen()){ drawerResult.closeDrawer(); } else{ super.onBackPressed(); } } - Handle click and long click events on Drawer elements
- Decrease / increase badge values
You can see the implementation of all these improvements in the full listing MainActivity:
Full code MainActivity
package ru.sample.drawer.myapplication; import android.app.Activity; import android.os.Bundle; import android.support.v7.app.ActionBarActivity; import android.support.v7.widget.Toolbar; import android.util.Log; import android.view.Menu; import android.view.MenuItem; import android.view.View; import android.view.inputmethod.InputMethodManager; import android.widget.AdapterView; import android.widget.Toast; import com.mikepenz.iconics.typeface.FontAwesome; import com.mikepenz.materialdrawer.Drawer; import com.mikepenz.materialdrawer.model.DividerDrawerItem; import com.mikepenz.materialdrawer.model.PrimaryDrawerItem; import com.mikepenz.materialdrawer.model.SecondaryDrawerItem; import com.mikepenz.materialdrawer.model.SectionDrawerItem; import com.mikepenz.materialdrawer.model.interfaces.Badgeable; import com.mikepenz.materialdrawer.model.interfaces.IDrawerItem; import com.mikepenz.materialdrawer.model.interfaces.Nameable; public class MainActivity extends ActionBarActivity { private Drawer.Result drawerResult = null; @Override protected void onCreate(Bundle savedInstanceState) { super.onCreate(savedInstanceState); setContentView(R.layout.activity_main); // Toolbar Toolbar toolbar = (Toolbar) findViewById(R.id.toolbar); setSupportActionBar(toolbar); getSupportActionBar().setDisplayHomeAsUpEnabled(true); // Navigation Drawer drawerResult = new Drawer() .withActivity(this) .withToolbar(toolbar) .withActionBarDrawerToggle(true) .withHeader(R.layout.drawer_header) .addDrawerItems( new PrimaryDrawerItem().withName(R.string.drawer_item_home).withIcon(FontAwesome.Icon.faw_home).withBadge("99").withIdentifier(1), new PrimaryDrawerItem().withName(R.string.drawer_item_free_play).withIcon(FontAwesome.Icon.faw_gamepad), new PrimaryDrawerItem().withName(R.string.drawer_item_custom).withIcon(FontAwesome.Icon.faw_eye).withBadge("6").withIdentifier(2), new SectionDrawerItem().withName(R.string.drawer_item_settings), new SecondaryDrawerItem().withName(R.string.drawer_item_help).withIcon(FontAwesome.Icon.faw_cog), new SecondaryDrawerItem().withName(R.string.drawer_item_open_source).withIcon(FontAwesome.Icon.faw_question).setEnabled(false), new DividerDrawerItem(), new SecondaryDrawerItem().withName(R.string.drawer_item_contact).withIcon(FontAwesome.Icon.faw_github).withBadge("12+").withIdentifier(1) ) .withOnDrawerListener(new Drawer.OnDrawerListener() { @Override public void onDrawerOpened(View drawerView) { // Navigation Drawer InputMethodManager inputMethodManager = (InputMethodManager) MainActivity.this.getSystemService(Activity.INPUT_METHOD_SERVICE); inputMethodManager.hideSoftInputFromWindow(MainActivity.this.getCurrentFocus().getWindowToken(), 0); } @Override public void onDrawerClosed(View drawerView) { } }) .withOnDrawerItemClickListener(new Drawer.OnDrawerItemClickListener() { @Override // public void onItemClick(AdapterView<?> parent, View view, int position, long id, IDrawerItem drawerItem) { if (drawerItem instanceof Nameable) { Toast.makeText(MainActivity.this, MainActivity.this.getString(((Nameable) drawerItem).getNameRes()), Toast.LENGTH_SHORT).show(); } if (drawerItem instanceof Badgeable) { Badgeable badgeable = (Badgeable) drawerItem; if (badgeable.getBadge() != null) { // , , "+" try { int badge = Integer.valueOf(badgeable.getBadge()); if (badge > 0) { drawerResult.updateBadge(String.valueOf(badge - 1), position); } } catch (Exception e) { Log.d("test", " , ! :)"); } } } } }) .withOnDrawerItemLongClickListener(new Drawer.OnDrawerItemLongClickListener() { @Override // , , SecondaryDrawerItem public boolean onItemLongClick(AdapterView<?> parent, View view, int position, long id, IDrawerItem drawerItem) { if (drawerItem instanceof SecondaryDrawerItem) { Toast.makeText(MainActivity.this, MainActivity.this.getString(((SecondaryDrawerItem) drawerItem).getNameRes()), Toast.LENGTH_SHORT).show(); } return false; } }) .build(); } @Override public void onBackPressed() { // Navigation Drawer "" if (drawerResult.isDrawerOpen()) { drawerResult.closeDrawer(); } else { super.onBackPressed(); } } // , @Override public boolean onCreateOptionsMenu(Menu menu) { getMenuInflater().inflate(R.menu.menu_main, menu); return true; } // , @Override public boolean onOptionsItemSelected(MenuItem item) { int id = item.getItemId(); //noinspection SimplifiableIfStatement if (id == R.id.action_settings) { return true; } return super.onOptionsItemSelected(item); } } Alternatives
I would like to draw your attention to the fact that no library will cover all the needs of all programmers. Therefore, I will give a list of similar libraries with the connection of which you can play:
https://github.com/neokree/MaterialNavigationDrawer
https://github.com/HeinrichReimer/material-drawer
https://github.com/kanytu/android-material-drawer-template
https://github.com/balysv/material-menu
https://github.com/ikimuhendis/LDrawer
https://github.com/Zlate87/material-navigation-drawer-example
As for the library described in the article, the author easily makes contact and reacts very quickly to comments and feature-requets, you can talk to him by creating an issue , for example.
If you don’t have any libraries at all, you can always write your own :)
Links
Ready example from article on Github: https://github.com/tral/MaterialDrawerSample ;
Ready example with fragments: https://github.com/tral/MaterialDrawerFragmentSample ;
Mike Penz's MaterialDrawer library: https://github.com/mikepenz/MaterialDrawer
Google Material Design Guidelines: Navigation Drawer: http://www.google.com/design/spec/patterns/navigation-drawer.html ;
Dashboards: https://developer.android.com/about/dashboards/index.html?utm_source=ausdroid.net ;
Support Library: https://developer.android.com/tools/support-library/index.html
Source: https://habr.com/ru/post/250765/
All Articles