Setting up the IPAM service step by step
An integral part of network administration is the management of IP addresses. Before the release of Windows Server 2012, system administrators had to use tables, various third-party tools, and write custom scripts for complex management of the entire IP address space, as well as DNS and DHCP services. With the release of Windows Server 2012, the situation has changed - IPAM (IP Address Management) has appeared. What IPAM is and how to configure this service on your network will be this article.
As noted above, before the advent of IPAM to manage IP addresses on the network, it was necessary to use the available tools: from third-party tools to the list of addresses in the Excel spreadsheet. As a result, network administration productivity has fallen, and costs have only increased. Moreover, the available tools were suitable for solving the problem of managing network addresses in the short term. But the more the network became and the longer they worked with it, the more laborious this task became.
With the release of Windows Server 2012, an internal IP address management tool - IPAM - has appeared. IPAM (IP Address Management) - IP Address Management Service, first introduced in Windows Server 2012 and Windows Server 2012 R2. In addition, IPAM change-enhancements should be expected in Windows Server vNext . IPAM is a platform for discovery, monitoring, management and auditing for an IP address space in an organization’s network.
Among the main features of IPAM are the following:
The main advantage of IPAM is that it provides a single console, which provides information about the configurations of all DNS and DHCP services in the forest. Using this console, you can change settings, for example, of one or several DHCP zones, which does not require the system administrator to write additional scripts or manually configure each DHCP server. Next we will see this setting in the example.
But first, we will deploy the IPAM service, and also see how it can be used to monitor DNS and DHCP services.
')
In order to start working with IPAM Server, it must be installed - IPAM is not included in the set of services installed by default. There are two ways to install. You can use the following PowerShell command:
Install-WindowsFeature IPAM –IncludeManagementTools
You can also use the installation wizard for server roles and components:

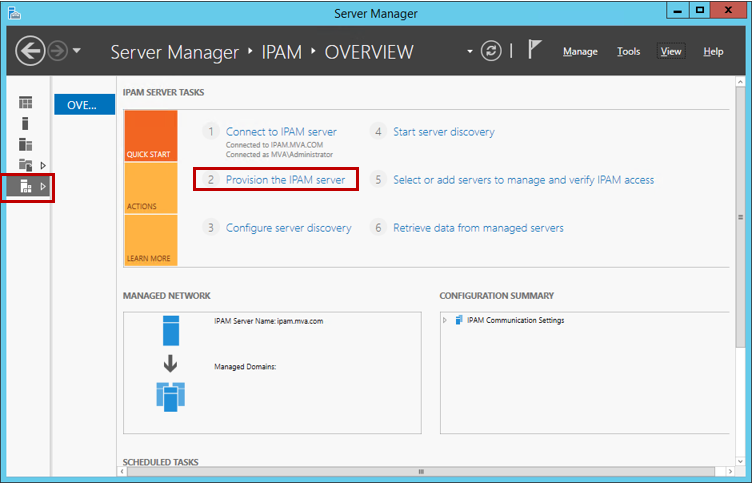
After the IPAM installation process is completed, you need to prepare it for work. To do this, in Server Manager, you must select IPAM and then Provision the IPAM server:
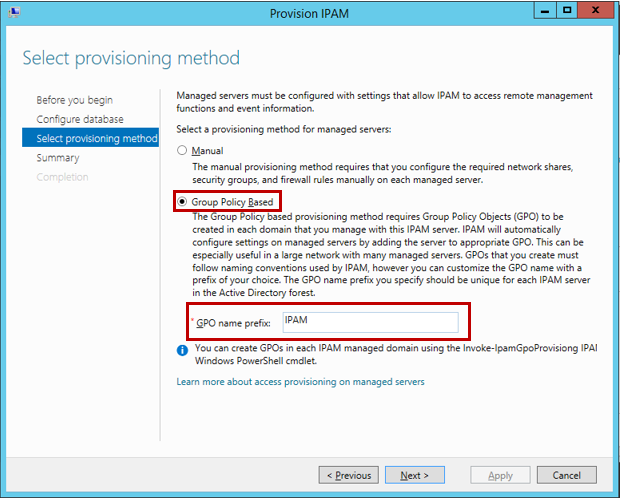
You can choose between two methods of preparation: manually ( manual ) or based on group policies based on group policies . What is the difference between these two methods?
The manual method of preparing the IPAM server is recommended to use in cases where the number of managed servers is small. If you choose this method of preparation, you must be prepared to manually configure access conditions for each of the managed servers. In addition, you will also have to delete the settings manually, in the event that you no longer need to manage this or that server. You can use group policies to apply the necessary settings to managed servers, even if you choose the manual preparation method, but all GPOs must be applied or removed manually. Due to the fact that the manual method of preparing the IPAM server is more laborious and complex, it is preferable to use the method of preparation using group policies.
Preparing an IPAM server using group policies is simpler and less likely to fail. When using this method, GPOs are applied and deleted automatically on managed servers. This method is proposed to be used by default in the IPAM Preparation Wizard. You need to enter a prefix for the name of group policy objects:
It is worth noting here, if you choose to prepare an IPAM server using group policies, you cannot change it to a manual preparation method. But in the opposite case, you can change the manual preparation method of preparation using group policies using the Windows PowerShell cmdlet:
Let's return now to the Master of preparation. After selecting the preparation method using group policies, we receive a message that the settings will be applied to the managed servers using the following group policy objects:
In our case, GPOs will be named IPAM_DHCP, IPAM_DNS, and IPAM_DC_NPS, respectively. To complete IPAM preparation, check whether the information is correctly indicated on the Summary tab and click Apply. The preparation process will take some time. As a result, you will see a message that the IPAM preparation was successfully completed:
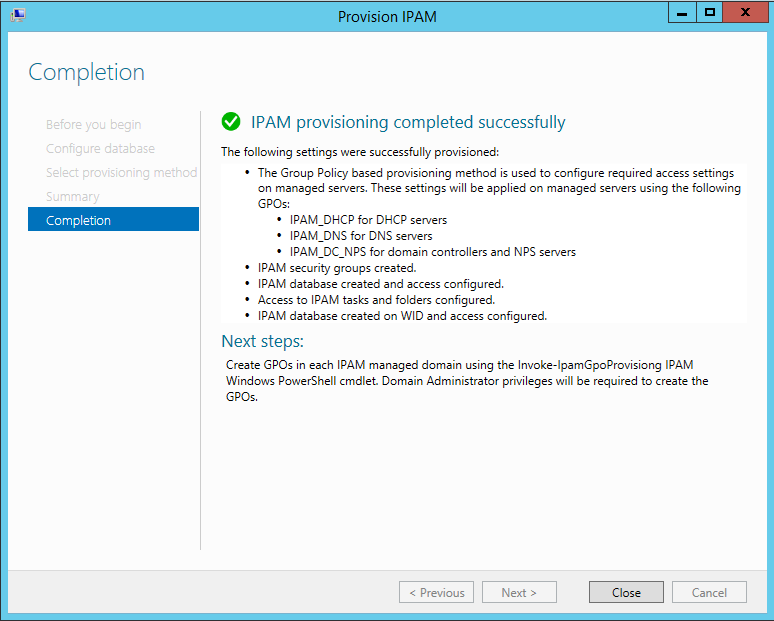
It is important to report on the next steps. Group Policy objects were not created, they will need to be created further using PowerShell cmdlets:
It will be a little later. For now, let's move on to the Server Manager and configure server discovery:
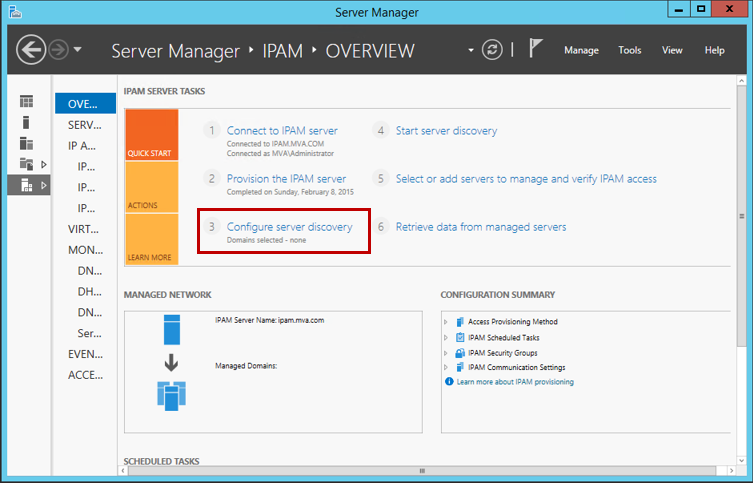
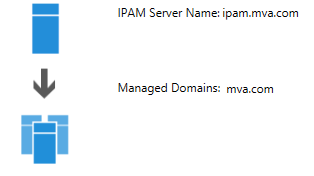
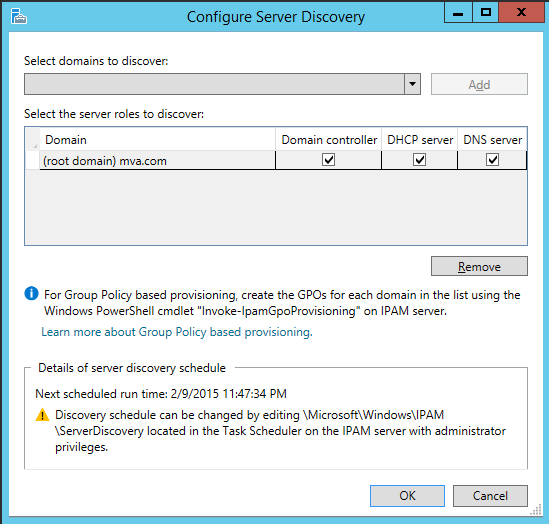
In the window that appears, select the domain to be detected. In our case, this is the root domain mva.com. After adding this domain, you need to make sure that among the server roles there is a domain controller, DHCP and DNS server. Click OK.
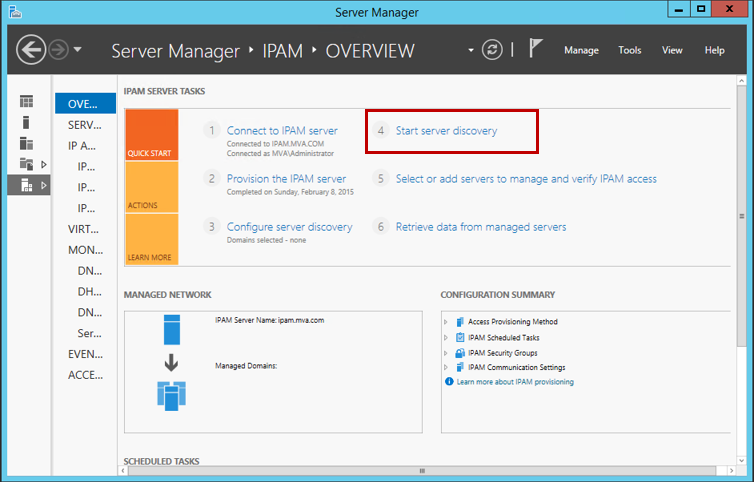
Now let's start discovering the servers:
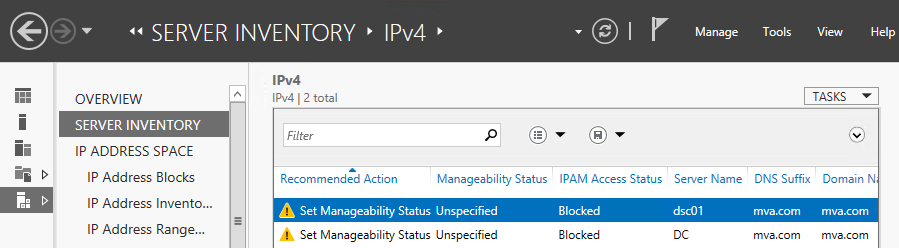
After completing the task. Go to Server Manager tab IPAM - SERVER INVERNTORY. You will see that for the dsc01 and DC servers, the status “Not defined” will be displayed in the column “Control status”, and in the column “Access status” - “Blocked”. You must grant IPAM permission to manage these servers using GPOs.
Now we recall the next step, which we were recommended to take after the completion of the IPAM preparation. We need to run Windows PowerShell as an administrator on the IPAM server and use the following cmdlet

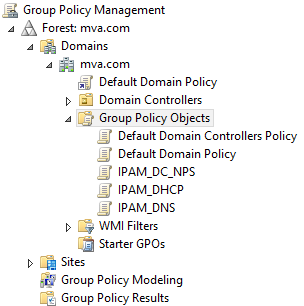
Now GPOs are created, which can be seen in the Group Policy Management snap-in:
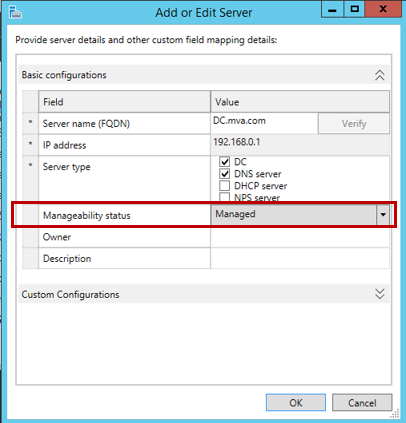
Let's go back to the Server Manager. In the IPAM - SERVER INVENTORY tab, right-click on one of the servers and select Edit Server . In the window that appears, change the item “Management Status” to “Managed” and click OK. Repeat the same for the second server.
Now you need to change the group policies on the DC and dsc01 servers. The fastest way to use each of the servers we need is to use the following cmdlet PowerShell:
Let's wait for the completion of this command on each of the servers. Let's go back to the IPAM server in Server Manager - IPAM - SERVER INVENTORY and update “IPv4”, as well as update the status of access to the server by right-clicking on each and selecting the “Refresh Server Access Status” option. As a result, we should get the status “Unlocked” for our servers in the column “IPAM Access Status”.

Now we’ll go back in the IPAM - OVERVIEW tab and select “Retrieve data from managed servers” and wait for the completion of this task:
The following data collection tasks will automatically run: AddressExpiry, AddressUtilication, Audit, ServerAvailability, ServiceMonitoring, ServerConfiguration.
At this stage, we have completed setting up the IPAM server and then we will see how it can be used in work. As an example, consider monitoring and managing infrastructure using IPAM.
IPAM allows you to automate and configure the monitoring frequency of DHCP and DNS servers throughout the forest. It is also possible to manage multiple servers to apply settings automatically and periodically monitor DHCP and DNS servers in the AD forest. In addition, there is the ability to manage multiple DHCP servers and domain settings for distributed servers with just one click.
As an example, consider how to monitor and manage DHCP and DNS servers using IPAM.
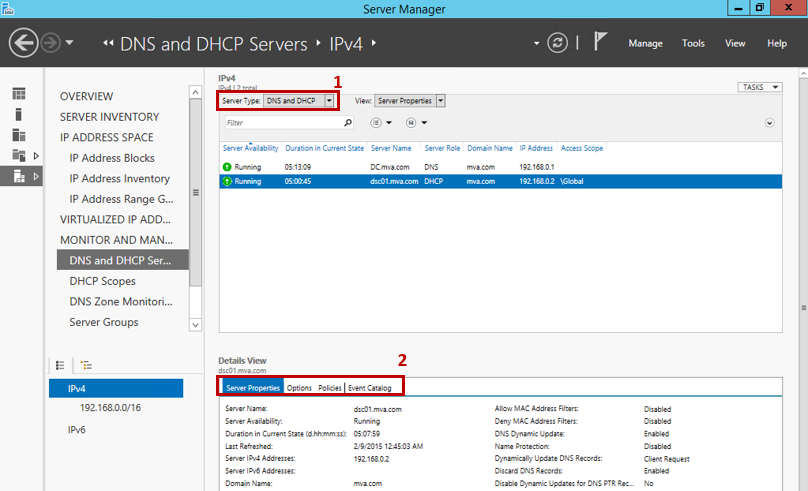
Open the Server Manager on the IPAM tab - MONITOR AND MANAGE - DNS and DHCP Servers. Please note that in the “Server type” field (1) you can choose not only DNS and DHCP, but also sort only DNS or only DHCP. By selecting one of the servers, you can view the properties of this server, the parameters and the event directory (2):
Now let's select DHCP in the “Server type” field, and “Area properties” in the “View” field:

Right-click on the DHCP MVA - scope 1 scope and select Duplicate DHCP Domain. In the “DHCP DHCP Duplication” dialog box that appears, change the value of the Domain Name field, and in the General Properties section, enter the following values:

As necessary, you can change other properties of the area. After all the necessary changes have been made, click OK and make sure that another area is now displayed in the list - MVA-scope2.

The same area will appear in the DHCP console on our DHCP server DSC01.
If you return to the IPAM server and select both DHCP areas, right-click on them, you can change the settings for both areas.
Of course, using IPAM, you can monitor various types of events on DNS and DHCP servers, including data on both the servers and clients. To view the audit logs and the event, select the Event Catalog (EVENT CATALOG) in the IPAM navigation menu. By default, “IPAM Configuration Events” is selected in the lower navigation area. You can select other events for viewing, as well as export them to a file for further viewing and analysis.
I hope the information in this article was useful to you!
As noted above, before the advent of IPAM to manage IP addresses on the network, it was necessary to use the available tools: from third-party tools to the list of addresses in the Excel spreadsheet. As a result, network administration productivity has fallen, and costs have only increased. Moreover, the available tools were suitable for solving the problem of managing network addresses in the short term. But the more the network became and the longer they worked with it, the more laborious this task became.
With the release of Windows Server 2012, an internal IP address management tool - IPAM - has appeared. IPAM (IP Address Management) - IP Address Management Service, first introduced in Windows Server 2012 and Windows Server 2012 R2. In addition, IPAM change-enhancements should be expected in Windows Server vNext . IPAM is a platform for discovery, monitoring, management and auditing for an IP address space in an organization’s network.
Among the main features of IPAM are the following:
- Automatic discovery of IP address infrastructure
- Convenient and flexible means to display, manage and report IP address space
- Auditing configuration changes for DHCP and IPAM services
- Monitoring and managing DHCP and DNS services
- IP Lease Tracking
The main advantage of IPAM is that it provides a single console, which provides information about the configurations of all DNS and DHCP services in the forest. Using this console, you can change settings, for example, of one or several DHCP zones, which does not require the system administrator to write additional scripts or manually configure each DHCP server. Next we will see this setting in the example.
But first, we will deploy the IPAM service, and also see how it can be used to monitor DNS and DHCP services.
')
Deploying IPAM Server
In order to start working with IPAM Server, it must be installed - IPAM is not included in the set of services installed by default. There are two ways to install. You can use the following PowerShell command:
Install-WindowsFeature IPAM –IncludeManagementTools
You can also use the installation wizard for server roles and components:
After the IPAM installation process is completed, you need to prepare it for work. To do this, in Server Manager, you must select IPAM and then Provision the IPAM server:
You can choose between two methods of preparation: manually ( manual ) or based on group policies based on group policies . What is the difference between these two methods?
The manual method of preparing the IPAM server is recommended to use in cases where the number of managed servers is small. If you choose this method of preparation, you must be prepared to manually configure access conditions for each of the managed servers. In addition, you will also have to delete the settings manually, in the event that you no longer need to manage this or that server. You can use group policies to apply the necessary settings to managed servers, even if you choose the manual preparation method, but all GPOs must be applied or removed manually. Due to the fact that the manual method of preparing the IPAM server is more laborious and complex, it is preferable to use the method of preparation using group policies.
Preparing an IPAM server using group policies is simpler and less likely to fail. When using this method, GPOs are applied and deleted automatically on managed servers. This method is proposed to be used by default in the IPAM Preparation Wizard. You need to enter a prefix for the name of group policy objects:
It is worth noting here, if you choose to prepare an IPAM server using group policies, you cannot change it to a manual preparation method. But in the opposite case, you can change the manual preparation method of preparation using group policies using the Windows PowerShell cmdlet:
Set-IpamConfiguration Let's return now to the Master of preparation. After selecting the preparation method using group policies, we receive a message that the settings will be applied to the managed servers using the following group policy objects:
- <GPO-prefix> _DHCP: This GPO is used to apply settings that allow IPAM to monitor, manage and collect information from managed DHCP servers on the network.
- <GPO-prefix> _DNS: This GPO is used to apply settings that allow IPAM to monitor and collect information from managed DNS servers on the network.
- <GPO-prefix> _DC_NPS: This GPO is used to apply settings that allow IPAM to collect information from managed domain controllers and network policy servers (NPS) on a network for a DHCP server on a network to track IP addresses
In our case, GPOs will be named IPAM_DHCP, IPAM_DNS, and IPAM_DC_NPS, respectively. To complete IPAM preparation, check whether the information is correctly indicated on the Summary tab and click Apply. The preparation process will take some time. As a result, you will see a message that the IPAM preparation was successfully completed:
It is important to report on the next steps. Group Policy objects were not created, they will need to be created further using PowerShell cmdlets:
Invoke-IpamGpoProvisioning It will be a little later. For now, let's move on to the Server Manager and configure server discovery:
In the window that appears, select the domain to be detected. In our case, this is the root domain mva.com. After adding this domain, you need to make sure that among the server roles there is a domain controller, DHCP and DNS server. Click OK.
Now let's start discovering the servers:
After completing the task. Go to Server Manager tab IPAM - SERVER INVERNTORY. You will see that for the dsc01 and DC servers, the status “Not defined” will be displayed in the column “Control status”, and in the column “Access status” - “Blocked”. You must grant IPAM permission to manage these servers using GPOs.
Now we recall the next step, which we were recommended to take after the completion of the IPAM preparation. We need to run Windows PowerShell as an administrator on the IPAM server and use the following cmdlet
Invoke-IpamGpoProvisioning –Domain mva.com –GpoPrefixName IPAM –DelegatedGpoUser Administrator –IpamServerFqdn ipam.mva.com Now GPOs are created, which can be seen in the Group Policy Management snap-in:
Let's go back to the Server Manager. In the IPAM - SERVER INVENTORY tab, right-click on one of the servers and select Edit Server . In the window that appears, change the item “Management Status” to “Managed” and click OK. Repeat the same for the second server.
Now you need to change the group policies on the DC and dsc01 servers. The fastest way to use each of the servers we need is to use the following cmdlet PowerShell:
gpupdate /force Let's wait for the completion of this command on each of the servers. Let's go back to the IPAM server in Server Manager - IPAM - SERVER INVENTORY and update “IPv4”, as well as update the status of access to the server by right-clicking on each and selecting the “Refresh Server Access Status” option. As a result, we should get the status “Unlocked” for our servers in the column “IPAM Access Status”.
Now we’ll go back in the IPAM - OVERVIEW tab and select “Retrieve data from managed servers” and wait for the completion of this task:
The following data collection tasks will automatically run: AddressExpiry, AddressUtilication, Audit, ServerAvailability, ServiceMonitoring, ServerConfiguration.
At this stage, we have completed setting up the IPAM server and then we will see how it can be used in work. As an example, consider monitoring and managing infrastructure using IPAM.
Infrastructure Monitoring and Management
IPAM allows you to automate and configure the monitoring frequency of DHCP and DNS servers throughout the forest. It is also possible to manage multiple servers to apply settings automatically and periodically monitor DHCP and DNS servers in the AD forest. In addition, there is the ability to manage multiple DHCP servers and domain settings for distributed servers with just one click.
As an example, consider how to monitor and manage DHCP and DNS servers using IPAM.
Open the Server Manager on the IPAM tab - MONITOR AND MANAGE - DNS and DHCP Servers. Please note that in the “Server type” field (1) you can choose not only DNS and DHCP, but also sort only DNS or only DHCP. By selecting one of the servers, you can view the properties of this server, the parameters and the event directory (2):
Now let's select DHCP in the “Server type” field, and “Area properties” in the “View” field:
Right-click on the DHCP MVA - scope 1 scope and select Duplicate DHCP Domain. In the “DHCP DHCP Duplication” dialog box that appears, change the value of the Domain Name field, and in the General Properties section, enter the following values:
- Starting IP Address: 192.168.1.1
- End IP Address: 192.168.1.254
- Subnet Mask: 255.255.255.0
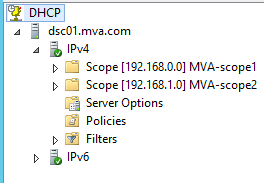
As necessary, you can change other properties of the area. After all the necessary changes have been made, click OK and make sure that another area is now displayed in the list - MVA-scope2.
The same area will appear in the DHCP console on our DHCP server DSC01.
If you return to the IPAM server and select both DHCP areas, right-click on them, you can change the settings for both areas.
Of course, using IPAM, you can monitor various types of events on DNS and DHCP servers, including data on both the servers and clients. To view the audit logs and the event, select the Event Catalog (EVENT CATALOG) in the IPAM navigation menu. By default, “IPAM Configuration Events” is selected in the lower navigation area. You can select other events for viewing, as well as export them to a file for further viewing and analysis.
I hope the information in this article was useful to you!
useful links
- Try Azure for free for 30 days!
- Learn Microsoft Virtual Academy courses
- Download a trial version of Windows Server 2012 R2
- Download free or trial Visual Studio
Source: https://habr.com/ru/post/250653/
All Articles