Nice build frontend project
In this article, we will analyze in detail the process of assembling a front-end project that has taken root in my daily work and has greatly simplified the routine.
The article does not claim to be the ultimate truth, since today there are a large number of different collectors and approaches to assembly, and everyone chooses to taste. I just share my thoughts on this topic and show my workflow.
UPD (March 13, 2015): Replaced several plugins with more current ones + solved the problem with importing CSS files into SCSS

We will use the Gulp collector. Accordingly, your system must have Node js installed. We will not consider the installation of a node for a specific platform, since It is googled in a couple of minutes.
And first I will answer the question - why is Gulp?
')
Of the more or less tolerable alternatives, we have Grunt and Brunch .
When I first began to join the collectors, Grunt and Gulp were already on the market. The first appeared earlier and therefore has a larger community and a variety of plug-ins. According to npm :
Grunt - 11171 package
Gulp - 4371 pack
But Grunt seemed to me too verbose. And after reading several comparison articles - I preferred Gulp for its simplicity and clarity.
Brunch is a relatively young project, with all the pros and cons. I am watching him with interest, but I have not used it yet.
Create a folder for our project, for example, “habr”. Open it in the console and execute the command:
You can simply press Enter to all questions of the installer, because now it doesn't matter.
As a result, in the folder with the project we will generate a file package.json, something like this:
We modify it a bit to fit our needs:
In the dependencies block, we indicated that we need a gulp and right there we will prescribe all our plugins.
gulp-autoprefixer - automatically adds vendor prefixes to CSS properties (a couple of years ago I would kill for such a tool)
gulp-minify-css - needed to compress CSS code
browser-sync - with this plugin we can easily deploy a local dev server with blackjack and livereload, and with its help we can make a tunnel on our localhost, which would be easy to demonstrate the layout to the customer
gulp-imagemin - for image compression
imagemin-pngquant - additions to the previous plugin for working with PNG
gulp-uglify - will compress our JS
gulp-sass - to compile our SCSS code
gulp-sourcemaps - let's take to generate css sourscemaps that will help us in debugging code
gulp-rigger is just a killer feature. The plugin allows you to import one file into another with a simple construction
and this line will be replaced with the contents of the file footer.html when compiled
gulp-watch - Will be needed to monitor file changes. I know that Gulp has a built-in watch, but I had some problems with it, in particular, it did not see the newly created files, and I had to restart it. This plugin solved the problem (I hope in the next versions gulp will fix this).
rimraf - rm -rf for node
Install all the plugins and get the following package.json:
I no longer think of my work without the Bower package manager, and I hope you too. If not, then read about what it is and what it is eaten with here .
Let's add it to our project. To do this, run the command in the console:
You can also enter all questions.
At the end, we get something like this bower.json file:
And we modify it to the state we need:
In the dependencies block, we will indicate the dependencies of our project. Now just for the test it is normalize and jQuery (although I don’t remember when I started the project without these things).
And of course install them with the command:
Well, now the fun part. We will create the structure of our project and configure the collector.
This is a very controversial moment. Of course projects are different, as well as the preferences of developers. One has only to look at the yeoman.io website (by the way, this is a very cool tool that provides a large number of prepared bases for a project with all sorts of buns. Definitely, look at it). We will not invent anything and make the simplest structure.
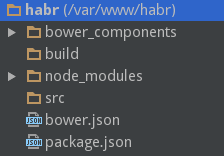
First we need 2 folders. One (src) in which we will actually write the code, and the second (build) into which the builder will spit out the finished files. Add them to the project. Our current structure looks like this:
In the src folder, create a typical structure of an average project. Let's make main files in js / and style / folders and create the first html page for such content.
index.html
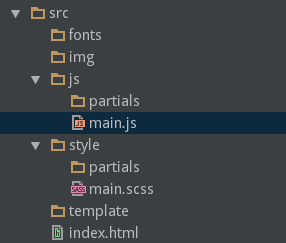
The src folder structure will now look like this:
Everything is trivial:
fonts - fonts
img - pictures
js - scripts. At the root of this folder will be only the file main.js, which is useful for us to build. All your js files - you will need to put in the folder partials
style - styles. There is also only main.scss in the root, and the working files in the partials folder
template - here we will store duplicate pieces of html code
All html pages we typeset will be at the root of src /
Add the first js and scss files to partials and finally - go to the root of our project and create a gulpfile.js file there. The entire project folder now looks like this:

Now everything is ready for setting up our collector, so let's rock!
All the magic will be enclosed in this file. First we import all our plugins and the gulp itself
gulpfile.js
Of course, it is not necessary to do it that way. There is a gulp-load-plugins plugin which allows you not to write all these noodles from require. But I like it when I clearly see what is connecting where and if I want, I can disable it. By this I write in the old fashioned way.
We will also create a js object in which we will write all the paths we need, so that if necessary we can easily edit them in one place:
Create a variable with the settings of our dev server:
Let's write a task to build html:
Let me remind you that rigger is our plugin that allows you to use this design to import files:
Let's apply it to business!
In the folder src / template / - create files header.html and footer.html with the following content
header.html
footer.html
and our index.html file is modified like this:
It remains to go to the console and run our task with the command:
After it works, go to the build folder and see our index.html file, which turned into this:
This is just amazing!
I remember how much inconvenience it caused to run through all the pages that were laid out and make changes to some part that was repeated on them. Now it is done comfortably in one place.
Task for building scripts will look like this:
Remember our main.js file?
The whole idea here is to include all the js files we need in the order we want with the help of rigger. It is for the sake of control over the order of connection - I do it exactly like that, instead of asking gulp to find all * .js files and glue them together.
Often, when searching for a place of error, I turn off some files from the assembly in turn to localize the problem. If you thoughtlessly glue all .js - debug will be complicated.
Fill in our main.js:
This is how I do combat projects. At the top of this file there is always a dependency connection, below is the connection of my own scripts.
By the way, bower packages can be connected via a plugin such as gulp-bower . But again, I do not do this, because I want to independently determine what, where and how it will connect.
It remains only to start our task from the console with the command:
And in the build / js folder - we will see our compiled and compressed file.
Let's write a task to build our SCSS:
Everything is simple here, but you may be interested in auto-fixer settings. By default, it writes the prefixes needed for the last two versions of browsers. In my case, this is enough, but if you need other settings - you can find them here .
I do the same with styles as with js, but instead of using rigger, I use the import built into SCSS.
UPD (March 13, 2015): Some people have a problem with importing css files inline. As it turned out, gulp-sass does not know how to do this, and on output gives a simple CSS import. But this issue is resolved by our gulp-minify-css plugin, which replaces CSS import with file content.
Our main.scss will look like this:
In this way, it is easy to control the order of connecting styles.
Check our task by running
Task on pictures will look like this:
I use the default imagemin settings, except for interlaced. Read more about the API of this plugin here .
Now, if we put some image in src / img and run the command:
then we will see in the build our optimized image. Also gulp will kindly write in the console how much space it has saved for users of our site.
With fonts, I usually do not need to carry out any manipulations, but in order not to destroy the paradigm “We work in src / and we collect in build /” - I simply copy the files from src / fonts and paste them into build / fonts. Here is a task:
Now let's define a task with the name “build”, which will run all that we have here with you:
In order not to climb into the console all the time, let's ask gulp to run the necessary task every time a file changes. To do this, write this task:
Since we understand there should be no problems. We just go through our paths defined in the path variable, and in the function that is called when the file changes - please run the task we need.
Try running in the console:
And change different files.
Isn't it cool?
To enjoy the miracle of livereload - we need to create a local web server. To do this, we write the following simple task:
There is nothing to comment on. We will simply launch the livereload server with the settings we defined in the config object. In addition, gulp will politely open our project in the browser, and in the console write links to the local server and to the tunnel, which we can throw to the customer for demonstration.
If you add any image, then run the image: build task and then delete the image - it will remain in the build folder. So it would be convenient to clean it periodically. Create a simple task for this.
Now when you run the command
just the build folder will be deleted.
The last thing - we define the default task, which will run our entire assembly.
Finally your gulpfile.js will look something like this .
Now we will execute in the console
And voila. Procurement for your project is ready and waiting for you.
This article was conceived as a way to once again brush up on the subtleties of building frontend projects, and for ease of transferring this experience to new developers. You do not need to use this kind of assembly on your projects. There is yeoman.io , on which you will find generators for almost any need.
I wrote this collector for three reasons.
- I like to use rigger in my html code
- Almost in all assemblies that I met - a temporary folder (usually .tmp /) is used to record intermediate results of the assembly. I do not like this approach and I wanted to get rid of temporary folders.
- And I wanted all this to be out of my box.
You can download my working version of the collector on my github .
I hope this article was helpful to you.
PS About all errors, shortcomings and jambs - please write in a personal.
The article does not claim to be the ultimate truth, since today there are a large number of different collectors and approaches to assembly, and everyone chooses to taste. I just share my thoughts on this topic and show my workflow.
UPD (March 13, 2015): Replaced several plugins with more current ones + solved the problem with importing CSS files into SCSS
We will use the Gulp collector. Accordingly, your system must have Node js installed. We will not consider the installation of a node for a specific platform, since It is googled in a couple of minutes.
And first I will answer the question - why is Gulp?
')
Of the more or less tolerable alternatives, we have Grunt and Brunch .
When I first began to join the collectors, Grunt and Gulp were already on the market. The first appeared earlier and therefore has a larger community and a variety of plug-ins. According to npm :
Grunt - 11171 package
Gulp - 4371 pack
But Grunt seemed to me too verbose. And after reading several comparison articles - I preferred Gulp for its simplicity and clarity.
Brunch is a relatively young project, with all the pros and cons. I am watching him with interest, but I have not used it yet.
Let's start:
Create a folder for our project, for example, “habr”. Open it in the console and execute the command:
npm init You can simply press Enter to all questions of the installer, because now it doesn't matter.
As a result, in the folder with the project we will generate a file package.json, something like this:
{ "name": "habr", "version": "1.0.0", "description": "", "main": "index.js", "scripts": { "test": "echo \"Error: no test specified\" && exit 1" }, "author": "", "license": "ISC" } We modify it a bit to fit our needs:
{ "name": "habr", "version": "1.0.0", "description": "", "author": "", "license": "ISC", "dependencies": { "gulp": "^3.8.11" } } In the dependencies block, we indicated that we need a gulp and right there we will prescribe all our plugins.
Plugins:
gulp-autoprefixer - automatically adds vendor prefixes to CSS properties (a couple of years ago I would kill for such a tool)
gulp-minify-css - needed to compress CSS code
browser-sync - with this plugin we can easily deploy a local dev server with blackjack and livereload, and with its help we can make a tunnel on our localhost, which would be easy to demonstrate the layout to the customer
gulp-imagemin - for image compression
imagemin-pngquant - additions to the previous plugin for working with PNG
gulp-uglify - will compress our JS
gulp-sass - to compile our SCSS code
Not holivar sake
I have used LESS in my work for a very long time. I was very impressed by this preprocessor for its speed and ease of learning. He even gave a report on it in one Rostov hackathon. And in particular, in this report I was not very complimentary about SASS.
But as time passed, I became older and wiser :) and now I have joined this preprocessor.
The basis of my dissatisfaction with SASS was that I do not write in Ruby. And when to compile a SASS / SCSS code, it was necessary to drag Ruby into the project, with the necessary bundles - which made me very upset.
But everything changed with the advent of such a thing as LibSass . This is the C / C ++ compiler port for SASS. The gulp-sass plugin uses it. Now we can use SASS in the native node environment - which pleases me endlessly.
gulp-sourcemaps - let's take to generate css sourscemaps that will help us in debugging code
gulp-rigger is just a killer feature. The plugin allows you to import one file into another with a simple construction
//= footer.html and this line will be replaced with the contents of the file footer.html when compiled
gulp-watch - Will be needed to monitor file changes. I know that Gulp has a built-in watch, but I had some problems with it, in particular, it did not see the newly created files, and I had to restart it. This plugin solved the problem (I hope in the next versions gulp will fix this).
rimraf - rm -rf for node
Install all the plugins and get the following package.json:
{ "name": "habr", "version": "1.0.0", "description": "", "author": "", "license": "ISC", "dependencies": { "browser-sync": "^2.2.3", "gulp": "^3.8.11", "gulp-autoprefixer": "^2.1.0", "gulp-imagemin": "^2.2.1", "gulp-minify-css": "^1.0.0", "gulp-rigger": "^0.5.8", "gulp-sass": "^1.3.3", "gulp-sourcemaps": "^1.5.0", "gulp-uglify": "^1.1.0", "gulp-watch": "^4.1.1", "imagemin-pngquant": "^4.0.0", "rimraf": "^2.3.1" } } Bower
I no longer think of my work without the Bower package manager, and I hope you too. If not, then read about what it is and what it is eaten with here .
Let's add it to our project. To do this, run the command in the console:
bower init You can also enter all questions.
At the end, we get something like this bower.json file:
{ "name": "habr", "version": "0.0.0", "authors": [ "Insayt <insait.rostov@ya.ru>" ], "license": "MIT", "ignore": [ "**/.*", "node_modules", "bower_components", "test", "tests" ] } And we modify it to the state we need:
{ "name": "habr", "version": "0.0.0", "authors": [ "Insayt <insait.rostov@ya.ru>" ], "license": "MIT", "ignore": [ "**/.*", "node_modules", "bower_components", "test", "tests" ], "dependencies": { "normalize.css": "*", "jquery": "2.*" } } In the dependencies block, we will indicate the dependencies of our project. Now just for the test it is normalize and jQuery (although I don’t remember when I started the project without these things).
And of course install them with the command:
bower i Well, now the fun part. We will create the structure of our project and configure the collector.
Project structure:
This is a very controversial moment. Of course projects are different, as well as the preferences of developers. One has only to look at the yeoman.io website (by the way, this is a very cool tool that provides a large number of prepared bases for a project with all sorts of buns. Definitely, look at it). We will not invent anything and make the simplest structure.
First we need 2 folders. One (src) in which we will actually write the code, and the second (build) into which the builder will spit out the finished files. Add them to the project. Our current structure looks like this:
In the src folder, create a typical structure of an average project. Let's make main files in js / and style / folders and create the first html page for such content.
index.html
<!DOCTYPE html> <html> <head lang="ru"> <meta charset="UTF-8"> <title> </title> </head> <body> <section class="header"> Header </section> <section class="content"> Content </section> <section class="footer"> Footer </section> </body> </html> The src folder structure will now look like this:
Everything is trivial:
fonts - fonts
img - pictures
js - scripts. At the root of this folder will be only the file main.js, which is useful for us to build. All your js files - you will need to put in the folder partials
style - styles. There is also only main.scss in the root, and the working files in the partials folder
template - here we will store duplicate pieces of html code
All html pages we typeset will be at the root of src /
Add the first js and scss files to partials and finally - go to the root of our project and create a gulpfile.js file there. The entire project folder now looks like this:
Now everything is ready for setting up our collector, so let's rock!
Gulpfile.js
All the magic will be enclosed in this file. First we import all our plugins and the gulp itself
gulpfile.js
'use strict'; var gulp = require('gulp'), watch = require('gulp-watch'), prefixer = require('gulp-autoprefixer'), uglify = require('gulp-uglify'), sass = require('gulp-sass'), sourcemaps = require('gulp-sourcemaps'), rigger = require('gulp-rigger'), cssmin = require('gulp-minify-css'), imagemin = require('gulp-imagemin'), pngquant = require('imagemin-pngquant'), rimraf = require('rimraf'), browserSync = require("browser-sync"), reload = browserSync.reload; Of course, it is not necessary to do it that way. There is a gulp-load-plugins plugin which allows you not to write all these noodles from require. But I like it when I clearly see what is connecting where and if I want, I can disable it. By this I write in the old fashioned way.
We will also create a js object in which we will write all the paths we need, so that if necessary we can easily edit them in one place:
var path = { build: { // html: 'build/', js: 'build/js/', css: 'build/css/', img: 'build/img/', fonts: 'build/fonts/' }, src: { // html: 'src/*.html', // src/*.html gulp .html js: 'src/js/main.js',// main style: 'src/style/main.scss', img: 'src/img/**/*.*', // img/**/*.* - fonts: 'src/fonts/**/*.*' }, watch: { // , html: 'src/**/*.html', js: 'src/js/**/*.js', style: 'src/style/**/*.scss', img: 'src/img/**/*.*', fonts: 'src/fonts/**/*.*' }, clean: './build' }; Create a variable with the settings of our dev server:
var config = { server: { baseDir: "./build" }, tunnel: true, host: 'localhost', port: 9000, logPrefix: "Frontend_Devil" }; We collect html
Let's write a task to build html:
gulp.task('html:build', function () { gulp.src(path.src.html) // .pipe(rigger()) // rigger .pipe(gulp.dest(path.build.html)) // build .pipe(reload({stream: true})); // }); Let me remind you that rigger is our plugin that allows you to use this design to import files:
//= template/footer.html Let's apply it to business!
In the folder src / template / - create files header.html and footer.html with the following content
header.html
<section class="header"> Header </section> footer.html
<section class="header"> Footer </section> and our index.html file is modified like this:
<!DOCTYPE html> <html> <head lang="ru"> <meta charset="UTF-8"> <title> </title> </head> <body> //= template/header.html <section class="content"> Content </section> //= template/footer.html </body> </html> It remains to go to the console and run our task with the command:
gulp html:build After it works, go to the build folder and see our index.html file, which turned into this:
<!DOCTYPE html> <html> <head lang="ru"> <meta charset="UTF-8"> <title> </title> </head> <body> <section class="header"> Header </section> <section class="content"> Content </section> <section class="footer"> Footer </section> </body> </html> This is just amazing!
I remember how much inconvenience it caused to run through all the pages that were laid out and make changes to some part that was repeated on them. Now it is done comfortably in one place.
We collected javascript
Task for building scripts will look like this:
gulp.task('js:build', function () { gulp.src(path.src.js) // main .pipe(rigger()) // rigger .pipe(sourcemaps.init()) // sourcemap .pipe(uglify()) // js .pipe(sourcemaps.write()) // .pipe(gulp.dest(path.build.js)) // build .pipe(reload({stream: true})); // }); Remember our main.js file?
The whole idea here is to include all the js files we need in the order we want with the help of rigger. It is for the sake of control over the order of connection - I do it exactly like that, instead of asking gulp to find all * .js files and glue them together.
Often, when searching for a place of error, I turn off some files from the assembly in turn to localize the problem. If you thoughtlessly glue all .js - debug will be complicated.
Fill in our main.js:
/* * Third party */ //= ../../bower_components/jquery/dist/jquery.js /* * Custom */ //= partials/app.js This is how I do combat projects. At the top of this file there is always a dependency connection, below is the connection of my own scripts.
By the way, bower packages can be connected via a plugin such as gulp-bower . But again, I do not do this, because I want to independently determine what, where and how it will connect.
It remains only to start our task from the console with the command:
gulp js:build And in the build / js folder - we will see our compiled and compressed file.
We collect styles
Let's write a task to build our SCSS:
gulp.task('style:build', function () { gulp.src(path.src.style) // main.scss .pipe(sourcemaps.init()) // js .pipe(sass()) // .pipe(prefixer()) // .pipe(cssmin()) // .pipe(sourcemaps.write()) .pipe(gulp.dest(path.build.css)) // build .pipe(reload({stream: true})); }); Everything is simple here, but you may be interested in auto-fixer settings. By default, it writes the prefixes needed for the last two versions of browsers. In my case, this is enough, but if you need other settings - you can find them here .
I do the same with styles as with js, but instead of using rigger, I use the import built into SCSS.
UPD (March 13, 2015): Some people have a problem with importing css files inline. As it turned out, gulp-sass does not know how to do this, and on output gives a simple CSS import. But this issue is resolved by our gulp-minify-css plugin, which replaces CSS import with file content.
Our main.scss will look like this:
/* * Third Party */ @import "../../bower_components/normalize.css/normalize.css"; /* * Custom */ @import "partials/app"; In this way, it is easy to control the order of connecting styles.
Check our task by running
gulp style:build We collect pictures
Task on pictures will look like this:
gulp.task('image:build', function () { gulp.src(path.src.img) // .pipe(imagemin({ // progressive: true, svgoPlugins: [{removeViewBox: false}], use: [pngquant()], interlaced: true })) .pipe(gulp.dest(path.build.img)) // build .pipe(reload({stream: true})); }); I use the default imagemin settings, except for interlaced. Read more about the API of this plugin here .
Now, if we put some image in src / img and run the command:
gulp image:build then we will see in the build our optimized image. Also gulp will kindly write in the console how much space it has saved for users of our site.
Fonts
With fonts, I usually do not need to carry out any manipulations, but in order not to destroy the paradigm “We work in src / and we collect in build /” - I simply copy the files from src / fonts and paste them into build / fonts. Here is a task:
gulp.task('fonts:build', function() { gulp.src(path.src.fonts) .pipe(gulp.dest(path.build.fonts)) }); Now let's define a task with the name “build”, which will run all that we have here with you:
gulp.task('build', [ 'html:build', 'js:build', 'style:build', 'fonts:build', 'image:build' ]); File Changes
In order not to climb into the console all the time, let's ask gulp to run the necessary task every time a file changes. To do this, write this task:
gulp.task('watch', function(){ watch([path.watch.html], function(event, cb) { gulp.start('html:build'); }); watch([path.watch.style], function(event, cb) { gulp.start('style:build'); }); watch([path.watch.js], function(event, cb) { gulp.start('js:build'); }); watch([path.watch.img], function(event, cb) { gulp.start('image:build'); }); watch([path.watch.fonts], function(event, cb) { gulp.start('fonts:build'); }); }); Since we understand there should be no problems. We just go through our paths defined in the path variable, and in the function that is called when the file changes - please run the task we need.
Try running in the console:
gulp watch And change different files.
Isn't it cool?
Web server
To enjoy the miracle of livereload - we need to create a local web server. To do this, we write the following simple task:
gulp.task('webserver', function () { browserSync(config); }); There is nothing to comment on. We will simply launch the livereload server with the settings we defined in the config object. In addition, gulp will politely open our project in the browser, and in the console write links to the local server and to the tunnel, which we can throw to the customer for demonstration.
Cleaning
If you add any image, then run the image: build task and then delete the image - it will remain in the build folder. So it would be convenient to clean it periodically. Create a simple task for this.
gulp.task('clean', function (cb) { rimraf(path.clean, cb); }); Now when you run the command
gulp clean just the build folder will be deleted.
Final chord
The last thing - we define the default task, which will run our entire assembly.
gulp.task('default', ['build', 'webserver', 'watch']); Finally your gulpfile.js will look something like this .
Now we will execute in the console
gulp And voila. Procurement for your project is ready and waiting for you.
A couple of words in conclusion
This article was conceived as a way to once again brush up on the subtleties of building frontend projects, and for ease of transferring this experience to new developers. You do not need to use this kind of assembly on your projects. There is yeoman.io , on which you will find generators for almost any need.
I wrote this collector for three reasons.
- I like to use rigger in my html code
- Almost in all assemblies that I met - a temporary folder (usually .tmp /) is used to record intermediate results of the assembly. I do not like this approach and I wanted to get rid of temporary folders.
- And I wanted all this to be out of my box.
You can download my working version of the collector on my github .
I hope this article was helpful to you.
PS About all errors, shortcomings and jambs - please write in a personal.
Source: https://habr.com/ru/post/250569/
All Articles