The boot server - as a bootable USB flash drive, only the server and the network
A bootable USB flash drive with a set of necessary software is a great tool for the system administrator. It would seem, what could be better? A better may be the boot server!
Imagine you have chosen to boot the network in the BIOS and can install the OS / disinfect the computer from viruses / reanimate disks / test the RAM / etc from the PXE Boot server, because this is much more convenient than running with a USB flash drive from the machine to the machine.
And in the case of a large computer park, such a tool is indispensable.
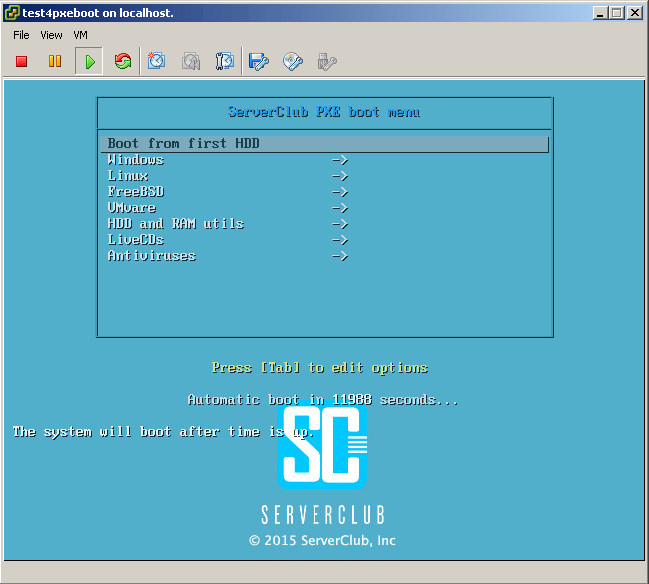
This is the menu that meets our engineering team when booting from PXE.
')
Under the cut you will find a description of all the settings, as well as a small surprise.
Let's take as a basis that a freshly installed Debian Wheezy already winks cheerfully at us with the console.
Prepare the base for further manipulations. Install and configure we need:
1. TFTP
we will give config
and put in
UPD, supplement from reader Aleksey Shipilev
2. Samba
At the end of the
Create a folder, give rights and restart samba
3. Syslinux
Download and upload everything you need to the root of the TFTP server.
Go to the setting
Create a config of the main menu and enter the initial settings
4. DHCP
move the default config, create your own instead and restart the DHCP daemon
It is also worth noting that in this installation, the north has two network cards and it is also the gateway to the Internet.
5. HTTP
For now, just install, and why we need it will be understood further in the text.
6. NFS
Exactly the same as the previous paragraph.
If everything is done correctly, then when booting any machine from this DHCP / PXE / TFTP server, we will see the following:

The base is ready!
Moving on.
For installation we will be available:
The menu structure, and therefore the
Listing directory
The paths to the folders where the installation files for each OS are located are described relative to the root of the TFTP server, i.e.
For example, for FreeBSD,
therefore, you need to create
Everyone should have the right to read - this rule applies to all files sent via TFTP.
And a couple of words about installing FreeBSD.
Login / password to enter the downloadable iso: root / mfsroot (or root without a password).
Plus a couple of examples of FreeBSD install scripts on ZFS:
1. RAID6 of 4 disks .
2. RAID1 from 2 disks .
About how to prepare Windows for installation with PXE, we wrote earlier.
The difference with this installation is only that here we can install both Windows 2008R2 and Windows 2012R2 (however, Windows 7/8 too, you just need to prepare the distribution files and winpe accordingly). After downloading winpe, we mount the
and run the desired installer.
To automate, via startnet.cmd, I sketched this menu:

Now it remains to deal with VMware.
As you noticed, the config for installing hypervisors is somewhat different from the rest - this is where we need the HTTP server.
In
How to prepare, for example, Debian for installation with PXE is written here , but I will not dwell on this.
This section will contain:
And I will tell you why we also installed the NFS server.
As can be seen from the SystemRescueCD download config, it pulls the files that this LiveCD needs by mounting the directory using the NFS protocol. The server is already installed, it remains only to edit / etc / exports and restart the server daemon.
I guess you have a reasonable question - “What is the LiveCD doing here, if there is a separate item for them?”
SystemRescueCD contains a lot of useful programs for working with the disk (for example, such as GParted and testdisk) and therefore it is available here and in the LiveCD.
Our LiveCD set will include:
A few words about the selected LiveCD.
Debian 7 LiveCD
This CD is an assembly of one of our engineers, including the following:
Login / Password: root / ServerClub
HirensBootCD
Hardly needs a presentation, contains many useful utilities.
More details can be found here .
Loads for a long time, MiniXP and Linux are not working. The remaining utilities are available for use.
Trinity Rescue Kit CD
According to the developers, created to restore Windows.
It contains utilities for resetting passwords, antiviruses, a program for cloning a “computer” over the network (and to several computers at the same time), and much more.
Read more here .
SystemRescueCD
Based on Gentoo, designed to restore Linux systems.
Includes a large number of various programs for administration, with a list can be found on the link .
Plop Live
LiveCD with three full-fledged DE to choose from, as well as the necessary admin software .
In a separate presentation, both antivirus do not need.
You can read more about Kaspersky Rescue disk here .
The description of the AVG Recsue CD will be introduced to you by this url .
Throughout the article, I deliberately gave no explanation where to get and how to prepare the content, because these actions are very trivial and would only overload the text.
As a surprise, I offer you two versions of our assembly, available on the links below:
In the first case, you must prepare the server yourself (this will help the “Beginning” chapter of this epic), unzip the contents of the archive and make adjustments according to the realities of your environment.
The second case involves installing on bare metal or a virtual machine.
In brief, the steps for deploying an assembly from the full OS archive are as follows:
1. Boot from the Linux LiveCD.
2. Mark the disk and format the partitions.
3. Mount the "/" section.
4. Unpack the archive.
5. Install the bootloader.
6. Reboot.
7. Configure the OS to fit your network and start using.
Login / password: root / ServerClub.
IMPORTANT: If your network has a working dhcp server, then before starting our build, disable dhcp autostart in it.
How to prepare Kaspersky Rescue disk 10 for PXE boot
Wiki syslinux
How to prepare ESXi for installation with PXE
ESXi Insight is not loaded with PXE. Decision
What does the ESXi insight not load from PXE? Decision
For those who do not have an account on Habré.
If you have any questions / comments, please email me at er [dog] serverclub.com.
Imagine you have chosen to boot the network in the BIOS and can install the OS / disinfect the computer from viruses / reanimate disks / test the RAM / etc from the PXE Boot server, because this is much more convenient than running with a USB flash drive from the machine to the machine.
And in the case of a large computer park, such a tool is indispensable.
This is the menu that meets our engineering team when booting from PXE.
')
Under the cut you will find a description of all the settings, as well as a small surprise.
Start
Let's take as a basis that a freshly installed Debian Wheezy already winks cheerfully at us with the console.
Prepare the base for further manipulations. Install and configure we need:
- TFTP server
- Samba
- Syslinux
- DHCP server
- HTTP server
- NFS server
1. TFTP
# aptitude install tftpd-hpa we will give config
/etc/default/tftpd-hpa to the form TFTP_USERNAME="tftp" TFTP_DIRECTORY="/srv/tftp" # tftp TFTP_ADDRESS="0.0.0.0:69" TFTP_OPTIONS="--secure -l -v -m /etc/tftpd.remap" # windows style linux style and put in
/etc/tftpd.remap just such a line rg \\ / UPD, supplement from reader Aleksey Shipilev
I pulled my hair while tftp otdebezhil.
What on the ThinkPad X201i, that in VirtualBox the download fell off with:
PXE-E32: TFTP Open timeout
Apparently, the PXE agents managed to be incompletely compatible, treated by adding "-r blksize":
TFTP_OPTIONS = "- secure -l -v -r blksize"
2. Samba
# aptitude install samba At the end of the
/etc/samba/smb.conf file we will add information about the folder where the Windows installation files will be located. [images] comment = images path = /srv/tftp/images create mask = 0660 directory mask = 0771 writable = yes guest ok=yes Create a folder, give rights and restart samba
# mkdir /srv/tftp/images # chmod 777 /srv/tftp/images # service samba restart 3. Syslinux
Download and upload everything you need to the root of the TFTP server.
# cd /tmp # wget https://www.kernel.org/pub/linux/utils/boot/syslinux/4.xx/syslinux-4.02.tar.gz # ESXi # tar -xf syslinux-4.02.tar.gz # cd syslinux-4.02/ # find ./ -name "memdisk" -type f|xargs -I {} cp '{}' /srv/tftp/ # find ./ -name "pxelinux.0"|xargs -I {} cp '{}' /srv/tftp/ # find ./ -name "*.c32"|xargs -I {} cp '{}' /srv/tftp/ Go to the setting
# cd /srv/tftp/ # mkdir pxelinux.cfg # cd pxelinux.cfg Create a config of the main menu and enter the initial settings
# cat > default ui vesamenu.c32 PROMPT 0 menu background background.jpg menu title ServerClub PXE boot menu LABEL bootlocal menu label Boot from first HDD kernel chain.c32 append hd0 0 timeout 120 TEXT HELP The system will boot after the time is up ENDTEXT 4. DHCP
# aptitude install isc-dhcp-server move the default config, create your own instead and restart the DHCP daemon
# mv /etc/dhcp/dhcpd.conf{,_orig} # cat > /etc/dhcp/dhcpd.conf option domain-name-servers 8.8.8.8, 8.8.4.4; option ip-forwarding on; default-lease-time 60; min-lease-time 120; max-lease-time 300; authoritative; ddns-update-style interim; log-facility local7; shared-network PXE-Netwotk { subnet 10.0.10.0 netmask 255.255.255.0 { range 10.0.10.10 10.0.10.254; option routers 10.0.10.1; option subnet-mask 255.255.255.0; option domain-name-servers 8.8.8.8, 8.8.4.4; filename "pxelinux.0"; next-server 10.0.10.1; option root-path "10.0.10.1:/srv/tftp/"; } } # service isc-dhcp-server restart Spoiler for those who have MikroTik as the DHCP server
address=10.0.10.0/24 gateway=10.0.10.1 dns-server=8.8.8.8, 8.8.4.4 wins-server="" ntp-server=212.20.50.208 caps-manager="" domain="domain.local" next-server=10.0.10.1 boot-file-name="pxelinux.0" dhcp-option=""
Spoiler for those who have DHCP on Cisco
network <ip > <> ip dhcp pool < > bootfile pxelinux.0 next-server <IP tftp> default-router <> option 66 ascii « » dns-server <DNS > option 150 <IP tftp> domain-name < > It is also worth noting that in this installation, the north has two network cards and it is also the gateway to the Internet.
Therefore, a number of simple manipulations are needed.
# sed -i 's/\#net.ipv4.ip_forward=1/net.ipv4.ip_forward=1/g' /etc/sysctl.conf # sysctl -p # iptables -t nat -I POSTROUTING -s 10.0.10.0/24 -o eth0 -j MASQUERADE # sed -i 's/INTERFACES=\"\"/INTERFACES=\"eth1\"/g' /etc/default/isc-dhcp-server # service isc-dhcp-server restart 5. HTTP
For now, just install, and why we need it will be understood further in the text.
# aptitude install apache2 6. NFS
Exactly the same as the previous paragraph.
# aptitude install nfs-kernel-server If everything is done correctly, then when booting any machine from this DHCP / PXE / TFTP server, we will see the following:
The base is ready!
Moving on.
Let's teach the server to install various OS
For installation we will be available:
- Windows 2008R2 / 20012R2
- Debian 6/7
- Centos 6/7
- Ubuntu 12.04 / 12.10 / 14.04 / 14.10
- FreeBSD 9.2 / 10.1
- VMware ESXi 5.0 / 5.5
The menu structure, and therefore the
/srv/tftp/pxelinux.cfg/default file, /srv/tftp/pxelinux.cfg/default suffered changes.Now the PXE server main menu config now looks like this
ui vesamenu.c32 PROMPT 0 menu background background.jpg menu title ServerClub PXE boot menu LABEL bootlocal menu label Boot from first HDD kernel chain.c32 append hd0 0 timeout 120 TEXT HELP The system will boot after time is up. ENDTEXT LABEL Windows -> KERNEL vesamenu.c32 APPEND pxelinux.cfg/windows LABEL Linux -> KERNEL vesamenu.c32 APPEND pxelinux.cfg/linux LABEL FreeBSD -> KERNEL vesamenu.c32 APPEND pxelinux.cfg/bsd LABEL VMvare -> KERNEL vesamenu.c32 APPEND pxelinux.cfg/vmware Listing directory
/srv/tftp/pxelinux.cfg/ root@pxe:/srv/tftp/pxelinux.cfg# ls -l total 32 -rw-r--r-- 1 tftp tftp 475 17 18:04 bsd -rw-r--r-- 1 tftp tftp 881 17 18:00 default -rw-r--r-- 1 tftp tftp 1316 17 18:01 linux -rw-r--r-- 1 tftp tftp 363 17 18:03 vmware -rw-r--r-- 1 tftp tftp 312 18 00:01 windows Under the spoiler, the contents of the config of each of the sub-items of the menu above
windows
linux
bsd
vmware
PROMPT 0 UI vesamenu.c32 MENU BACKGROUND background.jpg MENU TITLE Windows LABEL <- Main Menu KERNEL vesamenu.c32 APPEND pxelinux.cfg/default LABEL W2K8_x64_R2 & W2K12_x64_R2 (menu inside) kernel Boot/pxeboot.0 LABEL <- Main Menu KERNEL vesamenu.c32 APPEND pxelinux.cfg/default linux
PROMPT 0 UI vesamenu.c32 MENU BACKGROUND background.jpg MENU TITLE Linux LABEL <- Main Menu KERNEL vesamenu.c32 APPEND pxelinux.cfg/default LABEL Debian-7-x64 kernel debian/7/linux append initrd=debian/7/initrd.gz LABEL Debian-6.0.6-x64 kernel debian/6/linux append initrd=debian/6/initrd.gz LABEL CentOS-7-x64 kernel centos/7/vmlinuz append initrd=centos/7/initrd.img method=http://mirror.mirohost.net/centos/7/os/x86_64/ devfs=nomount ksdevice=link ramdisk_size=100000 LABEL CentOS-6-x64 kernel centos/6/vmlinuz append initrd=centos/6/initrd.img method=http://mirror.mirohost.net/centos/6/os/x86_64/ devfs=nomount ksdevice=link ramdisk_size=100000 LABEL Ubuntu-14.10-x64 kernel ubuntu/14.10/linux append initrd=ubuntu/14.10/initrd.gz expert dmraid=true LABEL Ubuntu-14.04-x64 kernel ubuntu/14.04/linux append initrd=ubuntu/14.04/initrd.gz expert dmraid=true LABEL Ubuntu-12.10-x64 kernel ubuntu/12.10/linux append initrd=ubuntu/12.10/initrd.gz expert dmraid=true LABEL Ubuntu-12.04_4-x64 kernel ubuntu/12.04_4/linux append initrd=ubuntu/12.04_4/initrd.gz expert dmraid=true LABEL <- Main Menu KERNEL vesamenu.c32 APPEND pxelinux.cfg/default bsd
PROMPT 0 UI vesamenu.c32 MENU BACKGROUND background.jpg MENU TITLE BSD LABEL <- Main Menu KERNEL vesamenu.c32 APPEND pxelinux.cfg/default LABEL FreeBSD-10.1-x64 kernel memdisk initrd freebsd/10/mfsbsd-se-10.1-RELEASE-amd64.iso append iso raw LABEL FreeBSD-9.2-x64 kernel memdisk initrd freebsd/9/fbsd92.iso append iso raw LABEL <- Main Menu KERNEL vesamenu.c32 APPEND pxelinux.cfg/default vmware
PROMPT 0 UI vesamenu.c32 MENU BACKGROUND background.jpg MENU TITLE VMware LABEL <- Main Menu KERNEL vesamenu.c32 APPEND pxelinux.cfg/default LABEL VMware-5.5 kernel vmw/5.5/mboot.c32 append -c /vmw/5.5/boot.cfg ks=http://10.0.10.1/vmw5.5/ks.cfg +++ LABEL VMware-5.0 kernel vmw/5.0/mboot.c32 append -c /vmw/5.0/boot.cfg ks=http://10.0.10.1/vmw5.0/ks.cfg +++ LABEL <- Main Menu KERNEL vesamenu.c32 APPEND pxelinux.cfg/default The paths to the folders where the installation files for each OS are located are described relative to the root of the TFTP server, i.e.
/srv/tftp .For example, for FreeBSD,
LABEL FreeBSD-10.1-x64 kernel memdisk initrd freebsd/10/mfsbsd-se-10.1-RELEASE-amd64.iso append iso raw therefore, you need to create
freebsd/10/ folders in the root of TFTP, while paying attention to the rights ls -l /srv/tftp/freebsd/10/ total 193780 -rw-r--r-- 1 tftp tftp 198430720 17 18:17 mfsbsd-se-10.1-RELEASE-amd64.iso Everyone should have the right to read - this rule applies to all files sent via TFTP.
And a couple of words about installing FreeBSD.
Login / password to enter the downloadable iso: root / mfsroot (or root without a password).
Plus a couple of examples of FreeBSD install scripts on ZFS:
1. RAID6 of 4 disks .
2. RAID1 from 2 disks .
About how to prepare Windows for installation with PXE, we wrote earlier.
The difference with this installation is only that here we can install both Windows 2008R2 and Windows 2012R2 (however, Windows 7/8 too, you just need to prepare the distribution files and winpe accordingly). After downloading winpe, we mount the
/srv/tftp/images/ folder, which contains the files for installing the Microsoft OS: ls -l /srv/tftp/images/ total 8 drwxr-xr-x 6 root root 4096 17 22:19 w2k12r2 drwxr-xr-x 7 tftp tftp 4096 17 19:05 w2k8r2 and run the desired installer.
To automate, via startnet.cmd, I sketched this menu:
Now it remains to deal with VMware.
As you noticed, the config for installing hypervisors is somewhat different from the rest - this is where we need the HTTP server.
In
/var/www we will create folders vmw5.5, vmw5.0, and in folders we will make symlinks on config # cd /var/www # mkdir vmw5.5 # cd vmw5.5/ # ln -s /srv/tftp/vmw/5.5/ks.cfg # mkdir ../vmw5.0 # cd ../vmw5.0/ # ln -s /srv/tftp/vmw/5.0/ks.cfg How to prepare, for example, Debian for installation with PXE is written here , but I will not dwell on this.
Add the ability to load various disk utilities and memory test
This section will contain:
- Memtest86 +
- Clonezilla-live
- SystemRescueCD
- Mhdd
Configs are located here.
default
du
ui vesamenu.c32 PROMPT 0 menu background background.jpg menu title ServerClub PXE boot menu LABEL bootlocal menu label Boot from first HDD kernel chain.c32 append hd0 0 timeout 120000 TEXT HELP The system will boot after time is up. ENDTEXT LABEL Windows -> KERNEL vesamenu.c32 APPEND pxelinux.cfg/windows LABEL Linux -> KERNEL vesamenu.c32 APPEND pxelinux.cfg/linux LABEL FreeBSD -> KERNEL vesamenu.c32 APPEND pxelinux.cfg/bsd LABEL VMvare -> KERNEL vesamenu.c32 APPEND pxelinux.cfg/vmware LABEL HDD and RAM utils -> KERNEL vesamenu.c32 APPEND pxelinux.cfg/du du
PROMPT 0 UI vesamenu.c32 MENU BACKGROUND background.jpg MENU TITLE HDD and RAM utils LABEL <- Main Menu KERNEL vesamenu.c32 APPEND pxelinux.cfg/default LABEL Memtest86+ kernel memtest/memtest label Clonezilla-live MENU LABEL Clonezilla Live KERNEL clonezilla/vmlinuz APPEND initrd=clonezilla/initrd.img boot=live config noswap nolocales edd=on nomodeset ocs_live_run="ocs-live-general" ocs_live_extra_param="" keyboard-layouts="" ocs_live_batch="no" locales="" vga=788 nosplash noprompt fetch=tftp://10.0.10.1/clonezilla/filesystem.squashfs label SystemRescueCD kernel SystemRescueCD/isolinux/rescue64 append initrd=SystemRescueCD/isolinux/initram.igz dodhcp nfsboot=10.0.10.1:/srv/tftp/SystemRescueCD LABEL MHDD kernel memdisk initrd mhdd/mhdd32ver4.6.iso append iso raw LABEL <- Main Menu KERNEL vesamenu.c32 APPEND pxelinux.cfg/default And I will tell you why we also installed the NFS server.
As can be seen from the SystemRescueCD download config, it pulls the files that this LiveCD needs by mounting the directory using the NFS protocol. The server is already installed, it remains only to edit / etc / exports and restart the server daemon.
# cat >> /etc/exports /srv/tftp/SystemRescueCD/ 10.0.10.1/255.255.255.0(ro,no_subtree_check,all_squash,insecure,anonuid=1000,anongid=1000) # service nfs-kernel-server restart I guess you have a reasonable question - “What is the LiveCD doing here, if there is a separate item for them?”
SystemRescueCD contains a lot of useful programs for working with the disk (for example, such as GParted and testdisk) and therefore it is available here and in the LiveCD.
Livecd
Our LiveCD set will include:
- Debian 7 LiveCD
- HirensBootCD
- Trinity Rescue Kit CD
- SystemRescueCD
- Plop Live
Configs
at the end of the default was added
livecds
To boot the Trinity Rescue Kit CD and Plop Live into
and send the NFS restart command to the daemon.
LABEL LiveCDs -> KERNEL vesamenu.c32 APPEND pxelinux.cfg/livecds livecds
PROMPT 0 UI vesamenu.c32 MENU BACKGROUND background.jpg MENU TITLE LiveCDs LABEL <- Main Menu KERNEL vesamenu.c32 APPEND pxelinux.cfg/default LABEL Debian LiveCD KERNEL Debian7live/vmlinuz APPEND initrd=Debian7live/initrd boot=live fetch=tftp://10.0.10.1/Debian7live/filesystem.squashfs root=/dev/ram0 rw LABEL HirensBootCD MENU LABEL Hiren's Boot CD KERNEL memdisk APPEND iso initrd=hirens/hirens.iso LABEL Trinity Rescue Kit CD kernel trk/kernel.trk append initrd=trk/initrd.trk ramdisk_size=65536 root=/dev/ram0 vga=788 splash=verbose pci=conf1 trkmenu timeout 100 trknfs=10.0.10.1:/srv/tftp/trk ip=dhcp LABEL SystemRescueCD kernel SystemRescueCD/isolinux/rescue64 append initrd=SystemRescueCD/isolinux/initram.igz dodhcp nfsboot=10.0.10.1:/srv/tftp/SystemRescueCD LABEL Plop Live KERNEL plop/bzImage APPEND initrd=plop/initramfs.gz vga=normal nfsmount=10.0.10.1:/srv/tftp/plop LABEL <- Main Menu KERNEL vesamenu.c32 APPEND pxelinux.cfg/default To boot the Trinity Rescue Kit CD and Plop Live into
/etc/exports you need to add the lines: /srv/tftp/trk/ 10.0.10.1/255.255.255.0(ro,no_subtree_check,all_squash,insecure,anonuid=1000,anongid=1000) /srv/tftp/plop/ 10.0.10.1/255.255.255.0(ro,no_subtree_check,all_squash,insecure,anonuid=1000,anongid=1000) and send the NFS restart command to the daemon.
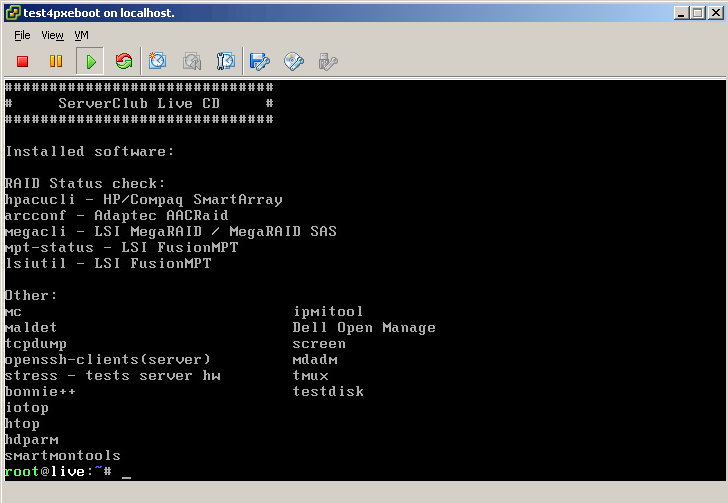
A few words about the selected LiveCD.
Debian 7 LiveCD
This CD is an assembly of one of our engineers, including the following:
Login / Password: root / ServerClub
HirensBootCD
Hardly needs a presentation, contains many useful utilities.
More details can be found here .
Loads for a long time, MiniXP and Linux are not working. The remaining utilities are available for use.
Trinity Rescue Kit CD
According to the developers, created to restore Windows.
It contains utilities for resetting passwords, antiviruses, a program for cloning a “computer” over the network (and to several computers at the same time), and much more.
Read more here .
SystemRescueCD
Based on Gentoo, designed to restore Linux systems.
Includes a large number of various programs for administration, with a list can be found on the link .
Plop Live
LiveCD with three full-fledged DE to choose from, as well as the necessary admin software .
Antivirus
- Kaspersky Rescue Disk 10

- AVG Rescue CD

In a separate presentation, both antivirus do not need.
You can read more about Kaspersky Rescue disk here .
The description of the AVG Recsue CD will be introduced to you by this url .
The final configuration file of the main menu, as well as the antivirus menu file
default
av
ui vesamenu.c32 PROMPT 0 menu background background.jpg menu title ServerClub PXE boot menu LABEL bootlocal menu label Boot from first HDD kernel chain.c32 append hd0 0 timeout 120000 TEXT HELP The system will boot after time is up. ENDTEXT LABEL Windows -> KERNEL vesamenu.c32 APPEND pxelinux.cfg/windows LABEL Linux -> KERNEL vesamenu.c32 APPEND pxelinux.cfg/linux LABEL FreeBSD -> KERNEL vesamenu.c32 APPEND pxelinux.cfg/bsd LABEL VMvare -> KERNEL vesamenu.c32 APPEND pxelinux.cfg/vmware LABEL HDD and RAM utils -> KERNEL vesamenu.c32 APPEND pxelinux.cfg/du LABEL LiveCDs -> KERNEL vesamenu.c32 APPEND pxelinux.cfg/livecds LABEL Antiviruses -> KERNEL vesamenu.c32 APPEND pxelinux.cfg/av av
PROMPT 0 UI vesamenu.c32 MENU BACKGROUND background.jpg MENU TITLE Antivirues LABEL <- Main Menu KERNEL vesamenu.c32 APPEND pxelinux.cfg/default LABEL Kaspersky Antivirus KERNEL kav/rescue APPEND initrd=kav/rescue.igz root=live rootfstype=auto vga=791 init=/init kav_lang=ru udev liveimg doscsi nomodeset LABEL Kaspersky Antivirus (text mode) KERNEL kav/rescue APPEND initrd=kav/rescue.igz root=live rootfstype=auto vga=791 init=/init kav_lang=ru udev liveimg nox kavshell noresume doscsi nomodeset label AVG menu label AVG Rescue CD kernel avg/vmlinuz append max_loop=255 vga=791 initrd=avg/initrd.lzm init=linuxrc reboot=bios label AVG nofb menu label AVG Rescue CD with Disabled Framebuffer kernel avg/vmlinuz append max_loop=255 video=vesafb:off initrd=avg/initrd.lzm init=linuxrc reboot=bios label AVG vgask menu label AVG Rescue CD with Resolution Selection kernel avg/vmlinuz append max_loop=255 initrd=avg/initrd.lzm init=linuxrc vga=ask reboot=bios LABEL <- Main Menu KERNEL vesamenu.c32 APPEND pxelinux.cfg/default Conclusion, it is also a surprise
Throughout the article, I deliberately gave no explanation where to get and how to prepare the content, because these actions are very trivial and would only overload the text.
As a surprise, I offer you two versions of our assembly, available on the links below:
- Archive with all content / srv / tftp ( link to torrent file , direct link )
- Archive of the entire OS ( link to torrent file , direct link )
In the first case, you must prepare the server yourself (this will help the “Beginning” chapter of this epic), unzip the contents of the archive and make adjustments according to the realities of your environment.
The second case involves installing on bare metal or a virtual machine.
In brief, the steps for deploying an assembly from the full OS archive are as follows:
1. Boot from the Linux LiveCD.
2. Mark the disk and format the partitions.
3. Mount the "/" section.
4. Unpack the archive.
5. Install the bootloader.
6. Reboot.
7. Configure the OS to fit your network and start using.
Login / password: root / ServerClub.
IMPORTANT: If your network has a working dhcp server, then before starting our build, disable dhcp autostart in it.
useful links
How to prepare Kaspersky Rescue disk 10 for PXE boot
Wiki syslinux
How to prepare ESXi for installation with PXE
ESXi Insight is not loaded with PXE. Decision
What does the ESXi insight not load from PXE? Decision
For this I finish, thank you for your attention!
For those who do not have an account on Habré.
If you have any questions / comments, please email me at er [dog] serverclub.com.
Source: https://habr.com/ru/post/250549/
All Articles