PIC16F1503. Wheelbarrow for pumping - 3. Power
It used to be about sound and light .
Finally, there is nowhere else to retreat and the time has come to assemble the machine into something whole and almost indivisible. There was only one tiny question: how will this machine turn on and off? And what about the tradition to continue in the next post the topic of the previous one?
')
In order not to violate the tradition, I will continue the topic from the previous post: blinking LEDs. What is wrong with them?
Not so much with them, starting from the curve of the delay time and ending with a terrible timer interrupt handler.
First you need to make a normal delay function. We put TMR1 for a period of 1ms and add to the code
In this simple way, we will get the delay function (no matter what the timer ticked), which does not depend on the frequency / presence of another code, up to 65 seconds. Enough for our purposes with a large margin.
Now look at the ignition code of the LEDs. Somehow it is ugly to interrupt to do delays (and even a cycle), plus a bunch of comparisons that you should take away in a good way somewhere. No, it’s quite a home project, but no good for an industrial project.
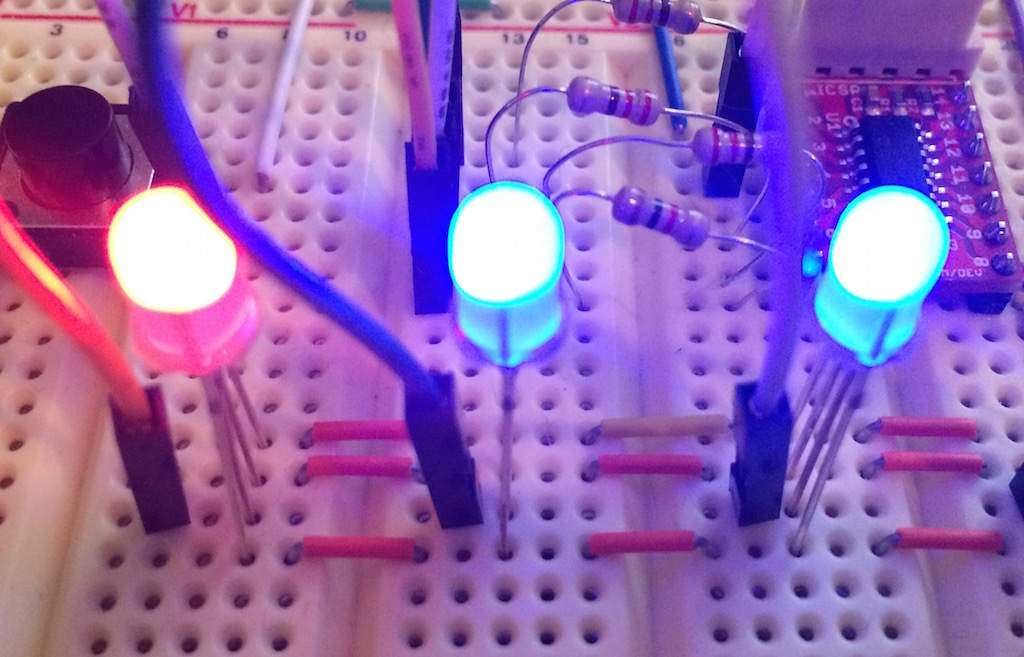
Let's change the algorithm again. What is the point? Consider the example of the port C, which is entirely given under the LEDs.
The younger 3 bits are responsible for the colors. Older 3 - for the first 3 LEDs. Mentally turn on the first LED to red, the second to green, and the third to "orange" (or red + green). What will be in port?
The first step, the "red" channel
0b00101001
The second step, the "green" channel
0b00110010
The third step, the "blue" channel
0b00000100
As we see, in principle, it is enough for us to send to the port one by one over and over again in order to get the same functionality. And the formation of these bytes will be given to the setLed function - it is called much less frequently than the code in the interrupt and can afford all sorts of calculations, cycles and other excesses.
It’s good that we know that we can shove anything into port C - it has 2 high-order bits that are not connected anywhere (judging by the datasheet and code). But what to do with port A, in which we need to change only one bit, without touching the rest? To do this, you can use the remarkable function "bit AND" and "bit OR."
To make it clearer, I'll sign an example:
0b00 0 01010 We read the current value from the port. I selected the bit we need - we only need to change its value. The rest is randomly placed.
We do a “bitwise OR” (somewhere there should be 1, so that the result would also be 1) with the mask set in advance by the setLed function. To enable a bit, it must be 0b00 1 00000. Let's say we need to turn on the bit
0b00 0 01010 | 0b00 1 0000 = 0b00 1 01010
Everything, the necessary bit is set, the rest are untouched, so that we can write the resulting value back to the port.
And now the same bit will be reset with the help of “bit-AND” (and there and there should be 1, so that the output is also 1)
0b00101010 & 0b11011111 = 0b00 0 01010
It seems everything is logical. Rewrite the code.
In general, the setLed function is assigned to prepare 6 bytes of what we will send to the port. Change led.c and led.h
And in the interrupt handler we register
Agree, much shorter than the previous version (although I left working with bits for port C, and port A turned out to be easier to pull by hand). If shorter, it means that it runs faster. And if it runs faster, then the overall performance of the controller is also higher. Solid bonus from all sides. True, to get "white" now you have to call setLed three times, but these are trifles.
Now it remains to solve the most important question: how to turn it on and how to turn it off?
In principle, I have the option proposed by the original creators of the typewriter - a button on the door. But before you engage in applied art, you need to estimate "is it worth it"?
We write the following code
Pay attention to the last instruction - SLEEP () pushes the microcontroller into hibernation, when everything is off and only some interruption can get out of this state. Interrupts have not yet been delivered to us, so I simply turn it on and off manually when measuring.
Connect a multimeter to measure current consumption. My bet is that when the LEDs are lit and the speaker is whining, then the current consumption is 2.97-3 mA. If you do not pick the speaker, then 2.85-2.9. And when everything ends, then 0.01mA and less (just my multimeter 0.01mA has a lower measurement limit). The difference between the clock frequency of 1 MHz and 4 MHz is also minimal - literally 0.2 mA.
Agree, smart numbers for 12 flashing LEDs? If we connected them “as usual”, we would get a current of 30-40mA.
Since I will have 2 AAA batteries (their average capacity is 1000 mAh), it is easy to estimate how long the machine will live.
If all the time will squeak and blink - 1000mAh / 3mA / 24h = 13 days.
And if you sleep all the time - 1000 / 0.1 / 24 = 416 days.
It is clear, in reality, the numbers will be less, since not a single battery will allow itself to be discharged "to zero." But even so - a year in hibernation for cars is very good. In general, there is no need for a separate switch and therefore I decide to use the already prepared blank for the button. I connect the button between RA4 and the “minus”, in the Code Configurator we enable this leg for reading and do not forget to turn on the pull-up resistor and generate interrupts for this leg.
For some reason, we forgot to add code in the Code Configurator to enable interrupts (although the checkboxes are set) and because of this I have to open the datasheet on the processor and look for which bits are responsible for what (actually this is a very useful activity). We enable the resolution of interrupts from the periphery and allow the ones connected to port A4 to generate them.
And check again. As a result, when we press the button, everything wakes up, blinks and falls asleep a couple of times.
There is already a beautiful flasher (code above), and with the siren frequencies they helped me in the comments. Ambulance siren: triangular frequency-modulated signal, with time-varying generation frequency from 850 Hz to 1550 Hz. with a speed of 0.2 hertz. Militia siren from 650 Hz. up to 1350 Hz. And do not ask me how speed can be measured in hertz :) But the sound is very similar.
Now it remains to collect all the accumulated (sound, flashers, sleep) into one piece of code. In the best traditions of tutorials, I will leave it to you.
Almost ready, you can take as usual, I have multik.org/pic/policecar.rar
Finally, there is nowhere else to retreat and the time has come to assemble the machine into something whole and almost indivisible. There was only one tiny question: how will this machine turn on and off? And what about the tradition to continue in the next post the topic of the previous one?
')
In order not to violate the tradition, I will continue the topic from the previous post: blinking LEDs. What is wrong with them?
Not so much with them, starting from the curve of the delay time and ending with a terrible timer interrupt handler.
First you need to make a normal delay function. We put TMR1 for a period of 1ms and add to the code
volatile uint16_t millis=0; void DelayMS(uint16_t m) { millis=0; while(millis<m); } ... void TMR1_ISR(void) { millis++; ... In this simple way, we will get the delay function (no matter what the timer ticked), which does not depend on the frequency / presence of another code, up to 65 seconds. Enough for our purposes with a large margin.
Now look at the ignition code of the LEDs. Somehow it is ugly to interrupt to do delays (and even a cycle), plus a bunch of comparisons that you should take away in a good way somewhere. No, it’s quite a home project, but no good for an industrial project.
Let's change the algorithm again. What is the point? Consider the example of the port C, which is entirely given under the LEDs.
The younger 3 bits are responsible for the colors. Older 3 - for the first 3 LEDs. Mentally turn on the first LED to red, the second to green, and the third to "orange" (or red + green). What will be in port?
The first step, the "red" channel
0b00101001
The second step, the "green" channel
0b00110010
The third step, the "blue" channel
0b00000100
As we see, in principle, it is enough for us to send to the port one by one over and over again in order to get the same functionality. And the formation of these bytes will be given to the setLed function - it is called much less frequently than the code in the interrupt and can afford all sorts of calculations, cycles and other excesses.
It’s good that we know that we can shove anything into port C - it has 2 high-order bits that are not connected anywhere (judging by the datasheet and code). But what to do with port A, in which we need to change only one bit, without touching the rest? To do this, you can use the remarkable function "bit AND" and "bit OR."
To make it clearer, I'll sign an example:
0b00 0 01010 We read the current value from the port. I selected the bit we need - we only need to change its value. The rest is randomly placed.
We do a “bitwise OR” (somewhere there should be 1, so that the result would also be 1) with the mask set in advance by the setLed function. To enable a bit, it must be 0b00 1 00000. Let's say we need to turn on the bit
0b00 0 01010 | 0b00 1 0000 = 0b00 1 01010
Everything, the necessary bit is set, the rest are untouched, so that we can write the resulting value back to the port.
And now the same bit will be reset with the help of “bit-AND” (and there and there should be 1, so that the output is also 1)
0b00101010 & 0b11011111 = 0b00 0 01010
It seems everything is logical. Rewrite the code.
In general, the setLed function is assigned to prepare 6 bytes of what we will send to the port. Change led.c and led.h
// basic colors #define RED 1 #define GREEN 2 #define BLUE 3 #define OFF 0 extern volatile uint8_t lc[3]; extern volatile uint8_t la[3]; void setLed(uint8_t n,uint8_t c) { uint8_t b; if(n==0) b=0b11110111; if(n==1) b=0b11101111; if(n==2) b=0b11011111; if(c>0) { c--; if(n==3) { la[0]=1; la[1]=1; la[2]=1; la[c]=0; } else { lc[c]=lc[c]&b; } } else { // turn off channel N b=b^0xff; if(n==3) { la[0]=1; la[1]=1; la[2]=1; } else { lc[0]=lc[0]|b; lc[1]=lc[1]|b; lc[2]=lc[2]|b; } } And in the interrupt handler we register
LATC=lc[current_led]; _LED4_ = la[current_led]; current_led++; if(current_led==3) current_led=0; Agree, much shorter than the previous version (although I left working with bits for port C, and port A turned out to be easier to pull by hand). If shorter, it means that it runs faster. And if it runs faster, then the overall performance of the controller is also higher. Solid bonus from all sides. True, to get "white" now you have to call setLed three times, but these are trifles.
Now it remains to solve the most important question: how to turn it on and how to turn it off?
In principle, I have the option proposed by the original creators of the typewriter - a button on the door. But before you engage in applied art, you need to estimate "is it worth it"?
We write the following code
setLed(3, RED); setLed(2, BLUE); PWM3_LoadDutyValue(49*2); TMR2_LoadPeriodRegister(49); uint8_t c,q; for(q=0;q<1;q++) { setLed(0, RED); setLed(1, OFF); DelayMS(100); for (c = 0; c < 10; c++) { setLed(0, OFF); DelayMS(50); setLed(0, RED); DelayMS(50); } setLed(1, BLUE); setLed(0, OFF); DelayMS(100); for (c = 0; c < 10; c++) { setLed(1, OFF); DelayMS(50); setLed(1, BLUE); DelayMS(50); } } PWM3_LoadDutyValue(0); TMR2_LoadPeriodRegister(0); setLed(0, OFF); setLed(1, OFF); setLed(2, OFF); setLed(3, OFF); DelayMS(10); SLEEP(); Pay attention to the last instruction - SLEEP () pushes the microcontroller into hibernation, when everything is off and only some interruption can get out of this state. Interrupts have not yet been delivered to us, so I simply turn it on and off manually when measuring.
Connect a multimeter to measure current consumption. My bet is that when the LEDs are lit and the speaker is whining, then the current consumption is 2.97-3 mA. If you do not pick the speaker, then 2.85-2.9. And when everything ends, then 0.01mA and less (just my multimeter 0.01mA has a lower measurement limit). The difference between the clock frequency of 1 MHz and 4 MHz is also minimal - literally 0.2 mA.
Agree, smart numbers for 12 flashing LEDs? If we connected them “as usual”, we would get a current of 30-40mA.
Since I will have 2 AAA batteries (their average capacity is 1000 mAh), it is easy to estimate how long the machine will live.
If all the time will squeak and blink - 1000mAh / 3mA / 24h = 13 days.
And if you sleep all the time - 1000 / 0.1 / 24 = 416 days.
It is clear, in reality, the numbers will be less, since not a single battery will allow itself to be discharged "to zero." But even so - a year in hibernation for cars is very good. In general, there is no need for a separate switch and therefore I decide to use the already prepared blank for the button. I connect the button between RA4 and the “minus”, in the Code Configurator we enable this leg for reading and do not forget to turn on the pull-up resistor and generate interrupts for this leg.
For some reason, we forgot to add code in the Code Configurator to enable interrupts (although the checkboxes are set) and because of this I have to open the datasheet on the processor and look for which bits are responsible for what (actually this is a very useful activity). We enable the resolution of interrupts from the periphery and allow the ones connected to port A4 to generate them.
INTCONbits.IOCIE =1; IOCANbits.IOCAN4 =1; And check again. As a result, when we press the button, everything wakes up, blinks and falls asleep a couple of times.
There is already a beautiful flasher (code above), and with the siren frequencies they helped me in the comments. Ambulance siren: triangular frequency-modulated signal, with time-varying generation frequency from 850 Hz to 1550 Hz. with a speed of 0.2 hertz. Militia siren from 650 Hz. up to 1350 Hz. And do not ask me how speed can be measured in hertz :) But the sound is very similar.
Now it remains to collect all the accumulated (sound, flashers, sleep) into one piece of code. In the best traditions of tutorials, I will leave it to you.
Almost ready, you can take as usual, I have multik.org/pic/policecar.rar
Source: https://habr.com/ru/post/250537/
All Articles