How backgrounds are made in Homeworld2 from the inside
This article is a translation of two articles from Simon Schreibt. Both articles on the same topic are complementary. Do not be alarmed by the fact that at the beginning everything is typed in large letters, this is the author's style and I tried to keep it as much as possible.

Thanks for reading.
')
Just kidding, of course. Of course, I have something to tell about this topic. In our company, we occasionally look at art from Homeworld and admire the skill of its creators. Now, after we have discussed how great the background looks and how interesting this outline style (sketch) looks like, something remains ... some details seem ... especially for us.

I mentioned that it looks a bit like ... gradient coloring on the vertices. But they will not draw the background geometry, right? I mean ... that in this case it should be a rather strongly tessellated sphere. The discussions were finished, but I was not satisfied with the result and wanted, at least, to see the textures. Therefore, I used some utilities to extract data from Homeworld 2 Demo, but there were no textures. Only a number of .HOD files. Googling I found a topic on how to generate these .HOD files from .TGA . She read:
“... scans each pixel of the image and then based on the contrast
decides whether or not to add a new top and color ... ”
Could this really be vertex coloring? Fortunately, you can look at the .HOD file using CFHodEdit. Another utility may turn on the forced grid display mode. See what you get to pull into the light:

And here you can see how this affects the geometry of the sky in the game. See how low the resolution is in non-contrast areas? And what a smooth sphere in places where there are many details?
I never even thought that this way you can get such good results. Oh, and do not forget that this approach solves two big problems.
# 1 There are no problems with artifacts from compressing DDS format textures.
# 2 More important from the point of view of the composition: due to the fact that it is impossible to get a strong level of detail (the training says that the original TGA should not contain many clear details), the background remains where it should be:
Very often I see games where the background contains too much noise and details that the truth is very difficult to distinguish from the middle and near plan.
The last time I saw the perfect combination of technology and composition in Diablo 3. I’m talking about my article "Trees in Diablo 3."
End of first article. The second part of.
Some people ask in the subject on Polycount how these areas in Homeworld were made. Let's do it together! Well, we will use for this utility for mods. And I have no idea how close it is to Relic ’s original approach to this issue.
Download
Download this mod utility collection and use the “HW2BGBuilder” tool. There is also “HW2 - Spookysoft - HOD Tool 1.5.0.1 ″, but for me it didn’t fit much.
Hod viewer
To view .HOD files, use “CFHodEdit 3.1.5 ″ (open your .HOD file, then in the bottom of the program, find the“ Miscellaneous ”tab and click“ HOD Preview ”).
Go!
Well, first we will create a test .TGA to see what we expect. I think this should work well (1024 × 512, 24bit):

Create a shortcut for HW2BGBuilder.exe and drag our texture onto it. We will give the utility to calculate the necessary and then click on “Space” (word game from the author. This implies both the space button and the space at the same time. Note. Lane) to start the process. We will feel like a hacker of the Matrix while the numbers run down the command line.

And this is what it looks like in “CFHodEdit”. You can very clearly see the UV scan of the sphere. So, now we know three things:
A little more about all this in a couple of sentences below.

Regarding the last point: in Homeworld, they draw only smooth gradients at the poles of the sphere and avoid any visible deformation. Vertices are also rare in these areas, which leads to smooth gradients of vertex colors.
See how the geometry is distributed around the pole:

I think it's just awesome. Due to the restriction on the use of detail only in horizontal areas, you also achieve the (hopefully) that the player will never lose orientation in space.
Now let's go to the “real” texture. But before that, let's reduce the level (brightness approx. Lane) from 255 to 128 (Photoshop> Image> Adjustments> Levels).
Brightness level: 255

Brightness level: 128

After generation, you will find a “_ref.TGA” texture, which is a map of the borders used by the program to create a sphere. I think she looks really interesting. I think that the squares are the parts that the program counts one by one.
Face Map:

And this is how it looks in the viewer. In some places, especially at the top of a big mountain, you can see the “leakage” of color. I didn't really play with the “HW2BGBuilder” settings. Perhaps there is room for maneuver and you can improve the result, but in general the result is very good.

It should be noted that the resolution of the original texture noticeably hit the number of polygons as a result.


Last thoughts will be a bit technical. Correct me if I explain incorrectly. There is a sense in what I said “bye” to numbers and went the way of graphics.
This means that if the original texture contains too much contrast and detail everywhere, then there will be more data than when using the texture. But the backgrounds in Homeworld consist mostly of colors and gradients, as well as a small amount of detail. So for these purposes, the optimization is cool.
While I was writing this article, there were discussions about how to reduce the number of polygons in zBrush. Computron posted their results here . Oh and poopinmymouth gave an excellent link which describes the utility for creating spheres with all its parameters.
And now I really thank you for reading.
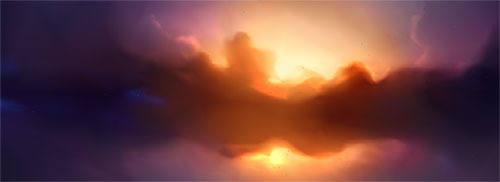
What you see here
these are stunning backgrounds
one of the most beautiful science fiction games.
H omeworld 2
Thanks for reading.
')
Just kidding, of course. Of course, I have something to tell about this topic. In our company, we occasionally look at art from Homeworld and admire the skill of its creators. Now, after we have discussed how great the background looks and how interesting this outline style (sketch) looks like, something remains ... some details seem ... especially for us.
I mentioned that it looks a bit like ... gradient coloring on the vertices. But they will not draw the background geometry, right? I mean ... that in this case it should be a rather strongly tessellated sphere. The discussions were finished, but I was not satisfied with the result and wanted, at least, to see the textures. Therefore, I used some utilities to extract data from Homeworld 2 Demo, but there were no textures. Only a number of .HOD files. Googling I found a topic on how to generate these .HOD files from .TGA . She read:
“... scans each pixel of the image and then based on the contrast
decides whether or not to add a new top and color ... ”
WHAT?
Could this really be vertex coloring? Fortunately, you can look at the .HOD file using CFHodEdit. Another utility may turn on the forced grid display mode. See what you get to pull into the light:
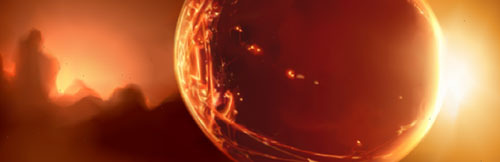
This one
of the bravest
solutions for game art I've ever seen.
And here you can see how this affects the geometry of the sky in the game. See how low the resolution is in non-contrast areas? And what a smooth sphere in places where there are many details?
I never even thought that this way you can get such good results. Oh, and do not forget that this approach solves two big problems.
# 1 There are no problems with artifacts from compressing DDS format textures.
# 2 More important from the point of view of the composition: due to the fact that it is impossible to get a strong level of detail (the training says that the original TGA should not contain many clear details), the background remains where it should be:
ON THE BACKGROUND.
Very often I see games where the background contains too much noise and details that the truth is very difficult to distinguish from the middle and near plan.
The last time I saw the perfect combination of technology and composition in Diablo 3. I’m talking about my article "Trees in Diablo 3."
End of first article. The second part of.
Some people ask in the subject on Polycount how these areas in Homeworld were made. Let's do it together! Well, we will use for this utility for mods. And I have no idea how close it is to Relic ’s original approach to this issue.
Download
Download this mod utility collection and use the “HW2BGBuilder” tool. There is also “HW2 - Spookysoft - HOD Tool 1.5.0.1 ″, but for me it didn’t fit much.
Hod viewer
To view .HOD files, use “CFHodEdit 3.1.5 ″ (open your .HOD file, then in the bottom of the program, find the“ Miscellaneous ”tab and click“ HOD Preview ”).
Go!
Well, first we will create a test .TGA to see what we expect. I think this should work well (1024 × 512, 24bit):
Create a shortcut for HW2BGBuilder.exe and drag our texture onto it. We will give the utility to calculate the necessary and then click on “Space” (word game from the author. This implies both the space button and the space at the same time. Note. Lane) to start the process. We will feel like a hacker of the Matrix while the numbers run down the command line.
And this is what it looks like in “CFHodEdit”. You can very clearly see the UV scan of the sphere. So, now we know three things:
- It is not necessary to add detailing at the top and bottom of the texture, as it will compress there very strongly.
- The left and right sides of the texture should match with each other to avoid visible seam.
- The color is brighter than the original texture.
A little more about all this in a couple of sentences below.
Regarding the last point: in Homeworld, they draw only smooth gradients at the poles of the sphere and avoid any visible deformation. Vertices are also rare in these areas, which leads to smooth gradients of vertex colors.
See how the geometry is distributed around the pole:
I think it's just awesome. Due to the restriction on the use of detail only in horizontal areas, you also achieve the (hopefully) that the player will never lose orientation in space.
Now let's go to the “real” texture. But before that, let's reduce the level (brightness approx. Lane) from 255 to 128 (Photoshop> Image> Adjustments> Levels).
Brightness level: 255
Brightness level: 128
After generation, you will find a “_ref.TGA” texture, which is a map of the borders used by the program to create a sphere. I think she looks really interesting. I think that the squares are the parts that the program counts one by one.
Face Map:
And this is how it looks in the viewer. In some places, especially at the top of a big mountain, you can see the “leakage” of color. I didn't really play with the “HW2BGBuilder” settings. Perhaps there is room for maneuver and you can improve the result, but in general the result is very good.
It should be noted that the resolution of the original texture noticeably hit the number of polygons as a result.
Last thoughts will be a bit technical. Correct me if I explain incorrectly. There is a sense in what I said “bye” to numbers and went the way of graphics.
- 1 pixel requires 24 bits \ 3 bytes to be stored (RGB, each channel is 8 bits)
- 1 vertex needs position (XYZ) and color (RGB)
This means that if the original texture contains too much contrast and detail everywhere, then there will be more data than when using the texture. But the backgrounds in Homeworld consist mostly of colors and gradients, as well as a small amount of detail. So for these purposes, the optimization is cool.
While I was writing this article, there were discussions about how to reduce the number of polygons in zBrush. Computron posted their results here . Oh and poopinmymouth gave an excellent link which describes the utility for creating spheres with all its parameters.
And now I really thank you for reading.
Source: https://habr.com/ru/post/250467/
All Articles