Differentiation of information systems in the protection of personal data
The subject of this article is the delineation of information systems in the protection of personal data using CyberSafe Firewall. The article will show an example of program deployment and access control of PC groups in a real company.
ISPDN (Personal Data Information System) is an information system that is a collection of personal data contained in a database, as well as information technologies and technical means that allow the processing of such personal data using automation tools or without using such tools.
According to the order of the FSTEC of Russia No. 21 dated February 18, 2013, to ensure 3 levels of personal data protection, apply (clause 12b):
')
firewalls of at least class 3 in the case of urgency of type 2 threats or interaction of an information system with information and telecommunications networks of international information exchange and firewalls of at least class 4 in case of relevance of threats of type 3 and the lack of interaction of information systems with information and telecommunications networks of international information exchange;
This article will discuss the practical use of the CyberSafe Firewall program, which is currently certified for Level 4 security, but will be certified for Level 3 for a month (the certificate is already signed by FSTEC). The corresponding certificate can be found on the CyberSoft company website . A link to the state register of certified software will be given at the end of the article.
The structure of the company, in which we recently introduced the Cybersafe Firewall program, is shown in Fig. one.
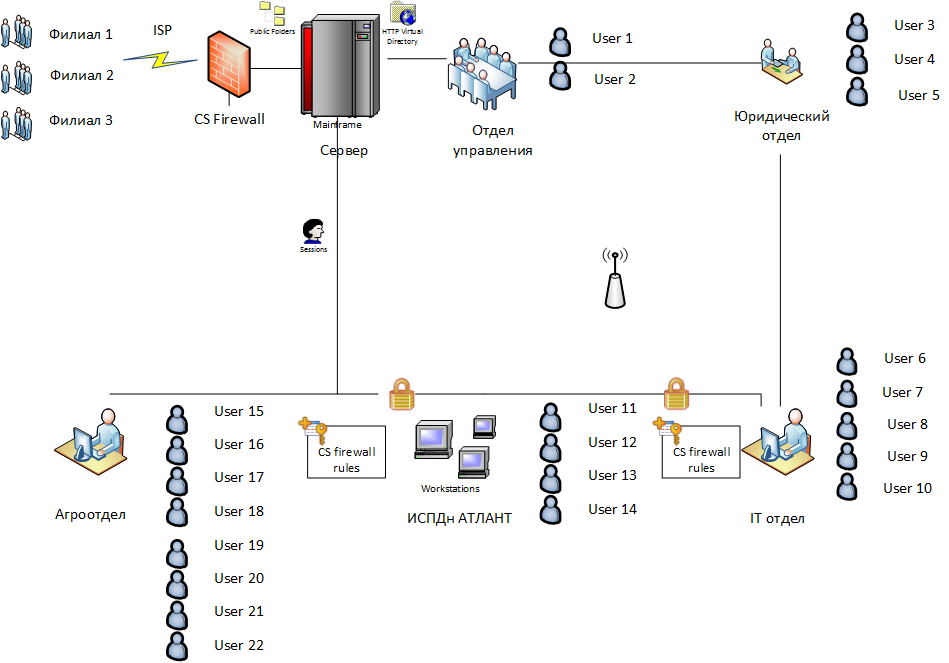
Fig. 1. Company structure
The company in question contains five departments (Agrootdel, IT-department, legal department, department of management, ISPDn “Atlant PD”) and three branches. Communication with remote branches via the Internet. On the gateway, as well as on other computers on the network, the Cybersafe Firewall program is installed.
The rest of this article will show how to deploy the Cybersafe Firewall program on all computers on the network using Active Directory, as well as setting group rules.
Our task is to protect the ISPDN group from the outside world (that is, to close its access to the Internet) and from the rest of the local network. Thus, computers in ISPDn can “communicate” only with each other. It should be noted that this product was specially created for the fastest possible solution of tasks to restrict access to groups of PCs. In other products, the solution of the task takes much more time or is impossible at all (if the system of dynamic distribution of network addresses is used). If you do not take into account the time required to deploy the program using Active Directory, you can restrict the access of one group of computers to another within minutes.
This scheme does not claim originality or novelty. The task was to make the product as convenient as possible for distinguishing several IPs or to limit one IP with confidential information from other sectors of the local network and the Internet in strict accordance with the legislation of the Russian Federation.
First of all, you need to create a transformation file (MST file) in order to be able to deploy the Cyber Safe Firewall to all computers on the network with the same settings. After that, you do not have to manually configure the firewall, for example, create a user to enter the program, specify the IP address of the remote server, its port, etc.
Install the program on the computer that will be used as a remote Cybersafe Firewall server, and which you will use to control the firewalls of the entire network. You can install the program on your own computer, or you can install the program directly to the gateway, which will provide other computers with access to the Internet.
To create a deployment script, follow these steps:
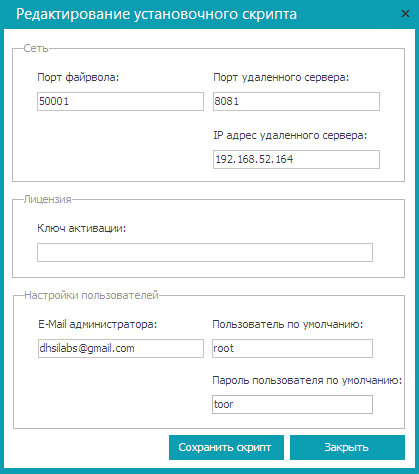
Fig. 2. Creating a deployment script
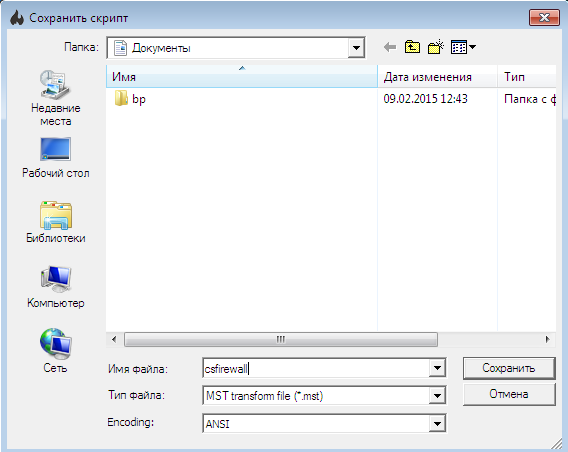
Fig. 3. Saving Deployment Script
The Cyber Safe Remote Server program is described in detail in the Cyber Safe Firewall program guide (http://cybersafesoft.com/eng/products/cybersafe-firewall/).
If your organization does not use Active Directory, you can create a batch file (* .bat) using the Cyber Safe Remote Server program. To deploy the program on all computers on the network, it will suffice to copy it to each computer along with the program installer (MSI file) and run it (batch file). If for each computer you need unique users, then you can manually run the installer of the program (MSI file) on each computer, and you do not need a transformation file or a batch file.
Now consider the process of deploying CyberSafe Firewall using ActiveDirectory. All the illustrations for this section were created in Microsoft Windows Server 2012 R2, but all of the above instructions will work in older versions (Microsoft Windows Server 2003/2008), and the illustrations may differ slightly.
The first step is to create a folder for software deployment. It will contain all MSI packages that you need to deploy (you do not need to create a separate folder for the CyberSafe Firewall program).
Let it be the folder C: \ Install. In this folder, create a subfolder of CSFirewall. You need to place the csfirewall.msi installation file and the csfirewall.mst transformation file that you created in the previous section into it.
The folder C: \ Install must be shared. To do this, right-click the folder and select the Properties command. On the Access tab, click the Share button and grant read and write access to the administrator and read-only access to all other users on the network.
Next, start the gpmc.msc Group Policy Editor. We assume that the CyberSafe Firewall program should be installed on all computers on the network. Therefore, right-click on the domain and select the Create Group Policy Object in this domain and link it (Fig. 4).

Fig. 4. Group Policy Editor
Name the new group policy object CS_Firewall (Figure 5). In the Security Filters section , delete the Authenticated Users group and add computers, groups and users to which the settings of this GPO will be applied (Figure 6). In other words, add the computers on which the program should be installed.
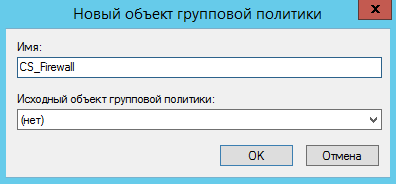
Fig. 5. Creating a new GPO

Fig. 6. Created GPO
Right-click on the newly created GPO (CS Firewall) and select the Edit command. Go to User Configuration, Policies, Software Configuration, Install Programs (Figure 7).
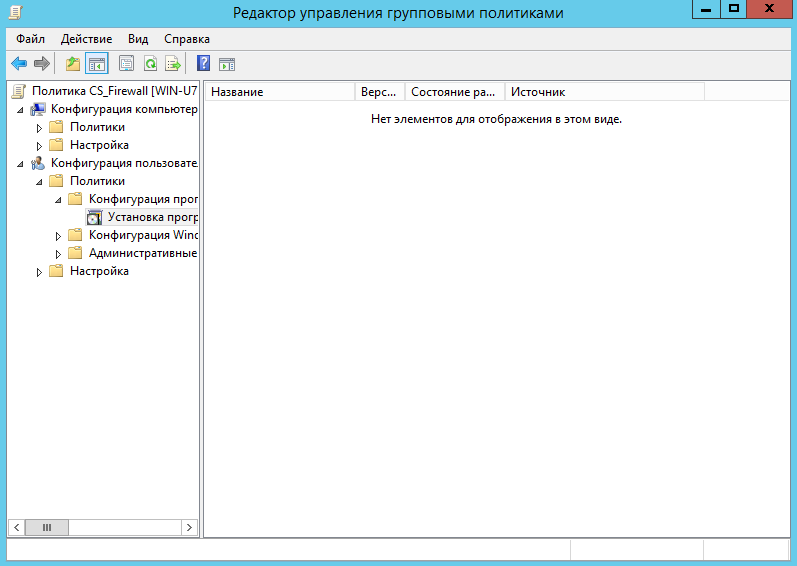
Fig. 7. Section User Configuration, Policies, Software Configuration, Software Installation
Right-click on the Install Software section and select New, Package . In the window that appears, select the path to the MSI file of the program. Note that you need to enter not a local path, but a network one, since users will access the package over the network.
The next step is to choose a deployment method. Since we want to provide a transformation file (mst file created by the Cybersafe Remote Server program), we need to choose a specific deployment method (Figure 8). This will open the deployment package configuration window (Figure 9). Then go to the Modifications tab, click the Add button and select the transformation file (.mst file), fig. ten.

Fig. 8. Choosing a deployment method
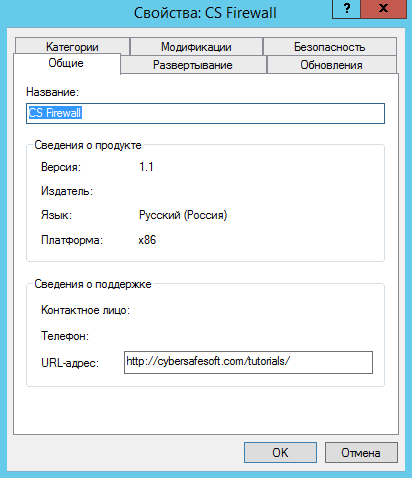
Fig. 9. Configure Deployment Package

Fig. 10. Specify the transformation file
Click OK .
Note After clicking the OK button, the package and the transformation file (the .msi and .mst files, respectively) will be cached. If you need to change the transformation file after creating the package, you will have to create the deployment package again.
This completes the work with the Group Policy Editor. Close all windows, open a command prompt (or at least the Run window by pressing the key combination Win + R) and enter the command:
That's all. The program will be automatically installed on the computers after they are rebooted and before the login window is displayed. The user can not affect anything and nothing can be wrong.
Sometimes the program is not installed automatically. Most often, this problem is observed on workstations running Windows XP. To install it, you need to manually enter the gpupdate / force command on it.
Using the CyberSafe Firewall administration panel, you can set global and group rules for all Cybersafe firewalls installed on your network. Global rules apply to all computers on which the Cybersafe firewall is installed, and group rules determine the behavior of the Cybersafe firewall installed on a specific group of computers.
Before you can set up global and group rules, you need to assign a user as an administrator. This can be done only with the help of the Cyber Safe Remote Server program.
The administrator can control the remote firewall using the administration panel. So, in the Cyber Safe Remote Server program, expand the Users node and select the user you want to make the administrator and turn on the Administrator check box (Fig. 11).
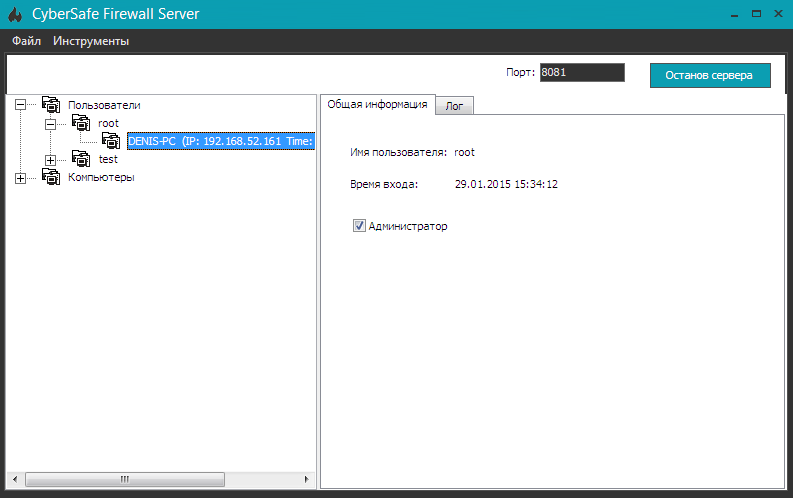
Fig. 11. Assigning a user as administrator
Now we are going to solve our problem. Let me remind you that we need to deny access to ISPD “Atlant” computers access to the Internet and to other computers on the network.
Enter the Cybersafe Firewall program and select the Firewall menu command , Administration Panel .
Create different groups of computers that will correspond to the departments on the network (see Figure 1). To create a group, right-click on the workspace and select Add Group . To add a computer to a group, simply drag its icon onto the group icon. The end result is shown in Fig. 12. Be sure to click the Apply button for the program to “remember” the created groups.
It should be noted that if the IP addresses of the computers in the group are changed, the composition of the created group will not change. Therefore, do not worry about group membership if you use a DHCP server in your organization.
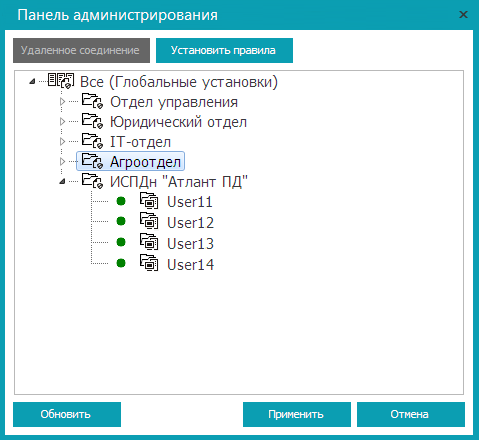
Fig. 12. Created groups
Highlight ISPD "Atlant PD" and click the Set rules button. So you can set group rules. To set global rules, select the All node and click the Set rules button.
So, we set the rules for the group ISPDn "Atlant PD" . In the window that appears, go to the Security Rules section and click the Add button (Fig. 13).

Fig. 13. Safety rules: not set yet.
On the General tab (fig. 14), set the description of the rule - “Prohibition of data exchange with the group <Group name>”.
Set the rule type - Deny packets , select the direction of the packets - For all packets and the protocol - Any .
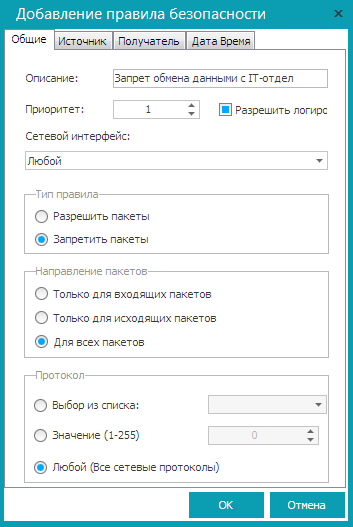
Fig. 14. General tab
As a source, indicate ISPDN “Atlant PD” , and as the recipient - one of the groups of your enterprise, for example, IT-department. Click OK .
What makes this rule? It prohibits the computers of ISPDn "Atlant PD" to transfer any packets to the group IT-department. Even if some computer from the IT department group tries to establish a connection with the computer of the ISPDn group “Atlant PD” , the computers of the ISPDn group “Atlant PD” will still not be able to answer it, since the rule prohibits it.
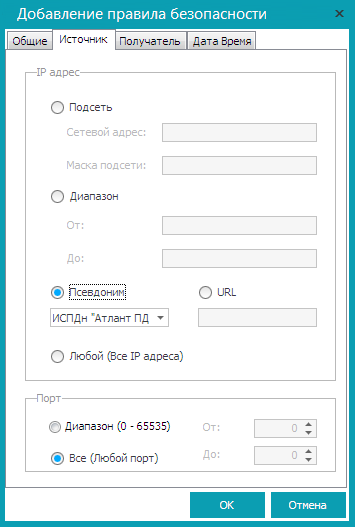
Fig. 15. Source tab

Fig. 16. Recipient tab
Repeat this process for the other groups in your network. You should have a set of rules, shown in Fig. 17

Fig. 17. Created rules for the ISPDn group “Atlant PD”
It remains to deny access to the Internet. For this, it is enough to prohibit any communication with the gateway. To do this, we will create another security rule for ISPD "Atlant PD". On the General tab, set the parameters as follows:
On the Source tab, select the source “Atlant PD” as the source (Fig. 15). On the Recipient tab, set the server’s IP address (internal), for example, 192.168.1.1 (Fig. 18).
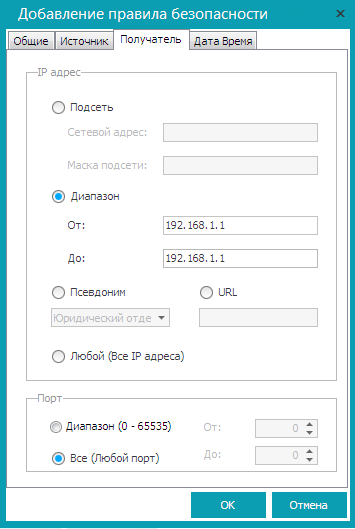
Fig. 18. Prohibition of access to the Internet
Click OK . By default, all rules are disabled. To enable them, right-click on each rule and select Enable . The final version of the rules is shown in Fig. 19. Note the status of the rule - Enabled .
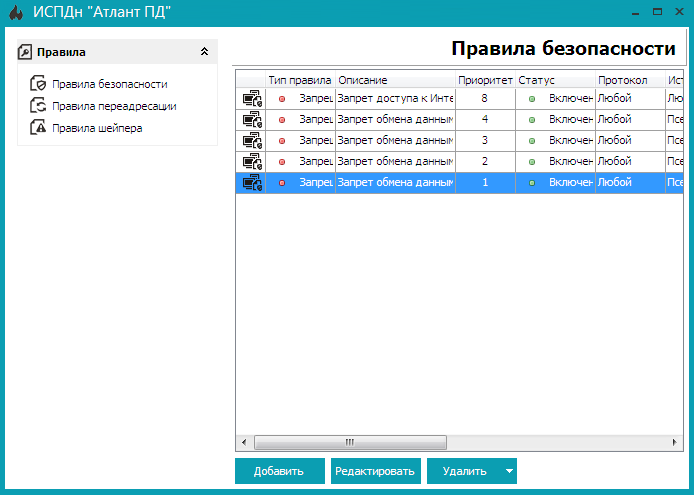
Fig. 19. The final version of the rules
Close the window for editing security rules, and in the Administration Panel window click the Apply button, and then close the window itself.
The task is solved and now the computers of the ISPDN group “Atlant PD” cannot interact with other computers of the local network and they do not have access to the Internet. Through the CyberSafe Firewall software, the personal data information system was completely isolated from the rest of the network.
CyberSoft LLC
CyberSafe Firewall Program
Order FSTEK Russia №21
State register of certified information security tools
Requirements for the protection of personal data information systems
ISPDN (Personal Data Information System) is an information system that is a collection of personal data contained in a database, as well as information technologies and technical means that allow the processing of such personal data using automation tools or without using such tools.
According to the order of the FSTEC of Russia No. 21 dated February 18, 2013, to ensure 3 levels of personal data protection, apply (clause 12b):
')
firewalls of at least class 3 in the case of urgency of type 2 threats or interaction of an information system with information and telecommunications networks of international information exchange and firewalls of at least class 4 in case of relevance of threats of type 3 and the lack of interaction of information systems with information and telecommunications networks of international information exchange;
This article will discuss the practical use of the CyberSafe Firewall program, which is currently certified for Level 4 security, but will be certified for Level 3 for a month (the certificate is already signed by FSTEC). The corresponding certificate can be found on the CyberSoft company website . A link to the state register of certified software will be given at the end of the article.
Formulation of the problem
The structure of the company, in which we recently introduced the Cybersafe Firewall program, is shown in Fig. one.
Fig. 1. Company structure
The company in question contains five departments (Agrootdel, IT-department, legal department, department of management, ISPDn “Atlant PD”) and three branches. Communication with remote branches via the Internet. On the gateway, as well as on other computers on the network, the Cybersafe Firewall program is installed.
The rest of this article will show how to deploy the Cybersafe Firewall program on all computers on the network using Active Directory, as well as setting group rules.
Our task is to protect the ISPDN group from the outside world (that is, to close its access to the Internet) and from the rest of the local network. Thus, computers in ISPDn can “communicate” only with each other. It should be noted that this product was specially created for the fastest possible solution of tasks to restrict access to groups of PCs. In other products, the solution of the task takes much more time or is impossible at all (if the system of dynamic distribution of network addresses is used). If you do not take into account the time required to deploy the program using Active Directory, you can restrict the access of one group of computers to another within minutes.
This scheme does not claim originality or novelty. The task was to make the product as convenient as possible for distinguishing several IPs or to limit one IP with confidential information from other sectors of the local network and the Internet in strict accordance with the legislation of the Russian Federation.
Creating a Transformation File
First of all, you need to create a transformation file (MST file) in order to be able to deploy the Cyber Safe Firewall to all computers on the network with the same settings. After that, you do not have to manually configure the firewall, for example, create a user to enter the program, specify the IP address of the remote server, its port, etc.
Install the program on the computer that will be used as a remote Cybersafe Firewall server, and which you will use to control the firewalls of the entire network. You can install the program on your own computer, or you can install the program directly to the gateway, which will provide other computers with access to the Internet.
To create a deployment script, follow these steps:
- Open the Cyber Safe Remote Server program (included in the Cyber Safe Firewall software package).
- Select the menu command Tools, Installation Script File .
- Fill in the settings that will be entered into the deployment script, namely the port on which the firewall will work (usually 50001), the port of the remote server, the IP address of the remote server, the activation key, the administrator's e-mail, the user and the default password (Fig. 2).
- Click the Save Script button.
- In the file saving window, select the script format — to be deployed using Active Directory, you need to select the format * .mst (Fig. 3)
Fig. 2. Creating a deployment script
Fig. 3. Saving Deployment Script
The Cyber Safe Remote Server program is described in detail in the Cyber Safe Firewall program guide (http://cybersafesoft.com/eng/products/cybersafe-firewall/).
If your organization does not use Active Directory, you can create a batch file (* .bat) using the Cyber Safe Remote Server program. To deploy the program on all computers on the network, it will suffice to copy it to each computer along with the program installer (MSI file) and run it (batch file). If for each computer you need unique users, then you can manually run the installer of the program (MSI file) on each computer, and you do not need a transformation file or a batch file.
Deploying CyberSafe Firewall with Active Directory
Now consider the process of deploying CyberSafe Firewall using ActiveDirectory. All the illustrations for this section were created in Microsoft Windows Server 2012 R2, but all of the above instructions will work in older versions (Microsoft Windows Server 2003/2008), and the illustrations may differ slightly.
The first step is to create a folder for software deployment. It will contain all MSI packages that you need to deploy (you do not need to create a separate folder for the CyberSafe Firewall program).
Let it be the folder C: \ Install. In this folder, create a subfolder of CSFirewall. You need to place the csfirewall.msi installation file and the csfirewall.mst transformation file that you created in the previous section into it.
The folder C: \ Install must be shared. To do this, right-click the folder and select the Properties command. On the Access tab, click the Share button and grant read and write access to the administrator and read-only access to all other users on the network.
Next, start the gpmc.msc Group Policy Editor. We assume that the CyberSafe Firewall program should be installed on all computers on the network. Therefore, right-click on the domain and select the Create Group Policy Object in this domain and link it (Fig. 4).
Fig. 4. Group Policy Editor
Name the new group policy object CS_Firewall (Figure 5). In the Security Filters section , delete the Authenticated Users group and add computers, groups and users to which the settings of this GPO will be applied (Figure 6). In other words, add the computers on which the program should be installed.
Fig. 5. Creating a new GPO
Fig. 6. Created GPO
Right-click on the newly created GPO (CS Firewall) and select the Edit command. Go to User Configuration, Policies, Software Configuration, Install Programs (Figure 7).
Fig. 7. Section User Configuration, Policies, Software Configuration, Software Installation
Right-click on the Install Software section and select New, Package . In the window that appears, select the path to the MSI file of the program. Note that you need to enter not a local path, but a network one, since users will access the package over the network.
The next step is to choose a deployment method. Since we want to provide a transformation file (mst file created by the Cybersafe Remote Server program), we need to choose a specific deployment method (Figure 8). This will open the deployment package configuration window (Figure 9). Then go to the Modifications tab, click the Add button and select the transformation file (.mst file), fig. ten.
Fig. 8. Choosing a deployment method
Fig. 9. Configure Deployment Package
Fig. 10. Specify the transformation file
Click OK .
Note After clicking the OK button, the package and the transformation file (the .msi and .mst files, respectively) will be cached. If you need to change the transformation file after creating the package, you will have to create the deployment package again.
This completes the work with the Group Policy Editor. Close all windows, open a command prompt (or at least the Run window by pressing the key combination Win + R) and enter the command:
gpupdate /force That's all. The program will be automatically installed on the computers after they are rebooted and before the login window is displayed. The user can not affect anything and nothing can be wrong.
Sometimes the program is not installed automatically. Most often, this problem is observed on workstations running Windows XP. To install it, you need to manually enter the gpupdate / force command on it.
Configure Firewall Rules
Using the CyberSafe Firewall administration panel, you can set global and group rules for all Cybersafe firewalls installed on your network. Global rules apply to all computers on which the Cybersafe firewall is installed, and group rules determine the behavior of the Cybersafe firewall installed on a specific group of computers.
Before you can set up global and group rules, you need to assign a user as an administrator. This can be done only with the help of the Cyber Safe Remote Server program.
The administrator can control the remote firewall using the administration panel. So, in the Cyber Safe Remote Server program, expand the Users node and select the user you want to make the administrator and turn on the Administrator check box (Fig. 11).
Fig. 11. Assigning a user as administrator
Now we are going to solve our problem. Let me remind you that we need to deny access to ISPD “Atlant” computers access to the Internet and to other computers on the network.
Enter the Cybersafe Firewall program and select the Firewall menu command , Administration Panel .
Create different groups of computers that will correspond to the departments on the network (see Figure 1). To create a group, right-click on the workspace and select Add Group . To add a computer to a group, simply drag its icon onto the group icon. The end result is shown in Fig. 12. Be sure to click the Apply button for the program to “remember” the created groups.
It should be noted that if the IP addresses of the computers in the group are changed, the composition of the created group will not change. Therefore, do not worry about group membership if you use a DHCP server in your organization.
Fig. 12. Created groups
Highlight ISPD "Atlant PD" and click the Set rules button. So you can set group rules. To set global rules, select the All node and click the Set rules button.
So, we set the rules for the group ISPDn "Atlant PD" . In the window that appears, go to the Security Rules section and click the Add button (Fig. 13).
Fig. 13. Safety rules: not set yet.
On the General tab (fig. 14), set the description of the rule - “Prohibition of data exchange with the group <Group name>”.
Set the rule type - Deny packets , select the direction of the packets - For all packets and the protocol - Any .
Fig. 14. General tab
As a source, indicate ISPDN “Atlant PD” , and as the recipient - one of the groups of your enterprise, for example, IT-department. Click OK .
What makes this rule? It prohibits the computers of ISPDn "Atlant PD" to transfer any packets to the group IT-department. Even if some computer from the IT department group tries to establish a connection with the computer of the ISPDn group “Atlant PD” , the computers of the ISPDn group “Atlant PD” will still not be able to answer it, since the rule prohibits it.
Fig. 15. Source tab
Fig. 16. Recipient tab
Repeat this process for the other groups in your network. You should have a set of rules, shown in Fig. 17
Fig. 17. Created rules for the ISPDn group “Atlant PD”
It remains to deny access to the Internet. For this, it is enough to prohibit any communication with the gateway. To do this, we will create another security rule for ISPD "Atlant PD". On the General tab, set the parameters as follows:
- Description - Prohibition of access to the Internet
- Rule Type - Forbid Packages
- Package direction - For all packages
- Protocol - Any
On the Source tab, select the source “Atlant PD” as the source (Fig. 15). On the Recipient tab, set the server’s IP address (internal), for example, 192.168.1.1 (Fig. 18).
Fig. 18. Prohibition of access to the Internet
Click OK . By default, all rules are disabled. To enable them, right-click on each rule and select Enable . The final version of the rules is shown in Fig. 19. Note the status of the rule - Enabled .
Fig. 19. The final version of the rules
Close the window for editing security rules, and in the Administration Panel window click the Apply button, and then close the window itself.
Conclusion
The task is solved and now the computers of the ISPDN group “Atlant PD” cannot interact with other computers of the local network and they do not have access to the Internet. Through the CyberSafe Firewall software, the personal data information system was completely isolated from the rest of the network.
Links
CyberSoft LLC
CyberSafe Firewall Program
Order FSTEK Russia №21
State register of certified information security tools
Source: https://habr.com/ru/post/250127/
All Articles