Automate and speed up the process of setting up cloud servers with Ansible. Part 2: output, debug, and reuse the playbook
In the previous article, we began exploring Ansible, a popular tool for automating the configuration and deployment of IT infrastructure. Ansible was successfully installed in InfoboxCloud , described the principles of operation, the basic setting. At the end of the article we showed how to quickly install nginx on multiple servers.

In this article we will continue to study Ansible: analyze the output of the playbook, learn how to debug them and share them for easy reuse.
In the last article we got a conclusion from the performance of our first playbook. Let's break it down.

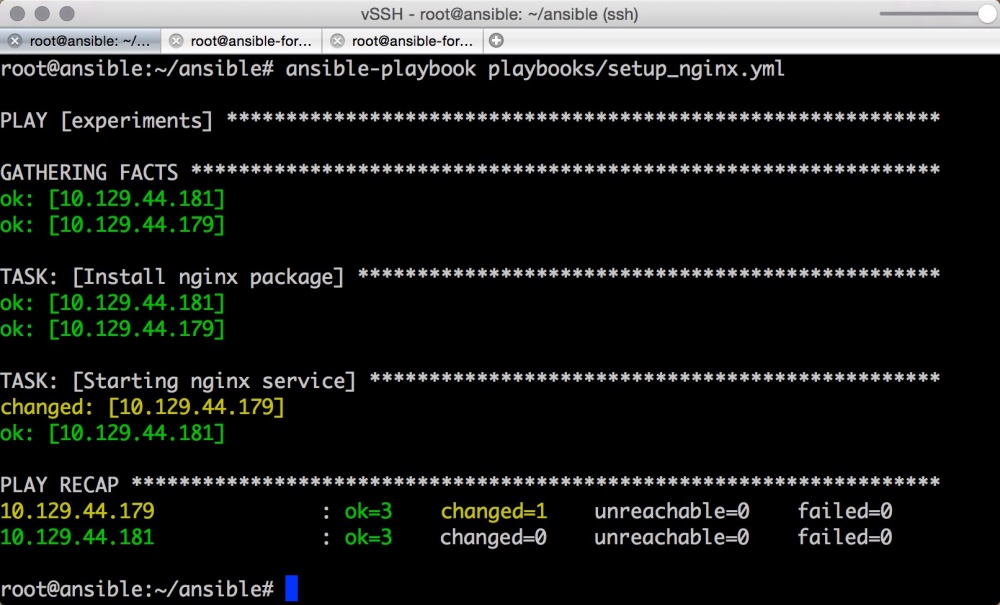
Gathering facts is the first default task in any playbook. The task collects useful server metadata in the form of variables that can be used in the playbook in the future. For example, such variables can be ip-address, OS architecture and host name.
You can view these variables using the command:
or write it to a file
Below in the output are the TASK tasks, according to the progress of the playbook: installing nginx, starting the service.
')
Let's run the playbook again.

Compared to the previous output, the Install nginx package task is completed without modification. The state has already been reached: nginx is installed. The task of starting the nginx service in both cases is completed without changes, since the nginx service starts itself immediately after installation. If you manually stop the nginx service on one of the servers, it will rise after the start of the playbook.
As we can see, one of the key properties of Ansible systems is fulfilled: Idempotency (an operation that, if applied to any value several times, always results in the same value as in a single application). Most configuration management systems follow this principle and apply it on infrastructure.
Let's look at the PLAY RECAP section below in the output. The changed parameter shows how many times the status of the server has changed in the tasks. ok is the number of tasks to be executed along with Gathering facts .
Understanding what happened during the execution of the playbook can be very useful for correcting errors.
There are 3 levels of debug output (Verbose).
-v . Display basic information.

-vv . More detailed output.

-vvv . The most detailed conclusion.
This output specifies the SSH – commands that Ansible uses to create temporary files on the remote host to run the script remotely.

You can output any variables ansible for debugging. To do this, add the following section to the playbook:
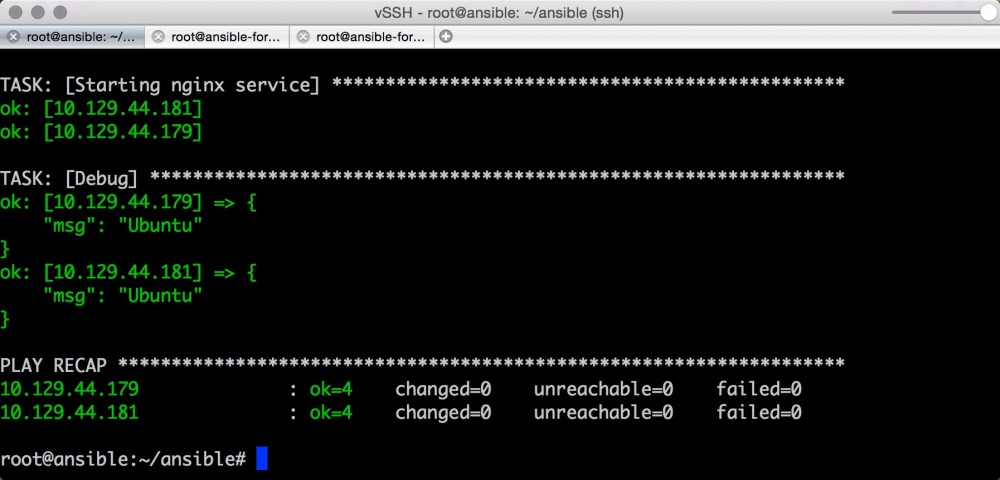
When you start the playbook, you will see the output of this variable. Each Ansible variable begins with the ansible_ prefix.
Another useful command is the opportunity to look at all the tasks running in the playbook. It is especially useful when there are several playbooks running other playbooks.
You can perform only a specific task from the playbook:
If a task or set of tasks is often used by you, it makes sense to arrange it as a separate file that can be used in other playbooks.
Create a folder for reusable tasks:
Let's create an OS update task in the file ~ / ansible / playbooks / tasks / os_update.yml :
Now we can enable the OS update section in ~ / ansible / playbooks / setup_nginx.yml :
Now before installing nginx Ubuntu on the serviced servers from Inventory will be updated.
It is worth setting up the nginx installation (~ / ansible / playbooks / tasks / pkg_nginx_install.yml ) to a separate task, if you often install nginx.
As a result, our playbook will become quite simple:
You can write a task to delete nginx (~ / ansible / tasks / pkg_nginx_remove.yml ):
and call it (~ / ansible / playbooks / remove_nginx.yml ):
where through -i we specify the path to the inventory file, which allows us to run the ansible-playbook not only from the ansible folder.
In the next article we will talk about variables and Ansible conditions. Finally, our playbook will work correctly on different operating systems.
The book " Learning Ansible " and of course the official documentation helped a lot in writing the article.
It is convenient to do all experiments with Ansible in InfoboxCloud , since there is an opportunity for each virtual server to set the exact amount of resources needed for the task (CPU / Ram / disk independently of each other) or to use autoscaling.
If you find an error in the article, the author will gladly correct it. Please write in the LAN or in the mail about it. There you can also ask questions about Ansible for coverage in subsequent articles.
Part 3: Variables and the inventory file
Part 4: working with modules
Part 5: local_action, conditions, cycles and roles
Successful work!
In this article we will continue to study Ansible: analyze the output of the playbook, learn how to debug them and share them for easy reuse.
Configuration Management
Parsing our first playbook
In the last article we got a conclusion from the performance of our first playbook. Let's break it down.
Gathering facts is the first default task in any playbook. The task collects useful server metadata in the form of variables that can be used in the playbook in the future. For example, such variables can be ip-address, OS architecture and host name.
You can view these variables using the command:
ansible -m setup experiments or write it to a file
ansible -m setup experiments >> facts Below in the output are the TASK tasks, according to the progress of the playbook: installing nginx, starting the service.
')
Let's run the playbook again.
ansible-playbook playbooks/setup_nginx.yml Compared to the previous output, the Install nginx package task is completed without modification. The state has already been reached: nginx is installed. The task of starting the nginx service in both cases is completed without changes, since the nginx service starts itself immediately after installation. If you manually stop the nginx service on one of the servers, it will rise after the start of the playbook.
As we can see, one of the key properties of Ansible systems is fulfilled: Idempotency (an operation that, if applied to any value several times, always results in the same value as in a single application). Most configuration management systems follow this principle and apply it on infrastructure.
Let's look at the PLAY RECAP section below in the output. The changed parameter shows how many times the status of the server has changed in the tasks. ok is the number of tasks to be executed along with Gathering facts .
Debug playbook
Understanding what happened during the execution of the playbook can be very useful for correcting errors.
There are 3 levels of debug output (Verbose).
-v . Display basic information.
ansible-playbook playbooks/setup_nginx.yml -v -vv . More detailed output.
ansible-playbook playbooks/setup_nginx.yml -vv -vvv . The most detailed conclusion.
This output specifies the SSH – commands that Ansible uses to create temporary files on the remote host to run the script remotely.
ansible-playbook playbooks/setup_nginx.yml -vvv You can output any variables ansible for debugging. To do this, add the following section to the playbook:
- name: Debug debug: msg={{ ansible_distribution }} When you start the playbook, you will see the output of this variable. Each Ansible variable begins with the ansible_ prefix.
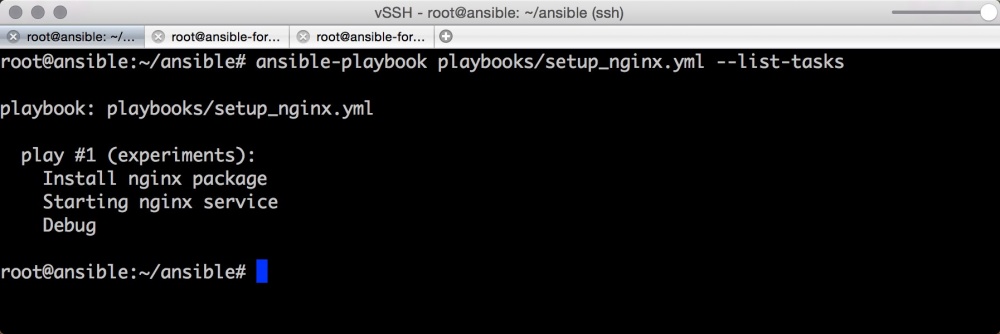
Another useful command is the opportunity to look at all the tasks running in the playbook. It is especially useful when there are several playbooks running other playbooks.
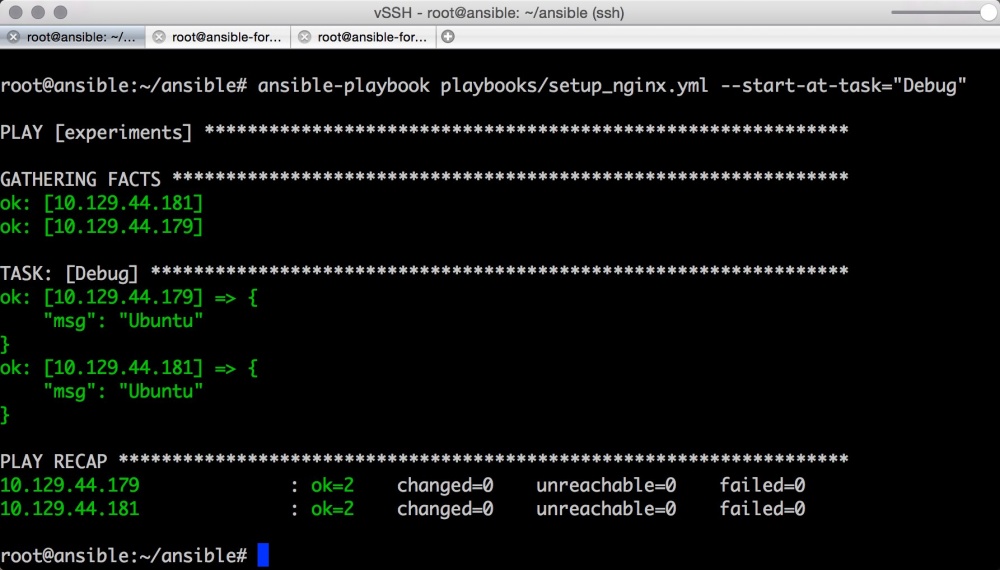
ansible-playbook playbooks/setup_nginx.yml --list-tasks You can perform only a specific task from the playbook:
ansible-playbook playbooks/setup_nginx.yml --start-at-task="Debug" Reuse in Playbook
If a task or set of tasks is often used by you, it makes sense to arrange it as a separate file that can be used in other playbooks.
Create a folder for reusable tasks:
mkdir ~/ansible/playbooks/tasks Let's create an OS update task in the file ~ / ansible / playbooks / tasks / os_update.yml :
--- #Update and upgrade apt-based linux - name: Update and upgrade apt-based Linux apt: update-cache=yes state=latest sudo: yes Now we can enable the OS update section in ~ / ansible / playbooks / setup_nginx.yml :
--- - hosts: experiments remote_user: root tasks: - include: tasks/os_update.yml - name: Install nginx package apt: name=nginx update_cache=yes sudo: yes - name: Starting nginx service service: name=nginx state=started sudo: yes Now before installing nginx Ubuntu on the serviced servers from Inventory will be updated.
It is worth setting up the nginx installation (~ / ansible / playbooks / tasks / pkg_nginx_install.yml ) to a separate task, if you often install nginx.
--- #Install NGINX package - name: Install nginx package apt: name=nginx update_cache=yes sudo: yes - name: Starting nginx service service: name=nginx state=started sudo: yes As a result, our playbook will become quite simple:
--- - hosts: experiments remote_user: root tasks: - include: tasks/os_update.yml - include: tasks/pkg_nginx_install.yml You can write a task to delete nginx (~ / ansible / tasks / pkg_nginx_remove.yml ):
--- #Remove NGINX package - name: Stopping nginx service service: name=nginx state=stopped sudo: yes - name: Remove nginx package apt: name=nginx state=removed sudo: yes and call it (~ / ansible / playbooks / remove_nginx.yml ):
--- - hosts: experiments remote_user: root tasks: - include: tasks/pkg_nginx_remove.yml ansible-playbook ~/ansible/playbooks/remove_nginx.yml -i ~/ansible/inventory where through -i we specify the path to the inventory file, which allows us to run the ansible-playbook not only from the ansible folder.
In the next article we will talk about variables and Ansible conditions. Finally, our playbook will work correctly on different operating systems.
Conclusion
The book " Learning Ansible " and of course the official documentation helped a lot in writing the article.
It is convenient to do all experiments with Ansible in InfoboxCloud , since there is an opportunity for each virtual server to set the exact amount of resources needed for the task (CPU / Ram / disk independently of each other) or to use autoscaling.
If you find an error in the article, the author will gladly correct it. Please write in the LAN or in the mail about it. There you can also ask questions about Ansible for coverage in subsequent articles.
Part 3: Variables and the inventory file
Part 4: working with modules
Part 5: local_action, conditions, cycles and roles
Successful work!
Source: https://habr.com/ru/post/250115/
All Articles