A little more reverse engineering of UEFI PEI modules on another useful example
And hello again, dear habrachititeli.
As part of the struggle for the possibility of modifying UEFI on HP laptops, we had to break off another protection, this time more modern. Apparently, HP’s firmware development department guessed that the previous protection was not so hot , and therefore they decided to improve it radically, so the DXE-volume protection method from the previous article stopped working, and I again needed to arm myself with a disassembler and develop a TE to PE converter and answer the same questions: where is the digital signature, who exactly is checking it and how to make it so that the check always ends in success.
If you are interested in the answers and description of the process of their search - I ask for cat.
Protection, about the burglary of which will be discussed in this text, was introduced by HP about a year and a half ago, and (as far as I know) was still considered reliable. HP laptop users with UEFI protected by it periodically visited the bios-mods.com forum hoping for help in getting rid of the white lists of equipment or opening the hidden UEFI Setup settings, but with the same periodicity they received the answer - protection is resistant and nothing is done. In the early summer of 2014, one of the administrators of bios-mods got tired of this and decided to take the initiative on hacking into his own hands. The process has begun, but extremely slowly, and the result of the public has not yet appeared, and repairmen really need it, who would be happy to install other processors / video cards / modems on these laptops, but they cannot, because for their proper operation, a modification of the DXE drivers is needed, and after it the firmware does not start. As a result, I got sick of this nonsense and I decided to break off the protection myself, since, as it turned out, HP couldn’t think of anything more complicated than the previous protection.
')
If you do not understand what is happening here, read the previous article , there is a brief introduction to the course of the case and a list of tools used.
There is an HP laptop, which responds to any change in the DXE volume by first rebooting almost immediately after switching on, and then flows into an endless cycle, blinking lights on the keyboard. There is also a dump of its firmware and kind repair guys ready to take the time to check the next modified firmware for performance.
The ultimate goal - the firmware should work after modifications.
Open the UEFITool firmware again and look at the Messages panel. Thanks to the experience gained in the last article, the utility now knows how to display non-standard data in the tree (that is, it is not necessary now to unpack the entire DXE volume to get to them) and stores it when reassembling a volume:

Like last time, the suspicious data is at the very end of the DXE volume, but now you can get it directly from the tree, which we do, we get the file key.bin , which we then open in the Hex editor:

And again an unknown piece of data with a size of 100h (similar to the public key in RSA2048) appears before it, but now it has a signature - $ HSS . As I already wrote, data of this kind can be found either by signature or by offset within the volume, or by absolute address (taking into account that the last byte of the SPI-flash chip turns out to be at the start at FFFFFFFFh). First check the first option using the UEFITool text search:
We find 4 occurrences of the required string, one of which we have already looked at (the one that is inside Non-UEFI data), we need to deal with the rest. The first is in the DXE driver called BiosImageInterface, but he himself is in the volume that is intended to check, so that the presence of the main test there is very unlikely. If we do not find it in other places, it will be necessary to return to it.
The last two entries indicate two copies of the same PEI-module, the first of which is in the packed copy of the PEI-volume (it can be used to automatically recover the damaged PEI-volume), and the other - in the "real" PEI-volume. That's our suspect, everything indicates that it is he who checks the integrity, and you need to get its contents to the hss.bin file for further analysis.
Last time at this place we loaded the resulting file into IDA and began to analyze it, but in this case only the holders of IDA 6.7 and above can do this. It was in 6.7 that the native support for the Terse Executable format appeared , in which our PEI module is stored. This format was developed by the authors of the UEFI PI specification to save space in the processor cache, in fact it is PE32 with a heavily truncated header, which was left only for the vital ones needed for the field image to load properly. Moreover, in the PEI phase, most manufacturers use an extremely primitive executable file loader that does not support relocations, and therefore its base address must match the physical address. All this is wonderful, of course, but we need not an incomprehensible TE, but an understandable PE32, so we had to write a TE to PE converter that tries to reconstruct the header of the PE file from the data that we found in the TE file. The utility was written in half an hour and for a specific file, so I cannot vouch for the correctness of converting any pre-defined TE-image.
Now we have a pe.bin file and we can open it in IDA and conduct analysis. This time, let's go a little different way and start not from the entry point, but from the place where the $ HSS signature is encountered. Go to Search -> Text ... (or press Alt + T ), enter $ HSS, set the Find all occurences checkbox and ... find nothing. We think a little and we understand that we have a LittleEndian-machine, and $ HSS will look like SSH $ or 53534824h when loaded into the register. We are looking for this option and voila, one entry:

Go to double click on the message and get here:

And here is a check that 53534824h lies at the address from EBX, and if it really lies there - EBX + 20h is saved to the stack, i.e. just the address of the first byte of the key, and if it does not lie, 10h is added to EBX and checked again. It is also seen that the value FFF3DF00h, which is the physical address of the first key byte, can fall into the same variable from another branch of the code. You can check this, for which it suffices to subtract FFF3DF00h from 100000000h and retreat received C2100h bytes from the end of the file - as expected, we are exactly at the beginning of the block with the key. Whether the key is found by signature or absolute address depends on the BootMode. If the current mode is 20h, i.e. BOOT_IN_RECOVERY_MODE - the key will be found at the absolute address, otherwise - by the signature.
Look further:

And then there is a function call from some HP-specific PPI , which performs the check. If this function returns 0 (i.e. EFI_SUCCESS), then we move down to return from this screen, if the check fails, everything depends on the BootMode again, in the case of BOOT_IN_RECOVERY_MODE, the function is called from another PPI (which I suspect will try to recover the DXE volume from the Recovery image). Then, independently of BootMode, another function is called from the second PPI, after which 6 and 0CF9h are put on the stack and the short function is called, in our case it looks like this:
If you suddenly did not recognize it in make-up, this is the most common method of hard reset via IO-ports. And if the reset suddenly did not happen, an infinite loop will happen that immediately follows it.
Well, with the reasons for the reset figured out, now we need to get around it, and so, to return EFI_SUCCESS to EAX from the function in which all this happens. In my opinion, the easiest way to achieve the desired is to change the first test eax, eax to xor eax, eax , as a result 0 will appear in EAX, and JGE will work 100% of the time, and the reset will become a dead code.
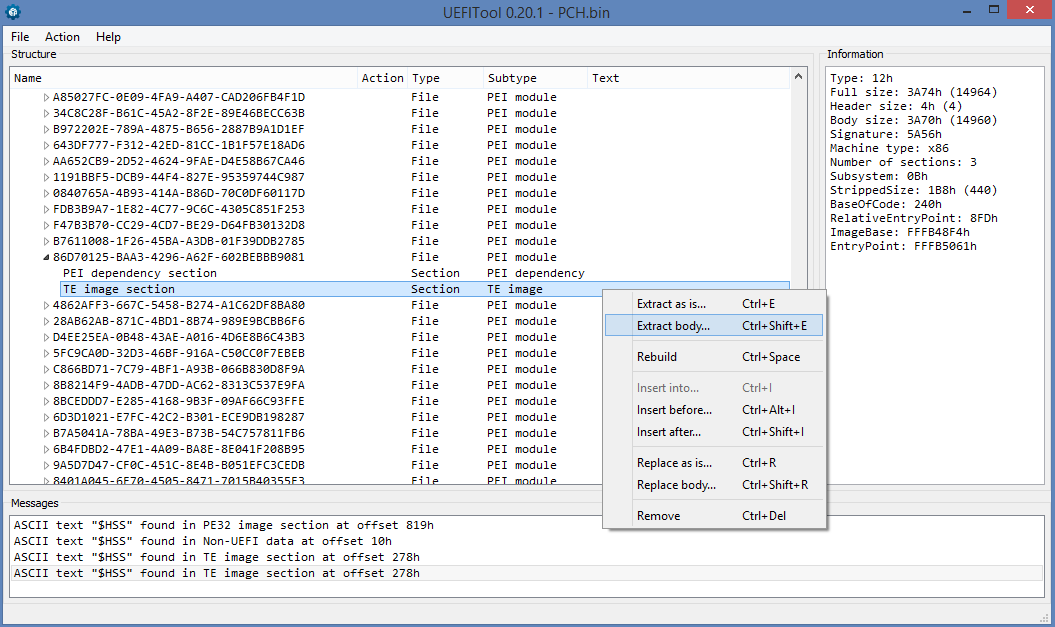
UPD by numerous requests from the LAN : to quickly find a place for a patch, you need to get from the file with GUID 86D70125-BAA3-4296-A62F-602BEBBB9081 an executable section (it can be both TE and PE, I met both options), open it in the Hex editor, find the $ HSS line and find the first occurrence of the pattern 85 C0 after $ HSS - with a very high probability this is the place for the patch. If not, you will have to look for it yourself.
Said and done, patch 85 C0 -> 31 C0, collect the firmware (do not forget that we have two copies of this file and we need to replace both) and send it to our repairmen for testing. After 5 minutes, a message arrives: “it starts and runs, thank you very much.” Now you can sit down and write an article about cool vendor defenses, which are held for a year and a half, and then removed in an hour and a half.
Thank you for your attention, successful firmware and modifications.
As part of the struggle for the possibility of modifying UEFI on HP laptops, we had to break off another protection, this time more modern. Apparently, HP’s firmware development department guessed that the previous protection was not so hot , and therefore they decided to improve it radically, so the DXE-volume protection method from the previous article stopped working, and I again needed to arm myself with a disassembler and develop a TE to PE converter and answer the same questions: where is the digital signature, who exactly is checking it and how to make it so that the check always ends in success.
If you are interested in the answers and description of the process of their search - I ask for cat.
Brief background
Protection, about the burglary of which will be discussed in this text, was introduced by HP about a year and a half ago, and (as far as I know) was still considered reliable. HP laptop users with UEFI protected by it periodically visited the bios-mods.com forum hoping for help in getting rid of the white lists of equipment or opening the hidden UEFI Setup settings, but with the same periodicity they received the answer - protection is resistant and nothing is done. In the early summer of 2014, one of the administrators of bios-mods got tired of this and decided to take the initiative on hacking into his own hands. The process has begun, but extremely slowly, and the result of the public has not yet appeared, and repairmen really need it, who would be happy to install other processors / video cards / modems on these laptops, but they cannot, because for their proper operation, a modification of the DXE drivers is needed, and after it the firmware does not start. As a result, I got sick of this nonsense and I decided to break off the protection myself, since, as it turned out, HP couldn’t think of anything more complicated than the previous protection.
')
Likbeza will not
If you do not understand what is happening here, read the previous article , there is a brief introduction to the course of the case and a list of tools used.
What is given and what is required to find
There is an HP laptop, which responds to any change in the DXE volume by first rebooting almost immediately after switching on, and then flows into an endless cycle, blinking lights on the keyboard. There is also a dump of its firmware and kind repair guys ready to take the time to check the next modified firmware for performance.
The ultimate goal - the firmware should work after modifications.
Search
Open the UEFITool firmware again and look at the Messages panel. Thanks to the experience gained in the last article, the utility now knows how to display non-standard data in the tree (that is, it is not necessary now to unpack the entire DXE volume to get to them) and stores it when reassembling a volume:
Like last time, the suspicious data is at the very end of the DXE volume, but now you can get it directly from the tree, which we do, we get the file key.bin , which we then open in the Hex editor:
And again an unknown piece of data with a size of 100h (similar to the public key in RSA2048) appears before it, but now it has a signature - $ HSS . As I already wrote, data of this kind can be found either by signature or by offset within the volume, or by absolute address (taking into account that the last byte of the SPI-flash chip turns out to be at the start at FFFFFFFFh). First check the first option using the UEFITool text search:
We find 4 occurrences of the required string, one of which we have already looked at (the one that is inside Non-UEFI data), we need to deal with the rest. The first is in the DXE driver called BiosImageInterface, but he himself is in the volume that is intended to check, so that the presence of the main test there is very unlikely. If we do not find it in other places, it will be necessary to return to it.
The last two entries indicate two copies of the same PEI-module, the first of which is in the packed copy of the PEI-volume (it can be used to automatically recover the damaged PEI-volume), and the other - in the "real" PEI-volume. That's our suspect, everything indicates that it is he who checks the integrity, and you need to get its contents to the hss.bin file for further analysis.
Last time at this place we loaded the resulting file into IDA and began to analyze it, but in this case only the holders of IDA 6.7 and above can do this. It was in 6.7 that the native support for the Terse Executable format appeared , in which our PEI module is stored. This format was developed by the authors of the UEFI PI specification to save space in the processor cache, in fact it is PE32 with a heavily truncated header, which was left only for the vital ones needed for the field image to load properly. Moreover, in the PEI phase, most manufacturers use an extremely primitive executable file loader that does not support relocations, and therefore its base address must match the physical address. All this is wonderful, of course, but we need not an incomprehensible TE, but an understandable PE32, so we had to write a TE to PE converter that tries to reconstruct the header of the PE file from the data that we found in the TE file. The utility was written in half an hour and for a specific file, so I cannot vouch for the correctness of converting any pre-defined TE-image.
Now we have a pe.bin file and we can open it in IDA and conduct analysis. This time, let's go a little different way and start not from the entry point, but from the place where the $ HSS signature is encountered. Go to Search -> Text ... (or press Alt + T ), enter $ HSS, set the Find all occurences checkbox and ... find nothing. We think a little and we understand that we have a LittleEndian-machine, and $ HSS will look like SSH $ or 53534824h when loaded into the register. We are looking for this option and voila, one entry:
Go to double click on the message and get here:
And here is a check that 53534824h lies at the address from EBX, and if it really lies there - EBX + 20h is saved to the stack, i.e. just the address of the first byte of the key, and if it does not lie, 10h is added to EBX and checked again. It is also seen that the value FFF3DF00h, which is the physical address of the first key byte, can fall into the same variable from another branch of the code. You can check this, for which it suffices to subtract FFF3DF00h from 100000000h and retreat received C2100h bytes from the end of the file - as expected, we are exactly at the beginning of the block with the key. Whether the key is found by signature or absolute address depends on the BootMode. If the current mode is 20h, i.e. BOOT_IN_RECOVERY_MODE - the key will be found at the absolute address, otherwise - by the signature.
Look further:
And then there is a function call from some HP-specific PPI , which performs the check. If this function returns 0 (i.e. EFI_SUCCESS), then we move down to return from this screen, if the check fails, everything depends on the BootMode again, in the case of BOOT_IN_RECOVERY_MODE, the function is called from another PPI (which I suspect will try to recover the DXE volume from the Recovery image). Then, independently of BootMode, another function is called from the second PPI, after which 6 and 0CF9h are put on the stack and the short function is called, in our case it looks like this:
mov al, 6 mov dx, 0CF9h out dx, al If you suddenly did not recognize it in make-up, this is the most common method of hard reset via IO-ports. And if the reset suddenly did not happen, an infinite loop will happen that immediately follows it.
Well, with the reasons for the reset figured out, now we need to get around it, and so, to return EFI_SUCCESS to EAX from the function in which all this happens. In my opinion, the easiest way to achieve the desired is to change the first test eax, eax to xor eax, eax , as a result 0 will appear in EAX, and JGE will work 100% of the time, and the reset will become a dead code.
UPD by numerous requests from the LAN : to quickly find a place for a patch, you need to get from the file with GUID 86D70125-BAA3-4296-A62F-602BEBBB9081 an executable section (it can be both TE and PE, I met both options), open it in the Hex editor, find the $ HSS line and find the first occurrence of the pattern 85 C0 after $ HSS - with a very high probability this is the place for the patch. If not, you will have to look for it yourself.
Testing and conclusion
Said and done, patch 85 C0 -> 31 C0, collect the firmware (do not forget that we have two copies of this file and we need to replace both) and send it to our repairmen for testing. After 5 minutes, a message arrives: “it starts and runs, thank you very much.” Now you can sit down and write an article about cool vendor defenses, which are held for a year and a half, and then removed in an hour and a half.
Thank you for your attention, successful firmware and modifications.
PS As a bonus, a fig photo of a running laptop with a replaced Boot Logo, stored in a DXE volume. Indicates that protection is really removed.
Source: https://habr.com/ru/post/249939/
All Articles