Making custom firmware for Grandstream phones
Our company finally decided to switch to ip telephony, and we purchased ip phones from Grandstream of various models, among them were the GXP2130 and GXP2160 models. All anything, but the BLF keys on these phones, in the case of a free line, glow terribly bright green, very annoying. Below I will tell you how I solved this problem.

First, I ran the phone firmware through binwalk and looked in the hex editor. The result was upset, the firmware was encrypted, so you have to go from the other side, try to get root access on the phone itself. For almost two weeks, I searched for a field filtering vulnerability in the web interface. In a couple of places I found the opportunity to transfer my parameters to the syslogd and udhcpd commands. In the case of a syslog, it did not provide interest, but in the case of udhcpd, it was possible to specify the -s parameter, which referred to the script that was run to configure the interface. Here it was possible to execute any command, but it was impossible for it to specify its parameters, it was always executed with the defconfig parameter. With the help of this vulnerability, nothing has been done so well. Therefore, the search for vulnerabilities continued. And I found it! I will not tell exactly where, because Producers can quickly cover it, and in the future it may still be useful, well, and root access can be obtained without it.
Further, I suggested that the manufacturer probably should have left the possibility of getting a root for himself, for example, for debugging, and it would be useful to look for it. I analyzed all the scripts executed via the web, I did not find anything similar there. Then I started analyzing the shell, which is available via ssh.
When we connect to the phone via ssh, we get into the gs_config shell, from which there is a small list of commands processed by the shell itself. I suggested that there might be service teams that are not described in the help. For this, I launched
Without hesitation, we ship gs_config to IDA and look for the gssu line there

Next, go to the function XFER sub_94BC
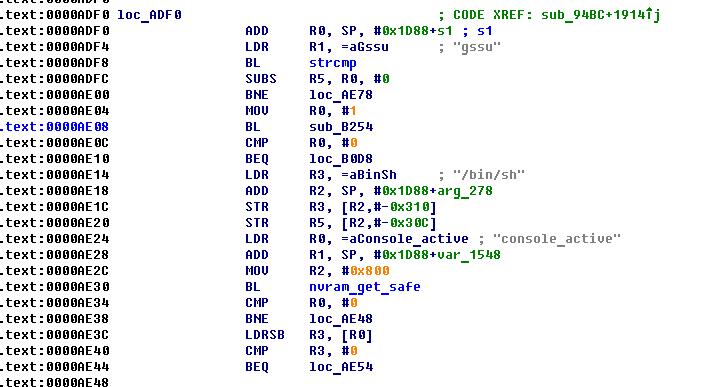
we see that after entering the gssu command, the sub_B254 function is called, and depending on its result, the / bin / sh command is executed or not
Go to this function and press F5, to switch from assembler to C ++ pseudocode
Having run through the eyes on the code, it is clear that first the generation of the challenge is taking place, and the received challenge is put into the variable s
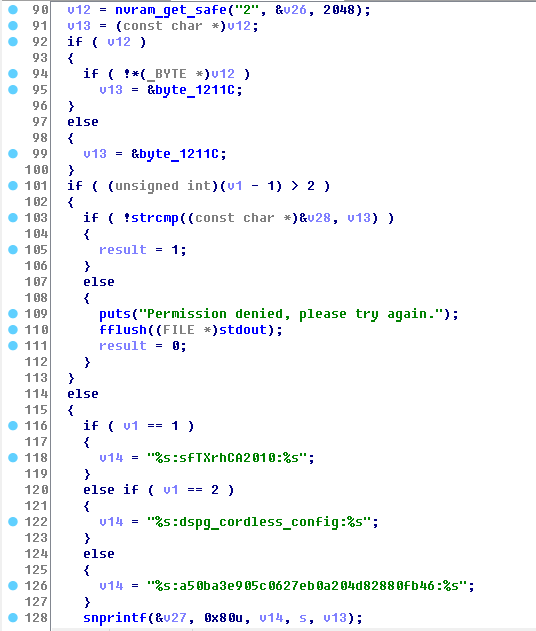
This line pulls the admin password from nvram, by which you log in to the web and ssh
Next, it is put in the variable v13.
Then the contents of the variable v1, which is the parameter of our function sub_B254, are analyzed. Its value indicates which command we check for Response, there should be three such commands, but I found only two: gssu and console
In the case of gssu, we get the string % s: sfTXrhCA2010:% s in the variable v14
Next, through sprintf we get the final line of the form Callenge: sfTXrhCA2010: Password and put it in the variable v27
Then we count from this line md5.
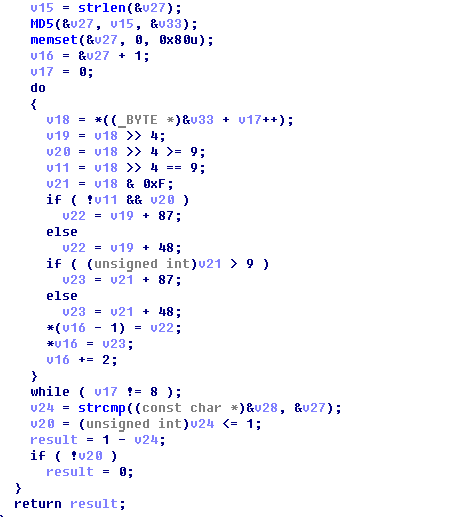
Next comes the do ... while loop for 8 iterations in which we pass half of the md5 sum, and translate it into a hex line. Then compare it with the entered Response.
The algorithm is quite simple, here is the implementation of keygen on python:
')
Well, we learned to get permanently root on the phone, now it's time to study how it unpacks the firmware.
A quick inspection of the executable scripts on the phone, we find the script / sbin / provision, which is actually responsible for flashing the phone.
It shows that the firmware is unpacked into separate files by the command prov_pipe_unpack , and further, the individual sections of the firmware are decrypted by the command prov_pipedec. In fact, this is the same binary. To find out all its features, I also threw it at IDA, where I found the teams of interest to us, these are:
Now about these commands in more detail:
prov_unpack - unpacks the firmware into separate files, runs like this:
prov_dec - decrypts individual firmware files
The second parameter is the file that is decrypted.
The third parameter - according to the manufacturer’s intention is the corresponding section in the flash of the phone, the program compares the version from the file and the version already flashed, and if they are equal, it does nothing. We specify the encrypted file of the firmware itself as the second parameter, then everything happens smoothly. At the output we get the decrypted file gxp1400prog.bin
prov_enc - encrypts the image back, but it needs an image in a special format.
About the image format more:
The image consists of a header and the actual data itself, for example, the squashfs file system.
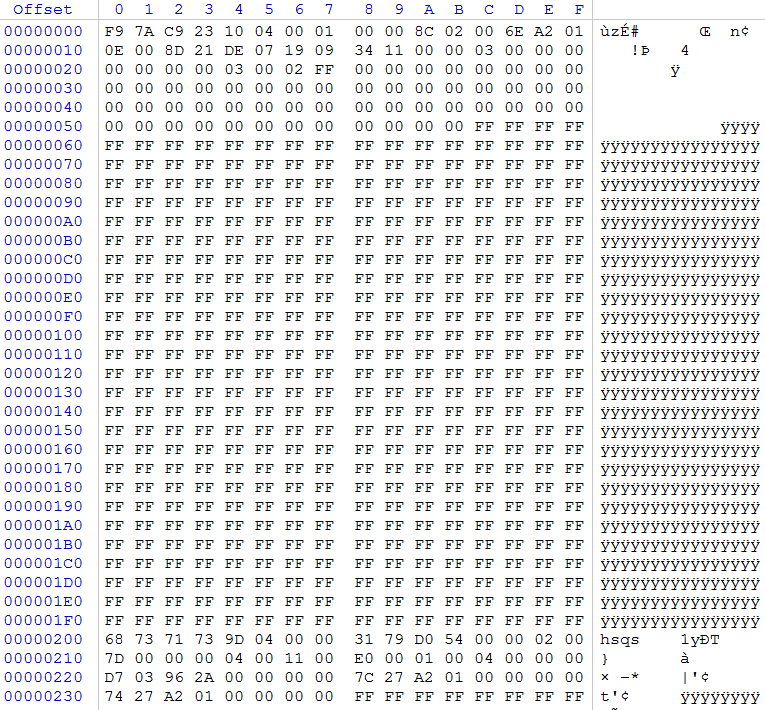
Below is an example of the image header gxp2130prog.bin
The header occupies the first 0x5C bytes, here is its format:
The purpose of not all the fields is clear to me, but this is not important, consider the main ones:
version is a version, if we want our firmware to be flashed into the phone, its version must be higher than the current one
size - the size of the payload in the firmware; this parameter uses prov_enc encryption
checksum - the checksum of the firmware, is used when decrypting the firmware, if it does not match, the firmware will not be flashed, about its generation later. The rest of the header fields, you need to leave as in the original, except that you can correct the date.
Further, the header reaches zeroes up to the size 0x5C.
The payload comes from offset 0x200, the space between the header and payload is clogged with units ...
This is how the decrypted firmware looks and, in this form, it is written into a flash, along with the title.
Utility prov_enc, works with a different format. At the entrance it should have a file, where the payload first comes, and immediately after it (i.e., at the end of the file), the header is 0x5C in size. prov_enc reads the size of the payload from the header, encrypts it, and then encrypts the header itself. The header is always encrypted only the first 32 bytes, the remaining bytes are not encrypted. In order to assemble the encrypted file back into the firmware using the prov_pack utility, it must be converted to the first format, i.e. Transfer the already encrypted header to the beginning of the file, and place the encrypted body of the firmware at offset 0x200.
Run prov_enc like this:
prov_pack - collects all encrypted firmware files into a solid firmware, ready for flashing to a phone
At the exit, we have a gxp1400fw.bin file ready for firmware
It is more convenient to work with these utilities in the qemu virtual machine than in the phone itself.
Now let's move on to what it was all about, turning off the green LED on the BLF keys.
The gs_gui process is responsible for the GUI in the phone, it lies in / app / gui / and uses the mountain of libraries from / app / gui / lib
Make grep with the word LED in the / app / gui folder and find the library libFramework.so.1.0.0
We merge it onto our computer and load it into IDA, since all functions have human names there.
We find a function with the interesting name turnOnMKPLED, from which another function is called writeToFile (LEDCOLOR, int, bool)
Below is a piece of it:
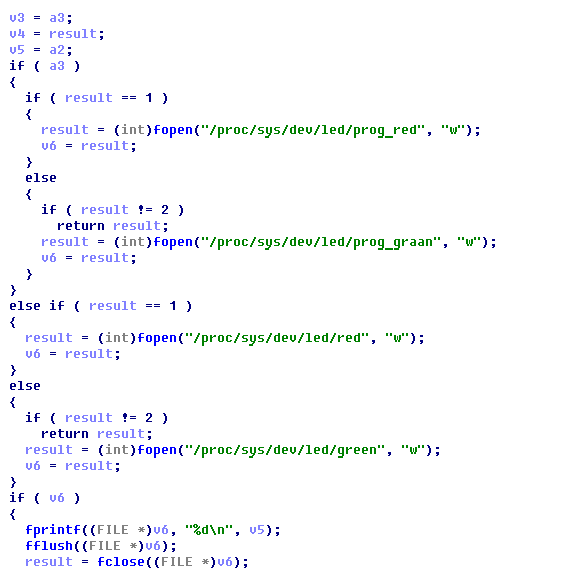
As you can see, the files / proc / sys / dev / led / * are used for working with LEDs.
I tried to write data to these files via echo, and found that the prog_green and prog_red files are responsible for the BLF (MKP) keys.
Accordingly, to prevent the green LED from turning on, you just need to ban write to the prog_green file. I did it simply, in the hex editor I changed one letter in the green table.
Now the patched libFramework.so.1.0.0 should be poured back into the phone. Create for this custom firmware.
The / app directory is contained in the gxp2130prog.bin image. Unpack the firmware and decrypt this image. Next, in the hex editor, we cut everything to offset 0x200 and get a squashfs image.
To work with squashfs you will need the squashfs-tools toolkit.
Version 4.0 of the Centos distribution could not unpack it, so I had to compile version 4.2 of the source code.
Unpack the team
Next, we change the libFramework.so.1.0.0 file there to ours and pack it back
Next, we encrypt the file, rearrange the header, and assemble the firmware, as described in the previous section. Well, flashing it.
If you want to return the original firmware, then on the phone you need to enter the command from the root
If you're interested, I can still write a detailed article on the provision of GrandStream phones (there are nuances that have not been written about anywhere) and a closed web-api
upd: found a secret to generate recponse on GXV3140:
Vulnerability Search
First, I ran the phone firmware through binwalk and looked in the hex editor. The result was upset, the firmware was encrypted, so you have to go from the other side, try to get root access on the phone itself. For almost two weeks, I searched for a field filtering vulnerability in the web interface. In a couple of places I found the opportunity to transfer my parameters to the syslogd and udhcpd commands. In the case of a syslog, it did not provide interest, but in the case of udhcpd, it was possible to specify the -s parameter, which referred to the script that was run to configure the interface. Here it was possible to execute any command, but it was impossible for it to specify its parameters, it was always executed with the defconfig parameter. With the help of this vulnerability, nothing has been done so well. Therefore, the search for vulnerabilities continued. And I found it! I will not tell exactly where, because Producers can quickly cover it, and in the future it may still be useful, well, and root access can be obtained without it.
Further, I suggested that the manufacturer probably should have left the possibility of getting a root for himself, for example, for debugging, and it would be useful to look for it. I analyzed all the scripts executed via the web, I did not find anything similar there. Then I started analyzing the shell, which is available via ssh.
Shell analysis
When we connect to the phone via ssh, we get into the gs_config shell, from which there is a small list of commands processed by the shell itself. I suggested that there might be service teams that are not described in the help. For this, I launched
strings gs_config console fw_setenv console yes gssu /bin/sh Quickly I typed these commands in the shell, and I saw the following: Grandstream GXP2130 Command Shell Copyright 2014 GXP2130> gssu Challenge: fb72f22fc5e233ae Response: The command requires a password generated based on a certain challenge.Without hesitation, we ship gs_config to IDA and look for the gssu line there
Next, go to the function XFER sub_94BC
we see that after entering the gssu command, the sub_B254 function is called, and depending on its result, the / bin / sh command is executed or not
Go to this function and press F5, to switch from assembler to C ++ pseudocode
Having run through the eyes on the code, it is clear that first the generation of the challenge is taking place, and the received challenge is put into the variable s
printf("Challenge: %s\n", s); then input from the user response is accepted and Response generation itself begins.This line pulls the admin password from nvram, by which you log in to the web and ssh
Next, it is put in the variable v13.
Then the contents of the variable v1, which is the parameter of our function sub_B254, are analyzed. Its value indicates which command we check for Response, there should be three such commands, but I found only two: gssu and console
In the case of gssu, we get the string % s: sfTXrhCA2010:% s in the variable v14
Next, through sprintf we get the final line of the form Callenge: sfTXrhCA2010: Password and put it in the variable v27
Then we count from this line md5.
Next comes the do ... while loop for 8 iterations in which we pass half of the md5 sum, and translate it into a hex line. Then compare it with the entered Response.
The algorithm is quite simple, here is the implementation of keygen on python:
import hashlib import sys challenge=sys.argv[2] pwd=sys.argv[1] secret=':sfTXrhCA2010:' # /sin/sh #secret=':dspg_cordless_config:' #secret=':a50ba3e905c0627eb0a204d82880fb46:' # console str=challenge+secret+pwd md5=hashlib.md5(str).hexdigest() result=md5[:16] print result ')
Work with firmware
Well, we learned to get permanently root on the phone, now it's time to study how it unpacks the firmware.
A quick inspection of the executable scripts on the phone, we find the script / sbin / provision, which is actually responsible for flashing the phone.
It shows that the firmware is unpacked into separate files by the command prov_pipe_unpack , and further, the individual sections of the firmware are decrypted by the command prov_pipedec. In fact, this is the same binary. To find out all its features, I also threw it at IDA, where I found the teams of interest to us, these are:
prov_unpackI will not dwell in detail on how this was searched for in IDA, I will only say that in order to facilitate the reverse engineering, gdbserver was loaded on the phone, and I drove these commands in the debugger.
prov_dec
prov_enc
prov_pack
Now about these commands in more detail:
prov_unpack - unpacks the firmware into separate files, runs like this:
prov_unpack gxp1400fw.bin The result of unpacking will be in the current directory.prov_dec - decrypts individual firmware files
prov_dec nokey gxp1400prog.bin gxp1400prog.bin The first parameter is the firmware key, in the factory firmware this is nokey, however, oem can be a vyryatny phones with their own keys.The second parameter is the file that is decrypted.
The third parameter - according to the manufacturer’s intention is the corresponding section in the flash of the phone, the program compares the version from the file and the version already flashed, and if they are equal, it does nothing. We specify the encrypted file of the firmware itself as the second parameter, then everything happens smoothly. At the output we get the decrypted file gxp1400prog.bin
prov_enc - encrypts the image back, but it needs an image in a special format.
About the image format more:
The image consists of a header and the actual data itself, for example, the squashfs file system.
Below is an example of the image header gxp2130prog.bin
The header occupies the first 0x5C bytes, here is its format:
struct header { DWORD signature; DWORD version; DWORD size_max; DWORD size; WORD image_id; WORD checksum; WORD ts_year; WORD ts_month_day; WORD ts_time; WORD oem_id; DWORD FW_V_Mask; WORD supported_bits1; WORD supported_bits2; WORD supported_bits3; WORD supported_bits4; WORD HW_id; } The purpose of not all the fields is clear to me, but this is not important, consider the main ones:
version is a version, if we want our firmware to be flashed into the phone, its version must be higher than the current one
size - the size of the payload in the firmware; this parameter uses prov_enc encryption
checksum - the checksum of the firmware, is used when decrypting the firmware, if it does not match, the firmware will not be flashed, about its generation later. The rest of the header fields, you need to leave as in the original, except that you can correct the date.
Further, the header reaches zeroes up to the size 0x5C.
The payload comes from offset 0x200, the space between the header and payload is clogged with units ...
This is how the decrypted firmware looks and, in this form, it is written into a flash, along with the title.
Utility prov_enc, works with a different format. At the entrance it should have a file, where the payload first comes, and immediately after it (i.e., at the end of the file), the header is 0x5C in size. prov_enc reads the size of the payload from the header, encrypts it, and then encrypts the header itself. The header is always encrypted only the first 32 bytes, the remaining bytes are not encrypted. In order to assemble the encrypted file back into the firmware using the prov_pack utility, it must be converted to the first format, i.e. Transfer the already encrypted header to the beginning of the file, and place the encrypted body of the firmware at offset 0x200.
Run prov_enc like this:
prov_enc nokey gxp1400prog.bin gxp1400prog.bin Here, everything is the same as prov_dec.prov_pack - collects all encrypted firmware files into a solid firmware, ready for flashing to a phone
prov_pack nokey gxp1400fw.bin gxp1400boot.bin gxp1400recovey.bin gxp1400core.bin gxp1400base.bin gxp1400prog.bin At the exit, we have a gxp1400fw.bin file ready for firmware
It is more convenient to work with these utilities in the qemu virtual machine than in the phone itself.
Patch green LED
Now let's move on to what it was all about, turning off the green LED on the BLF keys.
The gs_gui process is responsible for the GUI in the phone, it lies in / app / gui / and uses the mountain of libraries from / app / gui / lib
Make grep with the word LED in the / app / gui folder and find the library libFramework.so.1.0.0
We merge it onto our computer and load it into IDA, since all functions have human names there.
We find a function with the interesting name turnOnMKPLED, from which another function is called writeToFile (LEDCOLOR, int, bool)
Below is a piece of it:
As you can see, the files / proc / sys / dev / led / * are used for working with LEDs.
I tried to write data to these files via echo, and found that the prog_green and prog_red files are responsible for the BLF (MKP) keys.
Accordingly, to prevent the green LED from turning on, you just need to ban write to the prog_green file. I did it simply, in the hex editor I changed one letter in the green table.
Now the patched libFramework.so.1.0.0 should be poured back into the phone. Create for this custom firmware.
The / app directory is contained in the gxp2130prog.bin image. Unpack the firmware and decrypt this image. Next, in the hex editor, we cut everything to offset 0x200 and get a squashfs image.
To work with squashfs you will need the squashfs-tools toolkit.
Version 4.0 of the Centos distribution could not unpack it, so I had to compile version 4.2 of the source code.
Unpack the team
./unsquashfs gxp2130prog.bin Content will be in the squashfs-root directoryNext, we change the libFramework.so.1.0.0 file there to ours and pack it back
./mksquashfs squashfs-root new.bin -comp xz -all-root -noappend -always-use-fragments Now we need to prepare a headline. First, take a header from the original gxp2130prog.bin and copy it to the end of our squashfs image. Now you need to fix it version and size. Size is the size of the squashfs image itself, without a title. Now you need to calculate the checksum. Here is the C code to generate it (for Python, for some reason, the similar code worked 200 times slower, and this was run in qemu with arm emulation) #include <stdio.h> void main(int argc, char *argv[]) { FILE *f; int summ=0; int word; char buff[32]; int i; f = fopen(argv[1],"rb"); if(f) { while(fread(buff,32,1,f) != 0) { for(i=0;i<32;i+=2) { word = buff[i]; word |= buff[i+1]<<8; summ += word; summ &= 0xFFFF; } } printf("%d\n",0x10000-summ); } else printf("Error\n"); } Next, we encrypt the file, rearrange the header, and assemble the firmware, as described in the previous section. Well, flashing it.
If you want to return the original firmware, then on the phone you need to enter the command from the root
nvram set force_upgrade=1 And the phone will flash any firmware. regardless of the version.If you're interested, I can still write a detailed article on the provision of GrandStream phones (there are nuances that have not been written about anywhere) and a closed web-api
upd: found a secret to generate recponse on GXV3140:
:gshz: Source: https://habr.com/ru/post/249855/
All Articles