Simple techniques of reverse engineering UEFI PEI-modules on a useful example
Hello, dear readers of Habr.
After a long break with you again, I and we continue to delve into the guts of UEFI . This time I decided to show a few techniques that simplify the reverse and debugging of the executable components of UEFI using the example of the outdated but still-popular PEI module SecureUpdating, which is designed to protect the firmware of some HP laptops from modification.
The background is as follows: one evening a laptop repairman from Belarus wrote to me and asked me to see why the laptop with the replaced VideoBIOS does not want to start, although it starts exactly the same. The answer was on the surface - the laptop that did not start after modification had a newer version of UEFI, in which kind people from HP integrated protection against modification of the DXE -tom (and there we have the VideoBIOS we need along with 80% of the UEFI code), so that malicious viruses and less vicious users didn't accidentally break anything there. Then the problem was solved by transferring the SecureUpdating PEI module from the old UEFI version to the new one, but after two weeks the same person turned again, this time the old version of the module refused to work on a similar laptop, and my help was needed again.
If you are interested in my further adventures in the world of UEFI PEI-modules with disassembler and patched transitions - welcome under the cat.
')
We need to figure out the following:

It looks nothing unusual, except for the message that inside the free space of one of the UEFI volumes there was data, which according to the specification should not be there. This is how manufacturers (of those who do not really believe in the specification) usually hide their checksums or digital signatures. Double click on the message to select the volume in which these same data was found, and we get it entirely into the dxe.vol file for analysis. UEFITool is not necessary to close - still useful.
We open the received file with the Hex-editor and consider, starting from the end, because the free space in the volume can only be there:

There is also a very suspicious piece of data with a size of 100h (marked in red), followed by the signature $ SIG , firmware version F.50 and platform code name 68CPK . Thus, the answer to the first question, presumably, is received.

Iiii ... BINGO, only 2 entries, and both - in the same PEI module with the promising name SecureUpdating. We take it out without headers to the file su.bin for further analysis:

Thus, presumably, an answer was received to the second question.
Go to Options -> Compiler ... and set them like this:

Then go to File -> Load File -> Parse C header file ... and load the behemoth.h file mentioned above in the list with the definitions of the UEFI structures:

You should not pay attention to errors of analysis - they in this case will not harm.
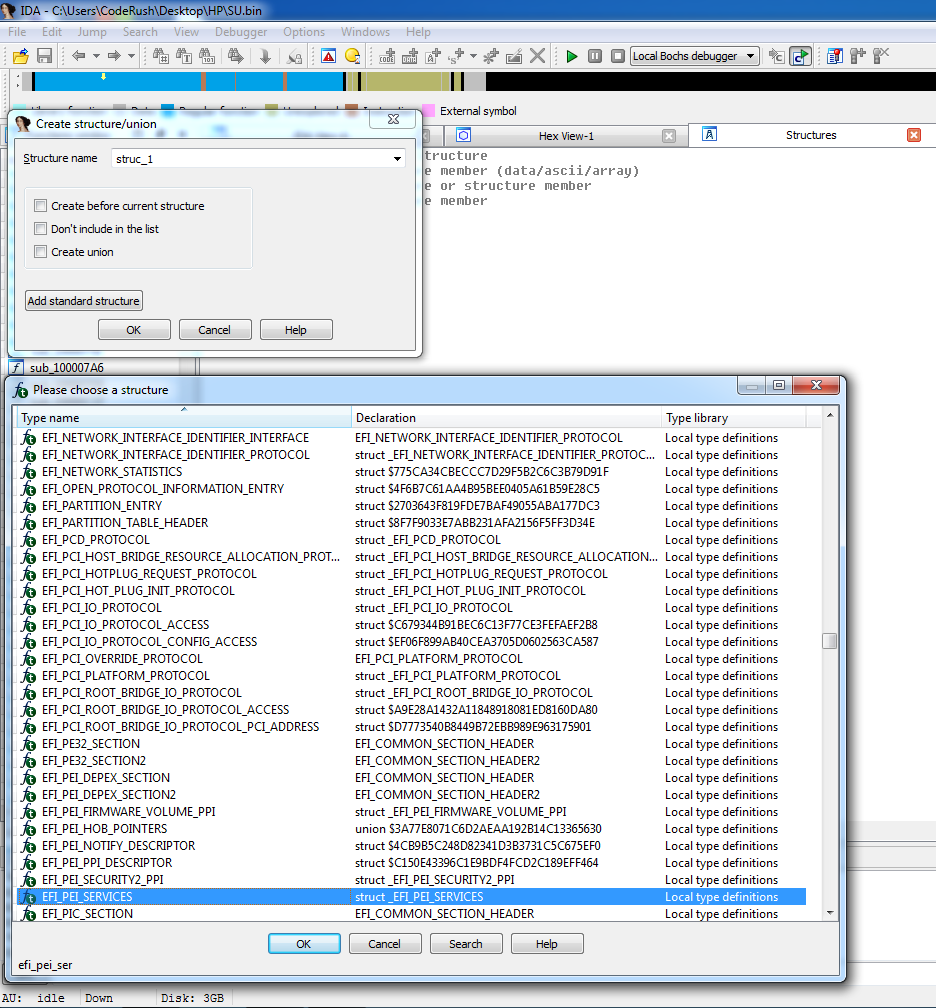
Now open the Structures tab, go to Edit -> Add structure type ... (or press Insert, it's faster), click Add standard structure and in the list that appears we find the most important structure for PEI files - EFI_PEI_SERVICES , which we add:
At the same time we add EFI_GUID and EFI_FFS_FILE_HEADER - they will be useful.
The EFI_PEI_SERVICES structure (to be exact, a double pointer to its instance created by the PEI core) is passed as a parameter to the entry point of each PEI module and to almost all of its functions. This is done because part of PEI is forced to be executed directly from flash memory, which is read-only at that moment, so global variables in such PEI modules are not available and you have to carry everything with you. This is an unpleasant restriction for a programmer, but it helps a lot in researching and debugging PEI modules, since double pointer dereferencing is not a very popular procedure in normal code, and therefore most of the calls to PEI services can be traced with the eyes directly in the listing. We’ll go back to it, but start to remember (or find out) what the entry point to the PEI module looks like. Do not rush to google, it looks like this:
EFI_STATUS is a typedef for an unsigned int, EFIAPI is a typedef for stdcall, the first parameter points to the FFS file in which the PEI module is called (in case the module stores some data next to it and it needs access to it) ), and the second is the above double pointer to the table of PEI services. Armed with this knowledge, we boldly change the type of the start function (by selecting it and pressing the Y key), it turns out something like this:
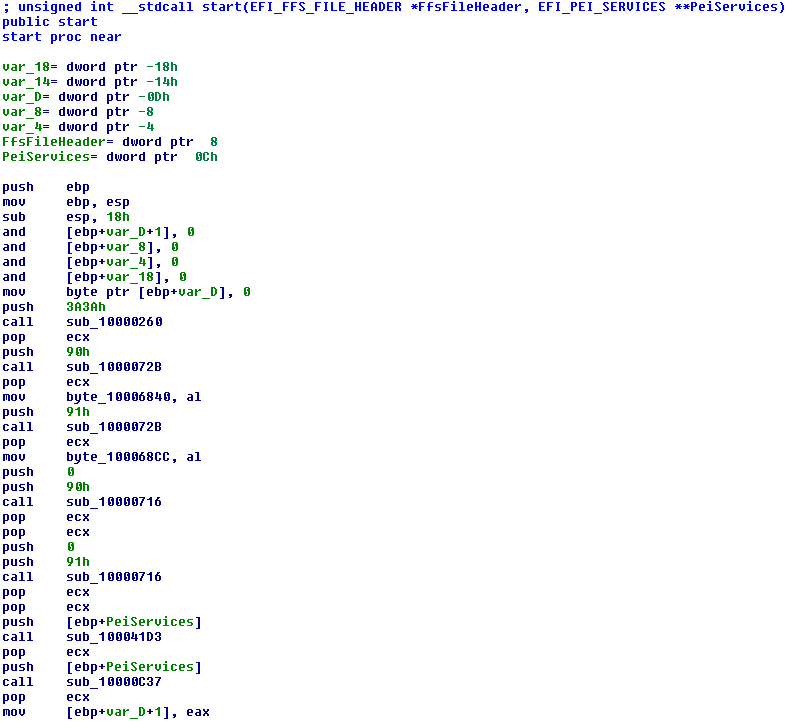
Now the listing shows the following: first comes a series of function calls for which PeiServices is not needed. Most often, they are engaged in input-output to / from IO-ports and other magic of this kind, we check this assumption, moving to the first in order:
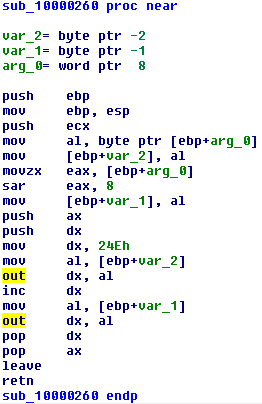
Indeed, the function performs data output to port 24Eh. I will omit the next few (they are very similar, we write-read IO-ports) and move on to those that PeiServices use.
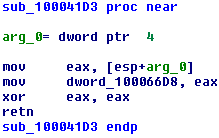
The first is trivial and simply saves PeiServices to a global variable (which indicates that our PEI module is already running from RAM, but the keen eye of a specialist would notice this from the information about the PE file in UEFITool):
The next one is much bigger and much more interesting, especially if you put the correct parameter and return value types to it:

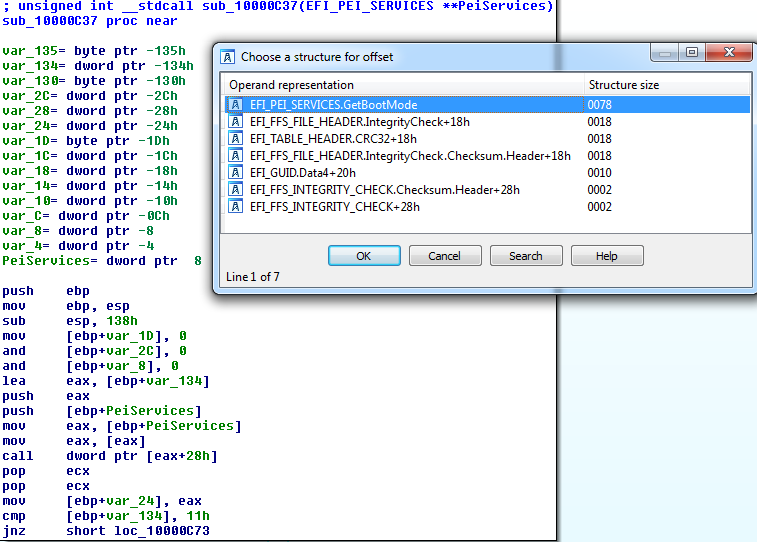
The fragment highlighted in red immediately after the prologue and zeroing of local variables is the most noticeable pattern with dereferencing a double pointer, which I mentioned above. To understand what kind of PEI service was called, we needed all these dances around the structures, now you can set the cursor to [eax + 28h], press T and select EFI_PEI_SERVICES.GetBootMode in the window that appears:
Looking at its signature , we can conclude that var_134 is actually a variable on the stack, in which the value of the current load mode will be written. Then this value is compared with 11h and if it is not equal, the calculations go further, and if it is still equal, we put zero in eax and go to return. 11h in this case is BOOT_ON_S3_RESUME , i.e. if the system wakes up from ACPI Sleep Mode, then the function always returns 0 (and this is in the local dialect EFI_SUCCESS). If the system is loaded from another state, then the execution goes further, and as a result it passes through such an interesting place:

Bah, old acquaintances! Those are the 12FEE0h entries by which we found this module. First, the CopyMem and the suspicious QS / EDS are copied to the buffer, and then the original place is overwritten by the FFh byte, which is empty at the DXE volume and filled initially, and then the function call that checks the same KS / EDS follows.
You can, of course, start to investigate it now, but this part of the code is not executed at all if the system wakes up from S3 (which is logical, since nothing from the DXE volume for S3 is needed, but you need to wake up as soon as possible), and everything it works less, so for a start we will make sure that this particular PEI module thinks we have eternal summer and always S3_RESUME, and skip any checks.
To do this, it is enough to change cmp [ebp + BootMode], 11h to xor eax, eax, then the jnz following it will never be executed, but if it should never be executed, then it is easier to replace the transition with a couple of NOPs:

Change the selection in the Hex editor to 90 90 and everything is ready.
Suddenly, some new circumstances emerged. It turns out that in this “old” version of protection there is a copy of the PEI-volume, which can be used by the system to restore the original state of the PEI-volume, and in this copy you also need to replace the SecureUpdating module with the patched one. The copy is stored in a file with a GUID 05B3AFFD-F7CC-4C0A-A19A-A9774E2675D7 of the RAW type, so the contents of this file are not displayed in current versions of UEFITool:

In fact, it is a file of the Freeform type, and in order to get access to its content, you need to extract it through Extract as is ... , replace the extracted file with the byte at offset 12h (File type) from 01 to 02 and insert the resulting file instead of the original Replace as is ... :

Inside this file is a compressed section with a copy of the PEI-volume, this is where another instance of SecureUpdating is located, which also needs a patch. Now everything works exactly where it didn’t want to before.
Further - the matter of technology. Replace Body through … Replace the contents of the original PE32 section with the modified file, make the necessary changes to the DXE volume, save the changes and flash the resulting image on the programmer. I did not have this laptop, made a modification and sent the results to the applicant. A couple of hours later, the answer was received: “thank you so much, everything is working, the client is satisfied,” and I went with a clear conscience to write the article you just read.
Thank you for your attention and successful modifications to you.
After a long break with you again, I and we continue to delve into the guts of UEFI . This time I decided to show a few techniques that simplify the reverse and debugging of the executable components of UEFI using the example of the outdated but still-popular PEI module SecureUpdating, which is designed to protect the firmware of some HP laptops from modification.
The background is as follows: one evening a laptop repairman from Belarus wrote to me and asked me to see why the laptop with the replaced VideoBIOS does not want to start, although it starts exactly the same. The answer was on the surface - the laptop that did not start after modification had a newer version of UEFI, in which kind people from HP integrated protection against modification of the DXE -tom (and there we have the VideoBIOS we need along with 80% of the UEFI code), so that malicious viruses and less vicious users didn't accidentally break anything there. Then the problem was solved by transferring the SecureUpdating PEI module from the old UEFI version to the new one, but after two weeks the same person turned again, this time the old version of the module refused to work on a similar laptop, and my help was needed again.
If you are interested in my further adventures in the world of UEFI PEI-modules with disassembler and patched transitions - welcome under the cat.
A couple of links to educational program
If you almost understand nothing - do not worry, I have a few articles explaining the terminology: 1 , 2 , 3 , read and come back. For fans of the original documentation, the UEFI PI specification is always available; everything is written there in much more detail.')
Required files and tools
To disassemble the above firmware, we need:- Actually the file with the firmware, I was sent this one .
- Any utility for working with UEFI images, I will use UEFITool as its author, but you can use any one you like, for example, uefi-firmware-parser or PhoenixTool is not important.
- Hex editor of your choice, I will use HxD .
- Disassembler with support for PE32-files, here IDA 6.6 Demo is ideal for us, because In the overwhelming majority of cases, PEI modules are 32-bit and the limitations of the demo version do not interfere too much. If a respected xvilka can show how to load structures from a C-file in radare2 , I will try to do the next mod in it, but for now IDA is our everything.
- From the efi-utils suite, you need a hefty behemoth.h file containing the definitions of almost all possible data structures used in UEFI. In our case, we need only a couple of three.
A starting point
So, from the words of a fellow repairman, we know the following: any change in the DXE-volume leads to a dead laptop, blinking Caps-lock, and changes in other parts of the image do not lead to such an outcome. This means that somewhere there is either a checksum or an EDS that is checked by the code of one of the PEI modules, and if it converges, control is transferred to the DXE phase, and if not, it is transferred somewhere to where we don’t happy toWe need to figure out the following:
- Where exactly is the COP / EDS stored?
- Who checks it?
- And, most importantly, how to make sure that the check always ends successfully?
Go!
Do it once!
Open the file with the firmware in UEFITool and look carefully:It looks nothing unusual, except for the message that inside the free space of one of the UEFI volumes there was data, which according to the specification should not be there. This is how manufacturers (of those who do not really believe in the specification) usually hide their checksums or digital signatures. Double click on the message to select the volume in which these same data was found, and we get it entirely into the dxe.vol file for analysis. UEFITool is not necessary to close - still useful.
We open the received file with the Hex-editor and consider, starting from the end, because the free space in the volume can only be there:
There is also a very suspicious piece of data with a size of 100h (marked in red), followed by the signature $ SIG , firmware version F.50 and platform code name 68CPK . Thus, the answer to the first question, presumably, is received.
Do two!
To answer the second, you need to look for PEI-modules that access this block of data. This is quite difficult and often have to try several options. The easiest thing is to look for other occurrences of the $ SIG signature, but in this case we are immediately unsuccessful - there are no other occurrences of such a string in the image. But if the block is not searched by signature, then it is searched either by offset or by absolute address. Its offset inside the volume is 12FEE0h. Switch to UEFITool and search for Hex pattern E0FF12 without considering headers (Intel processors are still LittleEndian, so the order of bytes had to be changed):Iiii ... BINGO, only 2 entries, and both - in the same PEI module with the promising name SecureUpdating. We take it out without headers to the file su.bin for further analysis:
Thus, presumably, an answer was received to the second question.
Do three!
It remains to deal with the third. To do this, you need a disassembler, a little knowledge about the device PEI-modules and a lot of patience. Run IDA, agree with the terms of the demo mode and open the file received earlier.Go to Options -> Compiler ... and set them like this:
Then go to File -> Load File -> Parse C header file ... and load the behemoth.h file mentioned above in the list with the definitions of the UEFI structures:
You should not pay attention to errors of analysis - they in this case will not harm.
Now open the Structures tab, go to Edit -> Add structure type ... (or press Insert, it's faster), click Add standard structure and in the list that appears we find the most important structure for PEI files - EFI_PEI_SERVICES , which we add:
At the same time we add EFI_GUID and EFI_FFS_FILE_HEADER - they will be useful.
The EFI_PEI_SERVICES structure (to be exact, a double pointer to its instance created by the PEI core) is passed as a parameter to the entry point of each PEI module and to almost all of its functions. This is done because part of PEI is forced to be executed directly from flash memory, which is read-only at that moment, so global variables in such PEI modules are not available and you have to carry everything with you. This is an unpleasant restriction for a programmer, but it helps a lot in researching and debugging PEI modules, since double pointer dereferencing is not a very popular procedure in normal code, and therefore most of the calls to PEI services can be traced with the eyes directly in the listing. We’ll go back to it, but start to remember (or find out) what the entry point to the PEI module looks like. Do not rush to google, it looks like this:
EFI_STATUS EFIAPI PeimEntry( IN EFI_FFS_FILE_HEADER *FfsFileHeader, IN EFI_PEI_SERVICES **PeiServices ); EFI_STATUS is a typedef for an unsigned int, EFIAPI is a typedef for stdcall, the first parameter points to the FFS file in which the PEI module is called (in case the module stores some data next to it and it needs access to it) ), and the second is the above double pointer to the table of PEI services. Armed with this knowledge, we boldly change the type of the start function (by selecting it and pressing the Y key), it turns out something like this:
Now the listing shows the following: first comes a series of function calls for which PeiServices is not needed. Most often, they are engaged in input-output to / from IO-ports and other magic of this kind, we check this assumption, moving to the first in order:
Indeed, the function performs data output to port 24Eh. I will omit the next few (they are very similar, we write-read IO-ports) and move on to those that PeiServices use.
The first is trivial and simply saves PeiServices to a global variable (which indicates that our PEI module is already running from RAM, but the keen eye of a specialist would notice this from the information about the PE file in UEFITool):
The next one is much bigger and much more interesting, especially if you put the correct parameter and return value types to it:
The fragment highlighted in red immediately after the prologue and zeroing of local variables is the most noticeable pattern with dereferencing a double pointer, which I mentioned above. To understand what kind of PEI service was called, we needed all these dances around the structures, now you can set the cursor to [eax + 28h], press T and select EFI_PEI_SERVICES.GetBootMode in the window that appears:
Looking at its signature , we can conclude that var_134 is actually a variable on the stack, in which the value of the current load mode will be written. Then this value is compared with 11h and if it is not equal, the calculations go further, and if it is still equal, we put zero in eax and go to return. 11h in this case is BOOT_ON_S3_RESUME , i.e. if the system wakes up from ACPI Sleep Mode, then the function always returns 0 (and this is in the local dialect EFI_SUCCESS). If the system is loaded from another state, then the execution goes further, and as a result it passes through such an interesting place:
Bah, old acquaintances! Those are the 12FEE0h entries by which we found this module. First, the CopyMem and the suspicious QS / EDS are copied to the buffer, and then the original place is overwritten by the FFh byte, which is empty at the DXE volume and filled initially, and then the function call that checks the same KS / EDS follows.
You can, of course, start to investigate it now, but this part of the code is not executed at all if the system wakes up from S3 (which is logical, since nothing from the DXE volume for S3 is needed, but you need to wake up as soon as possible), and everything it works less, so for a start we will make sure that this particular PEI module thinks we have eternal summer and always S3_RESUME, and skip any checks.
To do this, it is enough to change cmp [ebp + BootMode], 11h to xor eax, eax, then the jnz following it will never be executed, but if it should never be executed, then it is easier to replace the transition with a couple of NOPs:
Change the selection in the Hex editor to 90 90 and everything is ready.
UPD
Suddenly, some new circumstances emerged. It turns out that in this “old” version of protection there is a copy of the PEI-volume, which can be used by the system to restore the original state of the PEI-volume, and in this copy you also need to replace the SecureUpdating module with the patched one. The copy is stored in a file with a GUID 05B3AFFD-F7CC-4C0A-A19A-A9774E2675D7 of the RAW type, so the contents of this file are not displayed in current versions of UEFITool:
In fact, it is a file of the Freeform type, and in order to get access to its content, you need to extract it through Extract as is ... , replace the extracted file with the byte at offset 12h (File type) from 01 to 02 and insert the resulting file instead of the original Replace as is ... :
Inside this file is a compressed section with a copy of the PEI-volume, this is where another instance of SecureUpdating is located, which also needs a patch. Now everything works exactly where it didn’t want to before.
Conclusion
Further - the matter of technology. Replace Body through … Replace the contents of the original PE32 section with the modified file, make the necessary changes to the DXE volume, save the changes and flash the resulting image on the programmer. I did not have this laptop, made a modification and sent the results to the applicant. A couple of hours later, the answer was received: “thank you so much, everything is working, the client is satisfied,” and I went with a clear conscience to write the article you just read.
Thank you for your attention and successful modifications to you.
Source: https://habr.com/ru/post/249655/
All Articles