BemPHP: implementation of the BEM methodology using PHP
Something came to me here somehow to master PHP, and as you know, the best way to learn a language is to create a framework on it. When picking in various forums and topics, I was interested in one methodology, which is promoted in the respected Yandex company - BEM . Who else is not aware of this methodology, read on the official page . Also on Habré there is a publication “Layout for the youngest. We impose a page on BEM " from habrauzer xnim , in which everything will be explained with a specific example. Yandex wrote their modules and project build scripts, but they were all executed on Node.js, but I could not find something like this in PHP (although, frankly, I didn’t really look for anything). In addition, PHP, as an object-oriented language, provides interesting possibilities.

Download the BemPHP folder from GitHub and put it in the folder with your project. Next we connect BemPHP.php:
If you do not have the autoload function yet, register it:
Now let's create our first block. To do this, you need to create a folder with the name of the block in the BemPHP / blocks / folder, for example, 'b-block-name'. Actually everything. This is already enough for a block class object named b-block-name to be loaded into the block storage. Let's load it:
Of course, loading each block separately in this way would be too much, so you can write them separated by commas:
Please note that 'block-3' is written without the 'b-' prefix, this is not an error, in this case a block with the name 'b-block-3' will still be loaded if it is, of course. The prefix 'b-' indicates that there is a block description in this folder, if there is a folder in the blocks folder that does not begin with this prefix, it will be ignored. Specifying the prefix in the includeBlocksList method is optional.
Listing all the necessary blocks is also quite laborious, so you can write masks, for example:
In this case, all blocks starting with b-page1 will be loaded, all in the name of which there is the word input and all ending in down. If, for example, you need everything starting with b-page1 and having input, then the entry will look like this: b-page1 * input *. Well, if you need to load all the blocks without exception, then so:
Now you can add styles and behavior descriptions to the b-block-name folder. For this purpose, we create b-block-name.css and b-block-name.js files in the folder, they will be automatically loaded into the object. It is worth noting that the file names must match the block name, otherwise they will be ignored. Also during the download, the b-block-name.css file will be checked for the presence of the '.b-block-name' class style description and compression, that is, removal of extra spaces, line breaks and comments.
Since we are dealing with an object-oriented language, it would be great to create blocks as objects using PHP. To do this, in the b-block-name folder, create the file b-block-name.php. In this case, the .css and .js files will be ignored and the entire block description will be taken from the php file.
')
Here we create an object of the class Block, which during creation will be saved in the block storage, specify the directory where the block files are stored, load the files (the path is relative to the directory specified above), add the style rule (the second parameter is a pseudo-class), set the block tag (by the default is a div), add an attribute, and insert content. Two methods worth noting are setContent and addContent. The first one sets the content by deleting the previous one, the second one adds content, while the addContent method has a second parameter, which in the case of true adds content to the beginning, and in the case of false, adds to the end of the existing content. The default is false.
The blocks are created and loaded into the block storage, now let's bring them to the light. To do this, you need to connect the Tree module and build a BEM tree:
The following entry will appear in the created html document:
All is well, only we have no description of the class style '.b-block-name'. To do this, in the header of the page inside the style tags, we output the css of all our blocks:
We do the same with js scripts:
In the future, these scripts can be minimized and output to separate files (planned for release 1.2).
It is worth noting that the Tree :: html ($ blockName) method returns an object, but an object is not a block, as such, but a block in a wrapper. This is necessary in order to be able to redefine the block on the fly. For example, the code:
Displays the following:
That is, the block itself remained untouched, just at the time of the withdrawal, we redefined its tag.
Since Tree :: html () returns an object, we can assign a reference to it to some variable:
In this case, if we redefine the tag, then it will remain “live” in this variable, since we change the properties of a particular wrapper object:
Displays:
In order to return the wrapper to its original state, i.e. in the state of the initial block, you need to use the getDefault () method:
Thus, for example, you can create a file where all blocks will be described as variables:
Connect it and describe BEM-trees with syntax highlighting:
“It seems everything is clear with blocks, but what about the elements and modifiers?” The attentive reader exclaims. The fact is that elements and modifiers are essentially the same blocks, only they are used in conjunction with their parent blocks. For understanding, we analyze a specific example, which is described in the post I previously mentioned. There is an implementation of this menu:

Let's do it. First, create the 'b-menu' folder inside it with b-menu.css with the content:
Further the b-link folder in it is b-link.css:
In the b-link folder, create the b-link_menu modifier folder:
In the b-link_menu folder, create another b-link_menu_active modifier:
Now we define the parameters of the blocks by creating the files b-menu.php, b-link.php and b-link_menu_active.php in the appropriate folders:
And now let's add all this to our page:
As you can see in the Tree :: html () method you can add several block names separated by spaces. In this case, a cascade reassignment of block parameters will occur. For example, in the b-link block, the 'a' tag is defined, and in the b-link_menu_active block, the 'div' tag is defined. If we write Tree :: html ('b-link b-link_menu'), the 'a' tag will be indicated when outputting, because in the b-link_menu block, the tag is not defined and it will be inherited from the previous block. In the case of a Tree :: html entry ('b-link b-link_menu b-link_menu_active'), the 'div' tag will be specified, since it is defined on the block at the end of the chain. The same will happen with the content. The following will occur with attributes: if this attribute already exists, it will be redefined, if the previous block did not have such an attribute, it will be added to those attributes that already existed.
If you take a look at the html-code that you get as a result of creating your page, then it will be difficult to read it, because there are no indents and line breaks, but if you need to look at the generated html of any block, you can “Highlight” with the lighting () method:
Then in the generated html will be the following:
And you can easily find the code you need.
Also in BemPHP there is a class for recording logs - LogWriter. You can add an entry there like this:
In this case, a Log object will be created, with msg = 'Comment' and msgType = '3', placed in the log storage of the LogStorage class. You can implement your own logging output, for this you need to create a class, with the Notifycator interface connected and the notify method ($ logStorage), which takes a class object of the LogStorage as a parameter. And you can use an existing logger:
In this case, a window will appear on your page in the lower right corner in which logs will be displayed. The window will become transparent if the cursor is not hovering over it, as well as it can be minimized by pressing the corresponding button.
It is worth noting that for the Logger to work, you need to connect the jQuery library and that the call to the ShowLogger method should be the most recent on your page.
The idea of the BEM methodology is to create layout with independent blocks. With this approach, you can be sure that during the corrections, your layout will not fall apart. It is also possible to more effectively distribute tasks within the development team and create a single model language for all persons related to the project. BemPHP allows you to transfer the methodology to an object-oriented environment. As a result, you get not just a layout, but an object-oriented layout !
I will be glad to your comments, comments and questions.
Start
Download the BemPHP folder from GitHub and put it in the folder with your project. Next we connect BemPHP.php:
include_once "BemPHP/BemPHP.php"; If you do not have the autoload function yet, register it:
BemPHP::register_autoload(); Now let's create our first block. To do this, you need to create a folder with the name of the block in the BemPHP / blocks / folder, for example, 'b-block-name'. Actually everything. This is already enough for a block class object named b-block-name to be loaded into the block storage. Let's load it:
BemPHP::includeBlocksList('b-block-name'); Of course, loading each block separately in this way would be too much, so you can write them separated by commas:
BemPHP::includeBlocksList('b-block-1, b-block-2, block-3'); Please note that 'block-3' is written without the 'b-' prefix, this is not an error, in this case a block with the name 'b-block-3' will still be loaded if it is, of course. The prefix 'b-' indicates that there is a block description in this folder, if there is a folder in the blocks folder that does not begin with this prefix, it will be ignored. Specifying the prefix in the includeBlocksList method is optional.
Listing all the necessary blocks is also quite laborious, so you can write masks, for example:
BemPHP::includeBlocksList('b-page1*, *input*, *down'); In this case, all blocks starting with b-page1 will be loaded, all in the name of which there is the word input and all ending in down. If, for example, you need everything starting with b-page1 and having input, then the entry will look like this: b-page1 * input *. Well, if you need to load all the blocks without exception, then so:
BemPHP::includeBlocksList('*'); Now you can add styles and behavior descriptions to the b-block-name folder. For this purpose, we create b-block-name.css and b-block-name.js files in the folder, they will be automatically loaded into the object. It is worth noting that the file names must match the block name, otherwise they will be ignored. Also during the download, the b-block-name.css file will be checked for the presence of the '.b-block-name' class style description and compression, that is, removal of extra spaces, line breaks and comments.
Block definition
Since we are dealing with an object-oriented language, it would be great to create blocks as objects using PHP. To do this, in the b-block-name folder, create the file b-block-name.php. In this case, the .css and .js files will be ignored and the entire block description will be taken from the php file.
')
use BemPHP\Block; $_blockName_ = 'b-block-name'; /* ( ) */ $_blockObj_ = new Block($_blockName_); $_blockObj_->setBlockDir(__DIR__) /* , */ ->loadCSSFile($_blockName_.'.css') /* css ( null, $_blockName_.'.css') */ ->loadJSFile()/* .js*/ ->addCssRule('color:red','hover') /* */ ->setTag('a') /* . Block::TAG_DEFAULT*/ ->setAttribute('href','http://tricksterz.ru') /* */ ->setContent('Tricksterz') /* */ ->addContent('<b>',true) /* */ ->addContent('</b>') /* */ ; Here we create an object of the class Block, which during creation will be saved in the block storage, specify the directory where the block files are stored, load the files (the path is relative to the directory specified above), add the style rule (the second parameter is a pseudo-class), set the block tag (by the default is a div), add an attribute, and insert content. Two methods worth noting are setContent and addContent. The first one sets the content by deleting the previous one, the second one adds content, while the addContent method has a second parameter, which in the case of true adds content to the beginning, and in the case of false, adds to the end of the existing content. The default is false.
Grow a tree
The blocks are created and loaded into the block storage, now let's bring them to the light. To do this, you need to connect the Tree module and build a BEM tree:
use BemPHP\Tree; […] echo Tree::html('b-block-name'); The following entry will appear in the created html document:
<a class='b-block-name' href='http://tricksterz.ru' ><b>Tricksterz</b></a> All is well, only we have no description of the class style '.b-block-name'. To do this, in the header of the page inside the style tags, we output the css of all our blocks:
<?php echo "<style> "; print_r(BemPHP::getCss()); echo "</style>"; ?> We do the same with js scripts:
<script> <?php print_r(BemPHP::getJs()); ?> </script> In the future, these scripts can be minimized and output to separate files (planned for release 1.2).
It is worth noting that the Tree :: html ($ blockName) method returns an object, but an object is not a block, as such, but a block in a wrapper. This is necessary in order to be able to redefine the block on the fly. For example, the code:
echo Tree::html('b-block-name')->setTag('p'); echo Tree::html('b-block-name'); Displays the following:
<p class='b-block-name' href='http://tricksterz.ru' ><b>Tricksterz</b></p> <a class='b-block-name' href='http://tricksterz.ru' ><b>Tricksterz</b></a> That is, the block itself remained untouched, just at the time of the withdrawal, we redefined its tag.
Since Tree :: html () returns an object, we can assign a reference to it to some variable:
$b_block_name = Tree::html('b-block-name'); In this case, if we redefine the tag, then it will remain “live” in this variable, since we change the properties of a particular wrapper object:
echo $b_block_name->setTag('p'); echo $b_block_name; Displays:
<p class='b-block-name' href='http://tricksterz.ru' ><b>Tricksterz</b></p> <p class='b-block-name' href='http://tricksterz.ru' ><b>Tricksterz</b></p> In order to return the wrapper to its original state, i.e. in the state of the initial block, you need to use the getDefault () method:
echo $b_block_name->setTag('p'); // p echo $b_block_name->getDefault(); // a Thus, for example, you can create a file where all blocks will be described as variables:
$b_menu = Tree::html('b-menu'); $b_menu__item = Tree::html('b-menu__item'); […] Connect it and describe BEM-trees with syntax highlighting:
echo $b_menu->setContent( $b_menu__item->setContent('Home')->setAttribute('href','#home'). $b_menu__item->setContent('Music')->setAttribute('href','#music'). $b_menu__item->setContent('Video')->setAttribute('href','#video') ); Compound blocks
“It seems everything is clear with blocks, but what about the elements and modifiers?” The attentive reader exclaims. The fact is that elements and modifiers are essentially the same blocks, only they are used in conjunction with their parent blocks. For understanding, we analyze a specific example, which is described in the post I previously mentioned. There is an implementation of this menu:
Let's do it. First, create the 'b-menu' folder inside it with b-menu.css with the content:
.b-menu { margin:0; padding:0; list-style:none; width:100%; display:table; table-layout: fixed; } Further the b-link folder in it is b-link.css:
.b-link { color:#525252; font-size:12px; } In the b-link folder, create the b-link_menu modifier folder:
.b-link_menu { text-align:center; color:#bfbfbf; cursor:pointer; font-size:14px; height:38px; background-color:#f3f3f3; line-height:38px; border: 1px solid #e7e7e7; display:table-cell; text-decoration: none; } In the b-link_menu folder, create another b-link_menu_active modifier:
.b-link_menu_active { color:#fefefe; background-color:#29c5e6; border:1px solid #29c5e6; cursor: default; } Now we define the parameters of the blocks by creating the files b-menu.php, b-link.php and b-link_menu_active.php in the appropriate folders:
//b-menu.php $_blockObj_ = new Block('b-menu'); $_blockObj_->setBlockDir(__DIR__) ->loadCSSFile() ->setTag('nav'); //b-link.php $_blockObj_ = new Block('b-link'); $_blockObj_->setBlockDir(__DIR__) ->loadCSSFile() ->setTag('a'); //b-link_menu_active.php $_blockObj_ = new Block('b-link_menu_active'); $_blockObj_->setBlockDir(__DIR__) ->loadCSSFile() ->setTag('div'); And now let's add all this to our page:
// $menu_items_arr = array('HOME'=>'home', 'ABOUT US'=>'aboutus', 'SERVICES'=>'services', 'PARTNERS'=>'partners', 'CUSTOMERS'=>'customers', 'PROJECTS'=>'projects', 'CAREERS'=>'careers', 'CONTACT'=>'contact'); // foreach ($menu_items_arr as $itemName=>$param) { if ($_GET['param']==$param) $active = ' b-link_menu_active'; else $active=null; $menu_items_tree = $menu_items_tree.Tree::html('b-link b-link_menu'.$active)->setAttribute('href','?param='.$param)->setContent($itemName); } // $main_menu = Tree::html('b-menu')->setContent($menu_items_tree); echo $main_menu; As you can see in the Tree :: html () method you can add several block names separated by spaces. In this case, a cascade reassignment of block parameters will occur. For example, in the b-link block, the 'a' tag is defined, and in the b-link_menu_active block, the 'div' tag is defined. If we write Tree :: html ('b-link b-link_menu'), the 'a' tag will be indicated when outputting, because in the b-link_menu block, the tag is not defined and it will be inherited from the previous block. In the case of a Tree :: html entry ('b-link b-link_menu b-link_menu_active'), the 'div' tag will be specified, since it is defined on the block at the end of the chain. The same will happen with the content. The following will occur with attributes: if this attribute already exists, it will be redefined, if the previous block did not have such an attribute, it will be added to those attributes that already existed.
Buns
If you take a look at the html-code that you get as a result of creating your page, then it will be difficult to read it, because there are no indents and line breaks, but if you need to look at the generated html of any block, you can “Highlight” with the lighting () method:
echo Tree::html('b-block-name')->lighting(); Then in the generated html will be the following:
<!-- == BLOCK b-block-name HERE!!! == --!> <a class='b-block-name' href='http://tricksterz.ru' ><b>Tricksterz</b></a> <!-- ========= END ========= --!> And you can easily find the code you need.
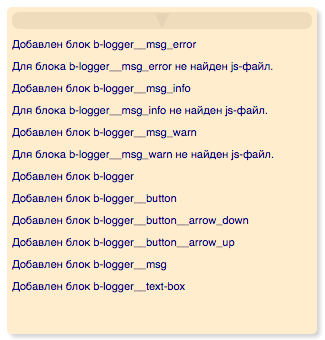
Also in BemPHP there is a class for recording logs - LogWriter. You can add an entry there like this:
LogWriter::putLog('',3); In this case, a Log object will be created, with msg = 'Comment' and msgType = '3', placed in the log storage of the LogStorage class. You can implement your own logging output, for this you need to create a class, with the Notifycator interface connected and the notify method ($ logStorage), which takes a class object of the LogStorage as a parameter. And you can use an existing logger:
echo BemPHP::showLogger(); In this case, a window will appear on your page in the lower right corner in which logs will be displayed. The window will become transparent if the cursor is not hovering over it, as well as it can be minimized by pressing the corresponding button.

It is worth noting that for the Logger to work, you need to connect the jQuery library and that the call to the ShowLogger method should be the most recent on your page.
Why is all this necessary?
The idea of the BEM methodology is to create layout with independent blocks. With this approach, you can be sure that during the corrections, your layout will not fall apart. It is also possible to more effectively distribute tasks within the development team and create a single model language for all persons related to the project. BemPHP allows you to transfer the methodology to an object-oriented environment. As a result, you get not just a layout, but an object-oriented layout !
I will be glad to your comments, comments and questions.
Source: https://habr.com/ru/post/249629/
All Articles