“Difficulties” of translating applications for Windows Store

I had a localized Windows Store app. It had the ability to switch the language to English, but even with the English interface, the application continued to amaze English-speaking users with Russian Cyrillic "hieroglyphs" on the splash screen and logos. And Russian-speaking users, in their turn, were surprised that the application was not called in Russian. How this disgrace has turned out and how to make this article well.
All who are interested in the development of universal Windows applications, I invite under the cat.
Practically all WP8 / WinRT / WinJs developers (even those who have never translated their applications into other languages) know that to localize the application, you need to create the Strings folder in which you create subfolders with names equivalent to language codes. Further in these subfolders the resources.resjson resource files for html5 applications or resources.resw for xaml applications are created.
')

Localized text strings are entered into resource dictionaries in pairs of key / string and extracted after using a similar code. C # example:
Windows.ApplicationModel.Resources.ResourceLoader resload; resload = new Windows.ApplicationModel.Resources.ResourceLoader(); txtWaitProcess.Text = resload.GetString("keyWaitProcess"); // txtWaitProcess XAML TextBlock, keyWaitProcess , . This looks a bit shorter in JavaScript:
document.getElementById('txtWaitProcess').innerText = WinJS.Resources.getString('keyWaitProcess').value; In addition, it is possible to declare content for the XAML element declaratively. In this example, the button text is set:
<Button x:Name="btnCancel" x:Uid="btnCancel" Click="do_cancel" FontFamily="Segoe UI" FontSize="20"></Button> In the resource file, you can enter a string indicating Uid, attribute through a dot and specify the value of this attribute. In this example, we can set the content of the button text, specifying btnCancel.Content as the key of the resource file .
In HTML5 applications in HTML code, the content text is set as follows:
<span data-win-res="{textContent: 'keyvisitsite'}"></span> You can also set the value of an attribute, for example, the title attribute:
<p style="" data-win-res="{attributes:{'title':'keytext7'}}"> </p> You can force the current application language using:
// C# Windows.Globalization.ApplicationLanguages.PrimaryLanguageOverride = "ru"; // , : // JavaScript Windows.Globalization.ApplicationLanguages.primaryLanguageOverride = "ru"; // : WinJS.Resources.processAll(); As you can see from the example, the application on WinJS does not require a restart. But for C # developers, there is little consolation in the form of the ability of the application to “catch” switching the current language in the system and automatically update the context. For this:
// MapChanged protected override void OnLaunched(LaunchActivatedEventArgs args) { ResourceManager.Current.DefaultContext.QualifierValues.MapChanged += Event_MapChanged; } // , , void Event_MapChanged(IObservableMap<string, string> sender, IMapChangedEventArgs<string> @event) { ResourceManager.Current.DefaultContext.Reset(); } It was a description of the well-known methods of translating text. However, many people forget that you can also translate logos, screensaver and other images.
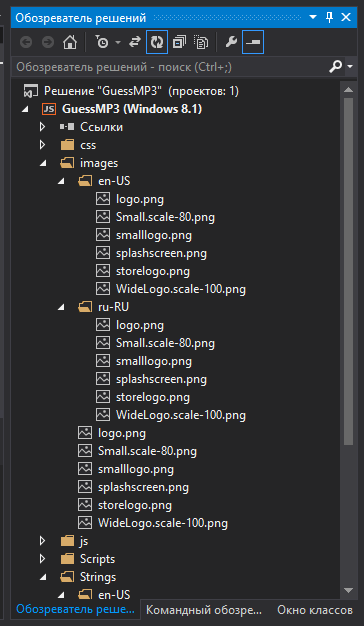
Make it very easy. It is enough to create subfolders with prefixes of language codes inside the Assets folders (in C # applications) or images (in JavaScript applications).
In the next screenshot, you can see that I have localized both standard application logos and splashscreen image.
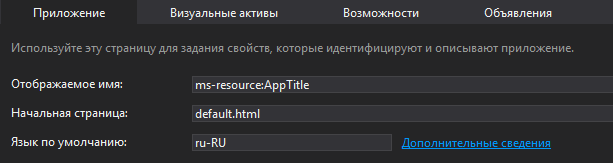
By opening the application manifest (the Package.appxmanifest file), we will be able to localize both the display name of the application and the name under which the application will be displayed in the store (the display name of the package). To do this, we use the ms-resource prefix and after it we will specify the key name in our resource files.
Finally, for guys and girls who want to automate the translation process, I want to provide a link to the official set of multilingual tools for automatic generation of resource files with translation. To localize the application in this case, we just need to create in the Strings folder only one subfolder with the default language and the resource file.
Download a set of multilingual tools at the link: a set of tools for multilingual applications
After installing the application, you will need to activate the toolkit. After opening the project, go to the “Tools” menu and click “Enable Multilingual Tools”. After that, in the “Project” menu you will see the item “Add translation languages ...”. The automatically created MultilingualResources folder will contain xlf translation files. After building the project, these files will be filled with values from the default language resource file.
Double-clicking on the xlf file will open it in an editor that includes an automatic translator.

This editor does not require Visual Studio installed on your computer, so you can easily send your xlf files and a link to a multilingual toolkit to a professional translator.
The file_name of your project.qps-ploc.xlf is a pseudo language file intended for test problems. Using this file, you can identify shifts in the markup of your code. Before publishing a project, this file must be deleted.
Source: https://habr.com/ru/post/249543/
All Articles