We listen to the birds from 1905. Recovery of old records

Not so long ago, on Habré, the news that scientists managed to restore one of the very old records, made back in 1905, slipped through without damaging the carrier. The main achievement here is just the fact of the integrity of the carrier, since the recording was made not on anything, but on a wax cylinder. This is almost the very first invented method of recording / reproducing sound, which was widely used. Prior to this, the carrier was glass cylinders with soot (they didn’t know how to reproduce them), then the foil became a coating and only then wax.
Why this is all so cool and technologically advanced, as well as which scientists had difficulty recovering, you can read the original news, and I will tell you about how I became interested in the resulting recording and took it up a little. In general, if you are interested in the process of restoration of any audio-rarity, welcome under cat.
To my surprise, the original recording turned out to be quite noisy, although it was claimed that it was processed by various noise-suppressing algorithms, etc. ... It is worth noting, of course, that compared to other wax-reconstructed recordings, this one really was very good - in quality already quite comparable with the first plates. However, as you know, the best is the enemy of the good.
')
In general, I am a fan of old pre-war songs, and often I have to update the sound of the exhibits from the depths of the network. In particular, for example, recordings of songs from old films suffer from this, since there the original of the film itself does not shine with sound quality.
In our case, we have, in fact, the impression of the track, made by a laser. Now I do not consider the fact that gentlemen, archaeologists also applied some procedures to the original sound, but I will assume that they tried to reproduce the original as accurately as possible. Since the linear dimensions of the track, in this case, are quite large, there is almost no talk of digitization errors, all the more so for the source file a sufficiently high sampling rate was chosen, about four times the frequency of the recorded sounds in the recording. So we can assume that before us is almost a perfect cast of the original sound wave.
Here we are confronted with the peculiarities of the material and the way of reproduction.
Fact number one: the material from which the cylinder is made is quite soft (wax), on it, even if it is perfectly new, it is impossible to capture sounds from a long wavelength less than a certain value.
Fact number two: in addition to the material, the technology of recording on such cylinders makes its own adjustments - the sound was literally written with a needle on the cylinder.
Fact number three: the reproduction of such a cylinder itself destroyed the carrier.
The first fact gives us a maximum recording frequency limit of about 5-6 kHz and, as we will see later, this is very important. And the second and third fact report that it is possible not to worry too much about the preservation of the steepness of the fronts and the shape of the waves - not the accuracy initially.
To begin with, let's turn on the spectral representation of the signal and take up the equalizer (and the equalizer is our everything).
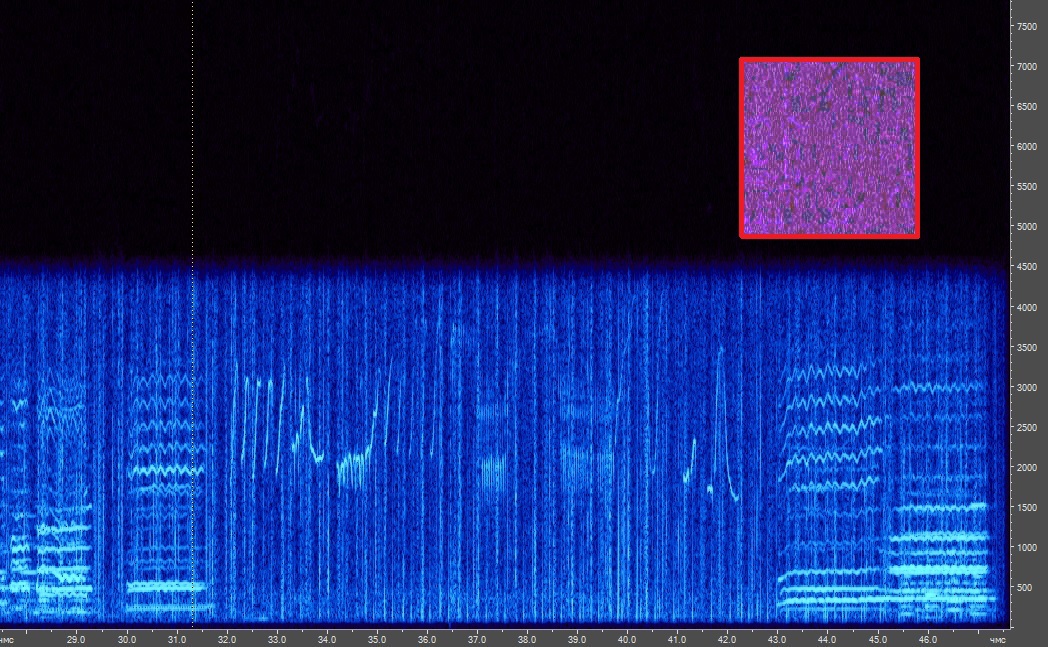
What do we see on the spectrogram? The file sampling rate is already 22000 kHz, while there are no sounds in the recording, as we see, there is no higher than 4.5 kHz, which is to be expected (see the fact number for the times). However, if you take a closer look, some dirt still seeps higher (to better be seen, he increased the contrast and brightness in the square, circled in red). Where it comes from is incomprehensible, but without going into details, in the first place we can, with a clear conscience, pry up everything above the so-called. “Nyquist frequencies” for our sample rate (11 kHz). Since the reserve is still decent there, I didn’t have to waste time on trifles and removed everything above 8 kHz, as well as below 100 Hz, because, judging by the spectrogram, there wasn’t anything sensible either.
After a bit of thinking, I approached this moment even more radically, namely, I did not freeze with the equalizer, but I started everything from the beginning and immediately changed the file sampling rate to 11 kHz.
Next, without further ado, let's use the tool that many modern audio editors have: Noise Reduction. The idea is simple - select a place in the track, where we have nothing but noise. Next, create a pattern of these noises (Capture Profile). In the simplest case, you will only need one single Noise Reduction Level slider.
You can find out about what all the other parameters are for, for example, from this video: An interesting video from Adobe. In English.
True, he says there that they supposedly updated the engine (talking about version CS5.5) and now they know how not to create unnecessary artifacts with noise cancellation, but you and I know that the difference is almost absent. And the settings are the same, except that the window in the new version is redrawn.
There are still some nuances that this charismatic man in the video does not affect, for example, the "window width" for the Fourier transform (FFT Size). If you do not go into details, when getting rid of random (this is important) noise, you should strive to use as many points as possible (Snapshots in profile), either with an equal FFT Size, or approximately two times smaller. All this means that for a high-quality “noise profile” we need as long a segment as possible, in which there is only noise. In general, the good thing about Noise Reduction is that it can be used not only for noise, but also for various background sounds (forest, rain, etc.)
In more detail about all these clever transformations it is written, for example here .
Actually, SoundForge also has more interesting tools, such as the ability to subtract a wave of arbitrary shape from the signal, but I started using Audition, even in bearded times when it was called CoolEdit, and then SoundForge couldn’t even look like , and now I’m too lazy to take on something new.
I habitually took up looking in the file for a segment with noises, but it turned out that they were too short and, when sampling for them, only too short patterns could be made. Because of this, either noise cancellation was not heard at all, or wildest artifacts appeared. Then I began to think how to deal with this. For now I thought, I decided to go from the other end.
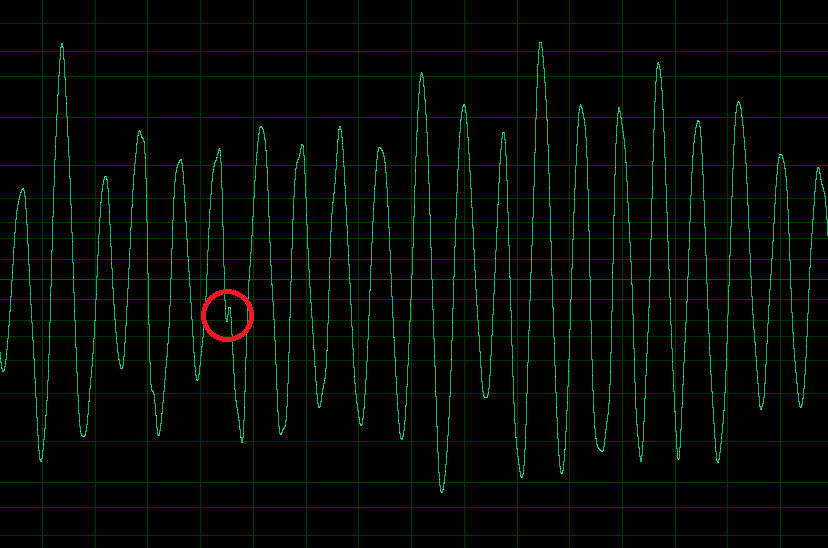
The most annoying in our case are the soft clicks, as well as the periodic noise that immediately follows the clicks. I think this effect appeared due to deviations of the cylinder cross-section from the circle shape, or the axis was not exactly standing. At some point during recording, the needle entered the wax too deeply (initial click) and then the short section went out of alignment (the characteristic noise continued several times after the click), then the cylinder made a full turn and the noise repeated. As we will see later, we still manage to get rid of this noise with the help of Noise Reduction, however, moving through the file and looking at the waveform, I noticed that there are also quite strange jambs, similar to the characteristic distortions of the A \ B-amplifiers. A very typical example on the title screen of the article, but there is still quite controversial, since that distortion is too long a period (I chose at random from a file). But the next screen shows very well what I mean.
About how these things ( not ) need to be treated and why, I decided to write separately, and in order for the article not to grow too much, I hid it under the spoiler. You can skip this piece, it is almost a lyrical digression.
How to remove distortion is not necessary and why
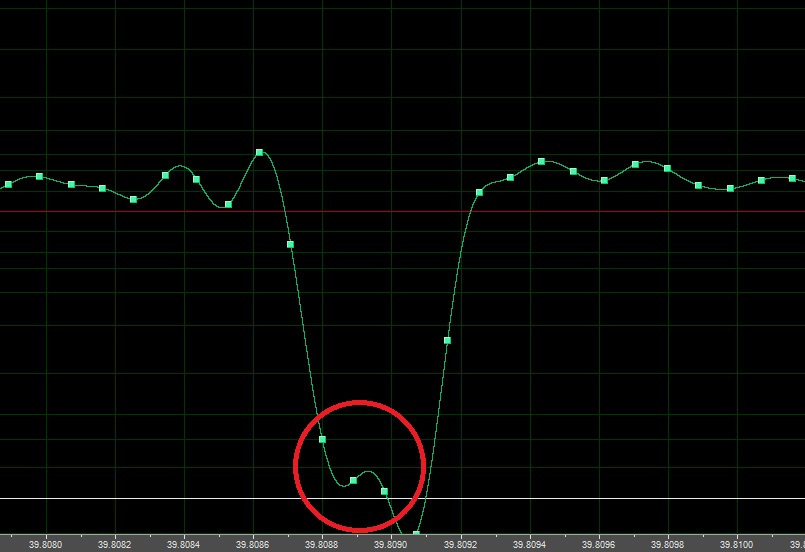
The above screen is not very clearly visible, since I moved a little away for scale, but the duration of such a fluctuation is a measly 80 microseconds. We make some simple calculations:
T = 0.00008 ms (period)
V = 340 M / s (speed of sound in air)
L = V * T = 0.0272 M (wavelength)
F = V / L = 12500 Hz (frequency)
In fact, everything can be reduced to the banal F = 1 / T , but this is Habr, everything should be hardcore.
It's time to recall the first fact voiced earlier: obviously, in such a record, 12 kilohertz have nowhere to come from, so almost certainly this is also noise. Here one could turn to a spectrometer, however, since these oscillations have a very tiny amplitude, and besides, for some reason, there are too many of them, they do not stand out at all on the spectral representation and resemble a dark, dark background (picture with a more contrasting square, this is what it is).
Hardly such shoals arose because of the movement of the needle. I suppose these are micro-cracks in wax, which appeared, most likely, because of time.
In the ideal case, it would seem as if it would be cool to just take and cut out such places, with entire periods: since these fluctuations occur in places where we actually have recording defects, we can definitely say that they do not carry any useful information. as it is not fundamentally for us to preserve the original timing of the composition, we could safely remove them - on average, they last no more than 100 µs, this is a completely scanty gap, it's impossible to notice by ear.
Only here, we are not living in an ideal world (although this is how to look), so this is a pretty bad idea. The fact is that when a site is removed, a so-called smoothing, i.e. smoothing the levels of neighboring points. Since this is our figure, such tiny irregularities after smoothing are the most natural high-frequency noise. We have limited it a bit by lowering the file sample rate, but nonetheless. Here one could try to cut such noise with an equalizer after all deletions, but again, this will change the waveform, and due to the fact that the sound is digital, everything rests on mathematics - to make an equalizer equal cut at the desired frequency just will not work . In addition, as I said above, there are too many such distortions, which makes it almost meaningless to handle everything like this — such fragments have a duration of about 100 µs, which means that this “improvement” is at least slightly noticeable (theoretically), you just need to remove an incredible number of such sites. At the same time, since in the rest of the file these distortions will not disappear anywhere, the “clean segment” in a couple of milliseconds will be trivially imperceptible against the background of noisy ones. And even a barrel of tar - the results of smoothing hundreds of remote segments will create such a noise that the initial version (which was without editing) will seem even better than what you end up with.
In addition to all of the above, the waves sometimes interfere with each other in a completely unimaginable way (sorry for tautology), which is why it is very difficult to understand exactly where the distortion is, and where, say, sibilant is very difficult - for this, at least, you need to know the features of human speech, harmonics and everything else. So, even if not smoothing, with such a removal there is a non-illusory chance to trivially spoil the original sound by breaking the interference pattern.
And nevertheless, there is a cure for these sores - below I will show how to clean the sound, including from such distortion.
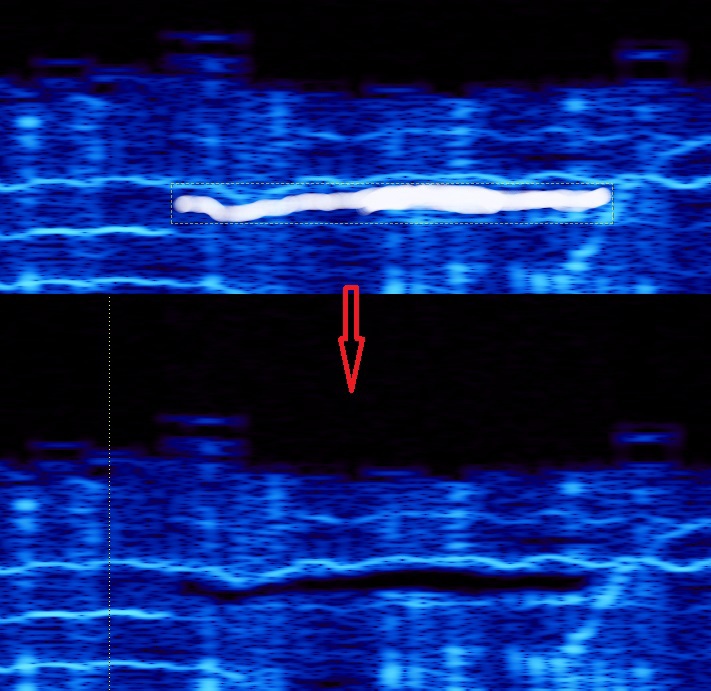
In one of the moments when I looked at the spectrogram of the signal, it dawned on me that at the end of the song there is a rather long time when nothing but “whistling birds” sounds. And this whistle on the spectrogram has a completely unambiguous band.

So we can cheat. We uncover the equalizer, set the maximum Range (this is the dynamic range, to put it simply, how much dB will be increased / attenuated by one or another frequency) and cut the frequencies at which the birds sing, and leave everything below / above.
Since even the maximum dynamic range is not enough to completely kill all the birds, I repeat the equalizer twice. In general, about how it works, and why everything is happening this way, you can write a separate article, only, I'm afraid, I don’t know the mathematics of algorithms so well to be clever about this topic.

So, now we have a rather long segment with only noise ... and, correctly, we return to what we started from. We capture the noise profile (after capturing, click close, not cancel, for otherwise all settings will be reset to the previously used ones).
In addition to Noise Reduction, there is also a Hiss Reduction filter, which, as the name implies, will help us get rid of whistles and all sorts of other things. The settings there are almost similar to the noise level, except that the FFT Size somehow works differently, but I didn’t figure out exactly how it is, so I’ve been doing it empirically, and I advise you. For Hiss Reduction, it is also necessary to specify the base noise level (the Get Noise Floor button), and so, this base level should be captured on the same segment where we captured the noise profile.
Next, roll back the last two actions (the equalizer on the birds), then select the entire file and apply Noise and Hiss Reduction to it successively.
After applying these two types of noise, we get a result that is already completely consumable. Is that small artifacts at the ends of the spectrum appear. Here an equalizer comes to the rescue again - we mercilessly cut everything below 150 Hz and above 4.5 kHz.
It became noticeably quieter, but clicks are still audible. Now the spectrometer is running again. If at this stage you listen to the file and watch the spectrogram, it will be obvious that at the time of the click, the noise has a very wide spectrum, but the melody, on the contrary, has clear wavy lines (below, for clarity, I selected one click in red).

To begin with, we will remove the impressive bursts at the places of clicks. To do this, switch to the waveform display mode. As a rule, this is just one “going wild” wave period.

In case this period was just too loud, then I usually just made it quieter. If it was also very distorted, then delete it entirely (too lazy to straighten everyone, which is already there).
And then I will tell you how to literally in two clicks edit the amplitude of such jumps.
Hint on how convenient it is to use your favorites in Audition
Actually, the idea is trivial. In Audition for an arbitrary part of the recording, we can set a specific graph of the change in volume (Amplitude and Compression -> Envelope). Those. for example, we can make a smooth attenuation, or a sharp appearance. Well, in general, you can draw what you want. Usually this tool is used for large scale. However, I figured out how to use it on microscales. Open the "Favorites" (Window-> Favorites) and create a new item. Select the Envelope effect and edit the settings. In the settings, we create the simplest arc curve, with a single exact minimum, exactly in the center of the graph (50% time, 50% amplitude). We come up with the name, save and move to our first click.
Now you just need to select at the maximum approximation one period of the “click” wave that rolls off and double-click on the created effect in the selected one. Voila - clicking on the level becomes approximately equal to the surrounding fluctuations. A sort of "ultraprecision softlimiter". In principle, it is possible to achieve a similar effect with Hard Limiter, but it will cut all the sounds in the track under one level, and we need to cut only unnecessary ones. In addition, there are still a number of nuances - for example, it is often impossible to find such settings in which the limiter cuts only what is needed, for example, when the clicks are too sharp.
Now you just need to select at the maximum approximation one period of the “click” wave that rolls off and double-click on the created effect in the selected one. Voila - clicking on the level becomes approximately equal to the surrounding fluctuations. A sort of "ultraprecision softlimiter". In principle, it is possible to achieve a similar effect with Hard Limiter, but it will cut all the sounds in the track under one level, and we need to cut only unnecessary ones. In addition, there are still a number of nuances - for example, it is often impossible to find such settings in which the limiter cuts only what is needed, for example, when the clicks are too sharp.
After the loudest clicks were defeated, it's time to get rid of the small distortions that exist throughout the file. In the previous spoiler, I already told how to remove them is not worth it, but now I will tell you how to do it more or less correctly.
Here we again come in handy spectral display of the signal. If you look at the toolbar in this mode with a keen eye, a thing that seems to be completely unrelated to the world of audio editors catches your eye. Brush. We need it.
It allows you to remove arbitrary areas on the spectrum. Like a dynamic ultra-accurate equalizer.
Remember I wrote that clicks have a wide range, but the musical sounds are well read on their background? Now we will take advantage of this. Choose this brush, look for the moment where we have such a column of noise on the background of music. Next, draw this brush in places where we only have noise, without affecting the musical line. Next, press del, then move the selection slider to view what we did, or just start painting with a brush in a new place. And we see that where we have just been removed, we now have darkness, that is, silence.
Then we repeat this procedure for all places where clicks are still clearly audible. In principle, with proper persistence, it is possible to uproot everything in general in all places, leaving only the harmonics.
Only this ungrateful occupation, in fact. Because in reality, sounds have a much more complex nature, and in addition to noises between the main harmonics, there are often less important overtones. But despite the fact that they are less important, they give the sound a more natural color and character, which can be lost if you start cutting out all non-harmonic sounds at all.
By the way, remember I wrote about the fact that when periods are removed, there is a certain noise, which seems to be like nowhere to come from? Working with a brush for a long time in the spectrograph, one can notice that even in this mode such noise also sometimes appears - it is not clear where white areas appear around a remote area - this is what it is.
So, as a final touch, we run Automatic Click remover in a mode slightly stronger than the average (upper slider 30, lower 75) - it will remove sharp clicks that could appear as a result of our manipulations. And the equalizer once again cut off all above 5 kHz and below 100 Hz. Next, we normalize the file to 100%. I also deleted the very beginning of the file, literally half a second somewhere, there is still nothing after all our manipulations.
By the way, the original article was not mentioned, and the tags in the file were not affixed, the performers of the original: Harlan And Belmont.
And Byron G. Harlan is even on discogs.com .
- Here, for comparison, the link to the original: yadi.sk/d/sLKZlyp2eQ2YK
And here is my result: yadi.sk/d/lPlJJaEQeQ2Zc
I hope you were interested.
PS I apologize in advance for the lack of axis designations on screenshots. Where the blue - there everywhere vertical Hz, where the green - DB. Horizontally everywhere seconds.
Upd. "Limit on file download exceeded"
Here is this yes! I did not think that Habr even Ya.Disk put.
Here, temporarily laid out on my personal file-trash, hopefully not collapse ...
www.chipinfo.pro/files/Birds.mp3
Source: https://habr.com/ru/post/249451/
All Articles