Car Tutorial Guide (Unity3d): Exploring an Alternative Physical Model (part 1 of 3)
Before we begin, I want to warn you that this is not a translation of the official guide, but my personal guide to installing physics on a car.
Part 1
Part 2
Part 3
Part 2
Part 3
')
The official guide said about the physics of the car, which has a simplified model and has many shortcomings that can be read at the very end Part 3 of the manual. Or watch this video:
PS For those who have exported the models, we can immediately proceed to setting up the vehicle Transition , and also can view the video on the vehicle settings (in addition to the article):
So let's get started in order.
First, download the scripts that we need ( download ), each script contains comments, we briefly examine the description of each script. To have a general idea.
AerodynamicResistance.cs : This script must be added to each car in order to calculate the aerodynamic friction of the car.
AntiRollBar.cs : Add, if necessary, to mimic the anti-roll bar for better handling.
CarController.cs : script to handle driving. This script is required for each car. You can edit this script if you want to change driving or implement AI. Also sets some characteristics of the car body, such as the center of gravity and inertia.
CarCamera.cs : Script for the camera. Which after the settings will follow our cars.
Drivetrain.cs : car engine and transmission. This script contains the gearbox and engine. One of the scripts needed in the car.
SoundController.cs : A simple class to play car sounds and other sounds. This script must be added to the car.
TractionHelper.cs : If necessary, add this script to the car to make it more sustainable.
Wheel.cs : This script simulates tire models and wheel suspension, and acts as a replacement in Unity for the built-in component Wheel Collider.
Wing.cs : Add one script or more than one if you want to simulate the downforce of aerodynamics for your car.
In fact, this is the most important part, I ran into a number of problems in the work of car physics due to improper export. And so let's first get acquainted with the coordinate system of the right-sided and left-sided.
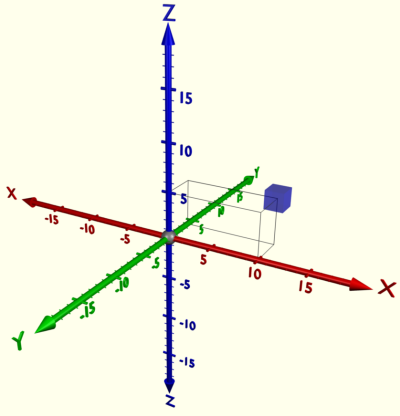
Blender uses a right-handed coordinate system with the Z axis pointing up. This coordinate system is used by almost all CAD systems . See the picture:
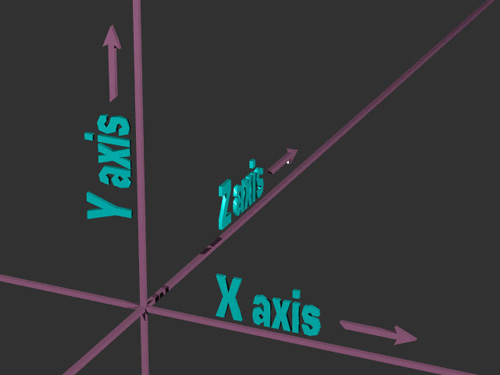
Unity3d, like almost any other game engine, uses a left-sided coordinate system. When Y is up, X is sideways, Z is forward. See the picture:
Therefore, first for the correct export of the car, we must understand for ourselves that Z + it will be the direction in the game when the car moves forward, (Z-) is the direction when the car moves backwards. (X + -) is the direction of turning sideways - but this is in Unity , which uses the left-side coordinate system . And in the right-hand coordinate system (Blender, 3ds max) Y + it will be the direction when the car is looking forward and (X + -) is the direction to the side. This means that the car must stand in the scene as shown, otherwise wait for problems with physics:

All rotation parameters must be set to 0 for further work and for Mesh (Mesh) to be generated correctly, you need to set the Scale as default. To do this, we will do the following in Blender.
1) Select all objects in the scene (A key)
2) Object> Apply> Rotate & Scale.
See the picture:

Now all the rotation parameters are taken and set to 0 . And scaling parameters (Scale) are set to default (1) . See the picture:
Now we can make “Right export” from the right-side coordinate system to the left-side coordinate system.
1) Select all objects (A key)
2) Click the sequence R> X> -90 .
3) Object> Apply> Rotate.
4) Click the sequence R> X> 90 .
Be sure to do in this sequence. Next, export the model to Unity. File> Export> FBX with the following settings:

After exporting the model, go to the folder with this model and copy the Textures folder (the folder with textures) and our FBX file . In the Assets folder of our project. This will allow Unity to import the model directly with the textures that were configured in Blender .
Game resources:

Video on setting up the car (addition to the article)
Create a Prefab and drop our object in the Prefab.
1) Assets tab > Create> Prefab
2) Rename new prefab to Car
3) Using the D & D drag method of our Asset Vaz_2106_mesh into our Prefab named Car.
4) D & D's drag and drop method from our Prefab named Car onto the stage.
The structure of Prefab Car is as follows:

VAZ2106_Car_body - Contains many elements, these are doors and headlights and bumpers, etc. (simplified structure of the car)
VAZ2106_Car_window - Car windows.
VAZ2106_WheelFL - Front left wheel.
VAZ2106_WheelFR - Front right wheel.
VAZ2106_WheelRL - Rear left wheel.
VAZ2106_WheelRR - Rear right wheel.
Now add physics to our car.
1) Select our object - the car (I have this Car).
2) Let's go to the Inspector tab and click the Add component> Physics> Rigidbody button .
3) Go to the component Rigidbody and make the settings (preferably more close to the original model).
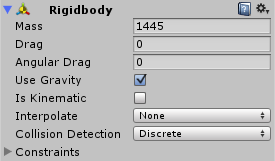
In my case, the total weight of the car is 1445 kg. Mass = 1445. All other characteristics set to 0. because they are responsible for resistance. And for the resistance we will have to answer a separate script AerodynamicResistance.cs .
Your Rigidbody settings should be something like this:
In addition to the mass of the car.
Create an empty object for each of the wheels - (you need to apply the Wheel script to each individual wheel).
1) Right click on our car Prefabs> Create Empty
2) Rename our empty object named GameObject to WheelFL (by analogy with VAZ2106_WheelFL )
3) Change the X, Y, Z coordinates of the WheelFL object to the coordinates of the VAZ2106_WheelFL object, and change the coordinates of the VAZ2106_WheelFL object to 0.
4) Drag and drop D & D our VAZ2106_WheelFL into the WheelFL object.
5) Repeat paragraph 1-4 3 more times changing the name of the GameObject in accordance with our wheels.
We should have the following file structure:

Next, add the Wheel.cs script to our wheels.
1) Select WheelFL go to the inspector tab.
2) Click the Add component> Script> Wheel button.
3) Repeat steps 1-2 more 3 times to WheelFR, WheelRL, WheelRR .
Each wheel should have the following structure of components:
Settings for wheels.
1) WheelFL:

2) WheelFR:

3) WheelRL:

4) WheelRR:

Basic settings here:
Radius : - the radius of the wheel, the value must be selected depending on the size of the wheel.
Suspresion Travel : - car suspension, in the last parts it was discussed in more detail about this.
Dumping : - spring stiffness.
The remaining settings are also very important, but I think they will be discussed in the next section.
With wheels finished.
1) Right click on the Prefabs of our car> Create Empty .
2) Rename our empty object with the name GameObject to CoG (abbreviation center of gravity).
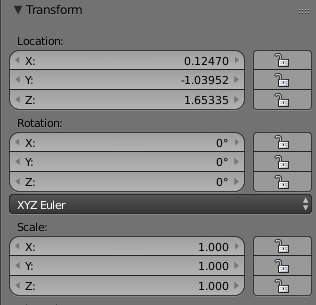
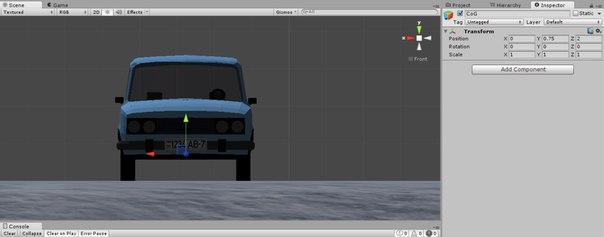
3) Set the coordinates in the Transform component of the CoG object as in the figures.
It should look like this:
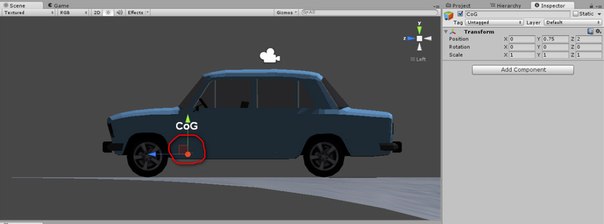
The center of gravity should approximately be ahead slightly above the bottom of the car. but in principle for each car is individually configured. All this will be debugged during testing.
1) Right click on our car Prefabs> Create Empty
2) Rename our empty object named GameObject to Collider_body
3) Add a Box Collider component. (Add component> Physics> Box Collider)
4) Make the settings of the components as in the figure. Maybe you will have other settings, see how the Box collider should cover.
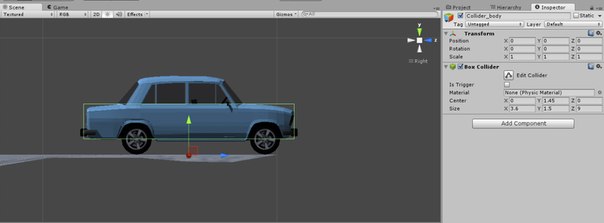


Collider needed to create collisions and the correct physics of the car.
1) Right click on the Prefabs of our car> Create Empty .
2) Rename our empty object named GameObject to Collider_head .
3) Add a Box Collider component (Add component> Physics> Box Collider).
4) Make the settings of the components as in the figure. Maybe you will have other settings, see how the Box collider should cover.


The collider is needed for what would, if an object falls on the roof of the car, so that it interacts with the roof and not with the body of the car.
In the end, you should get something like this:

Of course, you can use Mesh Collider, but Mesh Collider will require more resources than primitive objects. You decide.
So, we have partially dealt with the wheels, we will adjust the wheel settings later, and now we will add components to our Prefab car.
1) Select the prefab of the car.
2) On the inspector tab , click the Add Component> Script> Car Controller button.
Add CarController script and Drivetrain script dependent on it.
3) Click the Add Component> Script> Sound Controller button.
4) Click the Add Component> Script> Anti Roll bar button.
5) Repeat paragraph 4.
6) Click the Add Component> Script> Aerodynamic Resistance button.
7) Click the Add Component> Script> Traction Helper button.

After adding scripts, we make the following settings for our scripts.


It remains the last part, we will make the settings of our camera.
1) Click the Add Component> Script> Car Camera button.
Make the following setting:

Target - the object on which the camera will be oriented.
Height - The height of the camera.
Distance_to_back - distance from object to camera.
Distance_from_back - distance from object to camera after vehicle acceleration (approach effect).
Naturally, all these settings must be configured for each car individually. A description of all the settings is not given, because I still understand them, and did not want to describe the parameters in which 100% is not sure. However, this guide may be the starting point for creating your own car model.
Part 1
Part 2
Part 3
Exploring an alternative physical model:
Part 2
')
The official guide said about the physics of the car, which has a simplified model and has many shortcomings that can be read at the very end Part 3 of the manual. Or watch this video:
PS For those who have exported the models, we can immediately proceed to setting up the vehicle Transition , and also can view the video on the vehicle settings (in addition to the article):
So let's get started in order.
First, download the scripts that we need ( download ), each script contains comments, we briefly examine the description of each script. To have a general idea.
We study the script description.
AerodynamicResistance.cs : This script must be added to each car in order to calculate the aerodynamic friction of the car.
AntiRollBar.cs : Add, if necessary, to mimic the anti-roll bar for better handling.
CarController.cs : script to handle driving. This script is required for each car. You can edit this script if you want to change driving or implement AI. Also sets some characteristics of the car body, such as the center of gravity and inertia.
CarCamera.cs : Script for the camera. Which after the settings will follow our cars.
Drivetrain.cs : car engine and transmission. This script contains the gearbox and engine. One of the scripts needed in the car.
SoundController.cs : A simple class to play car sounds and other sounds. This script must be added to the car.
TractionHelper.cs : If necessary, add this script to the car to make it more sustainable.
Wheel.cs : This script simulates tire models and wheel suspension, and acts as a replacement in Unity for the built-in component Wheel Collider.
Wing.cs : Add one script or more than one if you want to simulate the downforce of aerodynamics for your car.
Car preparation
In fact, this is the most important part, I ran into a number of problems in the work of car physics due to improper export. And so let's first get acquainted with the coordinate system of the right-sided and left-sided.
Blender uses a right-handed coordinate system with the Z axis pointing up. This coordinate system is used by almost all CAD systems . See the picture:
Unity3d, like almost any other game engine, uses a left-sided coordinate system. When Y is up, X is sideways, Z is forward. See the picture:
Therefore, first for the correct export of the car, we must understand for ourselves that Z + it will be the direction in the game when the car moves forward, (Z-) is the direction when the car moves backwards. (X + -) is the direction of turning sideways - but this is in Unity , which uses the left-side coordinate system . And in the right-hand coordinate system (Blender, 3ds max) Y + it will be the direction when the car is looking forward and (X + -) is the direction to the side. This means that the car must stand in the scene as shown, otherwise wait for problems with physics:
All rotation parameters must be set to 0 for further work and for Mesh (Mesh) to be generated correctly, you need to set the Scale as default. To do this, we will do the following in Blender.
1) Select all objects in the scene (A key)
2) Object> Apply> Rotate & Scale.
See the picture:
Now all the rotation parameters are taken and set to 0 . And scaling parameters (Scale) are set to default (1) . See the picture:
Now we can make “Right export” from the right-side coordinate system to the left-side coordinate system.
1) Select all objects (A key)
2) Click the sequence R> X> -90 .
3) Object> Apply> Rotate.
4) Click the sequence R> X> 90 .
Be sure to do in this sequence. Next, export the model to Unity. File> Export> FBX with the following settings:
After exporting the model, go to the folder with this model and copy the Textures folder (the folder with textures) and our FBX file . In the Assets folder of our project. This will allow Unity to import the model directly with the textures that were configured in Blender .
Game resources:
Car setup
Video on setting up the car (addition to the article)
Create a Prefab and drop our object in the Prefab.
1) Assets tab > Create> Prefab
2) Rename new prefab to Car
3) Using the D & D drag method of our Asset Vaz_2106_mesh into our Prefab named Car.
4) D & D's drag and drop method from our Prefab named Car onto the stage.
The structure of Prefab Car is as follows:
VAZ2106_Car_body - Contains many elements, these are doors and headlights and bumpers, etc. (simplified structure of the car)
VAZ2106_Car_window - Car windows.
VAZ2106_WheelFL - Front left wheel.
VAZ2106_WheelFR - Front right wheel.
VAZ2106_WheelRL - Rear left wheel.
VAZ2106_WheelRR - Rear right wheel.
Now add physics to our car.
1) Select our object - the car (I have this Car).
2) Let's go to the Inspector tab and click the Add component> Physics> Rigidbody button .
3) Go to the component Rigidbody and make the settings (preferably more close to the original model).
In my case, the total weight of the car is 1445 kg. Mass = 1445. All other characteristics set to 0. because they are responsible for resistance. And for the resistance we will have to answer a separate script AerodynamicResistance.cs .
Your Rigidbody settings should be something like this:
In addition to the mass of the car.
Making wheels
Create an empty object for each of the wheels - (you need to apply the Wheel script to each individual wheel).
1) Right click on our car Prefabs> Create Empty
2) Rename our empty object named GameObject to WheelFL (by analogy with VAZ2106_WheelFL )
3) Change the X, Y, Z coordinates of the WheelFL object to the coordinates of the VAZ2106_WheelFL object, and change the coordinates of the VAZ2106_WheelFL object to 0.
4) Drag and drop D & D our VAZ2106_WheelFL into the WheelFL object.
5) Repeat paragraph 1-4 3 more times changing the name of the GameObject in accordance with our wheels.
We should have the following file structure:
Next, add the Wheel.cs script to our wheels.
1) Select WheelFL go to the inspector tab.
2) Click the Add component> Script> Wheel button.
3) Repeat steps 1-2 more 3 times to WheelFR, WheelRL, WheelRR .
Each wheel should have the following structure of components:
Settings for wheels.
1) WheelFL:
2) WheelFR:
3) WheelRL:
4) WheelRR:
Basic settings here:
Radius : - the radius of the wheel, the value must be selected depending on the size of the wheel.
Suspresion Travel : - car suspension, in the last parts it was discussed in more detail about this.
Dumping : - spring stiffness.
The remaining settings are also very important, but I think they will be discussed in the next section.
With wheels finished.
Adding a center of gravity and a car collider
Creating a center of gravity
1) Right click on the Prefabs of our car> Create Empty .
2) Rename our empty object with the name GameObject to CoG (abbreviation center of gravity).
3) Set the coordinates in the Transform component of the CoG object as in the figures.
It should look like this:
The center of gravity should approximately be ahead slightly above the bottom of the car. but in principle for each car is individually configured. All this will be debugged during testing.
Creating Collider for Car Body
1) Right click on our car Prefabs> Create Empty
2) Rename our empty object named GameObject to Collider_body
3) Add a Box Collider component. (Add component> Physics> Box Collider)
4) Make the settings of the components as in the figure. Maybe you will have other settings, see how the Box collider should cover.
Collider needed to create collisions and the correct physics of the car.
Creating a Collider for a Car Roof
1) Right click on the Prefabs of our car> Create Empty .
2) Rename our empty object named GameObject to Collider_head .
3) Add a Box Collider component (Add component> Physics> Box Collider).
4) Make the settings of the components as in the figure. Maybe you will have other settings, see how the Box collider should cover.
The collider is needed for what would, if an object falls on the roof of the car, so that it interacts with the roof and not with the body of the car.
In the end, you should get something like this:
Of course, you can use Mesh Collider, but Mesh Collider will require more resources than primitive objects. You decide.
Create and configure the car
So, we have partially dealt with the wheels, we will adjust the wheel settings later, and now we will add components to our Prefab car.
1) Select the prefab of the car.
2) On the inspector tab , click the Add Component> Script> Car Controller button.
Add CarController script and Drivetrain script dependent on it.
3) Click the Add Component> Script> Sound Controller button.
4) Click the Add Component> Script> Anti Roll bar button.
5) Repeat paragraph 4.
6) Click the Add Component> Script> Aerodynamic Resistance button.
7) Click the Add Component> Script> Traction Helper button.
After adding scripts, we make the following settings for our scripts.
Main Camera - Settings
It remains the last part, we will make the settings of our camera.
1) Click the Add Component> Script> Car Camera button.
Make the following setting:
Target - the object on which the camera will be oriented.
Height - The height of the camera.
Distance_to_back - distance from object to camera.
Distance_from_back - distance from object to camera after vehicle acceleration (approach effect).
Naturally, all these settings must be configured for each car individually. A description of all the settings is not given, because I still understand them, and did not want to describe the parameters in which 100% is not sure. However, this guide may be the starting point for creating your own car model.
Source: https://habr.com/ru/post/249363/
All Articles