Cross-platform Android Studio app on jMonkeyEngine 3
 jMonkeyEngine (jME) is a three-dimensional open source game engine. Written in Java and uses the default LWJGL for rendering. Fully supported versions of OpenGL from the second to the fourth.
Once mentioned on Habré in the distant 2010th year.
In addition to its characteristics , Java is noteworthy and not very interesting is NetBeans development environment, which comes with the SDK.
In this article I want to talk about how to screw the monkey to the familiar Android Studio.
Basic project
We create a new project for an API of at least 8 with Blank Activity and in the root directory of the project we create the core and desktop folders. In the language of screenshots, it looks like:
')
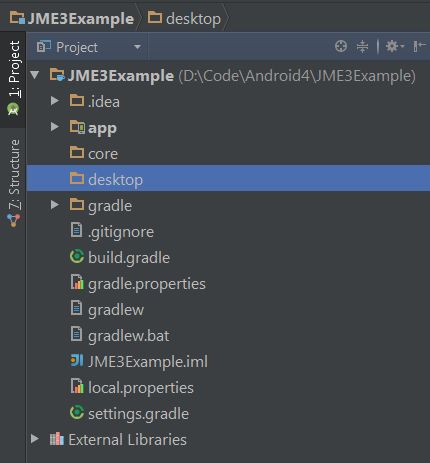
We mean that core is the main application code, and desktop and app are the launchers for the desktop and Android, respectively.
In the root settings.gradle we specify these directories:
include ':app', ':core', ':desktop' Click Sync Now in the upper right corner of the window. This will need to be done with any modification of the grad files.
In the core and desktop directories, create the build.gradle file:
apply plugin: "java" sourceSets.main.java.srcDirs = ["src/"] In the root build.gradle , we add the jmonkeyengine repository and the minimum set of libraries for our subprojects:
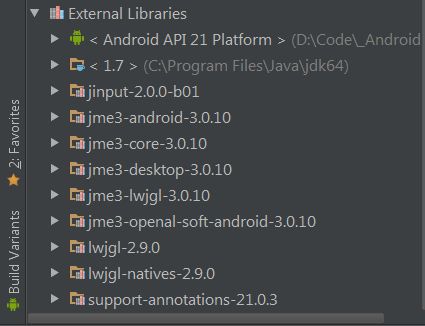
buildscript { repositories { jcenter() } dependencies { classpath 'com.android.tools.build:gradle:1.0.0' } } allprojects { repositories { jcenter() maven { url 'http://updates.jmonkeyengine.org/maven' } } } project(":core") { apply plugin: "java" dependencies { compile 'com.jme3:jme3-core:3.0.+' } } project(":desktop") { apply plugin: "java" dependencies { compile project(":core") compile 'com.jme3:jme3-desktop:3.0.+' compile 'com.jme3:jme3-lwjgl:3.0.+' } } project(":app") { apply plugin: "android" dependencies { compile project(":core") compile 'com.jme3:jme3-android:3.0.+' } } After synchronization, the indicated libraries with their colleagues should appear in External Libraries :
In the core and desktop directories we create the src directories, add the Game.java file to the core / src with the contents of the base example:
package org.lunapark.dev.jme3example; import com.jme3.app.SimpleApplication; import com.jme3.material.Material; import com.jme3.math.ColorRGBA; import com.jme3.scene.Geometry; import com.jme3.scene.shape.Box; public class Game extends SimpleApplication { @Override public void simpleInitApp() { Box b = new Box(1, 1, 1); Geometry geom = new Geometry("Box", b); Material mat = new Material(assetManager, "Common/MatDefs/Misc/Unshaded.j3md"); mat.setColor("Color", ColorRGBA.Blue); geom.setMaterial(mat); rootNode.attachChild(geom); } } Package specify the same as when creating the project and cure ailments with Alt + Enter and Move to package ... :

In desktop / src we create the file DesktopLauncher.java :
package org.lunapark.dev.jme3example; public class DesktopLauncher { public static void main(String[] args) { Game game = new Game(); game.start(); } } You can run DesktopLauncher.java and admire the fantastic three-dimensional model of the blue cube.
Android
To run on Android, we replace the code in MainActivity.java with the code from the example ( be sure to change the value of the appClass variable ):
package org.lunapark.dev.jme3example; import android.content.pm.ActivityInfo; import com.jme3.app.AndroidHarness; import com.jme3.system.android.AndroidConfigChooser; import java.util.logging.Level; import java.util.logging.LogManager; public class MainActivity extends AndroidHarness { public MainActivity() { // Set the application class to run appClass = "org.lunapark.dev.jme3example.Game"; // Try ConfigType.FASTEST; or ConfigType.LEGACY if you have problems eglConfigType = AndroidConfigChooser.ConfigType.BEST; // Exit Dialog title & message exitDialogTitle = "Exit?"; exitDialogMessage = "Are you sure you want to quit?"; // Choose screen orientation screenOrientation = ActivityInfo.SCREEN_ORIENTATION_LANDSCAPE; // Enable MouseEvents being generated from TouchEvents (default = true) mouseEventsEnabled = true; // Set the default logging level (default=Level.INFO, Level.ALL=All Debug Info) LogManager.getLogManager().getLogger("").setLevel(Level.INFO); } } Let's add AndroidManifest.xml with recommended parameters (android: launchMode = "singleTask" and the "supports-screens" block):
<?xml version="1.0" encoding="utf-8"?> <manifest xmlns:android="http://schemas.android.com/apk/res/android" package="org.lunapark.dev.jme3example"> <application android:allowBackup="true" android:icon="@drawable/ic_launcher" android:label="@string/app_name" android:theme="@style/AppTheme"> <activity android:name=".MainActivity" android:launchMode="singleTask" android:label="@string/app_name"> <intent-filter> <action android:name="android.intent.action.MAIN" /> <category android:name="android.intent.category.LAUNCHER" /> </intent-filter> </activity> </application> <supports-screens android:anyDensity="true" android:largeScreens="true" android:normalScreens="true" android:smallScreens="true" /> </manifest> You can run the app and contemplate the cube already on the phone. If instead of a cube you contemplate ClassNotFound Exception and other NPEs, you most likely forgot to change the appClass variable in MainActivity.java . With me it was so.
You can, of course, in the MainActivity.java, replace the appClass variable with
appClass = Game.class.getCanonicalName(); and get rid of the hardcode in the variables for the dialogue, but what are you after this Hindu, right?
Resources
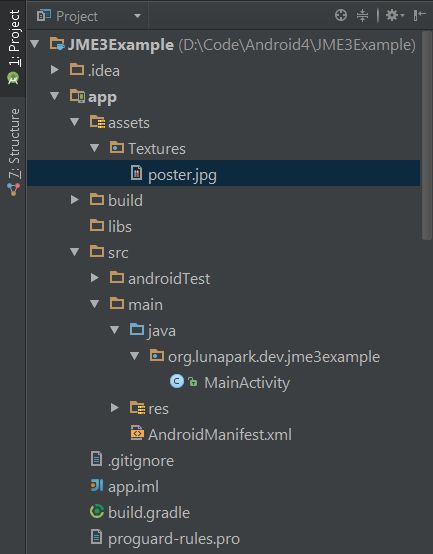
To use the resources, create the assets directory in the app . Add
sourceSets { main { assets.srcDirs = ['src/main/assets', 'assets/'] } } in app / build.gradle :
apply plugin: 'com.android.application' android { compileSdkVersion 21 buildToolsVersion "21.1.2" defaultConfig { applicationId "org.lunapark.dev.jme3example" minSdkVersion 8 targetSdkVersion 21 versionCode 1 versionName "1.0" } buildTypes { release { minifyEnabled false proguardFiles getDefaultProguardFile('proguard-android.txt'), 'proguard-rules.pro' } } sourceSets { main { assets.srcDirs = ['src/main/assets', 'assets/'] } } } dependencies { compile fileTree(dir: 'libs', include: ['*.jar']) compile 'com.android.support:appcompat-v7:21.0.3' } The creators of the engine recommend this directory structure:
jMonkeyProjects/MyGame/assets/Interface/ # .font, .jpg, .png, .xml jMonkeyProjects/MyGame/assets/MatDefs/ # .j3md jMonkeyProjects/MyGame/assets/Materials/ # .j3m jMonkeyProjects/MyGame/assets/Models/ # .j3o jMonkeyProjects/MyGame/assets/Scenes/ # .j3o jMonkeyProjects/MyGame/assets/Shaders/ # .j3f, .vert, .frag jMonkeyProjects/MyGame/assets/Sounds/ # .ogg, .wav jMonkeyProjects/MyGame/assets/Textures/ # .jpg, .png; also .mesh.xml+.material, .mtl+.obj, .blend (!) Support comrades and stuff some small texture for checking in assets / Textures :
Replace the code in Game.java :
@Override public void simpleInitApp() { Box b = new Box(1, 1, 1); Geometry geom = new Geometry("Box", b); Material mat = new Material(assetManager, "Common/MatDefs/Misc/Unshaded.j3md"); TextureKey key = new TextureKey("Textures/poster.jpg"); Texture tex = assetManager.loadTexture(key); mat.setTexture("ColorMap", tex); geom.setMaterial(mat); rootNode.attachChild(geom); } Running an application on an android device should be successful, while launching a desktop version of a computer will swear at an AssetNotFoundException evil red.
Go to desktop / build.gradle and explain:
apply plugin: "java" sourceSets.main.java.srcDirs = ["src/"] dependencies { compile files("../app/assets") } According to custom, we synchronize and, with a high degree of probability, we observe a positive result.

What's next?
If you are not very familiar with jME, then it would be nice to go to the Tutorials for Beginners section on the official website and go through the basics. Or even download the engine itself, complete with IDE based on NetBeans, JDK, Blender and all sorts of other useful things.
When studying examples in the root build.gradle, I recommend adding:
project(":core") { apply plugin: "java" dependencies { compile 'com.jme3:jme3-core:3.0.+' compile 'com.jme3:jme3-effects:3.0.+' compile 'com.jme3:jme3-networking:3.0.+' compile 'com.jme3:jme3-plugins:3.0.+' compile 'com.jme3:jme3-jogg:3.0.+' compile 'com.jme3:jme3-terrain:3.0.+' compile 'com.jme3:jme3-blender:3.0.+' compile 'com.jme3:jme3-jbullet:3.0.+' compile 'com.jme3:jme3-niftygui:3.0.+' compile 'net.sf.sociaal:jME3-testdata:3.0.0.20130526' } } This is almost all engine modules plus sample resources ( testdata ). Full list of modules on the official website .
When developing for mobile platforms, there are certain difficulties (using shaders, processing gestures, ...), but something quite playable can be made if you follow the famous 1899 expression . Although, perhaps, this applies not only to jMonkeyEngine.
I hope all this will help someone and will not harm anyone.
Source: https://habr.com/ru/post/249305/
All Articles