Arduino controls in the basement temperature, humidity and flooding and provides data to a web page.
Hello.
I want to share the experience of creating a monitoring and warning system.
At one of the construction sites did the building with a pool, sauna, gym and recreation room. All this was in decent size for one owner. Technically, it took 2 basements: the 1st for servicing the pool pumps - small, the 2nd for servicing heating systems and accumulating heat
')
Were purchased 2 floor euro-hatch of different sizes for two basements. The hatches were buried with 4 screws and had very tight rubber seals. To open the basement, it was necessary to 4 people (and some health). During the operation of all the equipment in the basement, the temperature and humidity rose, while controlling that there is almost uncomfortable.
As a result, it was decided to create a device that would show, as well as control the fan, buzzer, electric valve (water), and it could be monitored from any smart device.
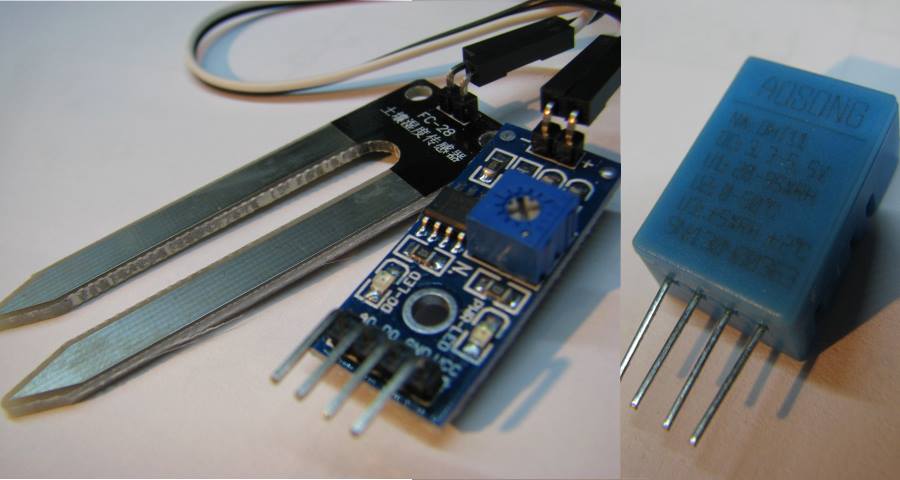
Based on the Arduino Pro Mini plus Ethernet ENC28J60. For measuring humidity and temperature sensor DHT11 and FC-28 (soil moisture sensor - as a sensor flooding).
Those task:
1) Management and information via the Web interface;
2) Turning on and off ventilation for a given level of humidity;
3) Turning on and off the water supply valve (possibly a howler, a drain pump) when flooded.
In choosing the Arduino Pro Mini, you also need to think, since there are different versions:
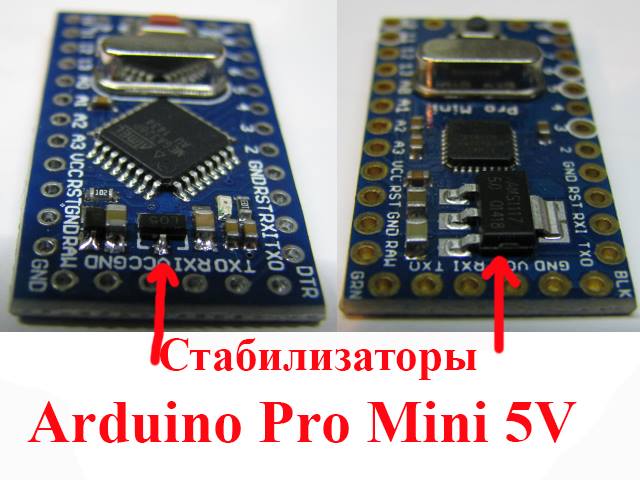
It is better to take the one in which the stabilizer is more powerful, since the one that is weaker, with active relays and the network controller, the stabilizer boils, which leads to a system hang (I missed this nuance and got the hang, but gained more valuable experience).
Network controllers also need to be chosen carefully, as there are those that are from 5V (stabilizer on the back of the module) and 3.3V. You will need an additional stabilizer at 3.3V.
The power supply took from the usual switch (or router) TP-Link 9V 500mA (approximately), they are often found for a penny from the burned switches or routers.
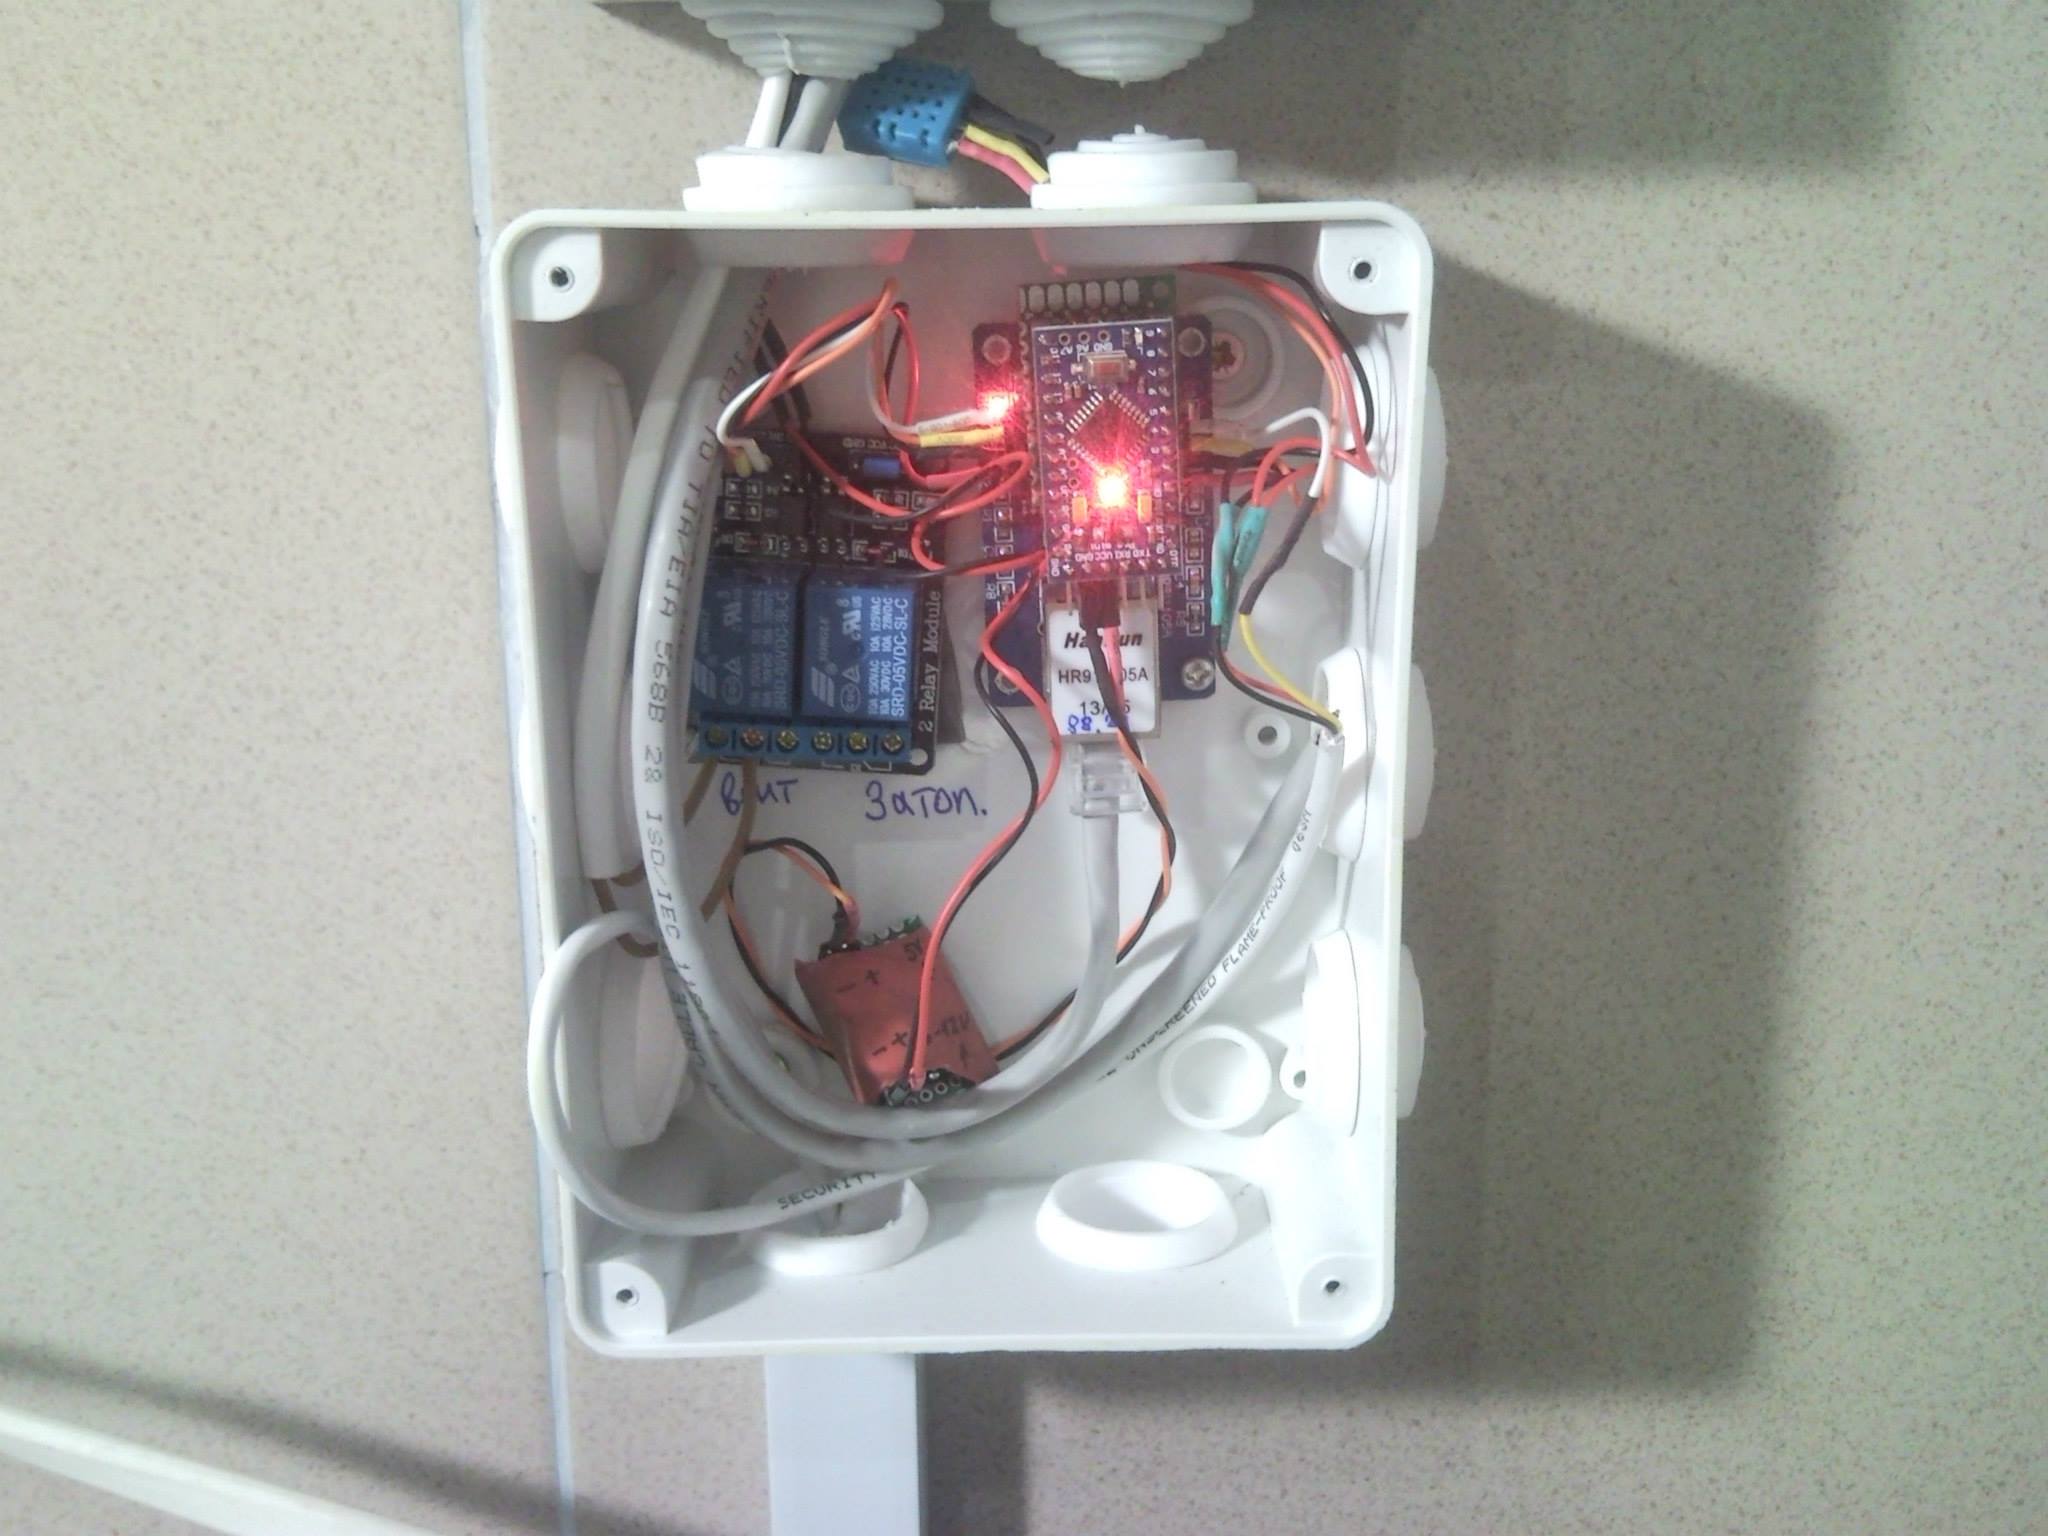
The principle of operation is simple: there are 2 sensors that merge information onto the controller. Depending on the situation, the controller turns the relay on and off (water supply valve, possibly a howler, a drain pump, a fan). Management and monitoring through the WEB interface which is implemented by the program based on the module ENC28J60.


1) Triggering the flooding sensor = switching on the relay (water supply valve (howler) pumping out the pump; + informing on the web page in large print;
2) Increasing the humidity above the set level = turning on the fan relay;
3) All information about the temperature of humidity and flooding is displayed on the web page;
4) When the temperature drops below 5 degrees alert on the web site about the threat.
You can see it in the video:
In practice, everything is very convenient. You can always watch from the TV (Smart), phone or tablet - what is happening in enclosed spaces without opening them.


I like to create devices that make life easier, and not just create a toy to play and throw away.
With the design of the page is not very strained, because it is technical in nature and should be practical, and not complex and beautiful.
I hope this article will help someone, but someone will inspire you to create your project.

And here is the program archive with libraries:
www.facebook.com/download/766447720118309/potop.IDE%201.5.2.rar
I want to share the experience of creating a monitoring and warning system.
At one of the construction sites did the building with a pool, sauna, gym and recreation room. All this was in decent size for one owner. Technically, it took 2 basements: the 1st for servicing the pool pumps - small, the 2nd for servicing heating systems and accumulating heat
')
Were purchased 2 floor euro-hatch of different sizes for two basements. The hatches were buried with 4 screws and had very tight rubber seals. To open the basement, it was necessary to 4 people (and some health). During the operation of all the equipment in the basement, the temperature and humidity rose, while controlling that there is almost uncomfortable.
As a result, it was decided to create a device that would show, as well as control the fan, buzzer, electric valve (water), and it could be monitored from any smart device.
Based on the Arduino Pro Mini plus Ethernet ENC28J60. For measuring humidity and temperature sensor DHT11 and FC-28 (soil moisture sensor - as a sensor flooding).
Those task:
1) Management and information via the Web interface;
2) Turning on and off ventilation for a given level of humidity;
3) Turning on and off the water supply valve (possibly a howler, a drain pump) when flooded.
In choosing the Arduino Pro Mini, you also need to think, since there are different versions:
It is better to take the one in which the stabilizer is more powerful, since the one that is weaker, with active relays and the network controller, the stabilizer boils, which leads to a system hang (I missed this nuance and got the hang, but gained more valuable experience).
Network controllers also need to be chosen carefully, as there are those that are from 5V (stabilizer on the back of the module) and 3.3V. You will need an additional stabilizer at 3.3V.
The power supply took from the usual switch (or router) TP-Link 9V 500mA (approximately), they are often found for a penny from the burned switches or routers.
The principle of operation is simple: there are 2 sensors that merge information onto the controller. Depending on the situation, the controller turns the relay on and off (water supply valve, possibly a howler, a drain pump, a fan). Management and monitoring through the WEB interface which is implemented by the program based on the module ENC28J60.
1) Triggering the flooding sensor = switching on the relay (water supply valve (howler) pumping out the pump; + informing on the web page in large print;
2) Increasing the humidity above the set level = turning on the fan relay;
3) All information about the temperature of humidity and flooding is displayed on the web page;
4) When the temperature drops below 5 degrees alert on the web site about the threat.
You can see it in the video:
In practice, everything is very convenient. You can always watch from the TV (Smart), phone or tablet - what is happening in enclosed spaces without opening them.
I like to create devices that make life easier, and not just create a toy to play and throw away.
With the design of the page is not very strained, because it is technical in nature and should be practical, and not complex and beautiful.
I hope this article will help someone, but someone will inspire you to create your project.
Program for Arduino
#include "etherShield.h" #include "ETHER_28J60.h" #include <EEPROM.h> #include "DHT.h" #define DHTPIN 2 // Data // #define DHTTYPE DHT11 // DHT 11 //#define DHTTYPE DHT22 // DHT 22 (AM2302) //#define DHTTYPE DHT21 // DHT 21 (AM2301) // Connect pin 1 (on the left) of the sensor to +5V // Connect pin 2 of the sensor to whatever your DHTPIN is // Connect pin 4 (on the right) of the sensor to GROUND // Connect a 10K resistor from pin 2 (data) to pin 1 (power) of the sensor // DHT dht(DHTPIN, DHTTYPE); int VlagInPin = 3; int RelPin = 4; int PotPin = 5; byte vlaga = 75; int temp = 55; int vent =85; int pot; // byte vf; // static uint8_t mac[6] = {0x54,0x55,0x58,0x10,0x00,0x24}; static uint8_t ip[4] = {192,168,88,24}; static uint16_t port = 80; ETHER_28J60 ethernet; void setup() { dht.begin(); // pinMode(VlagInPin, INPUT); pinMode(RelPin, OUTPUT); digitalWrite(RelPin, HIGH); pinMode(PotPin, OUTPUT); digitalWrite(PotPin, HIGH); vf = EEPROM.read(0); // if ( vf > 110) { EEPROM.write(0, 110); // } ethernet.setup(mac, ip, port); } void loop() { // 250 //float h = dht.readHumidity(); //float t = dht.readTemperature(); vlaga = dht.readHumidity(); temp = dht.readTemperature(); pot = digitalRead(VlagInPin); if (pot == LOW) { // digitalWrite(PotPin, LOW); } if (pot == HIGH) { // digitalWrite(PotPin, HIGH); } if (vlaga >= vf) { // digitalWrite(RelPin, LOW); } if (vlaga < vf-1) { // digitalWrite(RelPin, HIGH); } String param; if (param = ethernet.serviceRequest()) { ethernet.print("<H1> </H1>"); ethernet.print("<a href=\"/\"> </a><br>"); if (pot == LOW) { // ethernet.print("<H1> !!!</H1>"); } if (temp <= 3) { // ethernet.print("<H1> </H1>"); } if (param == "plus") { vf++; // if ( vf > 110) { vf=110; } EEPROM.write(0, vf); // } if (param == "minus") { vf--; // if ( vf < 5) { vf=5; } EEPROM.write(0, vf); // } ethernet.print("<H1></H1>"); ethernet.print("<H2>"); ethernet.print(temp); ethernet.print("</H2>"); ethernet.print("<H1></H1>"); ethernet.print("<H2>"); ethernet.print(vlaga); ethernet.print("</H2>"); ethernet.print("<H1> </H1>"); ethernet.print("<H2>"); ethernet.print(vf); ethernet.print("</H2>"); ethernet.print("<a href=\"/minus\"></a> <a href=\"/plus\"></a><br>"); ethernet.respond(); } } And here is the program archive with libraries:
www.facebook.com/download/766447720118309/potop.IDE%201.5.2.rar
Source: https://habr.com/ru/post/249201/
All Articles