Creating plug-ins for AutoCAD using the .NET API (part 3 - working with layers)
This is another article from the series on the development of plug-ins for AutoCAD. It will be about basic operations with layers in the document.
All readers of this article are probably familiar with what a layer is. At the primitive level, it can be considered a container for drawing elements that have some common feature that is important for the developer.
Layers can greatly simplify the life of not only the engineer who creates the drawing, but also the programmer. For example, all elements located on one layer can be hidden very quickly, if necessary, and then re-displayed on the workspace.
')
In the framework of this article, we will need some basic information, which can basically be gathered from here ( mirror )
Any AutoCAD document always contains at least one layer — zero (with the name “0”) that cannot be deleted. This layer is often very useful - for example, when removing other layers.
One of the document layers must be current. All the objects added to the drawing are placed on it (at least primitive ones - things are somewhat more complicated with blocks).
Any (including zero) layer in AutoCAD has three properties:
All these properties are binary (each of them can be considered a “yes / no” flag).
The " on " flag is responsible for the visibility of the layer. If this flag is cleared, then all elements located on the layer are no longer displayed in the drawing.
The flag " frozen " is also responsible for the visibility of the layer. In its action, it is similar to the "on" flag. As stated in the documentation, this property improves performance on very large drawings.
The " locked " flag is responsible for the ability to edit the layer. If this flag is set, then all elements located on the layer become inaccessible for any changes (move, delete, etc.). In addition, new items cannot be added to the locked layer.
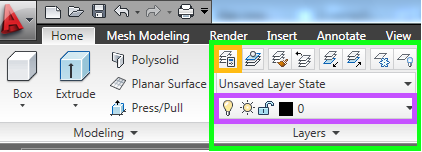
Layer properties can be controlled from AutoCAD. On the below picture is poisonous green, the Layers panel is highlighted, and the drop-down list of layers is highlighted in purple, on the left side of which are the property switches (light, sun, open lock — on, freeze, and lock, respectively ).
The simplest actions with layers were considered in the previous paragraph. For more complex operations (for example, creating or deleting a layer), use the Layer Properties panel, which is invoked by the LAYER command or by clicking on the corresponding icon in the Layers panel (indicated in orange in the figure in the previous section). This is what this panel looks like:

Of particular interest is the box section with buttons. The first button in it creates a new layer, the third - deletes the existing one, if possible.
Cannot be deleted:
Before removing a layer, you must ensure that these conditions are met.
At the theory of everything, you can begin to practice.
This was the first article of the cycle. The following examples specify .NET Framework 3.5 as the required version of the .NET Framework.
In this example, we will need two AutoCAD .NET API libraries: AcMgd.dll and AcDbMgd.dll (as always, do not forget to disable
All layers present in the document are stored in the layer list. To add a new layer to the drawing, it is enough to add a new element to this list.
However, despite the simplicity of the operation, the code is quite a lot.
After loading the plugin and executing the “TestCommand” command, a new layer should appear in the drawing:

In the above code, two important constructions were used that are often encountered when working with drawing objects:
Now that we have dealt with the document lock and transactions, we can proceed to the analysis of the rest of the code.
First , we include the necessary namespaces:
Second , we block the document and start the transaction:
Thirdly , we get a link to the document's layer table:
The
Fourth , we create a new layer:
A layer (or rather, the corresponding entry in the table of document layers) has the type
In this example, we changed only the name of the new layer, but if necessary we can set other parameters, such as visibility (
Fifth , we add a new layer to the document's layer table:
The layer table is the class for which the
Sixth , we add a new layer to the document database:
Since this layer did not exist before the start of a transaction, we must explicitly indicate that it should be added to the document database. If you do not, the entry will not be added.
An important detail: the
Seventh , we commit the transaction:
If any elements opened during a transaction using the
Finally , we end the transaction and unlock the document:
Here it is, an important plus of using a using construct! Without it, it is very easy to forget to call the
You can get the current document layer and set a new one using the
To change the layer properties, open the corresponding entry in the layer table.
Before an operation with a layer, it will be useful to verify its existence using the
If we load the plugin, execute the TestCommand command, and then the NewCommand command, we will see that the layer we created has become hidden, blocked and changed its name.Now no one will find him.

Deleting a layer is much the same as changing. For the corresponding entry in the layer table, the
However, it is important to remember the limitations that were discussed in the first section. I can not delete:
If you need to delete a layer that is currently the current layer, then before deleting, you need to make some other layer current — for example, zero.
If it is necessary to remove a layer on which any objects are present, then before deleting a layer, it is necessary to delete all these objects or transfer them to another layer.
You can read more about deleting layers in the documentation (section " Create and Edit AutoCAD Entities> Use Layers, Colors, Linetypes> Work with Layers> Erase Layers ").
And in Kean Walmsley's blog, there is a template for finding all the objects placed on a layer. Based on this example, you can write a function that removes all objects from the layer.
In any case, before removing a layer, it will not be superfluous to make sure that the operation is correct, and to frame the deletion itself with the
In this code, we already know everything except the
In the above example, the
If we load the plugin and execute the “TestCommand” command, and then the “NewCommand” command, we will see that the layer we created will be removed from the drawing.

In conclusion, I would like to talk about one more parameter related to the layers.
By default, locked layers in AutoCAD are displayed as blacked out. The maximum possible blackout is 90% (like the rectangle in the image below).

To change the degree of darkening is the variable LAYLOCKFADECTL . Its value is set by the corresponding slider on the layers control panel (circled in green in the figure).
To change the value of the LAYLOCKFADECTL variable inside the plugin, you can use the
As a result of executing this code, the darkening of locked layers will be disabled.
Before changing the variable LAYLOCKFADECTL, you should save its current value in order to return the variable to its original state after the plugin finishes its work.
Unfortunately, the method
That's all for now. Next time I will write about creating simple objects and blocks.
public static string disclaimer = " AutoCAD. – ."; 1. General information
All readers of this article are probably familiar with what a layer is. At the primitive level, it can be considered a container for drawing elements that have some common feature that is important for the developer.
Layers can greatly simplify the life of not only the engineer who creates the drawing, but also the programmer. For example, all elements located on one layer can be hidden very quickly, if necessary, and then re-displayed on the workspace.
')
In the framework of this article, we will need some basic information, which can basically be gathered from here ( mirror )
1.1. Layer number zero
Any AutoCAD document always contains at least one layer — zero (with the name “0”) that cannot be deleted. This layer is often very useful - for example, when removing other layers.
1.2. Current layer
One of the document layers must be current. All the objects added to the drawing are placed on it (at least primitive ones - things are somewhat more complicated with blocks).
1.3. Layer Properties
Any (including zero) layer in AutoCAD has three properties:
- on (" on ");
- frozen (" freeze ");
- locked (" lock ").
All these properties are binary (each of them can be considered a “yes / no” flag).
The " on " flag is responsible for the visibility of the layer. If this flag is cleared, then all elements located on the layer are no longer displayed in the drawing.
The flag " frozen " is also responsible for the visibility of the layer. In its action, it is similar to the "on" flag. As stated in the documentation, this property improves performance on very large drawings.
Nb:
Personally, I have never worked with large drawings and never used this property.
The " locked " flag is responsible for the ability to edit the layer. If this flag is set, then all elements located on the layer become inaccessible for any changes (move, delete, etc.). In addition, new items cannot be added to the locked layer.
Layer properties can be controlled from AutoCAD. On the below picture is poisonous green, the Layers panel is highlighted, and the drop-down list of layers is highlighted in purple, on the left side of which are the property switches (light, sun, open lock — on, freeze, and lock, respectively ).
Nb:
You really should pay attention to these switches: when writing a plug-in, everything does not always work out the first time, and sometimes you have to use “manual control”.
Nb:
Some sites claim that this picture shows not green and purple, but lime and heliotrope.
...
I guess I am a dog .
...
I guess I am a dog .
1.4. Layer management
The simplest actions with layers were considered in the previous paragraph. For more complex operations (for example, creating or deleting a layer), use the Layer Properties panel, which is invoked by the LAYER command or by clicking on the corresponding icon in the Layers panel (indicated in orange in the figure in the previous section). This is what this panel looks like:
Of particular interest is the box section with buttons. The first button in it creates a new layer, the third - deletes the existing one, if possible.
Cannot be deleted:
- zero layer;
- current layer;
- a layer containing at least one object;
- layer referenced in the block definition.
Before removing a layer, you must ensure that these conditions are met.
Nb:
In fact, the list of forbidden to delete layers is somewhat longer:

Unfortunately, the author of this post did not have to deal with either Defpoints or Xref-dependent layers , so we’ll leave the reader to work out these basic questions as a simple homework assignment. ^ __ ^
At the theory of everything, you can begin to practice.
2. Writing a plugin
2.1. Creating a new plugin project
This was the first article of the cycle. The following examples specify .NET Framework 3.5 as the required version of the .NET Framework.
You can immediately add a code framework:
using System; using Autodesk.AutoCAD.Runtime; using Autodesk.Windows; namespace MyAutoCADDll { public class Commands : IExtensionApplication { // AutoCAD "TestCommand" [CommandMethod("TestCommand")] public void MyCommand() { } // Initialize() Terminate() , IExtensionApplication public void Initialize() { } public void Terminate() { } } } 2.2. Adding links to the necessary libraries
In this example, we will need two AutoCAD .NET API libraries: AcMgd.dll and AcDbMgd.dll (as always, do not forget to disable
CopyLocal ).2.3. Adding a new layer
All layers present in the document are stored in the layer list. To add a new layer to the drawing, it is enough to add a new element to this list.
However, despite the simplicity of the operation, the code is quite a lot.
Code:
using System; using System.IO; using Autodesk.AutoCAD.Runtime; using Autodesk.AutoCAD.ApplicationServices; using Autodesk.AutoCAD.DatabaseServices; namespace HabrPlug_Layers { public class Commands : IExtensionApplication { // AutoCAD "TestCommand" [CommandMethod("TestCommand")] public void MyCommand() { // Document acDoc = Autodesk.AutoCAD.ApplicationServices.Application.DocumentManager.MdiActiveDocument; Database acCurDb = acDoc.Database; // using (DocumentLock docloc = acDoc.LockDocument()) { // using (Transaction tr = acCurDb.TransactionManager.StartTransaction()) { // LayerTable acLyrTbl = tr.GetObject(acCurDb.LayerTableId, OpenMode.ForWrite) as LayerTable; // LayerTableRecord acLyrTblRec = new LayerTableRecord(); acLyrTblRec.Name = "HabrLayer"; // acLyrTbl.Add(acLyrTblRec); // tr.AddNewlyCreatedDBObject(acLyrTblRec, true); // tr.Commit(); } } } // Initialize() Terminate() , IExtensionApplication public void Initialize() { } public void Terminate() { } } } After loading the plugin and executing the “TestCommand” command, a new layer should appear in the drawing:
In the above code, two important constructions were used that are often encountered when working with drawing objects:
a) blocking the document;
Autocad documentation says that requests to change objects or to access AutoCAD can be executed in any context and from any number of applications. To prevent conflicts with other requests, the programmer must ensure that the document is locked before it is changed. Failure to comply with this requirement in some cases leads to an error when changing the document database.
After making all the necessary changes to the database, it should be unlocked using the
using (DocumentLock docloc = acDoc.LockDocument()) Autocad documentation says that requests to change objects or to access AutoCAD can be executed in any context and from any number of applications. To prevent conflicts with other requests, the programmer must ensure that the document is locked before it is changed. Failure to comply with this requirement in some cases leads to an error when changing the document database.
After making all the necessary changes to the database, it should be unlocked using the
DocumentLock object's Dispose() method. You can also use a using block with declaring a DocumentLock object in it - in this case, when you exit the block, the database is unlocked automatically. ( source , mirror )Nb:
In my experience, using the using construct is much more convenient, since it reduces the probability of forgetting to call the
Dispose() method to zero.b) call the transaction.
The documentation ( mirror ) indicates that when working with objects, such as segments, circles and polylines, or with the table of identifiers and its records, it is necessary to open the object for reading or writing.
Attempts to ignore this requirement will not lead to anything good - quite unpleasant (including debugging point of view) errors can occur.
There are several basic steps to working with a transaction:
All these points are discussed in detail in the documentation for the links above.
As in the case of
using (Transaction tr = acCurDb.TransactionManager.StartTransaction()) … tr.GetObject(acCurDb.LayerTableId, OpenMode.ForWrite) as LayerTable; … tr.AddNewlyCreatedDBObject(acLyrTblRec, true); … tr.Commit(); The documentation ( mirror ) indicates that when working with objects, such as segments, circles and polylines, or with the table of identifiers and its records, it is necessary to open the object for reading or writing.
Attempts to ignore this requirement will not lead to anything good - quite unpleasant (including debugging point of view) errors can occur.
There are several basic steps to working with a transaction:
- the beginning of a new transaction;
- opening an object for reading or writing;
- if the object is created for the first time (it is not yet in the document) - adding it to the document database;
- commit transaction;
- completion of the transaction.
All these points are discussed in detail in the documentation for the links above.
As in the case of
DocumentLock , you must either call the Dispose() method after you finish working with a transaction, or use the using construct.Now that we have dealt with the document lock and transactions, we can proceed to the analysis of the rest of the code.
First , we include the necessary namespaces:
Autodesk.AutoCAD.Runtime - to use the IExtensionApplication type and the CommandMethod construction;Autodesk.AutoCAD.DatabaseServices - to use the Document and DocumentLock types;Autodesk.AutoCAD.Runtime - to use the Database , Transaction , LayerTable , OpenMode and LayerTableRecord .Second , we block the document and start the transaction:
// Document acDoc = Autodesk.AutoCAD.ApplicationServices.Application.DocumentManager.MdiActiveDocument; Database acCurDb = acDoc.Database; // using (DocumentLock docloc = acDoc.LockDocument()) { // using (Transaction tr = acCurDb.TransactionManager.StartTransaction()) { Thirdly , we get a link to the document's layer table:
LayerTable acLyrTbl = tr.GetObject(acCurDb.LayerTableId, OpenMode.ForWrite) as LayerTable; The
GetObject() method takes as input two parameters: the Id of the object to be opened and the access level. You can find the Id of the document's layers table using the LayerTableId property of the database of this document. Since we need to change the layer table (add a new layer to it), we use the write access level ( OpenMode.ForWrite ). Finally, the GetObject() method returns a value of type “object” ( object ), which must be explicitly cast to the type we need ( LayerTable ).Fourth , we create a new layer:
LayerTableRecord acLyrTblRec = new LayerTableRecord(); acLyrTblRec.Name = "HabrLayer"; A layer (or rather, the corresponding entry in the table of document layers) has the type
LayerTableRecord . Its constructor takes no values, so all initialization has to be done after creation.In this example, we changed only the name of the new layer, but if necessary we can set other parameters, such as visibility (
IsOff property) or accessibility for editing ( IsLocked property).Fifth , we add a new layer to the document's layer table:
acLyrTbl.Add(acLyrTblRec); The layer table is the class for which the
IEnumerable interface is implemented. To add a new element, use the Add() method.Sixth , we add a new layer to the document database:
tr.AddNewlyCreatedDBObject(acLyrTblRec, true); Since this layer did not exist before the start of a transaction, we must explicitly indicate that it should be added to the document database. If you do not, the entry will not be added.
An important detail: the
AddNewlyCreatedDBObject function should not be called before, but after adding a layer to the table of document layers. If you try to swap these operations, the layer will not be added. I have no coherent logical explanation for this; I will be glad if knowledgeable people will share a clue in the comments.Seventh , we commit the transaction:
tr.Commit(); If any elements opened during a transaction using the
GetObject() method GetObject() been changed, then to save these changes in the document database, you need to commit the transaction by calling the Commit() method. Otherwise, no changes will be saved, and the document will remain in the state that existed at the time of the start of the transaction.Finally , we end the transaction and unlock the document:
} } Here it is, an important plus of using a using construct! Without it, it is very easy to forget to call the
Dispose() method, especially since you need to do it twice - to commit the transaction and unlock the document. And when using the using construct, the Dispose() method is called automatically.2.4. Setting the current layer
You can get the current document layer and set a new one using the
Clayer property of the Clayer database.Code:
It is enough to insert this line in the previous example, right before committing the transaction.
acCurDb .Clayer = acLyrTbl["HabrLayer"]; It is enough to insert this line in the previous example, right before committing the transaction.
2.5. Changing properties and renaming a layer
To change the layer properties, open the corresponding entry in the layer table.
Code:
using System; using System.IO; using Autodesk.AutoCAD.Runtime; using Autodesk.AutoCAD.ApplicationServices; using Autodesk.AutoCAD.DatabaseServices; namespace HabrPlug_Layers { public class Commands : IExtensionApplication { // AutoCAD "TestCommand" [CommandMethod("TestCommand")] public void MyCommand() { // Document acDoc = Autodesk.AutoCAD.ApplicationServices.Application.DocumentManager.MdiActiveDocument; Database acCurDb = acDoc.Database; // using (DocumentLock docloc = acDoc.LockDocument()) { // using (Transaction tr = acCurDb.TransactionManager.StartTransaction()) { // LayerTable acLyrTbl = tr.GetObject(acCurDb.LayerTableId, OpenMode.ForWrite) as LayerTable; // LayerTableRecord acLyrTblRec = new LayerTableRecord(); acLyrTblRec.Name = "HabrLayer"; // acLyrTbl.Add(acLyrTblRec); // tr.AddNewlyCreatedDBObject(acLyrTblRec, true); // tr.Commit(); } } } // AutoCAD "NewCommand" [CommandMethod("NewCommand")] public void NewCommand() { // Document acDoc = Autodesk.AutoCAD.ApplicationServices.Application.DocumentManager.MdiActiveDocument; Database acCurDb = acDoc.Database; // using (DocumentLock docloc = acDoc.LockDocument()) { // using (Transaction tr = acCurDb.TransactionManager.StartTransaction()) { // LayerTable acLyrTbl = tr.GetObject(acCurDb.LayerTableId, OpenMode.ForWrite) as LayerTable; // - if (acLyrTbl.Has("HabrLayer") == false) { return; } // LayerTableRecord acLyrTblRec = tr.GetObject(acLyrTbl["HabrLayer"], OpenMode.ForWrite) as LayerTableRecord; // acLyrTblRec.Name = "test"; acLyrTblRec.IsOff = true; acLyrTblRec.IsLocked = true; // tr.Commit(); } } } // Initialize() Terminate() , IExtensionApplication public void Initialize() { } public void Terminate() { } } } Before an operation with a layer, it will be useful to verify its existence using the
Has() method of the document's layer table.If we load the plugin, execute the TestCommand command, and then the NewCommand command, we will see that the layer we created has become hidden, blocked and changed its name.
2.6. Deleting a layer
Deleting a layer is much the same as changing. For the corresponding entry in the layer table, the
Erase() method is called as follows: acLyrTblRec.Erase(true); However, it is important to remember the limitations that were discussed in the first section. I can not delete:
- zero layer;
- current layer;
- a layer containing at least one object;
- layer referenced in the block definition.
If you need to delete a layer that is currently the current layer, then before deleting, you need to make some other layer current — for example, zero.
If it is necessary to remove a layer on which any objects are present, then before deleting a layer, it is necessary to delete all these objects or transfer them to another layer.
You can read more about deleting layers in the documentation (section " Create and Edit AutoCAD Entities> Use Layers, Colors, Linetypes> Work with Layers> Erase Layers ").
And in Kean Walmsley's blog, there is a template for finding all the objects placed on a layer. Based on this example, you can write a function that removes all objects from the layer.
In any case, before removing a layer, it will not be superfluous to make sure that the operation is correct, and to frame the deletion itself with the
try ... catch construction.Code:
using System; using System.IO; using Autodesk.AutoCAD.Runtime; using Autodesk.AutoCAD.ApplicationServices; using Autodesk.AutoCAD.DatabaseServices; namespace HabrPlug_Layers { public class Commands : IExtensionApplication { // AutoCAD "TestCommand" [CommandMethod("TestCommand")] public void MyCommand() { // Document acDoc = Autodesk.AutoCAD.ApplicationServices.Application.DocumentManager.MdiActiveDocument; Database acCurDb = acDoc.Database; // using (DocumentLock docloc = acDoc.LockDocument()) { // using (Transaction tr = acCurDb.TransactionManager.StartTransaction()) { // LayerTable acLyrTbl = tr.GetObject(acCurDb.LayerTableId, OpenMode.ForWrite) as LayerTable; // LayerTableRecord acLyrTblRec = new LayerTableRecord(); acLyrTblRec.Name = "HabrLayer"; // acLyrTbl.Add(acLyrTblRec); // tr.AddNewlyCreatedDBObject(acLyrTblRec, true); // tr.Commit(); } } } // AutoCAD "TestCommand" [CommandMethod("NewCommand")] public void NewCommand() { // Document acDoc = Autodesk.AutoCAD.ApplicationServices.Application.DocumentManager.MdiActiveDocument; Database acCurDb = acDoc.Database; // using (DocumentLock docloc = acDoc.LockDocument()) { // using (Transaction tr = acCurDb.TransactionManager.StartTransaction()) { // LayerTable acLyrTbl = tr.GetObject(acCurDb.LayerTableId, OpenMode.ForWrite) as LayerTable; // - if (acLyrTbl.Has("HabrLayer") == false) { return; } // acCurDb.Clayer = acLyrTbl["0"]; // , ObjectIdCollection acObjIdColl = new ObjectIdCollection(); acObjIdColl.Add(acLyrTbl["HabrLayer"]); acCurDb.Purge(acObjIdColl); if (acObjIdColl.Count > 0) { // LayerTableRecord acLyrTblRec = tr.GetObject(acObjIdColl[0], OpenMode.ForWrite) as LayerTableRecord; try { // acLyrTblRec.Erase(true); // tr.Commit(); } catch (Autodesk.AutoCAD.Runtime.Exception Ex) { // - , Application.ShowAlertDialog(":\n" + Ex.Message); } } } } } // Initialize() Terminate() , IExtensionApplication public void Initialize() { } public void Terminate() { } } } In this code, we already know everything except the
Purge() method. The principle of its operation is described in the documentation : it analyzes the collection of objects and, at its output, leaves only those objects to which no one refers.In the above example, the
Purge() method is called for a collection in which there is only one object — the layer to be deleted. If no one references this layer, then after calling the Purge() method, it will remain in the collection, and then you can proceed to delete. If the call to the Purge() method returns an empty collection, then there are references to the layer to be removed - probably, the objects placed on it.If we load the plugin and execute the “TestCommand” command, and then the “NewCommand” command, we will see that the layer we created will be removed from the drawing.
2.7. Prevent darkening of blocked layers
In conclusion, I would like to talk about one more parameter related to the layers.
By default, locked layers in AutoCAD are displayed as blacked out. The maximum possible blackout is 90% (like the rectangle in the image below).
To change the degree of darkening is the variable LAYLOCKFADECTL . Its value is set by the corresponding slider on the layers control panel (circled in green in the figure).
To change the value of the LAYLOCKFADECTL variable inside the plugin, you can use the
SetSystemVariable function: Autodesk.AutoCAD.ApplicationServices.Application.SetSystemVariable("LAYLOCKFADECTL", 0); As a result of executing this code, the darkening of locked layers will be disabled.
Before changing the variable LAYLOCKFADECTL, you should save its current value in order to return the variable to its original state after the plugin finishes its work.
Code:
using System; using System.IO; using Autodesk.AutoCAD.Runtime; using Autodesk.AutoCAD.ApplicationServices; using Autodesk.AutoCAD.DatabaseServices; namespace HabrPlug_Layers { public class Commands : IExtensionApplication { // int old_LAYLOCKFADECTL = 0; // public void Initialize() { // old_LAYLOCKFADECTL = System.Convert.ToInt32(Autodesk.AutoCAD.ApplicationServices.Application.GetSystemVariable("LAYLOCKFADECTL")); // 0 Autodesk.AutoCAD.ApplicationServices.Application.SetSystemVariable("LAYLOCKFADECTL", 0); } // AutoCAD public void Terminate() { // , Autodesk.AutoCAD.ApplicationServices.Application.SetSystemVariable("LAYLOCKFADECTL", old_LAYLOCKFADECTL); } } } Unfortunately, the method
Terminate()does not always work correctly, and the original value may not be restored. But at least we tried.)That's all for now. Next time I will write about creating simple objects and blocks.
Source: https://habr.com/ru/post/249015/
All Articles