New heart for Chinese lantern
Having bought a lot of Chinese lanterns, with a capacity of 100 to 16,000 lumens, was not satisfied.
In most cases, the flashlight does not give the luminous flux declared by the seller. This is due to the fact that, at best, the sellers indicate the maximum luminous flux that the installed LED module can deliver, but as a result of savings on materials, the LED works, if lucky, at half its maximum. Thin wires are used to limit the current, it allows you to abandon the use of a DC source and limit yourself to a simple PWM controller with a power switch.
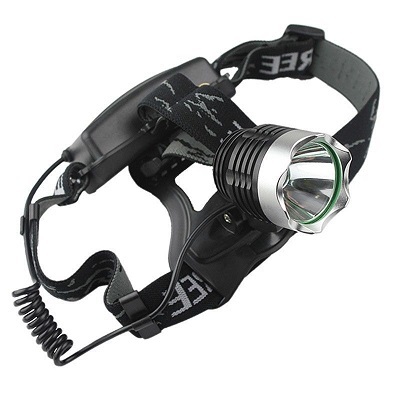
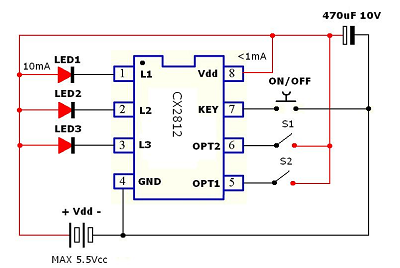
As a donor, the “2500Lm CREE XM-L T6 LED Headlamp” was selected at a price of 12 dollars, which has a CX2812 PWM controller died after one year of use. This controller has three outputs for load, two inputs for setting operation modes and one input for mode switching button. The first unpleasant moment of almost any Chinese flashlight for me was the presence of Strobe and SOS modes. In the case of this controller, it is enough to submit a logical unit to the OPT1 input and only three of the five modes will remain (High, Low, Off). If the unit is applied to both OPT inputs, the Low mode will also disappear.
')
The seller claims that the flashlight uses a Cree XM-L T6 LED and it fries as much as 2500 lumens at maximum. On the Cree website for this LED declared luminosity of 100 lumens per watt and a maximum power of 10 watts. In fact, the XM-L U2 LED is used, its characteristics do not differ much from T6, but due to the thickness of the wires, only 1.1A reaches the LED, which at 4. V battery power is 4.51W. It turns out that at the maximum mode, the flashlight emits about 451 lumens. The luxmeter shows 420 lumens, and that is quite far from the figure of 2500.

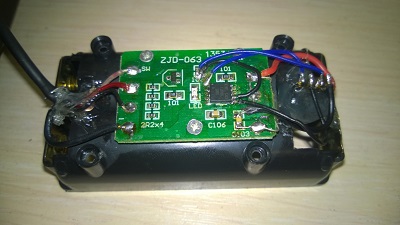
The driver circuit is nowhere simpler and we will not complicate it. The ATtiny85 microcontroller was chosen as the new stone heart, although ATtiny13 (a) would have been enough, but it was not at hand in the right case. The mode switch button successfully hit the PB2 / INT0 foot, but the base of the transistor was connected to the RESET output. Having on board hardware PWM, it was decided to use it, so the track leading to the RESET was cut, and the base of the transistor was connected with a jumper to the PB1 / OC0B output. For ease of programming, the necessary pins were taken out. Wires fixed snot glue. The wires from the batteries to the board are replaced by slightly thicker ones.
The firmware was assembled in Arduino 1.0.6, Arduino Nano was used as a programmer. Installed fyuzy in accordance with the scheme "ATtiny85 @ 1 MHz (internal oscillator; BOD disabled)". The weight of the firmware in binary form at the moment is 278 bytes. In the off state, the flashlight consumes 0.3mkA, by briefly pressing the button the minimum mode is turned on, the consumption increases to 7.6mA. To turn off, briefly press and release the button. If you continue to hold the button, the brightness will gradually increase to maximum. Partial replacement of wires did not give a significant increase in brightness, because the wires from the power supply to the head remained a bottleneck. At the moment, at the maximum mode, the consumption is 1.2A, the voltage of the battery is 4.2, it turns out about 500 lumens.
But even in spite of the fact that Chinese sellers indicate several times overestimated performance on luminosity, often even the minimum, from the proposed, the mode was too bright for me. After the alteration, the minimum mode is quite enough to not stumble on the forest path at night or to use a flashlight as a night light when spending the night in a cave. Total literally in a couple of hours, I managed to make a flashlight of my dream out of a dead flashlight. I hope my experience will be useful for someone. The code is available at the link HeadLamp.ino .
Update 02/04/2015: Thinking a bit, I added the ability to instantly turn on the flashlight for maximum mode (two quick clicks), as well as a strobe mode (three quick clicks). To activate these modes, you must uncomment the corresponding defaults at the beginning of the code.
In most cases, the flashlight does not give the luminous flux declared by the seller. This is due to the fact that, at best, the sellers indicate the maximum luminous flux that the installed LED module can deliver, but as a result of savings on materials, the LED works, if lucky, at half its maximum. Thin wires are used to limit the current, it allows you to abandon the use of a DC source and limit yourself to a simple PWM controller with a power switch.
As a donor, the “2500Lm CREE XM-L T6 LED Headlamp” was selected at a price of 12 dollars, which has a CX2812 PWM controller died after one year of use. This controller has three outputs for load, two inputs for setting operation modes and one input for mode switching button. The first unpleasant moment of almost any Chinese flashlight for me was the presence of Strobe and SOS modes. In the case of this controller, it is enough to submit a logical unit to the OPT1 input and only three of the five modes will remain (High, Low, Off). If the unit is applied to both OPT inputs, the Low mode will also disappear.
')
The seller claims that the flashlight uses a Cree XM-L T6 LED and it fries as much as 2500 lumens at maximum. On the Cree website for this LED declared luminosity of 100 lumens per watt and a maximum power of 10 watts. In fact, the XM-L U2 LED is used, its characteristics do not differ much from T6, but due to the thickness of the wires, only 1.1A reaches the LED, which at 4. V battery power is 4.51W. It turns out that at the maximum mode, the flashlight emits about 451 lumens. The luxmeter shows 420 lumens, and that is quite far from the figure of 2500.
The driver circuit is nowhere simpler and we will not complicate it. The ATtiny85 microcontroller was chosen as the new stone heart, although ATtiny13 (a) would have been enough, but it was not at hand in the right case. The mode switch button successfully hit the PB2 / INT0 foot, but the base of the transistor was connected to the RESET output. Having on board hardware PWM, it was decided to use it, so the track leading to the RESET was cut, and the base of the transistor was connected with a jumper to the PB1 / OC0B output. For ease of programming, the necessary pins were taken out. Wires fixed snot glue. The wires from the batteries to the board are replaced by slightly thicker ones.
The firmware was assembled in Arduino 1.0.6, Arduino Nano was used as a programmer. Installed fyuzy in accordance with the scheme "ATtiny85 @ 1 MHz (internal oscillator; BOD disabled)". The weight of the firmware in binary form at the moment is 278 bytes. In the off state, the flashlight consumes 0.3mkA, by briefly pressing the button the minimum mode is turned on, the consumption increases to 7.6mA. To turn off, briefly press and release the button. If you continue to hold the button, the brightness will gradually increase to maximum. Partial replacement of wires did not give a significant increase in brightness, because the wires from the power supply to the head remained a bottleneck. At the moment, at the maximum mode, the consumption is 1.2A, the voltage of the battery is 4.2, it turns out about 500 lumens.
But even in spite of the fact that Chinese sellers indicate several times overestimated performance on luminosity, often even the minimum, from the proposed, the mode was too bright for me. After the alteration, the minimum mode is quite enough to not stumble on the forest path at night or to use a flashlight as a night light when spending the night in a cave. Total literally in a couple of hours, I managed to make a flashlight of my dream out of a dead flashlight. I hope my experience will be useful for someone. The code is available at the link HeadLamp.ino .
Update 02/04/2015: Thinking a bit, I added the ability to instantly turn on the flashlight for maximum mode (two quick clicks), as well as a strobe mode (three quick clicks). To activate these modes, you must uncomment the corresponding defaults at the beginning of the code.
Source: https://habr.com/ru/post/249011/
All Articles