Practice "Intel IoT". Galileo Gen2 - Linux & Arduino
In this part of the "practical work", I will turn Intel Galileo Gen2 into a full-fledged linux-computer and show a simple way to interact Arduino-and linux-components.
I need a microSD card (recommended from 8GB and 10th speed class), I used a 16GB card. All the steps I will do on the Mac, for Windows and * nix-platforms, everything is the same (of course, with the appropriate "amendments" to the operating system).
For Galileo , the development team releases a special linux image: Yocto
')
1. First you need to download the most current version of the image. You can do this, for example, by this link .
2. Unzip the downloaded file:
3. Connect the microSD to the computer and identify it (I provide data output for my laptop):
In my case, the map is / dev / disk2 (you may be otherwise).
4. Unmount this disk.
5. Now you can use the 'dd' command to copy the image to the microSD card:
Copying the image to the card took almost 6 minutes - be patient (at this time, the progress of the process is not displayed in the terminal).
After these simple steps the microSD card is ready.
In the course of these actions, I will show that Intel Galileo Gen2 is almost a normal linux computer.
Actually, insert the card into the slot Intel Galileo, connect the LAN-cable and connect the power supply. Our linux computer boots. For greater clarity, it is highly recommended to connect to the UART connector to receive various diagnostic messages, monitor the download progress and organize an additional “console”. I use the Foca v2.2 “programmer” (built on the base of the FT232RL).
On Mac, it's convenient to use the goSerial application. The connection parameters are the following (choose your port):
 After the system boots, a prompt appears: you must enter the username (root). After that, you can send any linux commands to the terminal.
Determine the IP address of the system:
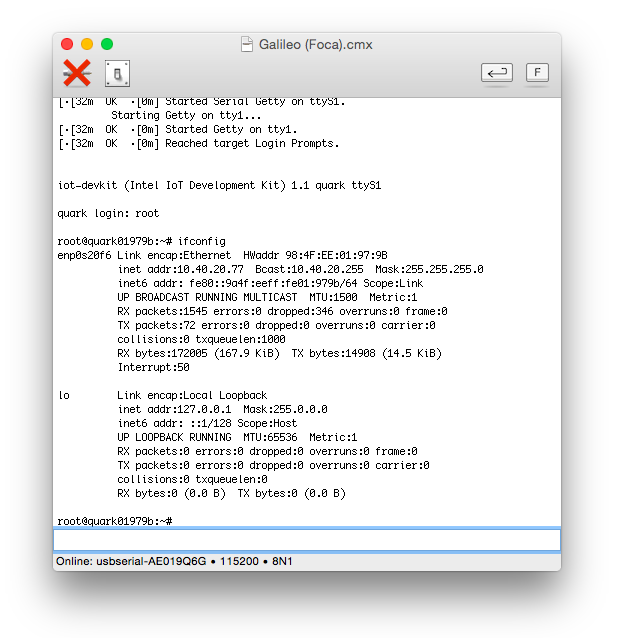 Let's see the linux version:
Now you can customize the system:
I will do the configuration via SSH (although something can be done through the terminal, with the help of which we determined the IP address).
In the course of these settings, I want to show that on Intel Galileo Gen2 almost normal linux works (with all its great features).
1. Connect to Intel Galileo Gen2 via SSH as root (by default, the password is empty).
2. Create a nano-src folder:
3. Go to this folder:
4. Download the nano source archive:
5. Unpack the archive in the appropriate folder:
6. Go to this new folder (nano-2.2.6):
7. Run the following commands to compile and install nano:
8. You can delete the source directory:
After these simple steps, the “friendly” editor nano appeared on Intel Galileo Gen2.
Thanks to the newly installed editor, this is extremely easy to do:
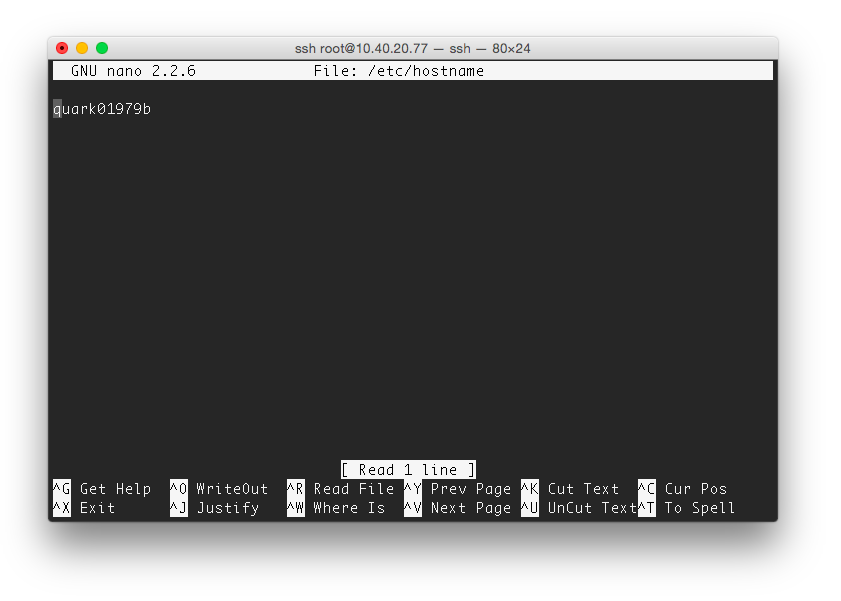 I corrected the name to "galileo" (further: exit through "Ctrl + X" and "Enter" to confirm the save). You can immediately restart Intel Galileo, but we will not rush, and ...
Everything is simple, done as in the most ordinary linux:
After that, the system prompts you to enter a new password and confirm it (note, no characters entered are displayed). If all is well, the system will confirm the change of the password with the message:
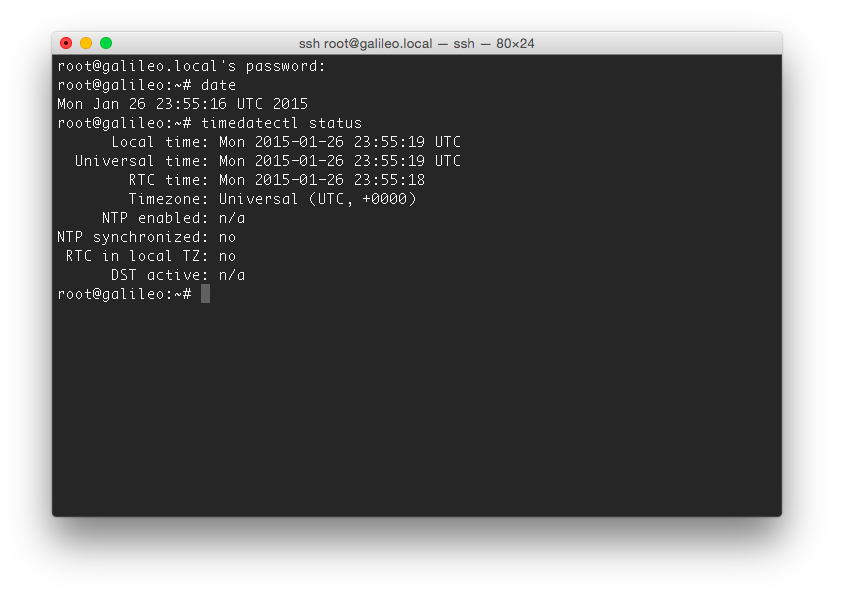
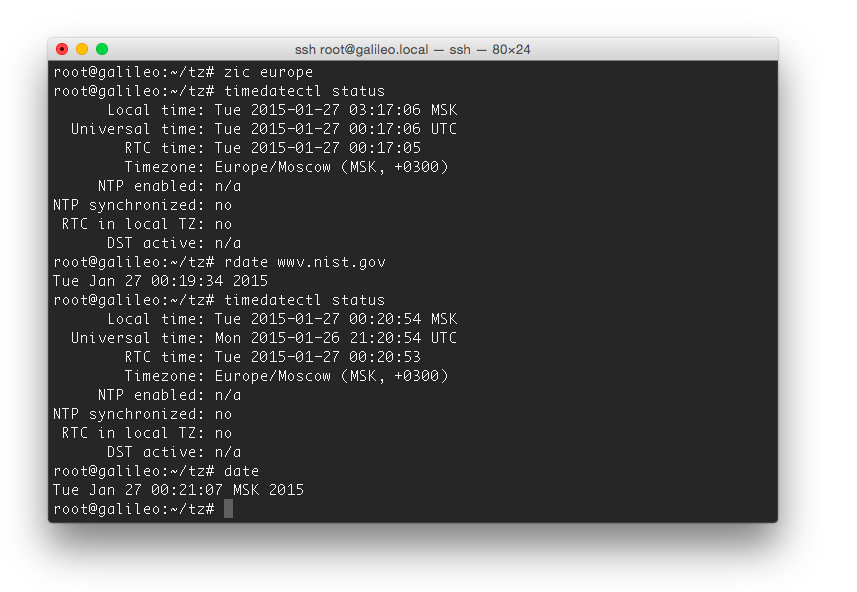
To check the current date / time, use the command:
Type information will be displayed:
Additionally, you can see what the command displays:
 Let's replace the current time zone with the current one (in my case, for Moscow):
The list of "available" time zones can be peeped in the / usr / share / zoneinfo directory
Again, see what this command returns:
 Actually, it already seems to be true, but only “it seems” (the time shift for Moscow now is +3 hours). In this linux image, there is no relevant information in the time zone database. Let's correct this situation:
1. Create a folder for current actions:
2. Go to the new folder:
3. Download the current version of the time zone database:
4. Unpack the file:
5. Compile the time zone file Europe:
Check again:
 Well, the time zone was corrected (it is clear that now the shift is +3 hours, i.e. the information on the time zone is relevant). Set the clock by NTP. To do this, run the command:
 Now we have a time zone in order and time corresponds to reality.
The tz folder is no longer needed - it can be deleted.
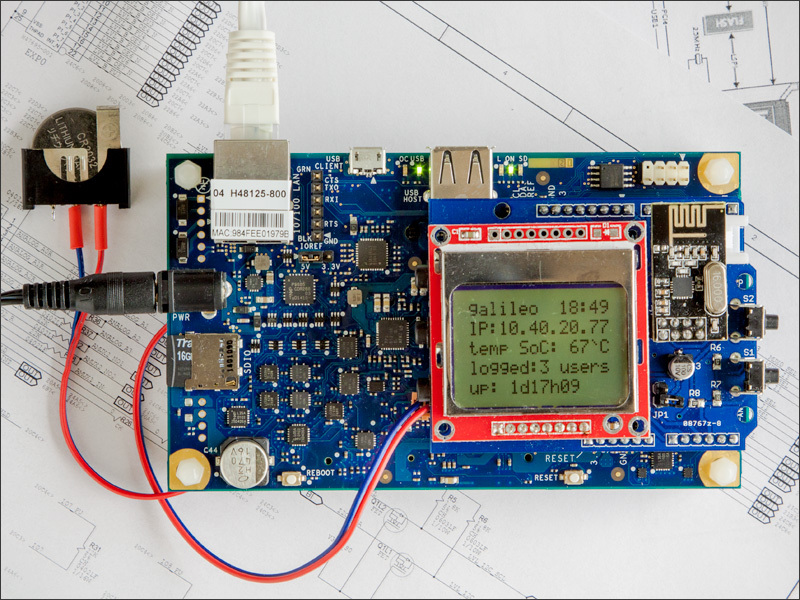
A little distracted and remember that the SoC on Intel Galileo has RTC (and the corresponding pins on the board for connecting a backup battery). I found a CR2032 battery and a holder for it in the household. I made a primitive cable with a connector and connected this battery to the corresponding connector. Now the clock module is backed up. It remains only to configure them for proper operation.
To do this, we write the current system time in the RTC module, for this we execute the command:
You can read the time from RTC with the command:
Now you can and
Thus, nothing unusual was revealed for those who are a little familiar with linux: Intel Galileo with Yocto is a completely “ordinary” linux computer. But it is not so…
Of course, you can install another linux distribution (for example, Debian ), but then out of the box there will be no such tight integration:
For interaction between the Intel Galileo Arduino and linux components in sketches, you can use the system (const char * command) function. This is a standard C function that transmits requests to the shell of the operating system. With this feature, the Arudino sketch “communicates” with Linux, just as we just did through the terminal from the command line.
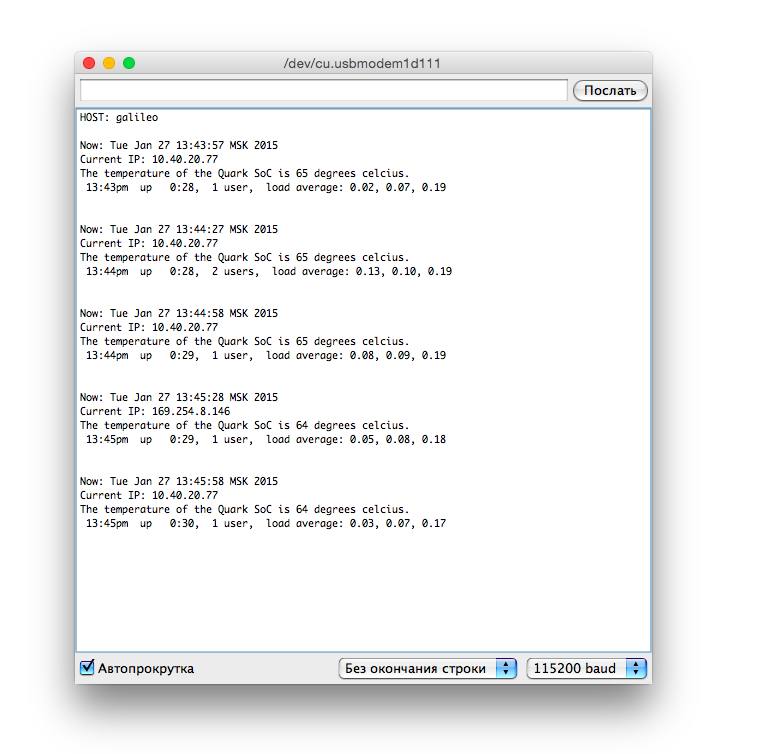
For the test, I wrote a simple template that displays the following information on the port monitor:
In addition to the system () function, I used the functions of working with the file system: fopen (), fclose (). In order not to waste the resources of a microSD card, we will work with the files in the / tmp folder (this folder is in RAM).
The result of the work can be seen in the port monitor:
 During the work of the sketch, I connected with another user, then disconnected the power cable and after a while returned the cable to its place.
Those. our system of separate components, which work perfectly separately (Arduino and linux), is already beginning to turn into something monolithic, opening up additional possibilities for development.
You can, for example, create a python script from the Arduino sketch, make it executable and run it. Similarly, you can organize a reverse interaction, when a process from linux influences what the Arduino sketch does (in more detail I will tell about it in the third part of the practicum).
But this is not all yet - in the next publication I will discuss how Intel Galileo can be programmed using Eclipse and mraa , so the sequel follows, do not switch!
» The first part of the" workshop ": Galileo Gen2 - The first acquaintance .
I need a microSD card (recommended from 8GB and 10th speed class), I used a 16GB card. All the steps I will do on the Mac, for Windows and * nix-platforms, everything is the same (of course, with the appropriate "amendments" to the operating system).
SD card preparation
For Galileo , the development team releases a special linux image: Yocto
')
1. First you need to download the most current version of the image. You can do this, for example, by this link .
2. Unzip the downloaded file:
Mac:Downloads user$ bunzip2 iot-devkit-latest-mmcblkp0.direct.bz2 3. Connect the microSD to the computer and identify it (I provide data output for my laptop):
Mac:Downloads user$ diskutil list /dev/disk0 #: TYPE NAME SIZE IDENTIFIER 0: GUID_partition_scheme *121.3 GB disk0 1: EFI EFI 209.7 MB disk0s1 2: Apple_CoreStorage 120.5 GB disk0s2 3: Apple_Boot Recovery HD 650.0 MB disk0s3 /dev/disk1 #: TYPE NAME SIZE IDENTIFIER 0: Apple_HFS Macintosh HD *120.1 GB disk1 Logical Volume on disk0s2 9735977A-C01B-4DDC-8167-7F1238330E9D Unencrypted /dev/disk2 #: TYPE NAME SIZE IDENTIFIER 0: FDisk_partition_scheme *15.9 GB disk2 1: Windows_FAT_32 NO NAME 15.9 GB disk2s1 In my case, the map is / dev / disk2 (you may be otherwise).
4. Unmount this disk.
Mac:Downloads user$ diskutil unmountDisk /dev/disk2 Unmount of all volumes on disk2 was successful 5. Now you can use the 'dd' command to copy the image to the microSD card:
Mac:Downloads user$ sudo dd if=iot-devkit-latest-mmcblkp0.direct of=/dev/disk2 bs=8m 131+1 records in 131+1 records out 1103102976 bytes transferred in 345.586518 secs (3191973 bytes/sec) Mac:Downloads user$ sync Copying the image to the card took almost 6 minutes - be patient (at this time, the progress of the process is not displayed in the terminal).
After these simple steps the microSD card is ready.
First launch and configuration of linux on Intel Galileo Gen2
In the course of these actions, I will show that Intel Galileo Gen2 is almost a normal linux computer.
Actually, insert the card into the slot Intel Galileo, connect the LAN-cable and connect the power supply. Our linux computer boots. For greater clarity, it is highly recommended to connect to the UART connector to receive various diagnostic messages, monitor the download progress and organize an additional “console”. I use the Foca v2.2 “programmer” (built on the base of the FT232RL).
On Mac, it's convenient to use the goSerial application. The connection parameters are the following (choose your port):
Determine the IP address of the system:
root@quark01979b:~# cat /proc/version Linux version 3.8.7-yocto-standard (brendan@thorium) (gcc version 4.8.2 (GCC) ) #1 Wed Sep 3 10:41:56 BST 2014 Now you can customize the system:
- install the nano friendly text editor
- change the name of the computer
- set the root password
- set the correct time zone and time
- update the RTC.
I will do the configuration via SSH (although something can be done through the terminal, with the help of which we determined the IP address).
In the course of these settings, I want to show that on Intel Galileo Gen2 almost normal linux works (with all its great features).
Install nano
1. Connect to Intel Galileo Gen2 via SSH as root (by default, the password is empty).
2. Create a nano-src folder:
Mac:Downloads user$ mkdir nano-src 3. Go to this folder:
Mac:Downloads user$ cd nano-src 4. Download the nano source archive:
Mac:Downloads user$ curl http://www.nano-editor.org/dist/v2.2/nano-2.2.6.tar.gz >nano-2.2.6.tar.gz 5. Unpack the archive in the appropriate folder:
Mac:Downloads user$ tar zxvf nano-2.2.6.tar.gz 6. Go to this new folder (nano-2.2.6):
Mac:Downloads user$ cd nano-2.2.6 7. Run the following commands to compile and install nano:
./configure make make install 8. You can delete the source directory:
cd .. cd .. rm nano-src -r After these simple steps, the “friendly” editor nano appeared on Intel Galileo Gen2.
Change the computer name
Thanks to the newly installed editor, this is extremely easy to do:
nano /etc/hostname Set the root password
Everything is simple, done as in the most ordinary linux:
passwd After that, the system prompts you to enter a new password and confirm it (note, no characters entered are displayed). If all is well, the system will confirm the change of the password with the message:
passwd: password changed. Set the correct time zone and time
To check the current date / time, use the command:
date Type information will be displayed:
Mon Jan 26 23:51:15 UTC 2015 Additionally, you can see what the command displays:
timedatectl status timedatectl set-timezone Europe/Moscow The list of "available" time zones can be peeped in the / usr / share / zoneinfo directory
Again, see what this command returns:
timedatectl status 1. Create a folder for current actions:
mkdir tz 2. Go to the new folder:
cd tz 3. Download the current version of the time zone database:
wget http://www.iana.org/time-zones/repository/releases/tzdata2014j.tar.gz 4. Unpack the file:
tar xzf tzdata2014j.tar.gz 5. Compile the time zone file Europe:
zic europe Check again:
timedatectl status rdate wwv.nist.gov The tz folder is no longer needed - it can be deleted.
cd .. rm tz -r Update RTC
A little distracted and remember that the SoC on Intel Galileo has RTC (and the corresponding pins on the board for connecting a backup battery). I found a CR2032 battery and a holder for it in the household. I made a primitive cable with a connector and connected this battery to the corresponding connector. Now the clock module is backed up. It remains only to configure them for proper operation.
To do this, we write the current system time in the RTC module, for this we execute the command:
hwclock -w You can read the time from RTC with the command:
hwclock -r Now you can and
reboot Thus, nothing unusual was revealed for those who are a little familiar with linux: Intel Galileo with Yocto is a completely “ordinary” linux computer. But it is not so…
Of course, you can install another linux distribution (for example, Debian ), but then out of the box there will be no such tight integration:
Arduino & linux
For interaction between the Intel Galileo Arduino and linux components in sketches, you can use the system (const char * command) function. This is a standard C function that transmits requests to the shell of the operating system. With this feature, the Arudino sketch “communicates” with Linux, just as we just did through the terminal from the command line.
For the test, I wrote a simple template that displays the following information on the port monitor:
- The host name (from the / etc / hostname file).
- Current date-time ( date command).
- IP address ( grep 'is the result of the ifconfig command).
- SoC temperature (processed data from the “file” / sys / class / thermal / thermal_zone0 / temp).
- The output of the uptime command .
In addition to the system () function, I used the functions of working with the file system: fopen (), fclose (). In order not to waste the resources of a microSD card, we will work with the files in the / tmp folder (this folder is in RAM).
Full sketch code
char buf[128]; void setup() { Serial.begin(115200); FILE *hostname; hostname = fopen("/etc/hostname", "r"); fgets(buf, 128, hostname); fclose(hostname); Serial.print("HOST: "); Serial.println(buf); } void loop() { /* --- - --- */ system("date > /tmp/my.txt"); // / // my.txt /tmp FILE *fp; fp = fopen("/tmp/my.txt", "r"); fgets(buf, 128, fp); fclose(fp); Serial.print("Now: "); Serial.print(buf); /* --- IP- --- */ system("ifconfig | grep inet | grep -v inet6 | grep -v 127.0.0.1 | cut -d: -f2 | awk '{printf $1""\n""}' > /tmp/my.txt"); fp = fopen("/tmp/my.txt", "r"); fgets(buf, 128, fp); fclose(fp); Serial.print("Current IP: "); Serial.println(buf); /* --- SoC --- */ int temp; temp = getQuarkTemp(); Serial.print("The temperature of the Quark SoC is "); Serial.print(temp); Serial.println(" degrees celcius."); /* --- uptime --- */ system("uptime > /tmp/my.txt"); fp = fopen("/tmp/my.txt", "r"); fgets(buf, 128, fp); fclose(fp); //Serial.print("Current IP: "); Serial.println(buf); Serial.println(); delay(30000); } int getQuarkTemp(){ char temp_raw[6]; FILE *fp; fp = fopen("/sys/class/thermal/thermal_zone0/temp", "r"); fgets(temp_raw, 5, fp); fclose(fp); int temp = atoi(temp_raw); temp /= 100; return temp; } The result of the work can be seen in the port monitor:
A similar sketch was used to prepare the KDPV.
Those. our system of separate components, which work perfectly separately (Arduino and linux), is already beginning to turn into something monolithic, opening up additional possibilities for development.
You can, for example, create a python script from the Arduino sketch, make it executable and run it. Similarly, you can organize a reverse interaction, when a process from linux influences what the Arduino sketch does (in more detail I will tell about it in the third part of the practicum).
But this is not all yet - in the next publication I will discuss how Intel Galileo can be programmed using Eclipse and mraa , so the sequel follows, do not switch!
» The first part of the" workshop ": Galileo Gen2 - The first acquaintance .
Source: https://habr.com/ru/post/248893/
All Articles