How to encrypt and hide a hard disk partition using CyberSafe
Using CyberSafe, you can not only encrypt individual files. The program allows you to encrypt an entire hard disk partition or an entire external drive (for example, a USB disk or a USB flash drive). This article will show you how to encrypt and hide an encrypted hard disk partition from prying eyes.
Who will benefit from the ability to encrypt partitions? We will immediately reject spies and paranoids. The first is not so much and the need to encrypt their data is purely professional. The second is to encrypt, hide, etc. Although there is no real threat and the encrypted data is of no interest to anyone, they still encrypt them. That is why we are interested in ordinary users, which, I hope, will be more than spyware with paranoids.
A typical partition encryption scenario is computer sharing. There are two options for using the CyberSafe program: either each of the users working on the computer creates a virtual disk, or each takes a partition on the hard disk to store personal files and encrypts it. The creation of virtual disks has already been written , and in this article we will focus on the encryption of the entire partition.
Suppose there is a 500 GB hard drive and there are three users who periodically work with the computer. Despite the fact that the NTFS file system still supports access rights and allows you to limit the access of one user to files of another user, its protection is not enough. After all, one of these three users will have administrator rights and he will be able to access the files of the remaining two users.
Therefore, the hard disk space can be divided as follows:
')
What is better - to encrypt partitions or use virtual encrypted disks? Here everyone decides for himself, since each method has its own advantages and disadvantages. Encrypting partitions is as secure as encrypting a virtual disk and vice versa.
What is a virtual disk? Look at it as an archive with a password and a compression ratio of 0. Here, only the files inside this archive are encrypted much more securely than in a regular archive. The virtual disk is stored on the hard disk as a file. In CyberSafe, you need to open and mount a virtual disk and then you can work with it as with a regular disk.
The advantage of a virtual disk is that it can be easily copied to another hard disk or USB flash drive (if size allows). For example, you can create a 4 GB virtual disk (there is no limit on the size of the virtual disk, except for natural ones) and, if necessary, copy the virtual disk file to a USB flash drive or to an external hard disk. You will not be able to do this with the encrypted partition. Also, the virtual disk file can be hidden .
Of course, if necessary, you can create an image of an encrypted disk - in case you want to backup it or move it to another computer. But this is another story. If you have a similar need, I recommend the program Clonezilla - already a reliable and proven solution. Transferring an encrypted partition to another computer is a more complicated task than transferring a virtual disk. If there is such a need, it is easier to use virtual disks.
In the case of partition encryption, the entire partition is physically encrypted. When mounting this section, you will need to enter a password, after which you can work with the section, as usual, that is, read and write files.
Which way to choose? If you can afford to encrypt the partition, then you can choose this method. Also, the entire section is better to encrypt if the size of your secret documents is quite large.
But there are situations when it is impossible or not to use the whole section. For example, you have only one partition (drive C :) on your hard drive and for one reason or another (no rights, for example, since the computer is not yours) you cannot or do not want to change its layout, then you need to use virtual disks. It makes no sense to encrypt the entire section, if the size of the documents (files) that you need to encrypt is small - a few gigabytes. I think we figured it out, so it's time to talk about which partitions (disks) can be encrypted.
You can encrypt the following media types:
Cannot encrypt:
Starting from Windows XP, Windows supports dynamic disks. Dynamic disks allow you to combine several physical hard drives (analog LVM in Windows). Such disks cannot be encrypted by the program.
Imagine that you have already encrypted a hard disk partition. To work with files on an encrypted partition, you need to mount it. When mounting, the program will ask you for the password to the encrypted disk specified when encrypting it. Having worked with an encrypted disk, it must be immediately unmounted, otherwise the files will remain accessible to users who have physical access to your computer.
In other words, encryption protects your files only when the encrypted partition is unmounted. When a partition is mounted, anyone who has physical access to the computer can copy files from it to an unencrypted partition, USB disk or external hard disk and files will not be encrypted. Therefore, when you work with an encrypted disk, make it a habit to always unmount it every time you leave the computer, even for a short time! After you unmount the encrypted disk, your files will be protected.
As for performance, when working with an encrypted partition, it will be lower. How much lower it depends on the capabilities of your computer, but the system will remain operational and you just have to wait a little longer than usual (especially when you copy large files to an encrypted partition).
The first thing you need to get somewhere UPS. If you have a laptop, everything is fine, if you have a regular desktop computer and you want to encrypt a partition that already has files, then encryption will take some time. If during this time the light is turned off, data loss is guaranteed. Therefore, if you have no UPS capable of withstanding several hours of battery life, I recommend doing the following:
If you have a laptop and you are ready to continue without creating a backup of the data (I would recommend to do it just in case), be sure to check the disk for errors, at least with the standard Windows utility. Only after that you need to start encrypting the partition / disk.
So, the theory without practice is meaningless, so let's proceed to encrypting the partition / disk. Launch the CyberSafe program and go to the Disk Encryption section , Encrypt Partition (fig. 1).
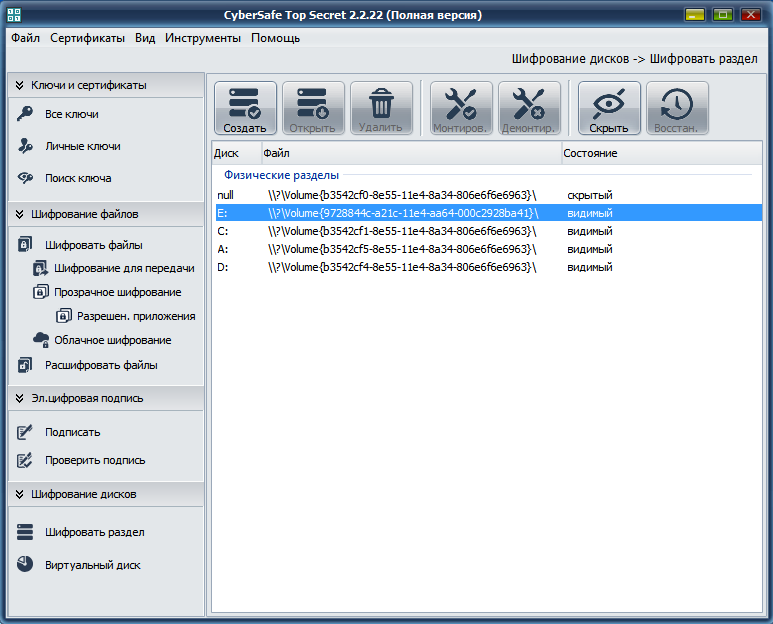
Fig. 1. List of partitions / disks of your computer
Select the partition you want to encrypt. If the Create button is inactive, then this section cannot be encrypted. For example, it can be a system partition or a dynamic disk. Also, you cannot simultaneously encrypt multiple disks. If you need to encrypt several disks, then the encryption operation must be repeated in turn.
Click the Create button. Next, the Creeper Disk window will open (Fig. 2). In it, you need to enter a password that will be used to decrypt the disk when it is mounted. When entering a password, check the case of characters (so that the Caps Lock key is not pressed) and the layout. If no one is behind, you can turn on the Show password checkbox .

Fig. 2. Crypto Disc
From the list of Encryption type, you need to select an algorithm - AES or GOST. Both algorithms are reliable, but in state organizations it is customary to use only GOST. On your own computer or in a commercial organization, you are free to use any of the algorithms.
If there is information on the disk and you want to save it, select the Save file structure and data check box . It is necessary to take into account that in this case the time of disk encryption will increase significantly. On the other hand, if the encrypted files are, say, on an external hard drive, then you still have to copy them to an encrypted disk to encrypt them, and copying with encryption on the fly will also take some time. If you have not made a backup of the data, be sure to check the box to enable the Save file structure and data check box, otherwise you will lose all your data.
The remaining parameters in the Crypto Disc window can be left as default. Namely - all available device size will be used and fast formatting to the NTFS file system will be performed. To start encryption, click Accept . The progress of the encryption process will be displayed in the main program window.

Fig. 3. The progress of the encryption process
After the disk is encrypted, you will see its state — encrypted, hidden (Fig. 4). This means that your disk has been encrypted and hidden - it will not be displayed in Explorer and other high-level file managers, but programs for working with the partition table will see it. No need to hope that once the disk is hidden, then no one will find it. All disks hidden by the program will be displayed in the Disk Management snap-in (see Figure 5) and other programs for disk partitioning. Note that in this snap-in, the encrypted partition is displayed as a partition with the RAW file system, that is, without the file system at all. This is normal - after encrypting a partition, Windows cannot determine its type. However, the section hiding is necessary for very different reasons and then you will understand for what reasons.

Fig. 4. Disk status: encrypted, hidden. Section E: not displayed in Explorer

Fig. 5. Tooling Disk Management
Now we will mount the section. Select it and click Restore. to make the partition visible again (the state of the disk will be changed to just " encrypted "). Windows will see this partition, but since it cannot recognize the type of its file system, it will offer to format it (Fig. 6). This can not be done in any case, because you lose all the data. That is why the program hides encrypted disks - after all, if not only you are working at the computer, another user can format the supposedly unreadable partition of the disk.

Fig. 6. Offer to format the encrypted partition
Of course, we refuse formatting, and click the Montirov button. in the main window of the CyberSafe program. Next, you will need to select a drive letter through which you will access the encrypted partition (Fig. 7).

Fig. 7. Select the drive letter
After that, the program will ask you to enter the password required to decrypt your data (Fig. 8). The decrypted partition (disk) appears in the Connected Decrypted Devices area (Fig. 9).

Fig. 8. Password to decrypt section

Fig. 9. Connected decrypted devices
After that, it will be possible to work with the decoded disk as with a normal one. In Explorer, only the Z: drive will be displayed - it is this letter that I assigned to the decrypted drive. Encrypted disk E: will not be displayed.

Fig. 10. Explorer - view computer disks
Now you can open the mounted disk and copy all the secret files to it (just do not forget to delete them from the original source and wipe free space on it).
When you need to complete work with our section, then click the Dismantle button . and then the Hide button or simply close the CyberSafe window. As for me, it is easier to close the program window. It is clear that you do not need to close the program window during the file copy / move operation. Nothing terrible and irreparable will happen, just some of the files will not be copied to your encrypted disk.
It is clear that the performance of an encrypted disk will be lower than normal. But how much? In fig. 11 I copied the folder of my user profile (where there are a lot of small files) from the C: drive to the Z: encrypted drive. Copy speed is shown in Fig. 11 - approximately at the level of 1.3 MB / s. This means that 1 GB of small files will be copied for approximately 787 seconds, that is 13 minutes. If you copy the same folder to an unencrypted partition, then the speed will be approximately 1.9 MB / s (Fig. 12). At the end of the copy operation, the speed increased to 2.46 MB / s, but quite a few files were copied at such a speed, so we believe that the speed was at 1.9 MB / s, which is 30% faster. The very 1 GB of small files in our case will be copied in 538 seconds, or almost 9 minutes.

Fig. 11. Speed of copying small files from an unencrypted partition to an encrypted one.

Fig. 12. Speed of copying small files between two unencrypted partitions.
As for large files, you will not feel any difference. In fig. 13 shows the speed of copying a large file (400 MB video file) from one unencrypted partition to another. As you can see, the speed was 11.6 MB / s. And in fig. 14 shows the speed of copying the same file from a regular partition to an encrypted one, and it was 11.1 MB / s. The difference is small and within the limits of error (all the same, the speed changes slightly as the copy operation proceeds). For the sake of interest, I’ll inform you about the speed of copying the same file from a USB flash drive (not USB 3.0) to a hard disk - about 8 MB / s (no screenshot, but trust me).

Fig. 13. Copy speed of a large file.

Fig. 14. Copy speed of a large file to an encrypted partition.
This test is not entirely accurate, but still allows you to get some ideas about performance.
That's all. I also recommend that you read the article "CyberSafe - encryption for all occasions . "
Spies, paranoids and ordinary users
Who will benefit from the ability to encrypt partitions? We will immediately reject spies and paranoids. The first is not so much and the need to encrypt their data is purely professional. The second is to encrypt, hide, etc. Although there is no real threat and the encrypted data is of no interest to anyone, they still encrypt them. That is why we are interested in ordinary users, which, I hope, will be more than spyware with paranoids.
A typical partition encryption scenario is computer sharing. There are two options for using the CyberSafe program: either each of the users working on the computer creates a virtual disk, or each takes a partition on the hard disk to store personal files and encrypts it. The creation of virtual disks has already been written , and in this article we will focus on the encryption of the entire partition.
Suppose there is a 500 GB hard drive and there are three users who periodically work with the computer. Despite the fact that the NTFS file system still supports access rights and allows you to limit the access of one user to files of another user, its protection is not enough. After all, one of these three users will have administrator rights and he will be able to access the files of the remaining two users.
Therefore, the hard disk space can be divided as follows:
- Approximately 200 GB - the general section. This section will also be the system partition. An operating system will be installed on it, the program and all three users' common files will be stored.
- Three sections of ~ 100 GB each - I think 100 GB is enough to store each user's personal files. Each of these sections will be encrypted, and only the user who has encrypted this section will know the password for access to the encrypted section. In this case, the administrator, with all his desire, will not be able to decrypt the section of another user and gain access to his files. Yes, if you wish, the administrator can format the partition and even delete it, but it can get access only if it delays the user’s password with deception. But, I think this will not happen, so encrypting a partition is a much more efficient measure than differentiating access rights using NTFS.
')
Encryption partition vs virtual encrypted disks
What is better - to encrypt partitions or use virtual encrypted disks? Here everyone decides for himself, since each method has its own advantages and disadvantages. Encrypting partitions is as secure as encrypting a virtual disk and vice versa.
What is a virtual disk? Look at it as an archive with a password and a compression ratio of 0. Here, only the files inside this archive are encrypted much more securely than in a regular archive. The virtual disk is stored on the hard disk as a file. In CyberSafe, you need to open and mount a virtual disk and then you can work with it as with a regular disk.
The advantage of a virtual disk is that it can be easily copied to another hard disk or USB flash drive (if size allows). For example, you can create a 4 GB virtual disk (there is no limit on the size of the virtual disk, except for natural ones) and, if necessary, copy the virtual disk file to a USB flash drive or to an external hard disk. You will not be able to do this with the encrypted partition. Also, the virtual disk file can be hidden .
Of course, if necessary, you can create an image of an encrypted disk - in case you want to backup it or move it to another computer. But this is another story. If you have a similar need, I recommend the program Clonezilla - already a reliable and proven solution. Transferring an encrypted partition to another computer is a more complicated task than transferring a virtual disk. If there is such a need, it is easier to use virtual disks.
In the case of partition encryption, the entire partition is physically encrypted. When mounting this section, you will need to enter a password, after which you can work with the section, as usual, that is, read and write files.
Which way to choose? If you can afford to encrypt the partition, then you can choose this method. Also, the entire section is better to encrypt if the size of your secret documents is quite large.
But there are situations when it is impossible or not to use the whole section. For example, you have only one partition (drive C :) on your hard drive and for one reason or another (no rights, for example, since the computer is not yours) you cannot or do not want to change its layout, then you need to use virtual disks. It makes no sense to encrypt the entire section, if the size of the documents (files) that you need to encrypt is small - a few gigabytes. I think we figured it out, so it's time to talk about which partitions (disks) can be encrypted.
Disc types supported
You can encrypt the following media types:
- Hard disk partitions formatted in FAT, FAT32 and NTFS file systems.
- USB flash drives, external USB drives with the exception of drives representing mobile phones, digital cameras and audio players.
Cannot encrypt:
- CD / DVD-RW-disks, floppy disks
- Dynamic disks
- System disk (from which Windows boots)
Starting from Windows XP, Windows supports dynamic disks. Dynamic disks allow you to combine several physical hard drives (analog LVM in Windows). Such disks cannot be encrypted by the program.
Features of working with an encrypted disk
Imagine that you have already encrypted a hard disk partition. To work with files on an encrypted partition, you need to mount it. When mounting, the program will ask you for the password to the encrypted disk specified when encrypting it. Having worked with an encrypted disk, it must be immediately unmounted, otherwise the files will remain accessible to users who have physical access to your computer.
In other words, encryption protects your files only when the encrypted partition is unmounted. When a partition is mounted, anyone who has physical access to the computer can copy files from it to an unencrypted partition, USB disk or external hard disk and files will not be encrypted. Therefore, when you work with an encrypted disk, make it a habit to always unmount it every time you leave the computer, even for a short time! After you unmount the encrypted disk, your files will be protected.
As for performance, when working with an encrypted partition, it will be lower. How much lower it depends on the capabilities of your computer, but the system will remain operational and you just have to wait a little longer than usual (especially when you copy large files to an encrypted partition).
Preparing for encryption
The first thing you need to get somewhere UPS. If you have a laptop, everything is fine, if you have a regular desktop computer and you want to encrypt a partition that already has files, then encryption will take some time. If during this time the light is turned off, data loss is guaranteed. Therefore, if you have no UPS capable of withstanding several hours of battery life, I recommend doing the following:
- Make a backup of your data, for example, on an external hard drive. Then you have to get rid of this copy (preferably after deleting data from an unencrypted disk, wipe the free space with a utility like Piriform, so that it is impossible to recover deleted files), because if it exists, the meaning of the encrypted copy of the data disappears.
- Transfer the data to the encrypted disk from the copy after the disk is encrypted. Format the disk and encrypt it. Actually, you don’t need to format it separately - CyberSafe will do it for you, but more on that later.
If you have a laptop and you are ready to continue without creating a backup of the data (I would recommend to do it just in case), be sure to check the disk for errors, at least with the standard Windows utility. Only after that you need to start encrypting the partition / disk.
Section Encryption: Practice
So, the theory without practice is meaningless, so let's proceed to encrypting the partition / disk. Launch the CyberSafe program and go to the Disk Encryption section , Encrypt Partition (fig. 1).
Fig. 1. List of partitions / disks of your computer
Select the partition you want to encrypt. If the Create button is inactive, then this section cannot be encrypted. For example, it can be a system partition or a dynamic disk. Also, you cannot simultaneously encrypt multiple disks. If you need to encrypt several disks, then the encryption operation must be repeated in turn.
Click the Create button. Next, the Creeper Disk window will open (Fig. 2). In it, you need to enter a password that will be used to decrypt the disk when it is mounted. When entering a password, check the case of characters (so that the Caps Lock key is not pressed) and the layout. If no one is behind, you can turn on the Show password checkbox .
Fig. 2. Crypto Disc
From the list of Encryption type, you need to select an algorithm - AES or GOST. Both algorithms are reliable, but in state organizations it is customary to use only GOST. On your own computer or in a commercial organization, you are free to use any of the algorithms.
If there is information on the disk and you want to save it, select the Save file structure and data check box . It is necessary to take into account that in this case the time of disk encryption will increase significantly. On the other hand, if the encrypted files are, say, on an external hard drive, then you still have to copy them to an encrypted disk to encrypt them, and copying with encryption on the fly will also take some time. If you have not made a backup of the data, be sure to check the box to enable the Save file structure and data check box, otherwise you will lose all your data.
The remaining parameters in the Crypto Disc window can be left as default. Namely - all available device size will be used and fast formatting to the NTFS file system will be performed. To start encryption, click Accept . The progress of the encryption process will be displayed in the main program window.
Fig. 3. The progress of the encryption process
After the disk is encrypted, you will see its state — encrypted, hidden (Fig. 4). This means that your disk has been encrypted and hidden - it will not be displayed in Explorer and other high-level file managers, but programs for working with the partition table will see it. No need to hope that once the disk is hidden, then no one will find it. All disks hidden by the program will be displayed in the Disk Management snap-in (see Figure 5) and other programs for disk partitioning. Note that in this snap-in, the encrypted partition is displayed as a partition with the RAW file system, that is, without the file system at all. This is normal - after encrypting a partition, Windows cannot determine its type. However, the section hiding is necessary for very different reasons and then you will understand for what reasons.
Fig. 4. Disk status: encrypted, hidden. Section E: not displayed in Explorer
Fig. 5. Tooling Disk Management
Now we will mount the section. Select it and click Restore. to make the partition visible again (the state of the disk will be changed to just " encrypted "). Windows will see this partition, but since it cannot recognize the type of its file system, it will offer to format it (Fig. 6). This can not be done in any case, because you lose all the data. That is why the program hides encrypted disks - after all, if not only you are working at the computer, another user can format the supposedly unreadable partition of the disk.
Fig. 6. Offer to format the encrypted partition
Of course, we refuse formatting, and click the Montirov button. in the main window of the CyberSafe program. Next, you will need to select a drive letter through which you will access the encrypted partition (Fig. 7).
Fig. 7. Select the drive letter
After that, the program will ask you to enter the password required to decrypt your data (Fig. 8). The decrypted partition (disk) appears in the Connected Decrypted Devices area (Fig. 9).
Fig. 8. Password to decrypt section
Fig. 9. Connected decrypted devices
After that, it will be possible to work with the decoded disk as with a normal one. In Explorer, only the Z: drive will be displayed - it is this letter that I assigned to the decrypted drive. Encrypted disk E: will not be displayed.
Fig. 10. Explorer - view computer disks
Now you can open the mounted disk and copy all the secret files to it (just do not forget to delete them from the original source and wipe free space on it).
When you need to complete work with our section, then click the Dismantle button . and then the Hide button or simply close the CyberSafe window. As for me, it is easier to close the program window. It is clear that you do not need to close the program window during the file copy / move operation. Nothing terrible and irreparable will happen, just some of the files will not be copied to your encrypted disk.
About performance
It is clear that the performance of an encrypted disk will be lower than normal. But how much? In fig. 11 I copied the folder of my user profile (where there are a lot of small files) from the C: drive to the Z: encrypted drive. Copy speed is shown in Fig. 11 - approximately at the level of 1.3 MB / s. This means that 1 GB of small files will be copied for approximately 787 seconds, that is 13 minutes. If you copy the same folder to an unencrypted partition, then the speed will be approximately 1.9 MB / s (Fig. 12). At the end of the copy operation, the speed increased to 2.46 MB / s, but quite a few files were copied at such a speed, so we believe that the speed was at 1.9 MB / s, which is 30% faster. The very 1 GB of small files in our case will be copied in 538 seconds, or almost 9 minutes.
Fig. 11. Speed of copying small files from an unencrypted partition to an encrypted one.
Fig. 12. Speed of copying small files between two unencrypted partitions.
As for large files, you will not feel any difference. In fig. 13 shows the speed of copying a large file (400 MB video file) from one unencrypted partition to another. As you can see, the speed was 11.6 MB / s. And in fig. 14 shows the speed of copying the same file from a regular partition to an encrypted one, and it was 11.1 MB / s. The difference is small and within the limits of error (all the same, the speed changes slightly as the copy operation proceeds). For the sake of interest, I’ll inform you about the speed of copying the same file from a USB flash drive (not USB 3.0) to a hard disk - about 8 MB / s (no screenshot, but trust me).
Fig. 13. Copy speed of a large file.
Fig. 14. Copy speed of a large file to an encrypted partition.
This test is not entirely accurate, but still allows you to get some ideas about performance.
That's all. I also recommend that you read the article "CyberSafe - encryption for all occasions . "
Source: https://habr.com/ru/post/248843/
All Articles