Reports for NORD POS. Part 2
Take the jrxml template and install it in the application
In the first part, I talked about how to prepare a report template for the JasperReports library in iReport. And this article is about how to integrate the resulting template directly into the NORD POS application. And if in the first part the program was needed only as a data source for building an example report on the product directory, then in this article it will be necessary to integrate the report into the application interface, as well as to demonstrate the possibilities of interaction between the business logic of the application and JasperReports library template elements.
In addition, I had to divide the article into two parts due to the fact that during the preparation of the material I found an error in printing the report in version 3.0.1CE. The error occurred due to an incorrect call to the printer selection dialog when using a non-standard design from the Swing Look & Feel Insubstantial library. The error did not occur when using the Metal theme or design in the style of the operating system. But, since the non-standard CremeSkin theme is used by default in NORD POS, to write this part, it was necessary to eliminate this bug and release an updated version of NORD POS 3.0.2CE . And it is this version that we will use in the second part of the article.
Place the template
To install the report template, it is not necessary to download the entire application source, just save the file from iRepot in the reports folder of the installed application and specify the path ./reports/io/example/reports/ for it. In addition, you need to create a BeanShell script to initialize the template in NORD POS, as well as the Properties resource for localizing the template text fields.
')

We write a script
The script code must initialize our report template in the program and transfer the values from the application database to the form fields. And so in the first line of the script we initialize the PanelReportBean () class, which is responsible for interacting with the JasperReports library:
report = new com.openbravo.pos.reports.PanelReportBean(); We set the main parameters for it:
report.setTitleKey("Menu.ExtProducts"); // report.setReport("/io/example/reports/productsext"); // report.setResourceBundle("io/example/reports/productsext_messages"); // And a SQL query string to get the value from the database:
report.setSentence("SELECT"+ " PRODUCTS.NAME AS PRODUCT_NAME" + ", PRODUCTS.REFERENCE AS PRODUCT_REFERENCE" + ", PRODUCTS.PRICESELL AS PRODUCT_PRICESELL" + ", PRODUCTS.CATEGORY AS CATEGORY_ID" + ", CATEGORIES.NAME AS CATEGORY_NAME" + ", PRODUCTS.TAXCAT AS TAX_ID" + " FROM PRODUCTS" + " LEFT OUTER JOIN CATEGORIES ON PRODUCTS.CATEGORY = CATEGORIES.ID" + " LEFT OUTER JOIN TAXCATEGORIES ON PRODUCTS.TAXCAT = TAXCATEGORIES.ID" + " LEFT OUTER JOIN TAXES ON TAXCATEGORIES.ID = TAXES.CATEGORY" + " WHERE ?(QBF_FILTER)" + " ORDER BY CATEGORIES.NAME, PRODUCTS.NAME"); Here you need to pay attention to the WHERE condition ? (QBF_FILTER) , it allows you to insert a filter into the query from the application interface. For example, for a product directory this is ProductFilter () with the following parameter fields:
report.addParameter("PRODUCTS.NAME"); report.addParameter("PRODUCTS.PRICEBUY"); report.addParameter("PRODUCTS.PRICESELL"); report.addParameter("PRODUCTS.CATEGORY"); report.addParameter("PRODUCTS.CODE"); report.addQBFFilter(new com.openbravo.pos.ticket.ProductFilter()); With the help of the filter, the user NORD POS will be able to make a selection at the price of the product, its category, or use the SQL regular expression to select the product only with a specific name. For example, the expression A% will give us a list of products starting only with the letter “A” from any category.
At the end of our script, you must specify the fields that will be used in the jrxml template for building the report:
report.addField("PRODUCT_NAME", com.openbravo.data.loader.Datas.STRING); report.addField("PRODUCT_REFERENCE", com.openbravo.data.loader.Datas.STRING); report.addField("PRODUCT_PRICESELL", com.openbravo.data.loader.Datas.DOUBLE); report.addField("CATEGORY_ID", com.openbravo.data.loader.Datas.STRING); report.addField("CATEGORY_NAME", com.openbravo.data.loader.Datas.STRING); report.addField("TAX_ID", com.openbravo.data.loader.Datas.STRING); report; And call the BeanShell script using the report we created.
Full script text
report = new com.openbravo.pos.reports.PanelReportBean ();
report.setTitleKey ("Menu.ProductList"); // Set the panel name
report.setReport ("/ io / example / reports / productsext"); // Point to the file forming the report
report.setResourceBundle ("io / example / reports / productsext_messages"); // and localization file
report.setSentence ("SELECT" +
"PRODUCTS.NAME AS PRODUCT_NAME" +
", PRODUCTS.REFERENCE AS PRODUCT_REFERENCE" +
", PRODUCTS.PRICESELL AS PRODUCT_PRICESELL" +
", PRODUCTS.CATEGORY AS CATEGORY_ID" +
", CATEGORIES.NAME AS CATEGORY_NAME" +
", PRODUCTS.TAXCAT AS TAX_ID" +
"FROM PRODUCTS" +
"LEFT OUTER JOIN CATEGORIES ON PRODUCTS.CATEGORY = CATEGORIES.ID" +
"LEFT OUTER JOIN TAXCATEGORIES ON PRODUCTS.TAXCAT = TAXCATEGORIES.ID" +
"LEFT OUTER JOIN TAXES ON TAXCATEGORIES.ID = TAXES.CATEGORY" +
"WHERE? (QBF_FILTER)" +
"ORDER BY CATEGORIES.NAME, PRODUCTS.NAME");
report.addParameter ("PRODUCTS.NAME");
report.addParameter ("PRODUCTS.PRICEBUY");
report.addParameter ("PRODUCTS.PRICESELL");
report.addParameter ("PRODUCTS.CATEGORY");
report.addParameter ("PRODUCTS.CODE");
report.addQBFFilter (new com.openbravo.pos.ticket.ProductFilter ());
report.addField (“PRODUCT_NAME”, com.openbravo.data.loader.Datas.STRING);
report.addField (“PRODUCT_REFERENCE”, com.openbravo.data.loader.Datas.STRING);
report.addField (“PRODUCT_PRICESELL”, com.openbravo.data.loader.Datas.DOUBLE);
report.addField ("CATEGORY_ID", com.openbravo.data.loader.Datas.STRING);
report.addField ("CATEGORY_NAME", com.openbravo.data.loader.Datas.STRING);
report.addField ("TAX_ID", com.openbravo.data.loader.Datas.STRING);
report;
Localize the fields
To do this, we need to return to iReport and replace the signature fields with text ones, in order to specify a variable of the form $ R {label.key} for localization in the expression. For example, for the report header, set the value of $ R {label.title} in the jrxml template text box.
Then we add the value for this key to the productsext_messages.properies file.
label.title=List of Products label.line.number=N label.product.reference=Reference label.product.name=Name label.product.price=Price label.product.vat=VAT label.product.TaxPrice=Price+Tax label.report.summary=Summary As a basic language, it is better to use English, then adding a translation to another language. For example, for the Russian language it will be the productsext_messages_ru.properies file.
label.title= label.line.number=№ label.product.reference= label.product.name= label.product.price= label.product.vat= label.product.TaxPrice=+ label.report.summary= Recalculate taxes
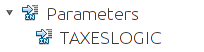
In the first part, we took the tax rate directly from the database, but when generating a report from the application, it is better to calculate the tax rate and the tax amount using the TaxesLogic class getTaxRate specifically for this purpose. To do this, create the parameter TAXESLOGIC in the template.
Parameter tag in XML template
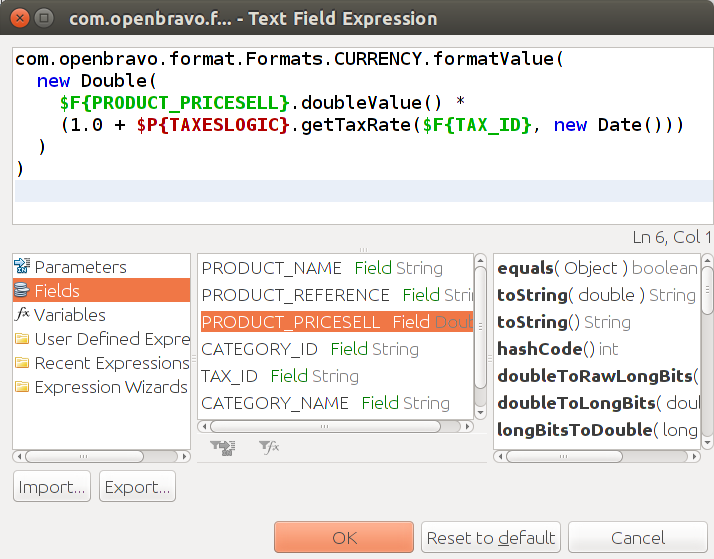
<parameter name="TAXESLOGIC" class="com.openbravo.pos.sales.TaxesLogic" isForPrompting="false"/> Which is called when calculating the price and receives a tax rate directly on the date of the report, which allows you to use the possibilities of NORD POS to calculate the VAT in case of a change in its rate after a certain date.
Price field with tax on report date
<textField pattern="" isBlankWhenNull="false"> <reportElement uuid="1158eb51-5046-4b15-88f2-2456bac9eea1" x="425" y="2" width="84" height="32"/> <textElement textAlignment="Right" verticalAlignment="Top"/> <textFieldExpression><![CDATA[com.openbravo.format.Formats.CURRENCY.formatValue( new Double( $F{PRODUCT_PRICESELL}.doubleValue() * (1.0 + $P{TAXESLOGIC}.getTaxRate($F{TAX_ID}, new Date())) ) ) ]]></textFieldExpression> </textField> Also in this example, instead of the pattern of the template for monetary values, the application pattern is used to ensure the uniformity of the output of all values.
Add a logo and QR code
Also, by calling the external class methods, you can add various resources of the parent application to the report. For example, a logo image is stored in the NORD POS database. You cannot insert it into the report using a SQL query, but you can use the getResourceAsImage method of the DataLogicSystem class by calling it with a query from the expression of the image field.
com.openbravo.pos.forms.DataLogicSystem.getResourceAsImage("Window.SupportBy") Logo image field
<image scaleImage="Clip"> <reportElement uuid="5b7371fd-db3f-488e-80b2-1f2bc912703b" key="image-1" mode="Transparent" x="381" y="1" width="132" height="34"/> <box> <topPen lineWidth="0.0" lineStyle="Solid" lineColor="#000000"/> <leftPen lineWidth="0.0" lineStyle="Solid" lineColor="#000000"/> <bottomPen lineWidth="0.0" lineColor="#000000"/> <rightPen lineWidth="0.0" lineStyle="Solid" lineColor="#000000"/> </box> <imageExpression><![CDATA[com.openbravo.pos.forms.DataLogicSystem.getResourceAsImage("Window.SupportBy")]]></imageExpression> </image> Or, for example, in JasperReports there is no QR code among the supported bar codes, and ZXing library is integrated into NORD POS, with it you can generate a QR code for a report, for example, with a link to the site.
com.nordpos.device.util.BarcodeImage.getQRCode("http://nordpos.mobi") Field of QR code links to the site
<image scaleImage="RetainShape" hAlign="Center" vAlign="Middle"> <reportElement uuid="425a36a5-4937-4551-8b26-8ffe7245f9f0" key="barcode-1" x="449" y="13" width="64" height="64"/> <box> <topPen lineWidth="0.0" lineStyle="Solid" lineColor="#000000"/> <leftPen lineWidth="0.0" lineStyle="Solid" lineColor="#000000"/> <bottomPen lineWidth="0.0" lineColor="#000000"/> <rightPen lineWidth="0.0" lineStyle="Solid" lineColor="#000000"/> </box> <graphicElement fill="Solid"> <pen lineWidth="0.0" lineStyle="Solid"/> </graphicElement> <imageExpression><![CDATA[com.nordpos.device.util.BarcodeImage.getQRCode("http://nordpos.mobi")]]></imageExpression> </image> Configuring access
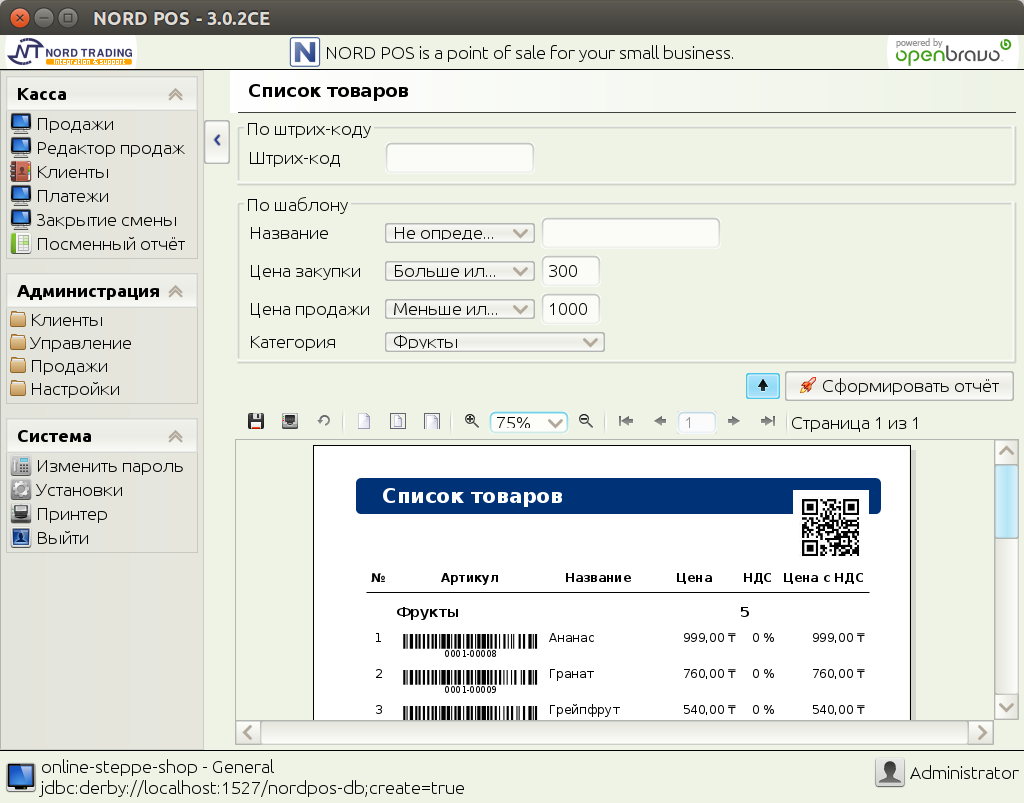
Now the last step remains, it is to open access to the report from NORD POS. From the beginning, we will add our report button to the application interface. Open in Settings -> Resources , find the Menu.Root BeanShell script and add a report panel to the MenuSalesManagement section.
submenu.addPanel("/com/openbravo/images/appointment.png", "Menu.ProductList", "/io/example/reports/productsext.bsh"); The second step is to allow access to the report in the profile for a group of users. Go to Settings -> Profiles , select a role from the list and add permission to access our report in the XML-document.
<class name="/io/example/reports/productsext.bsh"/> Everything, we reboot NORD POS, open the report panel and configure it. This completes the task of creating a report for NORD POS.

In addition to creating reports using the JasperReports tools in NORD POS, you can create labels, fill in tables, build graphs and diagrams, but I tried to explain the foundations for this to Habr's readers in this article. And in the future, if it is interesting, then I want to continue the story about other features of NORD POS, which appeared through the use of third-party libraries. But first I would like to make a small survey among those readers who have read both parts to the end.
Source: https://habr.com/ru/post/248587/
All Articles