How to make friends OpenHAB and Arduino
We all want to make life better, add technical innovations to our home, automate it and make it safer. Often, these desires are transformed into motion on a rake. It is known that branded systems are expensive and often not compatible with each other, and not every professional is capable of creating his own solution. What to do, how to find a simple solution accessible to amateurs, but also interesting to professionals?
Arduino is a simple electronic designer, which enjoys well-deserved respect among amateurs, they say that professionals dislike it, although they secretly use it in their creepy experiments. What is the secret of its popularity, how to use it to solve our problem?
Arduino is suitable for local control and management in the house, there are a lot of projects in the network for this - great, but not enough, because you need to think globally! We need access to the network and mobile interface!
')
It is good that thanks to this article we are already familiar with OpenHAB, an open source platform that unites a large number of devices with different protocols into a single network. OpenHAB is implemented in Java, so it works in various operating systems, it can be run on a single-board computer and even a router, it has a mobile and Web interface. Sounds like a good set of spells against our, already annoying rake, check?
First, install OpenHAB , open the download page, download the Runtime core and Demo setup, unpack them in C: \ openhab. When unpacking the Demo setup, allow the replacement of the README.txt file. If there is no Java on the computer (check with the java –version command), then install it according to the instructions .
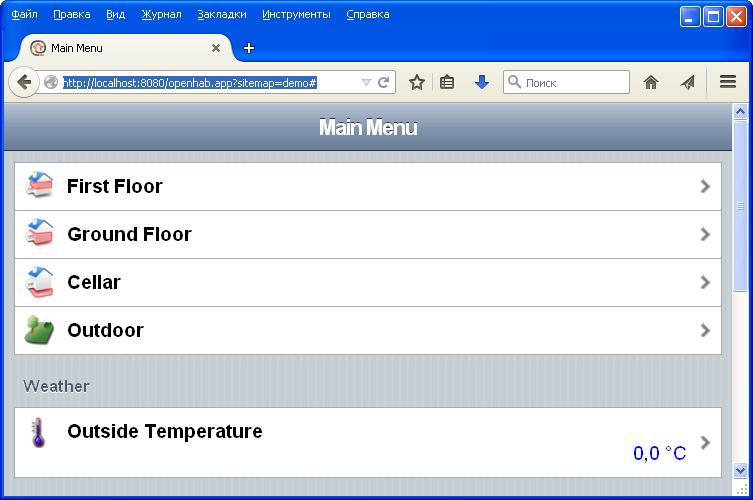
Now we’ll start OpenHAB by running C: \ openhab \ start.bat, wait a while and open the Web interface - localhost : 8080 / openhab.app? Sitemap = demo
(if we need to stop OpenHAB - press Ctl + C or close the program console)
Works! We continue. Our goal is to find a simple solution, so let's start with experiments. In one of the comments on the article, it was proposed to connect the controller to the OpenHub via a serial port using Serial-Binding. It is an interesting decision, we will try to implement it.
To install the add-on, open the download page , download the Addons, unpack org.openhab.binding.serial-1.6.1.jar (the plug-in version may differ) in the C: \ openhab \ addons folder. If desired, read the documentation .
Since debugging the interaction with a real device usually delivers a lot of trouble, we will first try to send commands via the terminal, connecting it to OpenHAB via a null modem cable emulator.
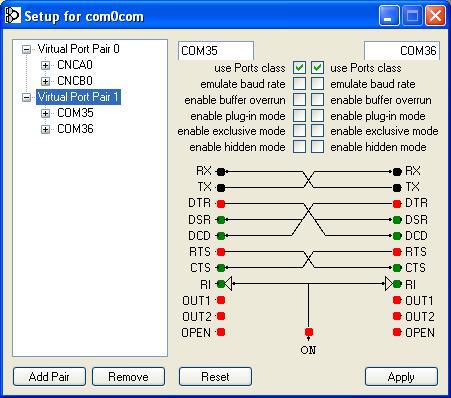
Download and install the com0com emulator, run the utility Setup from the program menu and see that during the installation a virtual pair of serial ports has already been created - I have this COM35 + COM36. We will use them in our work.
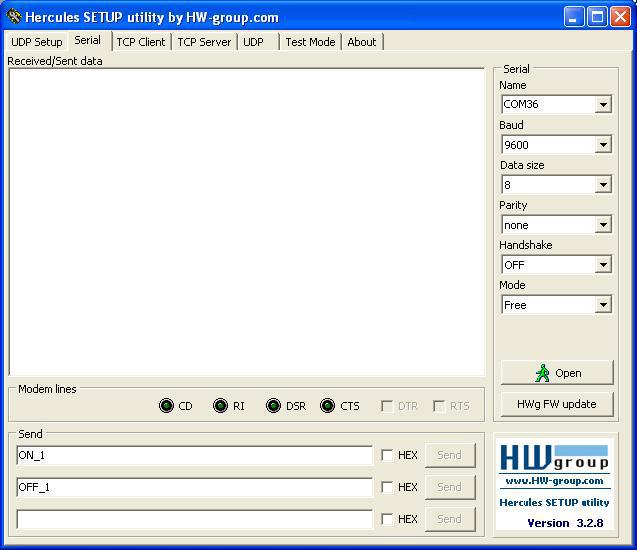
As a terminal, I used the Hercules SETUP utility , this is a free program that allows you to select ports with large numbers and enter several commands, sending them by pressing the appropriate button. Download it, run hercules_3-2-8.exe, go to the “Serial” tab, select the second port of the virtual pair (I have it COM36) and enter the following settings - speed 9600, 8 bits, 1 stop bit, no parity. Open the port.
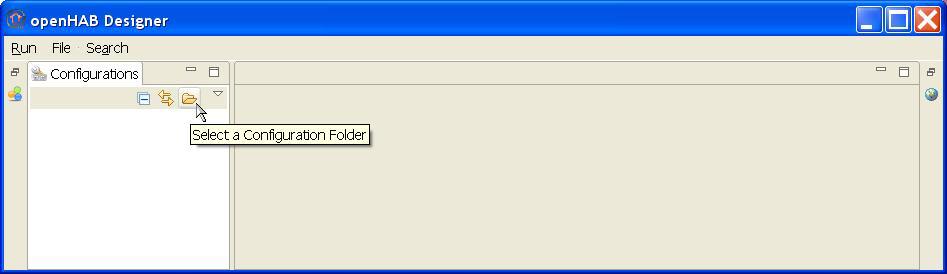
Now you need to configure openHAB, for this we use its designer. Open the download page, download openHAB Designer and unpack it into the folder C: \ openhab \ designer, run C: \ openhab \ designer \ openHAB-Designer.exe and specify the folder where the configuration is located - C: \ openhab \ configurations.
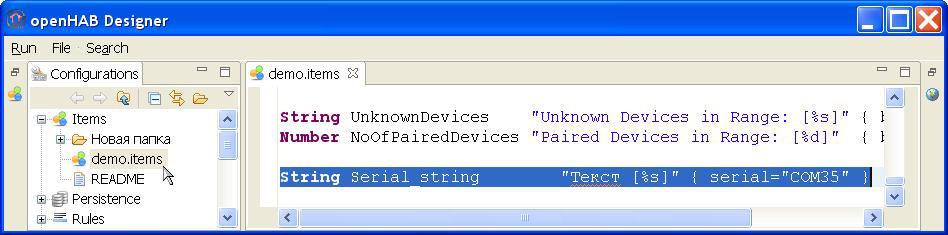
First, create an item (item) and link it to the first serial port in the virtual pair (I have it COM35). To do this, we add the following code to the end of the demo.items file, then right-click in the editor window and click “Save”, instead, you can simply press ctl + S.
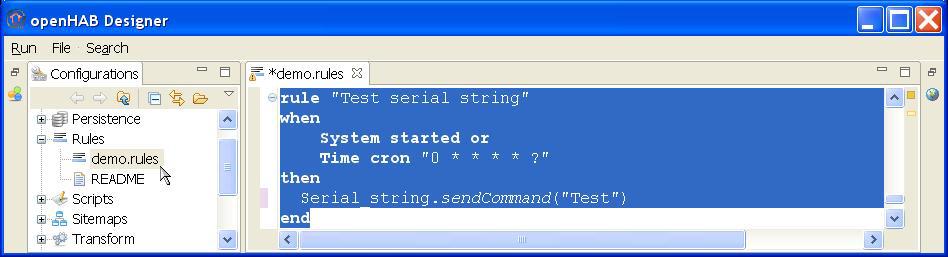
For testing, we will write a rule that every minute will send a command to the created element. To do this, add the following code to the end of the demo.rules file and then save it.
If OpenHAB is running, we will almost immediately begin to accept the command text in the terminal program, and in the console we will see a report on its progress:

Now let's try sending commands to OpenHAB. Enter in the terminal, in the first field of the “Send” panel the text “ON_1”, and in the second “OFF_1”. Press the first “Send” button, then the second. As a result, the following messages appear in the console:

In order for our efforts not to be in vain, we will create a rule that will process our commands. To do this, add the following code to the end of the demo.rules file and save it.
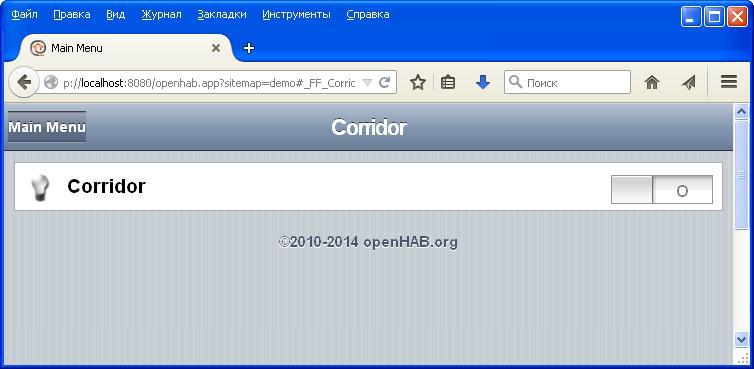
Open the WEB interface, click on “First Floor”, then on “Corridor” or copy the link: localhost : 8080 / openhab.app? Sitemap = demo # _FF_Corridor to the browser, send the text “ON_1”, and then OFF_1 ”from the terminal. Check the switch in the WEB application, its state should change.
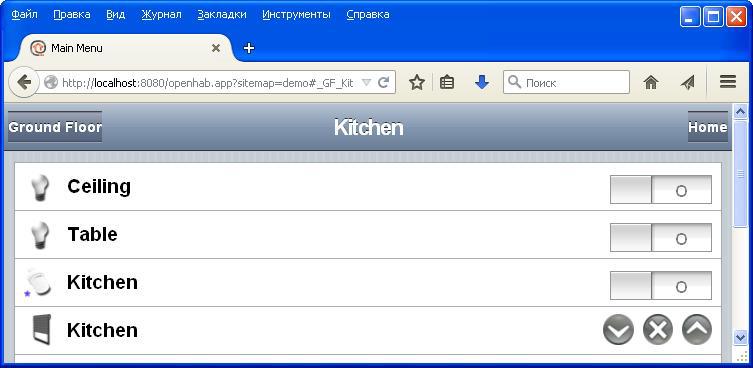
Now click “Home”, select “Ground Floor” and then “Kitchen” or copy the link: localhost : 8080 / openhab.app? Sitemap = demo # _GF_Kitchen to the browser, send the text “ON_2”, and then “OFF_2” from the terminal . Check the switch in the WEB application, its state should also change.
The result of our experiment can be seen in the application console, in which the following messages appear:

On the computer everything works, it's time to connect to the real world!
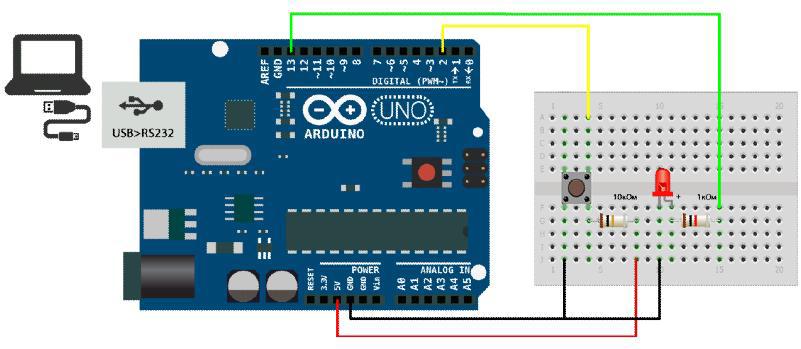
Most of the Arduino boards already have a built-in adapter from the COM port to USB, so we won't have any issues connecting to a computer or laptop. From improvised means we will assemble a model, for this we need an Arduino controller, a breadboard, wires, a button, an LED, resistors 10k ohm and 1 kOhm.
There are enough instructions and examples on the network, so there is no need to describe in detail the installation process and work in the development environment for Arduino. Let's go straight to creating a simple sketch that will handle the button press and send text commands via the serial port. In order to avoid false sending of commands, we will add in the sketch a simple protection against the bounce of contacts.
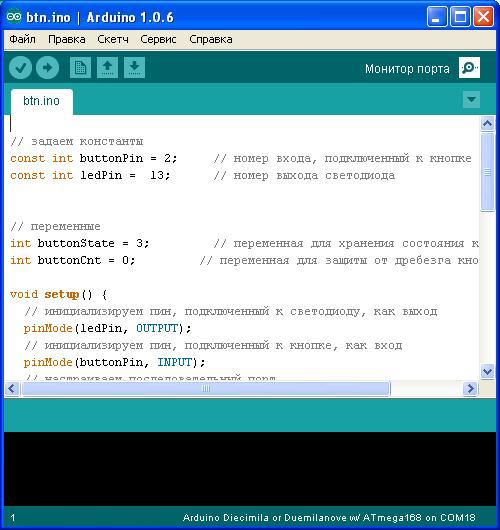
Open the editor, add the following code to it and save the sketch in the btn.ino file.
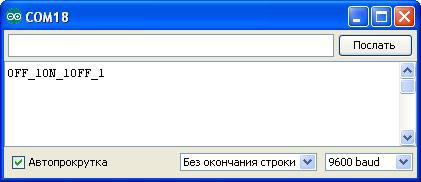
Compile and load the sketch into the Arduino, open the port monitor, select the speed 9600 and try pressing the button on the board. As a result, we can observe the receipt of commands:
Now we’ll close the port monitor and configure OpenHAB to communicate with the controller. To do this, edit the settings of our item (in my case, you need to change the value to COM18, since the Arduino USB adapter is installed on this port).
In the end, we check the passage of commands using the console and WEB interface.
What we received as a result of our work:
1 installed, set up OpenHAB, learned how to add elements (item) and automate processing using rules (rule);
2 learned to test the exchange with the help of software. These tools will help in future troubleshooting and in the formulation of their own experiments;
3 made the simplest sketch for Arduino, connected it to OpenHAB, created a rule that processes text commands, tested the ability to control via the serial port.
Findings:
Sending commands in text form is a common thing in Arduino practice, processing of such commands can be implemented in OpenHAB, so this way of interaction deserves attention and discussion.
The disadvantage of the solution obtained is that the commands are not separated by anything except a pause, this can lead to their “sticking” and unreliable processing. To solve this problem, you need to refine the sketch and the rule for processing commands or make changes to the Serial-Binding module.
Many will call this version of interaction with OpenHAB amateur, so before continuing to work on it, let's try to connect OpenHAB and Arduino via the Modbus protocol.
About this in the following publications:
Arduino & Modbus habrahabr.ru/post/249043
Arduino & OpenHAB habrahabr.ru/post/252555
Open controller of smart home based on Arduino vk.com/myremoter
Arduino is a simple electronic designer, which enjoys well-deserved respect among amateurs, they say that professionals dislike it, although they secretly use it in their creepy experiments. What is the secret of its popularity, how to use it to solve our problem?
Arduino is suitable for local control and management in the house, there are a lot of projects in the network for this - great, but not enough, because you need to think globally! We need access to the network and mobile interface!
')
It is good that thanks to this article we are already familiar with OpenHAB, an open source platform that unites a large number of devices with different protocols into a single network. OpenHAB is implemented in Java, so it works in various operating systems, it can be run on a single-board computer and even a router, it has a mobile and Web interface. Sounds like a good set of spells against our, already annoying rake, check?
First, install OpenHAB , open the download page, download the Runtime core and Demo setup, unpack them in C: \ openhab. When unpacking the Demo setup, allow the replacement of the README.txt file. If there is no Java on the computer (check with the java –version command), then install it according to the instructions .
Now we’ll start OpenHAB by running C: \ openhab \ start.bat, wait a while and open the Web interface - localhost : 8080 / openhab.app? Sitemap = demo
(if we need to stop OpenHAB - press Ctl + C or close the program console)
Works! We continue. Our goal is to find a simple solution, so let's start with experiments. In one of the comments on the article, it was proposed to connect the controller to the OpenHub via a serial port using Serial-Binding. It is an interesting decision, we will try to implement it.
To install the add-on, open the download page , download the Addons, unpack org.openhab.binding.serial-1.6.1.jar (the plug-in version may differ) in the C: \ openhab \ addons folder. If desired, read the documentation .
Since debugging the interaction with a real device usually delivers a lot of trouble, we will first try to send commands via the terminal, connecting it to OpenHAB via a null modem cable emulator.
Download and install the com0com emulator, run the utility
Setup from the program menu and see that during the installation a virtual pair of serial ports has already been created - I have this COM35 + COM36. We will use them in our work.As a terminal, I used the Hercules SETUP utility , this is a free program that allows you to select ports with large numbers and enter several commands, sending them by pressing the appropriate button. Download it, run hercules_3-2-8.exe, go to the “Serial” tab, select the second port of the virtual pair (I have it COM36) and enter the following settings - speed 9600, 8 bits, 1 stop bit, no parity. Open the port.
Now you need to configure openHAB, for this we use its designer. Open the download page, download openHAB Designer and unpack it into the folder C: \ openhab \ designer, run C: \ openhab \ designer \ openHAB-Designer.exe and specify the folder where the configuration is located - C: \ openhab \ configurations.
First, create an item (item) and link it to the first serial port in the virtual pair (I have it COM35). To do this, we add the following code to the end of the demo.items file, then right-click in the editor window and click “Save”, instead, you can simply press ctl + S.
String Serial_string " [%s]" { serial="COM35" } For testing, we will write a rule that every minute will send a command to the created element. To do this, add the following code to the end of the demo.rules file and then save it.
rule "Test serial string" when System started or Time cron "0 * * * * ?" then Serial_string.sendCommand("Test") end If OpenHAB is running, we will almost immediately begin to accept the command text in the terminal program, and in the console we will see a report on its progress:
Now let's try sending commands to OpenHAB. Enter in the terminal, in the first field of the “Send” panel the text “ON_1”, and in the second “OFF_1”. Press the first “Send” button, then the second. As a result, the following messages appear in the console:
In order for our efforts not to be in vain, we will create a rule that will process our commands. To do this, add the following code to the end of the demo.rules file and save it.
rule "Serial control" when Item Serial_string received update then if(Serial_string.state=="ON_1") sendCommand(Light_FF_Corridor_Ceiling, ON) if(Serial_string.state=="OFF_1") sendCommand(Light_FF_Corridor_Ceiling, OFF) if(Serial_string.state=="ON_2") sendCommand(Light_GF_Kitchen_Ceiling, ON) if(Serial_string.state=="OFF_2") sendCommand(Light_GF_Kitchen_Ceiling, OFF) end Open the WEB interface, click on “First Floor”, then on “Corridor” or copy the link: localhost : 8080 / openhab.app? Sitemap = demo # _FF_Corridor to the browser, send the text “ON_1”, and then OFF_1 ”from the terminal. Check the switch in the WEB application, its state should change.
Now click “Home”, select “Ground Floor” and then “Kitchen” or copy the link: localhost : 8080 / openhab.app? Sitemap = demo # _GF_Kitchen to the browser, send the text “ON_2”, and then “OFF_2” from the terminal . Check the switch in the WEB application, its state should also change.
The result of our experiment can be seen in the application console, in which the following messages appear:
On the computer everything works, it's time to connect to the real world!
Most of the Arduino boards already have a built-in adapter from the COM port to USB, so we won't have any issues connecting to a computer or laptop. From improvised means we will assemble a model, for this we need an Arduino controller, a breadboard, wires, a button, an LED, resistors 10k ohm and 1 kOhm.
There are enough instructions and examples on the network, so there is no need to describe in detail the installation process and work in the development environment for Arduino. Let's go straight to creating a simple sketch that will handle the button press and send text commands via the serial port. In order to avoid false sending of commands, we will add in the sketch a simple protection against the bounce of contacts.
Open the editor, add the following code to it and save the sketch in the btn.ino file.
// const int buttonPin = 2; // , const int ledPin = 13; // // int buttonState = 3; // int buttonCnt = 0; // void setup() { // , , pinMode(ledPin, OUTPUT); // , , pinMode(buttonPin, INPUT); // Serial.begin(9600); } void loop(){ // delay(1); if (buttonState != digitalRead(buttonPin)) buttonCnt++; else buttonCnt = 0; if (buttonCnt > 100) { // buttonState = digitalRead(buttonPin); buttonCnt = 0; // // , buttonState LOW: if (buttonState == LOW) { // digitalWrite(ledPin, HIGH); // Serial.print("ON_1"); } else { // digitalWrite(ledPin, LOW); // Serial.print("OFF_1"); } } } Compile and load the sketch into the Arduino, open the port monitor, select the speed 9600 and try pressing the button on the board. As a result, we can observe the receipt of commands:
Now we’ll close the port monitor and configure OpenHAB to communicate with the controller. To do this, edit the settings of our item (in my case, you need to change the value to COM18, since the Arduino USB adapter is installed on this port).
String Serial_string " [%s]" { serial="COM18" } In the end, we check the passage of commands using the console and WEB interface.
What we received as a result of our work:
1 installed, set up OpenHAB, learned how to add elements (item) and automate processing using rules (rule);
2 learned to test the exchange with the help of software. These tools will help in future troubleshooting and in the formulation of their own experiments;
3 made the simplest sketch for Arduino, connected it to OpenHAB, created a rule that processes text commands, tested the ability to control via the serial port.
Findings:
Sending commands in text form is a common thing in Arduino practice, processing of such commands can be implemented in OpenHAB, so this way of interaction deserves attention and discussion.
The disadvantage of the solution obtained is that the commands are not separated by anything except a pause, this can lead to their “sticking” and unreliable processing. To solve this problem, you need to refine the sketch and the rule for processing commands or make changes to the Serial-Binding module.
Many will call this version of interaction with OpenHAB amateur, so before continuing to work on it, let's try to connect OpenHAB and Arduino via the Modbus protocol.
About this in the following publications:
Arduino & Modbus habrahabr.ru/post/249043
Arduino & OpenHAB habrahabr.ru/post/252555
Open controller of smart home based on Arduino vk.com/myremoter
Source: https://habr.com/ru/post/248569/
All Articles