Automated testing of services using the MQ protocol using JMeter
Large distributed information systems often consist of smaller modules (subsystems) and are developed by groups of programmers using different platforms and approaches. Often, data exchange in such systems occurs in asynchronous mode, and preferably the use of middleware, message-oriented software (English Message-Oriented Middleware, MOM).
For modular and integration testing of such systems, it is convenient to use the good old Apache JMeter.
For example, select a small standard module of such a system. Suppose there is an adapter that reads an XML message from an incoming message queue, converts the structure of an XML message, and publishes the converted message to an outgoing message queue. Websphere MQ 7.5 is used as the MOM in this case.
For manual testing of such a system, you can use the rfhutil utility, which comes with Websphere MQ. However, if there are many options for transforming the structure of an XML document, then checking these changes with “hands” is not justified. There is a big risk not to find an error.
')
For the test plan, we need the following elements: User Defined Variables, Thread Group, JMS Publisher, JMS Subscriber. In order for JMeter to use the JMS Publisher, JMS Subscriber elements, you need to add the jar libraries to the% jmeter_home% / lib / ext folder, depending on which MOM you are using.
In the case of Websphere MQ 7.5, the necessary jar libraries are located in the% wmq_home% / java / lib directory.
List of required libraries:
You must create the% jmeter_home% / bindings folder and place the .bindings file generated using the JMSAdmin utility that comes with Websphere MQ.
The .bindings file contains all the necessary information to connect to the queue manager. To create a .bindings file for JMeter, you need to use the JMSAdmin utility that comes with Websphere MQ. % Websphere_mq_home% \ java \ bin> JMSAdmin.bat
Running WebSphere MQ classes to administer JMS
InitCtx> DEF CF (LOCAL.QCF) QMGR (TEST.QM) TRANSPORT (CLIENT) HOSTNAME (localhost) PORT (1415)
InitCtx> DEF Q (QUEUE.IN) QMGR (TEST.QM) QUEUE (QUEUE.IN)
InitCtx> DEF Q (QUEUE.OUT) QMGR (TEST.QM) QUEUE (QUEUE.OUT)
InitCtx> end
Stopping WebSphere MQ classes for JMS administration
Our test plan contains several basic elements: User Defined Variables, Thread Group, JMS Publisher, JMS Subscriber, View Results Tree.
The User Defined Variables element contains parameters for connecting to the MQ infrastructure.
The JMS Publisher element contains settings for working with the MQ queue (write mode). There are several ways to specify which message should be written to the queue. In this example, for simplicity, the message is published directly in the script step.
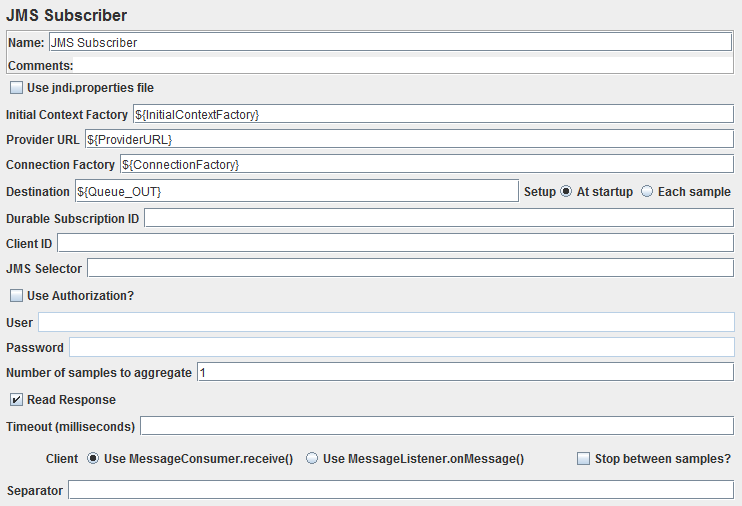
The JMS Subscriber element contains settings for working with the MQ queue (read mode).
To check that our test works as it is necessary to clear the message queues with which we will work. In the queue from which the test will read the messages, we place the test message with the contents of “Hello, Habrahabr!”

Now let's run our script.
We see that the test message was successfully placed in the QUEUE.IN queue.

Also, the message was successfully read from the QUEUE.OUT queue.
The main idea of the article is to show how JMeter can work with the MQ protocol. Otherwise, test scripts can be modified (working with Assertions, variables, reading from a file, etc.) in the same way as with functional testing of services running via other protocols (for example, HTTP).
For modular and integration testing of such systems, it is convenient to use the good old Apache JMeter.
For example, select a small standard module of such a system. Suppose there is an adapter that reads an XML message from an incoming message queue, converts the structure of an XML message, and publishes the converted message to an outgoing message queue. Websphere MQ 7.5 is used as the MOM in this case.
JMerter setup
For manual testing of such a system, you can use the rfhutil utility, which comes with Websphere MQ. However, if there are many options for transforming the structure of an XML document, then checking these changes with “hands” is not justified. There is a big risk not to find an error.
')
For the test plan, we need the following elements: User Defined Variables, Thread Group, JMS Publisher, JMS Subscriber. In order for JMeter to use the JMS Publisher, JMS Subscriber elements, you need to add the jar libraries to the% jmeter_home% / lib / ext folder, depending on which MOM you are using.
In the case of Websphere MQ 7.5, the necessary jar libraries are located in the% wmq_home% / java / lib directory.
List of required libraries:
- com.ibm.mq.commonservices.jar
- com.ibm.mq.headers.jar
- com.ibm.mq.jar
- com.ibm.mq.jmqi.jar
- com.ibm.mq.pcf.jar
- com.ibm.mqjms.jar
- connector.jar
- dhbcore.jar
- fscontext.jar
- jms.jar
- jta.jar
- mqcontext.jar
- providerutil.jar
You must create the% jmeter_home% / bindings folder and place the .bindings file generated using the JMSAdmin utility that comes with Websphere MQ.
Creating a .bindings file
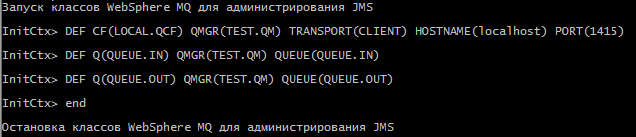
The .bindings file contains all the necessary information to connect to the queue manager. To create a .bindings file for JMeter, you need to use the JMSAdmin utility that comes with Websphere MQ. % Websphere_mq_home% \ java \ bin> JMSAdmin.bat
Running WebSphere MQ classes to administer JMS
InitCtx> DEF CF (LOCAL.QCF) QMGR (TEST.QM) TRANSPORT (CLIENT) HOSTNAME (localhost) PORT (1415)
InitCtx> DEF Q (QUEUE.IN) QMGR (TEST.QM) QUEUE (QUEUE.IN)
InitCtx> DEF Q (QUEUE.OUT) QMGR (TEST.QM) QUEUE (QUEUE.OUT)
InitCtx> end
Stopping WebSphere MQ classes for JMS administration
Creating a test plan
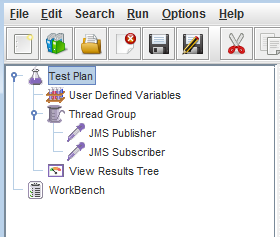
Our test plan contains several basic elements: User Defined Variables, Thread Group, JMS Publisher, JMS Subscriber, View Results Tree.
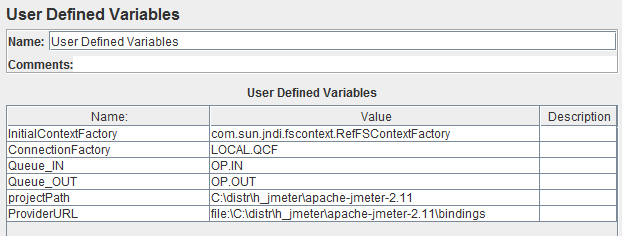
The User Defined Variables element contains parameters for connecting to the MQ infrastructure.
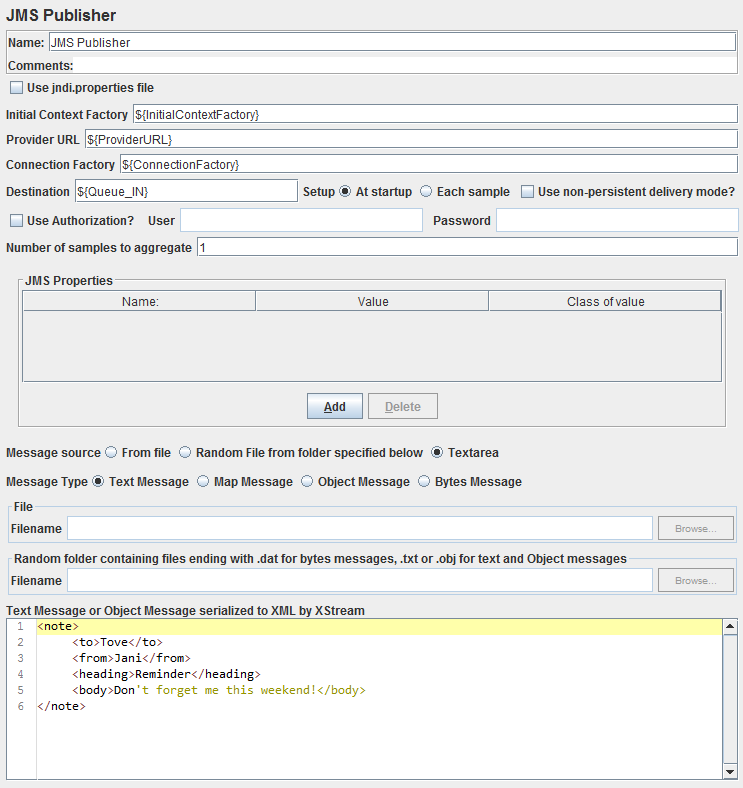
The JMS Publisher element contains settings for working with the MQ queue (write mode). There are several ways to specify which message should be written to the queue. In this example, for simplicity, the message is published directly in the script step.
The JMS Subscriber element contains settings for working with the MQ queue (read mode).
Run the test and view the results
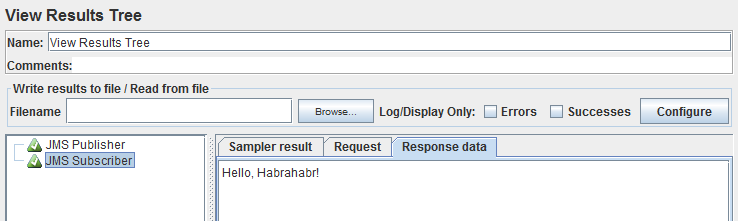
To check that our test works as it is necessary to clear the message queues with which we will work. In the queue from which the test will read the messages, we place the test message with the contents of “Hello, Habrahabr!”
Now let's run our script.
We see that the test message was successfully placed in the QUEUE.IN queue.
Also, the message was successfully read from the QUEUE.OUT queue.
Conclusion
The main idea of the article is to show how JMeter can work with the MQ protocol. Otherwise, test scripts can be modified (working with Assertions, variables, reading from a file, etc.) in the same way as with functional testing of services running via other protocols (for example, HTTP).
Source: https://habr.com/ru/post/248453/
All Articles