OAuth using JWT on salesforce
JWT OAuth General Information
JSON Web Token (JWT, pronounced jot) is an encrypted security token (JSON) token that allows identification and provision of secure access to information from a third-party domain.
Skip theory.
')
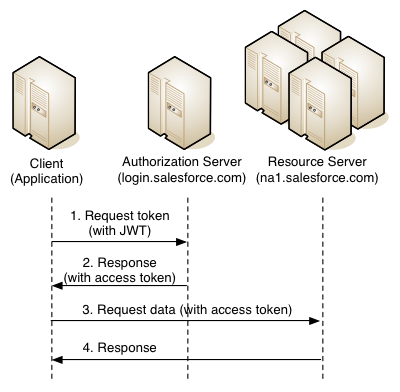
OAuth 2.0 JWT Bearer Token stream determines how a JWT token can be used to request an OAuth access token from Salesforce when the client side wants to use the previously passed authorization. The data included in the JWT contains the username (username) for which you need an access token, as well as the application identifier that requests access (client_id). Authentication of the requesting application is provided by applying a digital signature to the JWT — i.e. json token must be encoded with an RSA key.
The JWT Bearer Token stream supports the RSA / SHA256 algorithm, i.e. You must download the signed certificate in the configuration page of your Connected App, this will allow Salesforce to verify that your token came from a trusted source.
When using the JWT Bearer Token stream, the JWT token itself is sent with a POST request (1) to the url called OAuth endpoint - login.salesforce.com/services/oauth2/token and contains the following data (payload)
grant_type = urn% 3Aietf% 3Aparams% 3Aoauth% 3Agrant-type% 3Ajwt-bearer & assertion = PHN ... QZT
| grant_type | Set this to urn: ietf: params: oauth: grant-type: jwt-bearer |
| assertion | The JWT bearer token. |
The server checks the JWT and creates an access token (access_token) (2) based on the access previously granted to the application. However, the client side is not required to store the refresh_token (as with other OAuth threads), in this case the client application generates a new JWT token when it is necessary to obtain access_token. Also note that client_secret is not necessary when sending a request for a token - JWT authorizes the application.
More theory about OAuth 2.0 JWT Bearer Token stream and see an example on java can be read here - OAuth 2.0 JWT Bearer Token Flow .
Generate private key and certificate
JWT Bearer Flow requires an RSA SHA256 certificate (X.509). You can generate this pair using the openssl utility. Below is an example of a command line for key and certificate generation.
openssl req -x509 -nodes -subj "/C=US/ST=CA/L=San Francisco/CN=web_site.com" -days 3650 -newkey rsa:2048 -keyout your_private_key.pem -out your_certificate.pem 
your_private_key.pem - will be used in the client application
your_certificate.pem - will be uploaded to the Connected app on salesforce (where you will log in)
Attention! The key and certificate listed below is just an example. Do not try to use them in production.
your_private_key.pem
-----BEGIN RSA PRIVATE KEY----- MIIEowIBAAKCAQEA9aHYIsb3WWWfhSeDdZnZagxRrHvcam1QZc5QCGr1EyiuBedb 9xCdJx9qXKv7qvF0fTxZU5wUVicgvUYrTg9hBxx2rkZ4GKgy6DQSO3A/d/7CUk/d 6BrIQlYLW5iLZ68aN7RoVdTl8+wMRjW6yuAIl02bpeI1yuLFDL7jM9mA+PEtSRcB 4JrbvfKoiyG8Q0PWXpl1DyjpqjmP02ezGlUe9MwiZQ6w3MfR0tMOAaroYKo+Tpqp yDy98ca6cwOr1G7H46n/ifITJp1QyWPUA8P0/Bu/R2nLhsec5Xp5FOJgIn4tOysJ oAaZRAmg+OMMn7IosiOOtzxWOFROYP89zUwICQIDAQABAoIBAQDSAuNJsLXQ0EtY TFVgWf8CZa/6+heVQwtHT+Mrn08UZ2aKk6oUjjbfOUP2IfFV0YWYgd2Z18uncWLT kUf7QLjjnJl4HbYW1tBXqhWgjjMlxEKen7yJ80QfO3QQh1dBefu/ftbp89H8AGjq KowfYvbVbjxS0xrM8aAqapbVQPS9YcJGm4VvzE+H+p/cdORfmcssBZtX8ym/EeGB hOWmmQyHxrfR5SzxWyGwntT7kMbZMJ5rixiUnDUhHgTSOWbKYTKPE5sojrV8en3r Ic/Sy/GqwHPfDhaA/ZfPI7d8wBueDrMOb4goO6oNmO6xQkozSOgIsOmpHOpkEaj/ Vlbqmw7RAoGBAP+GLKFSPSgKt5ZymRieZmPXAYohYIcDAExSYdQOA6vVlheXn9Kr /fHZLNult0omevCb7stW192H2A2RN5HzqUO8eJ0/DyUR13ZluNGUUxLMh//wapKT wfCXzDMYdYoeVf6PgZwLdY2BSXG3/Ycr7N27ak251Nffgnh4RxXW8eL1AoGBAPYW 9CweiJ1Vt5Z3KHDRsoCWqFYH+229j9tcxdJGt5VNKrkDxOJfhGu3N6dESo8qEGuu ix6hZhMnF04s8oiBowXFfoopw4K3CUR9paaM+W1fsKDM0f51wZAxd2ZmKnNZW53a zc5iQH0Zy1qT9M5iiXM3VutadSkwupETlOqRYOxFAoGAEf5Z0DZhVhuDGBYTz9b/ sNIoKpj1GizM7ZLzjqI6AfS1cA3eVFCGPmyjqwf9YzxYde8VHr6Lzu7M+Q+b0SxO ZBW2jKQvJdYezRiWrjN6sh0zCoPcjVvYUV/vIj37sPE37wgeAWYRLhjHmjlxof4m 3Opgrv6CDX2Qy3j00IXlXK0CgYAU9smgRI2g0Z+NKuOAEO0i9TKr+Ywawi5SIqob iriy+FruXfrUygxO3NHZ5wBvB8dUVQ828crvUMI0f7G9nUWVBUkNXhdwuEUK16VX 9eR9w8wZNrmg8skljoE8cPGm1/LtFKm5rjcOMTdYpQgS2OQas5ks/YzDkIokN8XU 4cOe/QKBgFp2xSur5d4OFm3yfwq9I2p+tLQrKQexgPExbs4opPmGvsg429xmiLDs d1V0622jOeZflsSFJpsY/MPgxMM2mEfjfEWmqcyOHKoCGbsBc4HC7UJ5zXo4Txaz 1dU9+mRV9XS7mr5bSgNyRB3X1DEeJ4Wi8tp3gV4FH0DwSNGByS/1 -----END RSA PRIVATE KEY----- your_certificate.pem
-----BEGIN CERTIFICATE----- MIIDwTCCAqmgAwIBAgIJAOuaqw3NQvmyMA0GCSqGSIb3DQEBBQUAMEkxCzAJBgNV BAYTAlVTMQswCQYDVQQIEwJDQTEWMBQGA1UEBxMNU2FuIEZyYW5jaXNjbzEVMBMG A1UEAxQMd2ViX3NpdGUuY29tMB4XDTE0MTIxODE0MzkxM1oXDTI0MTIxNTE0Mzkx M1owSTELMAkGA1UEBhMCVVMxCzAJBgNVBAgTAkNBMRYwFAYDVQQHEw1TYW4gRnJh bmNpc2NvMRUwEwYDVQQDFAx3ZWJfc2l0ZS5jb20wggEiMA0GCSqGSIb3DQEBAQUA A4IBDwAwggEKAoIBAQD1odgixvdZZZ+FJ4N1mdlqDFGse9xqbVBlzlAIavUTKK4F 51v3EJ0nH2pcq/uq8XR9PFlTnBRWJyC9RitOD2EHHHauRngYqDLoNBI7cD93/sJS T93oGshCVgtbmItnrxo3tGhV1OXz7AxGNbrK4AiXTZul4jXK4sUMvuMz2YD48S1J FwHgmtu98qiLIbxDQ9ZemXUPKOmqOY/TZ7MaVR70zCJlDrDcx9HS0w4Bquhgqj5O mqnIPL3xxrpzA6vUbsfjqf+J8hMmnVDJY9QDw/T8G79HacuGx5zlenkU4mAifi07 KwmgBplECaD44wyfsiiyI463PFY4VE5g/z3NTAgJAgMBAAGjgaswgagwHQYDVR0O BBYEFComQlVarS6Y5vru8+0WVLEN5fkeMHkGA1UdIwRyMHCAFComQlVarS6Y5vru 8+0WVLEN5fkeoU2kSzBJMQswCQYDVQQGEwJVUzELMAkGA1UECBMCQ0ExFjAUBgNV BAcTDVNhbiBGcmFuY2lzY28xFTATBgNVBAMUDHdlYl9zaXRlLmNvbYIJAOuaqw3N QvmyMAwGA1UdEwQFMAMBAf8wDQYJKoZIhvcNAQEFBQADggEBAN4bpIEbkYe/fkMZ gLplj5wVz4CQgTeYdjgQnZqlJV7bXUJnEREE1oyfS5UHHvKpAOzBhZFNc+T0LFV1 ivKBa6ZJnMY9iUqDuyf7x3QyV62bWeHqOuT8RcZpMtJ1YcQUZgotWlvm2/4zlbVE sZNhsC8NxPRGu3T9d+GPa2zfICMMwDGOHJejPH0FBxdbByHDRkg59UYLFWhejY1G qN2QRDOi6B8LytcMkMyiPZoXL8mFOhR9C6GdoLcc1IZZk5PnrAn0i8sgBs9d4ev1 JU42f8cI8QSG/xKftdVRsoSBPG+EGXJ4EmjUXt1XMu9zSij5WZP5mHfzdfkLgwnf XFhp0s0= -----END CERTIFICATE----- Org's salesforce configuration
- Setup-> Create-> App -> scroll down to Connected Apps -> click New

- Configuring the Connected app and downloading the certificate generated in the first step

- Save changes.
- Open the Setup page of the Setup application -> Manage Apps -> Connected App -> select your application and click the Edit button

- Select the option All users may self-authorize for Permitted Users
- Select the Relax IP Restrictions for IP Restrictions option.
- Click Save
JWT authorization process
In order to allow a connection from one salesforce organization to another salesforce organization, you must set the Remote Site Settings on the client side.
Setup -> Security controls -> Remote Site Settings -> New

To allow access to a specific application for a specific user, you will need to link and open a specific link in the browser. The format is as follows:
https://login.salesforce.com/services/oauth2/authorize?client_id=[client_id]&redirect_uri=[redirect_url]&response_type=code | client_id | so-called consumer key generated during the creation of the Connected App, in our case - 3MVG9QDx8IX8nP5RvIRcKYiylTgtQ1RUJT7tgOC0REp4bEA3JwFM5t39RGF_H5Kwfh6hf_j3.XKTf.IMOThR |
| redirect_url | URL to which the redirect will occur (it must also correspond to what was specified when creating the Connected App), in our case login.salesforce.com/home/home.jsp |

To get the access token, we will need to create a JWT and sign it with the RSA SHA256 key generated in the first step.
Below is the Apex code for generating JWT and getting access_token
public with sharing class JwtAuth { //JWT Header public class JwtHeader{ public String alg = 'RS256'; } //JWT Claims Set public class JsonClaimsSet{ public String iss; //Consumer Key of Salesforce Connected App public String prn; //Salesforce username on destination Org public String aud = 'https://login.salesforce.com'; //https://login.salesforce.com OR https://test.salesforce.com public String exp = '' + System.currentTimeMillis() + (1000 * 60 *60); //Token expiration date - timestamp in miliseconds public String sub; //optional in JWT Bearer Token flow } // JWT Auth flow result public class JwtAuthResult { public String scope; public String instance_url; public String token_type; public String access_token; public String error; public String error_description; } // Singleton private static JwtAuth self; private JwtAuth () {} public static JwtAuth getInstance() { if (self == null) { return new JwtAuth(); } return self; } public String generateJWT(String consumerKey, String sfUsername, String x509PrivateKey) { //lifetime by defaultt = 10 minutes //connect to production by default return generateJWT(consumerKey, sfUsername, x509PrivateKey, 600, false); } private String generateJWT(String consumerKey, String sfUsername, String x509PrivateKey, Integer lifetimeSeconds, Boolean isSandbox) { //1. Construct a JWT Header JwtHeader header = new JwtHeader(); header.alg = 'RS256'; String jwtHeaderStr = JSON.serialize(header); jwtHeaderStr = base64EncodeUrl(jwtHeaderStr); //2. Construct a JSON Claims Set JsonClaimsSet claimsSet = new JsonClaimsSet(); claimsSet.iss = consumerKey; claimsSet.prn = sfUsername; claimsSet.aud = isSandbox ? 'https://test.salesforce.com' : 'https://login.salesforce.com'; claimsSet.exp = '' + (System.currentTimeMillis() + lifetimeSeconds*1000); String jsonClaimsSetStr = JSON.serialize(claimsSet); jsonClaimsSetStr = base64EncodeUrl(jsonClaimsSetStr); //3. Join JWT Header and JSON Claims Set String token = jwtHeaderStr + '.' + jsonClaimsSetStr; //4. Sign with RSA-SHA256 Certificate String signedPayload = base64EncodeUrl( Crypto.sign('RSA-SHA256', Blob.valueOf(token), EncodingUtil.base64Decode(x509PrivateKey)) ); return token + '.' + signedPayload; } public JwtAuthResult requestAccessToken (String endpoint, String jwtSignedToken) { HttpRequest req = new HttpRequest(); req.setEndpoint(endpoint); req.setBody( EncodingUtil.urlDecode('grant_type=urn:ietf:params:oauth:grant-type:jwt-bearer', 'UTF-8') + '&assertion=' + jwtSignedToken); req.setHeader('Content-Type', 'application/x-www-form-urlencoded'); req.setMethod('POST'); Http http = new Http(); HTTPResponse res = http.send(req); String result = res.getBody(); return (JwtAuthResult) JSON.deserialize(result, JwtAuth.JwtAuthResult.class); } //Convert Plain base64 to base64Url public String base64EncodeUrl(Blob data) { return EncodingUtil.base64Encode(data).replaceAll('\\+','-').replaceAll('/','_'); } //Convert Plain base64 to base64Url public String base64EncodeUrl(String data) { return EncodingUtil.base64Encode(Blob.valueOf(data)).replaceAll('\\+','-').replaceAll('/','_'); } } Useful resources on the topic:
Digging Deeper into OAuth 2.0 on Force.com
Remote Access. Oauth JWT flow
Apex Crypto Documentation
Apex Crypto Examples
Source: https://habr.com/ru/post/248387/
All Articles