Unity3D - crossfade, the basics of working with sound (lesson)

picture to attract attention:
"Acorn" - the game we are working on
it uses the script from this lesson.
In the lesson we quickly and easily accomplish about three tasks:
- 1a Smooth attenuation of ambient volume (or soundtrack) of the previous level when moving to the next.
1b. Further, this “sound” is removed after a specified amount of time. - 2. Smooth appearance (volume increase from 0 to 1) of the ambient after loading the level.
- 3. Crossfade of ambient with yourself - the sounds / soundtrack of the level, ~ 10 seconds before their final, should fade out smoothly and smoothly go with amplification to their own beginning.
In other words - “software” smooth mixing (loop / mix / loop, etc.) on the fly.
What is a crossfade ...
Some optional information under the spoiler.... how do I understand this "amateur me"?
')
Here, for example, a screenshot from Adobe Audition.
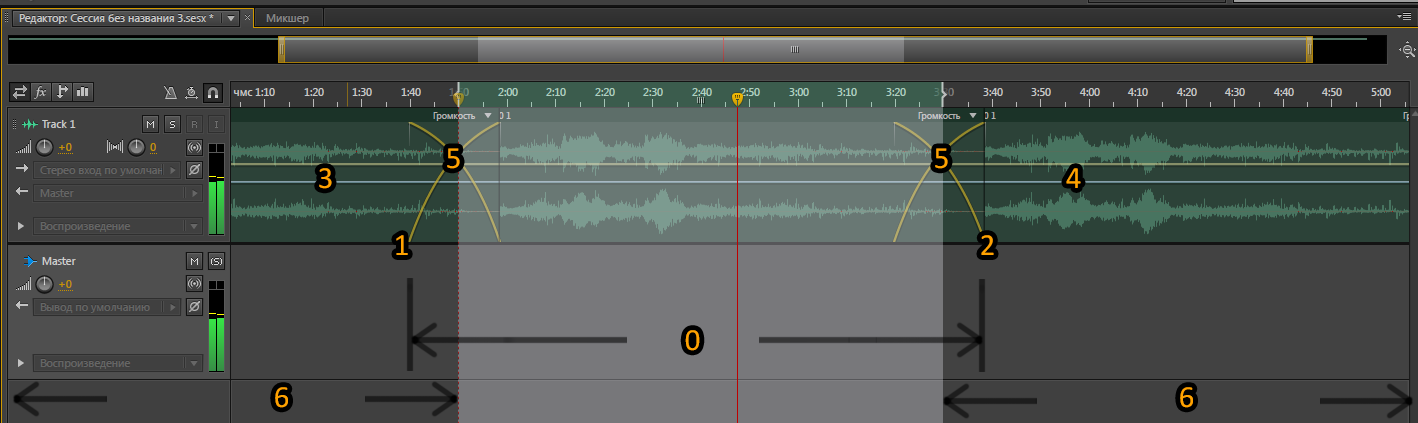
We take the track (0) , do the volume increase at the beginning (1) and the attenuation at the end (2) ,
we clone the result to the beginning (3) and to the end (4) , with an offset to the attenuation crosshair (5) , cut off the excess (6) .
7 - Save the result.
We lose some material at the beginning and at the end, cut off, hmm ... the beginning and the end are "polluted" by admixture of each other.
Somehow, you can, of course, and in another way.
For example, “cut off” completely at the beginning or at the end, leaving uh ... fading in the opposite beginning or at the end.
But it will "eat" even more material.
Why am I doing this programmatically?
')
Here, for example, a screenshot from Adobe Audition.
We take the track (0) , do the volume increase at the beginning (1) and the attenuation at the end (2) ,
we clone the result to the beginning (3) and to the end (4) , with an offset to the attenuation crosshair (5) , cut off the excess (6) .
7 - Save the result.
We lose some material at the beginning and at the end, cut off, hmm ... the beginning and the end are "polluted" by admixture of each other.
Somehow, you can, of course, and in another way.
For example, “cut off” completely at the beginning or at the end, leaving uh ... fading in the opposite beginning or at the end.
But it will "eat" even more material.
Why am I doing this programmatically?
- 1. Because laziness. It was enough to write the script once to forget about Audacity and Adobe Audition
- 2. The source code is preserved in its original form - without “eating” the beginning (going to the end),
no distortion at the beginning and at the end. - 3. I can make a transition on any part of the track, and if I finish the script, then mix several tracks -
all this without bullying audio material in audio editors and without wasting time. - 4. The traditional method limits the choice of formats - loop from * mp3 will “clatter” at the moment of transition.
My way is free from this flaw. - 5. Programs like Audacity, sorry, terribly inconvenient. Programs like Adobe Audition are worth the money.
Mixing in Unity 5.0 via AudioMixer is probably cool.
But you needed your own solution here and now (at the time of writing the lesson - version 4.5.2f1).
So let's start in order.
0. Preparatory work
- 1. Create a project, save.
- 2. In the project we create two scenes, save. For convenience, you can simply call them - 0 and 1
- 3. Drag the created scenes into the Build Settings window (Ctrl + Shift + B).
- 4. Drag two music files into the Project window - for the first and second scenes.
Preferably * wav - if necessary, you can always compress it in the options of the Unity inspector. Well, or * ogg.
In which folders and how to place these files is to your taste.
Also, I recommend for a lesson to take shorter music - so as not to wait for a moment of looping for too long.
In principle, this can be bypassed (set the time for the transition earlier), but for accuracy it is better this way. - 5. Set up our music files: uncheck the 3D Sound checkbox - in our case, the volume of the soundtrack / ambient does not depend on the position of the player with respect to the sound source.
Drag one of the sound files into the first scene and the other into the second.
The camera (or character) should have an Audio Listener.
1. Smooth attenuation of the ambient of the previous level when moving to the next.
Subsequent deletion after a specified amount of time
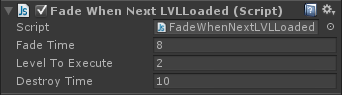
Create a new js script, like stupid names - call it FadeOutAndDestrTimerWhenNextLvlLoad
The first thing we need is that the “sound” object is not destroyed when going to the next level.
What for? Then, to make it a smooth attenuation and then remove.
We climb to read the documentation.
Yeah, we need the line:
DontDestroyOnLoad (transform.gameObject); Based on our requirements, we consider three “variable” variables:
- sound attenuation duration
- time from the moment of loading the level to removing the "sound" object
- the number of the level at which the script will run -
the right thing, because the script is universal - we will apply it at different levels.
We convert thoughts into lines:
var fadeTime = 0; var levelToExecute = 0; var DestroyTime = 0; Yeah, then the script will then consist of two functions - a “delete timer” and a “fade mechanism”.
Let's start with the "delete timer".
It's all elementary:
function OnLevelWasLoaded (level : int) { if (level == (levelToExecute)) { Destroy (gameObject, DestroyTime); //Destroy (gameObject, 20); //- , . } } If the number of the loaded level will correspond to the one specified by us in the “levelToExecute” window, a “delete timer” starts - from the moment of loading the level to the time specified by us in the DestroyTime window.
Hmm, why don't we immediately add the launch of the (not yet written) function “damping mechanism” here? Can.
function OnLevelWasLoaded (level : int) { if (level == (levelToExecute)) { FadeAudio(fadeTime, Fade.Out); // , - ( ) Destroy (gameObject, DestroyTime); } } Now it remains to write the function "damping mechanism", let's say this method:
function FadeAudio (timer : float, fadeType : Fade) { var start = fadeType == Fade.In? 0.0 : 1.0; // ( ) 0 1 var end = fadeType == Fade.In? 1.0 : 0.0; // 1 0 var i = 0.0; // () var step = 1.0/timer; // ("" ) / while (i <= 1.0) { // , "0" () "1" ↓ , // "0" i += step * Time.deltaTime; audio.volume = Mathf.Lerp(start, end, i); // Mathf.Lerp - start, end, "i" // yield; } } Here's what we got:
2.3 “Software” ambient loop with itself, smooth ambient enhancement when loading level
We already know almost everything that is needed for this part.
Add a little bit.
Create a new js script, I will call it StartFadeIn_CloneTimer_FadeOut_DestrTimer
Please note - the name is not just stupid, it shows the sequence of execution of functions, so convenient for me.
By the way, I originally wrote Clauses 1 and 2 in one script, but it turned out to be more convenient to turn off the “slice” when needed.
You can combine them, slightly corrected.
Let's look back to the beginning of the article - what are the requirements for the future script?
The music, for ~ N seconds before its finale, should begin to fade out smoothly and smoothly transition with amplification to its own beginning.
We will think how to implement it:
- 1. Fade at the beginning of the track, “unregulated”, the volume increases from 0 to 1.
It should work both at the start of the level and at the clone (see below). - 2. Fade at the end of the track - the volume decays from 1 to 0,
activated 10 (for example) seconds before the final of the track.
The “unregulated” function, but not quite - not directly. About this below. - 3. Destruction of the object "track" - adjustable figure
the default is equal to the length of the track in seconds, but not necessarily.
We are free to destroy the track at any time, without waiting for the end.
The script will automatically start the decay fade 10 seconds before being destroyed,
according to this figure. - 4. Adjustable fade duration.
According to the above, this is 10c,
but we will leave it possible to change it if necessary. - 5. Creating a track clone - adjustable figure,
it is equal to the track length in seconds, minus 10 seconds of attenuation. - 6. Since at different levels there are different tracks, we will make the script universal -
let's add the ability to choose the “sound” object we need.
We convert thoughts into lines, again, we list that we have attenuation and gain here, and create four variables:
enum Fade {In, Out} // - "" "" var prefab : Transform; // "" var DestroyTime: float = 1; // () var CloneTime: float = 1; // () var fadeTime: float = 1; // / Add the "Start" function:
function Start(){ Spawn(); //↑ "" () FadeAudio(fadeTime, Fade.In ); //↑ "", - Destroy ((prefab as Transform).gameObject, DestroyTime); //↑ , DestroyTime } Now, in order, add the functions listed above. Cloning:
function Spawn(){ while( true ){ yield WaitForSeconds(CloneTime); // , CloneTime for (var i : int = 0;i < 1; i++) { Instantiate (prefab, Vector3(i * 2.0, 0, 0), Quaternion.identity); } // "" FadeAudio(fadeTime, Fade.Out); // , } } We already have the “Fade” function - copy-paste it from the first part of the article:
function FadeAudio (timer : float, fadeType : Fade) { var start = fadeType == Fade.In? 0.0 : 1.0; var end = fadeType == Fade.In? 1.0 : 0.0; var i = 0.0; var step = 1.0/timer; while (i <= 1.0) { i += step * Time.deltaTime; audio.volume = Mathf.Lerp(start, end, i); yield; Debug.Log (audio.volume); // - / } } Here's what we got:
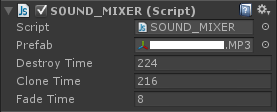
We look at the length of our track, convert it to seconds = DestroyTime
If you are too lazy to count, you can use the online minutes converter (google help) + add the rest of seconds.
Subtract fade duration = CloneTime
We enter the obtained values in the windows.
In perfab add the desired track.
Feyd to taste.
You must ensure that the delay before cloning / fade duration / deletion time
did not conflict with the time parameters of the script from the first part of the article -
otherwise, when moving to the next level, the track may not have time to remove itself and begin to create many of its copies.
...
And finally, if you are wondering what this is done for:
steamcommunity.com/sharedfiles/filedetails/?id=252305314
Source: https://habr.com/ru/post/248371/
All Articles