Practice "Intel IoT". Galileo Gen2 - First dating
Intel has released several devices for developers: Galileo , Galileo Gen2 and Edison - products that are compatible with the Arduino platform, whose main purpose is to create solutions in the field of Internet of things ( IoT ).
Today I want to introduce you to Intel Galileo Gen2:

Intel Galileo Gen2 is positioned as a debugging board for exploring key features and features of the Intel platform and is not intended to be embedded into end devices. Intel Edison is intended for use in ready-made devices (a simple Gilileo -> Edison migration is declared).
')
Galileo Gen2 comes in a beautiful (not only outside, but inside as well) package, however, the list of contents is quite modest:
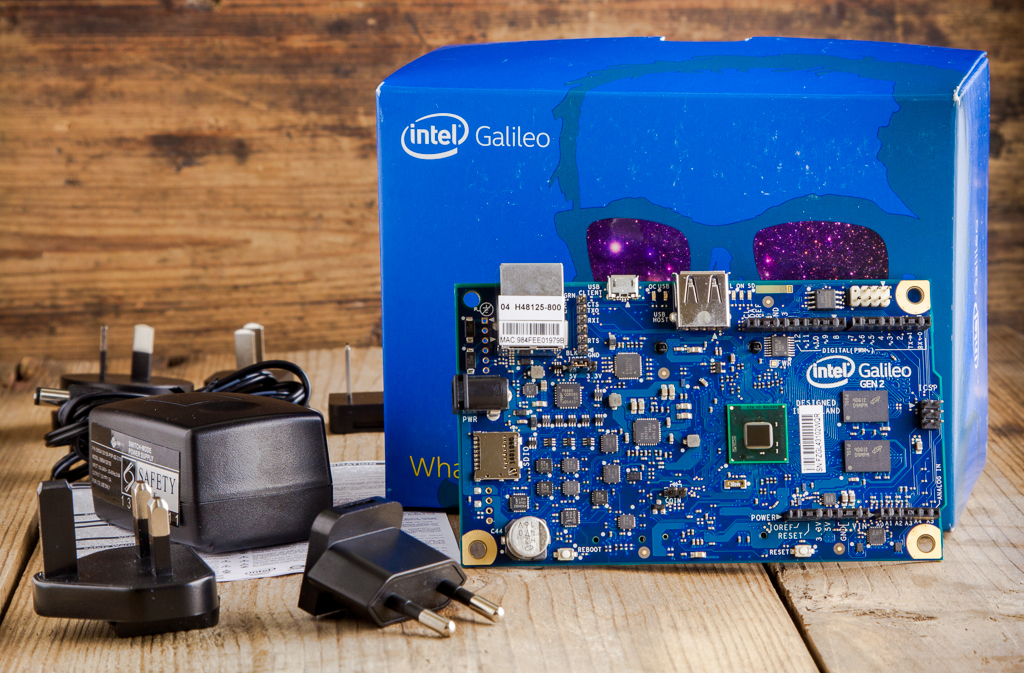
Actually, inside there is only the Intel Galileo Gen2 board itself, a power source (12V 1.5A, 5 different adapters for various outlets) and one piece of important security information (printed in ultra-small font, recording in all possible languages except Russian).
The size of the Intel Galileo Gen2 board is 124x72 mm (the connectors slightly protrude beyond the board):

In the photo for comparison: Intel Galileo Gen 2, "raspberry" and the compact version of the Arduino Mega clone.
The main connectors on the board (starting from the lower left corner and then clockwise):
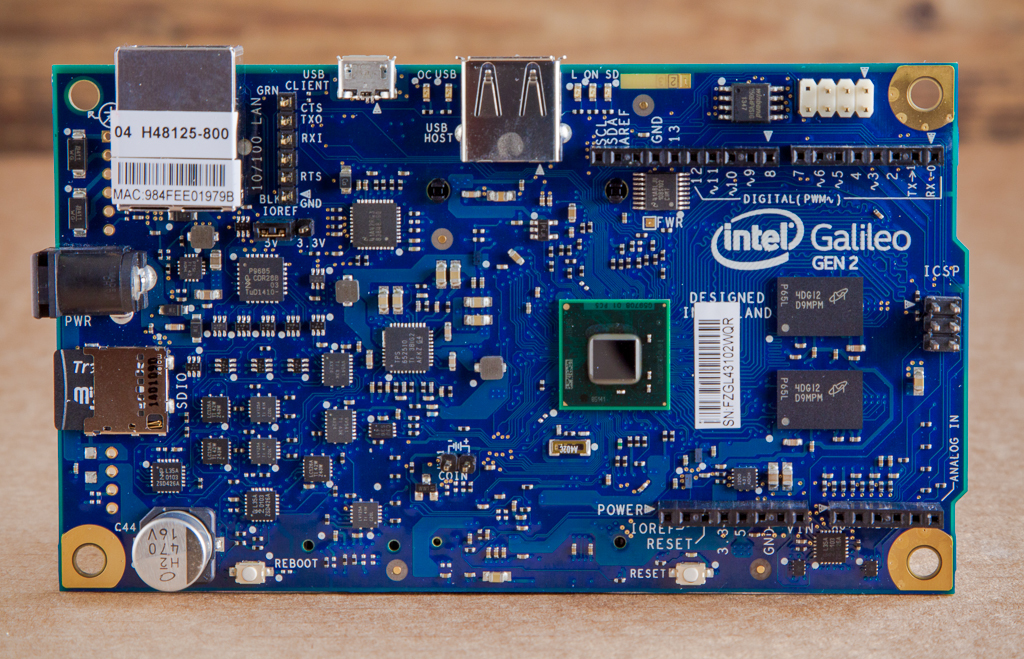
On the right side of the board, the characteristic “comb” for Arduino-shields are also visible (fully comply with Arduino Uno R3). All pins are carefully signed in the best traditions of the Arduino-boards.
Just below the UART connector, there is a single jumper (IOREF) for two positions (5V and 3.3V) - it allows you to select the level of logic levels that the connected shields will work with. Incorrect voltage selection can damage both the shield and the Intel Galileo I / O ports.
To the left and just below the SoC is a two-pin connector for connecting a backup battery (3V) for the RTC (signed "COIN"). RTC is integrated into the processor.
There are also two buttons on the upper side of the board: RESET (reloading the arduino component) and REBOOT (rebooting the entire system).
To indicate activity on Intel Galileo Gen2 there are 5 LEDs (all located next to the USBhost connector):
Let's look at the board from the bottom:
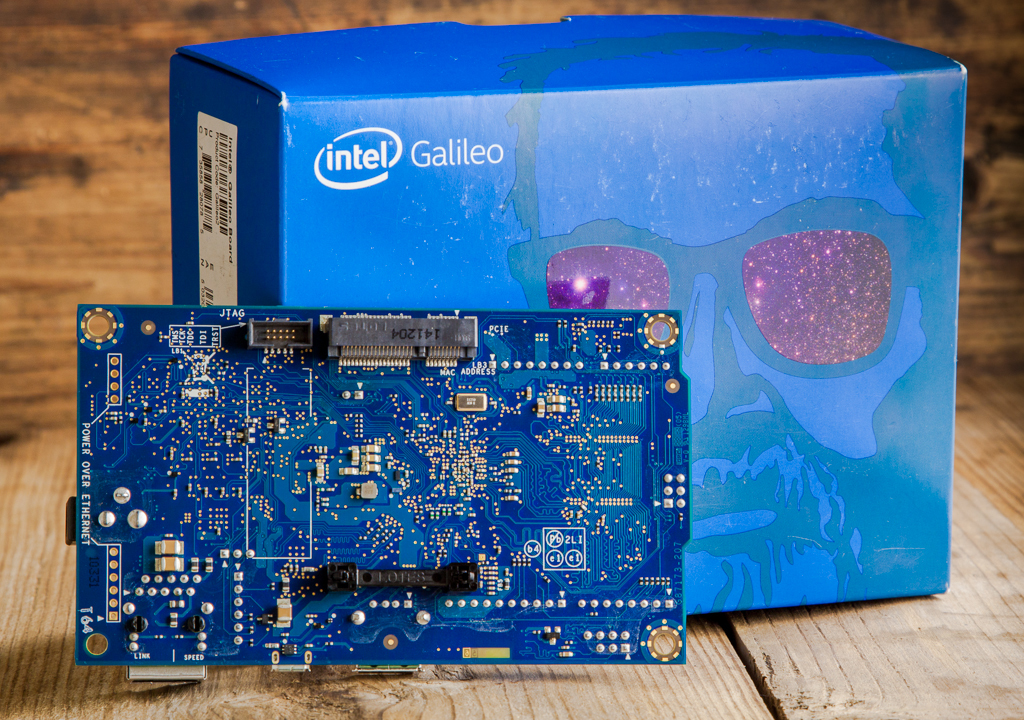
The first thing that caught my eye was the flux residues on almost the entire bottom surface of the board. It is strange to see this in a well-known manufacturer (and even with such an attractive package). Well, okay, "does not affect the speed."
But on the bottom side of the board there is a full mini-PCI Express slot for possible extensions (WiFi modules, modems, etc.). Next to it is a 10-pin JTAG connector for debugging. In the same place it is supposed to connect also the optional PoE module (the corresponding contacts are signed “POWER OVER ETHERNET”).
I will not give the key features of the board, as it has already been done many times. Who is interested, can be found, for example, with the information on the company's website .
A fee of this class for me is a big novelty. Before that, I worked quite closely at first with various arduino boards, and then simply with atmega-based devices.
Intel Galileo is positioned (at least, as it is declared in Intel marketing materials) as a board with great features of linux-systems and simple prototyping of Arduino, as well as with the possibility of organizing the interaction of these two "subsystems". Let's see how things really are.
I will begin the study with the part that is well known to me: Arduino. All actions will be described under the Mac.
The board in the factory state (without any preparation) is already suitable for work in the Arduino environment (in 8Mb of the built-in flash storage there is a lightweight version of linux, which provides this functionality).
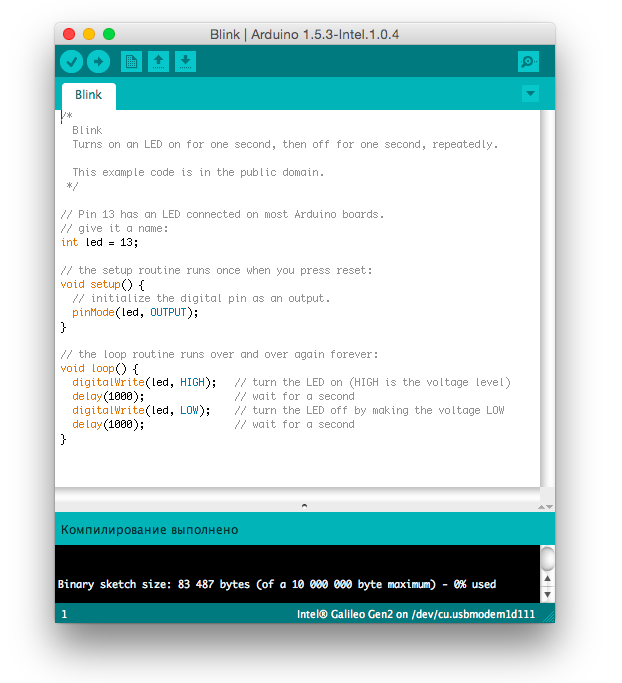
But “it’s enough to put it off - it's time to hatch out”: we shake from the main caliber on sparrows (we blink the LED). The first thing to do is download and install a special version of the Arduino IDE (available in Galileo Software Downloads ) for your OS.
Now, finally, you can connect the board itself. There is a small nuance here - after connecting the power, it is necessary to wait a little (a few seconds) until the system boots. At the same time, two green LEDs (on opposite sides of the USBhost connector) on the board will light up in sequence - only after that you can connect a microUSB cable.
In the Arduino IDE, you must select your board (in this environment, the options available are Intel Galileo, Intel Galileo Gen2 and Intel Edison) and the port that appears after connecting the board. For Mac, the port address is: /dev/cu.usbmodemXXXXX, where XXXXX looks like fd121.
For the first time, it is recommended to check the firmware version and update if required, of course. My board received this update:
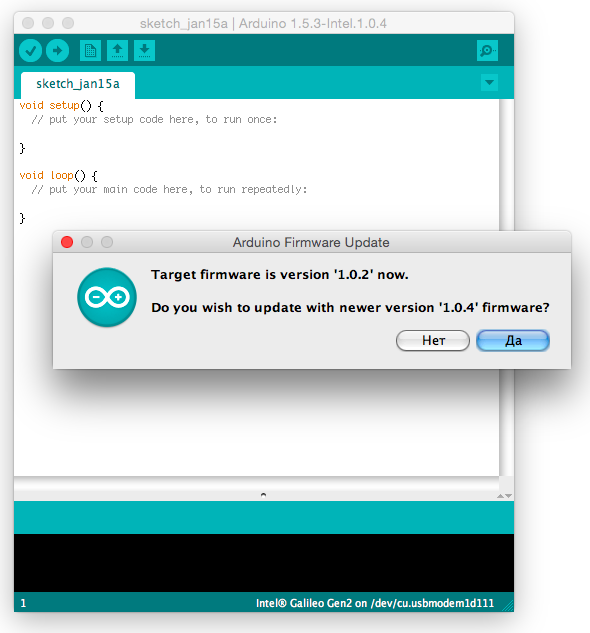
Firmware update takes about 5 minutes.
Now the board is completely ready for operation. As the first experiment we load “Hello World!” For MK - an example of Blink. Usually we press the "download" button and after a few moments the green LED at the USB connector starts blinking defiantly on the board.
Done! The first sketch is already working. After the system reboots, it will start working again. Thus, you can immediately use the Arduino-capabilities of the board. The Arduino IDE contains all the main examples and includes the basic libraries (with their own examples), allowing you to quickly familiarize yourself with the capabilities of the board and its programming. Actually, nothing unusual in this has yet been discovered - everything works as expected (even if “blinking with a light” is too simple and trite).
Interestingly, through the Arduino component, you can work with the Ethernet port (via the standard adapted library of the same name) and the SD card. At the same time, no pins are used to connect shield.
Intel states that compatibility is ensured with almost any Arduino shield.
I, of course, will not check all shields (especially since there is such a document ) - EM Shield caught my arm. This module contains a popular LCD display (similar to the Nokia 5510), two buttons (connected to one analog pin), three connectors for connecting current sensors (also connected to analog pins) and an interface for connecting the popular nRF24l01 + transceiver (hardware uses Arduino SPI) . The purpose of the express check is to try to run some examples from ready-made libraries that are not part of the “prepared” IDE.
For clarity, began with the display. And the LCD5110_Graph library (as expected) did not “start up” ... Main compilation errors: working with registers directly. But if you rewrite the corresponding pieces of code on digitalWrite (), etc. - the display comes to life. Actually, the KDPV was made precisely during these experiments.
Similar problems (not compiled, not working) appeared when working with timers. There were problems when working with interrupts - they (interrupts) are processed, but only “when changed” (remember, in the usual Arduino, you can configure interrupts “on the front”, “on the slope” and “when changed”).
There are probably some other peculiarities that will manifest themselves in further study. While writing this post, I found such a document — it describes the relevant restrictions. It is better to study them in advance so as not to walk on the already known “rakes”. Particular attention should be paid to significantly lower currents from each pin: 16mA @ 5V or 8mA@3.3V (on a typical Arduino - 50mA @ 5V). That is, in which case you can easily burn out the pin - be careful.
It was also very interesting how much faster Intel Galileo performs “standard” functions - for example, digitalWrite (). To do this, I took a blink sketch, removed the delays from the loop () loop and filled one sketch in arduino (atmega328p), and a similar one in Galileo. I connected the oscilloscope and saw the following:
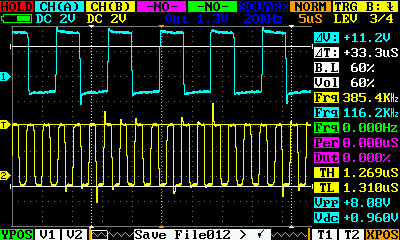
The first channel (blue) - Arduino, the second (yellow) - Intel Galileo.
It turns out that the motherboard from Intel works about four times faster (385kHz, against 116kHz from the Arduino).
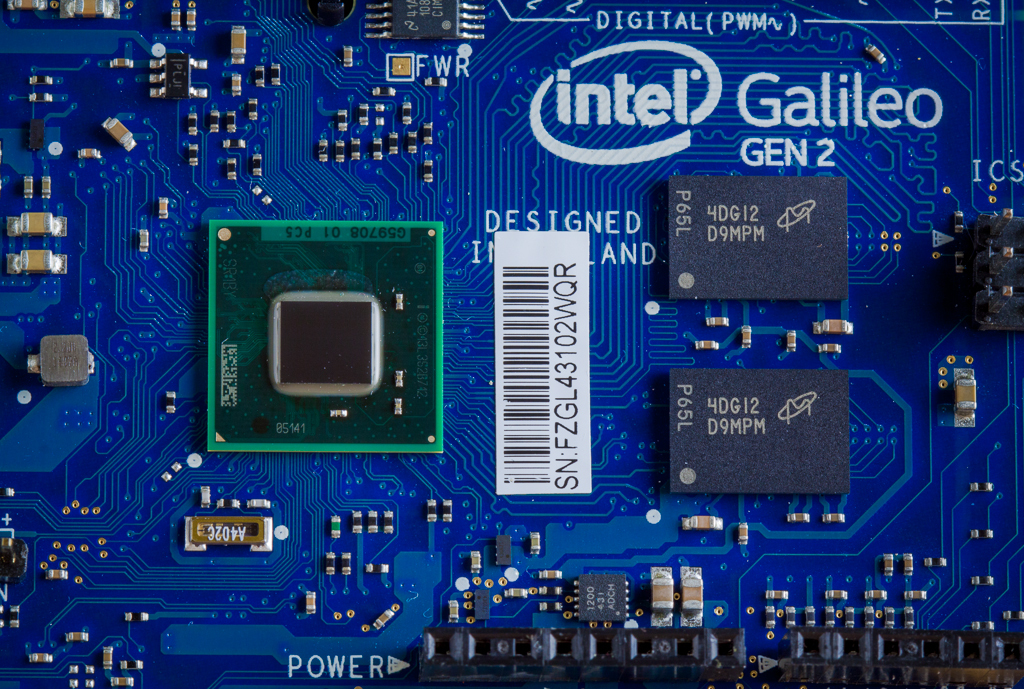
The hot “heart” of the system is the Intel Quark SoC X1000 and two memory chips (DDR3, 256Mb).
We can safely say that the board from Intel (if we consider only the Arduino component) provides the same low level of input as the Arduino (albeit with a significantly higher cost of the board). But this is not even half the possibilities!
On Intel Galileo, you can run a fully functional version of linux - Yocto, while you can use the board as a normal linux computer. And having organized the interaction of the “linux-computer” and the “arduino-device” - to realize much more functionally advanced things.
In the following parts of the "workshop" I will try to highlight these opportunities. To be continued…
» The second part of the" workshop ": Galileo Gen2 - Linux & Arduino .
Today I want to introduce you to Intel Galileo Gen2:
Equipment
Intel Galileo Gen2 is positioned as a debugging board for exploring key features and features of the Intel platform and is not intended to be embedded into end devices. Intel Edison is intended for use in ready-made devices (a simple Gilileo -> Edison migration is declared).
')
Galileo Gen2 comes in a beautiful (not only outside, but inside as well) package, however, the list of contents is quite modest:
Actually, inside there is only the Intel Galileo Gen2 board itself, a power source (12V 1.5A, 5 different adapters for various outlets) and one piece of important security information (printed in ultra-small font, recording in all possible languages except Russian).
By the way, in this piece of paper it is written that while the Intel Quark SoC is running, it can heat up and touch it is not recommended.It is strange that the bundled does not have a microUSB cable, which is required to work with the board, but oh well, such goodness in the household of any geek is enough.
Appearance
The size of the Intel Galileo Gen2 board is 124x72 mm (the connectors slightly protrude beyond the board):
In the photo for comparison: Intel Galileo Gen 2, "raspberry" and the compact version of the Arduino Mega clone.
The main connectors on the board (starting from the lower left corner and then clockwise):
- MicroSD card slot
- Power Connector (7 to 15V)
- Ethernet port (10/100)
- UART (6-pin connector)
- USBclient
- Ushost
- DEDIPROG connector (white, may be needed, for example, for recovery after “scaling”)
- ICSP (6-pin connector)
On the right side of the board, the characteristic “comb” for Arduino-shields are also visible (fully comply with Arduino Uno R3). All pins are carefully signed in the best traditions of the Arduino-boards.
Just below the UART connector, there is a single jumper (IOREF) for two positions (5V and 3.3V) - it allows you to select the level of logic levels that the connected shields will work with. Incorrect voltage selection can damage both the shield and the Intel Galileo I / O ports.
To the left and just below the SoC is a two-pin connector for connecting a backup battery (3V) for the RTC (signed "COIN"). RTC is integrated into the processor.
There are also two buttons on the upper side of the board: RESET (reloading the arduino component) and REBOOT (rebooting the entire system).
To indicate activity on Intel Galileo Gen2 there are 5 LEDs (all located next to the USBhost connector):
- OC (red) - to indicate power overload
- USB (green) - ready to connect via USB
- L (green) - custom LED (connected to D13)
- ON (green) - power
- SD (green) - SD card access indication
Let's look at the board from the bottom:
The first thing that caught my eye was the flux residues on almost the entire bottom surface of the board. It is strange to see this in a well-known manufacturer (and even with such an attractive package). Well, okay, "does not affect the speed."
But on the bottom side of the board there is a full mini-PCI Express slot for possible extensions (WiFi modules, modems, etc.). Next to it is a 10-pin JTAG connector for debugging. In the same place it is supposed to connect also the optional PoE module (the corresponding contacts are signed “POWER OVER ETHERNET”).
I will not give the key features of the board, as it has already been done many times. Who is interested, can be found, for example, with the information on the company's website .
Let's go!
A fee of this class for me is a big novelty. Before that, I worked quite closely at first with various arduino boards, and then simply with atmega-based devices.
Intel Galileo is positioned (at least, as it is declared in Intel marketing materials) as a board with great features of linux-systems and simple prototyping of Arduino, as well as with the possibility of organizing the interaction of these two "subsystems". Let's see how things really are.
I will begin the study with the part that is well known to me: Arduino. All actions will be described under the Mac.
The board in the factory state (without any preparation) is already suitable for work in the Arduino environment (in 8Mb of the built-in flash storage there is a lightweight version of linux, which provides this functionality).
But “it’s enough to put it off - it's time to hatch out”: we shake from the main caliber on sparrows (we blink the LED). The first thing to do is download and install a special version of the Arduino IDE (available in Galileo Software Downloads ) for your OS.
Now, finally, you can connect the board itself. There is a small nuance here - after connecting the power, it is necessary to wait a little (a few seconds) until the system boots. At the same time, two green LEDs (on opposite sides of the USBhost connector) on the board will light up in sequence - only after that you can connect a microUSB cable.
In the Arduino IDE, you must select your board (in this environment, the options available are Intel Galileo, Intel Galileo Gen2 and Intel Edison) and the port that appears after connecting the board. For Mac, the port address is: /dev/cu.usbmodemXXXXX, where XXXXX looks like fd121.
For the first time, it is recommended to check the firmware version and update if required, of course. My board received this update:
Firmware update takes about 5 minutes.
Now the board is completely ready for operation. As the first experiment we load “Hello World!” For MK - an example of Blink. Usually we press the "download" button and after a few moments the green LED at the USB connector starts blinking defiantly on the board.
Done! The first sketch is already working. After the system reboots, it will start working again. Thus, you can immediately use the Arduino-capabilities of the board. The Arduino IDE contains all the main examples and includes the basic libraries (with their own examples), allowing you to quickly familiarize yourself with the capabilities of the board and its programming. Actually, nothing unusual in this has yet been discovered - everything works as expected (even if “blinking with a light” is too simple and trite).
Interestingly, through the Arduino component, you can work with the Ethernet port (via the standard adapted library of the same name) and the SD card. At the same time, no pins are used to connect shield.
Intel states that compatibility is ensured with almost any Arduino shield.
I, of course, will not check all shields (especially since there is such a document ) - EM Shield caught my arm. This module contains a popular LCD display (similar to the Nokia 5510), two buttons (connected to one analog pin), three connectors for connecting current sensors (also connected to analog pins) and an interface for connecting the popular nRF24l01 + transceiver (hardware uses Arduino SPI) . The purpose of the express check is to try to run some examples from ready-made libraries that are not part of the “prepared” IDE.
For clarity, began with the display. And the LCD5110_Graph library (as expected) did not “start up” ... Main compilation errors: working with registers directly. But if you rewrite the corresponding pieces of code on digitalWrite (), etc. - the display comes to life. Actually, the KDPV was made precisely during these experiments.
Similar problems (not compiled, not working) appeared when working with timers. There were problems when working with interrupts - they (interrupts) are processed, but only “when changed” (remember, in the usual Arduino, you can configure interrupts “on the front”, “on the slope” and “when changed”).
There are probably some other peculiarities that will manifest themselves in further study. While writing this post, I found such a document — it describes the relevant restrictions. It is better to study them in advance so as not to walk on the already known “rakes”. Particular attention should be paid to significantly lower currents from each pin: 16mA @ 5V or 8mA@3.3V (on a typical Arduino - 50mA @ 5V). That is, in which case you can easily burn out the pin - be careful.
It was also very interesting how much faster Intel Galileo performs “standard” functions - for example, digitalWrite (). To do this, I took a blink sketch, removed the delays from the loop () loop and filled one sketch in arduino (atmega328p), and a similar one in Galileo. I connected the oscilloscope and saw the following:
The first channel (blue) - Arduino, the second (yellow) - Intel Galileo.
It turns out that the motherboard from Intel works about four times faster (385kHz, against 116kHz from the Arduino).
Despite the warning, I still touched the SoC during the last experiment ... and almost burned my finger.
The hot “heart” of the system is the Intel Quark SoC X1000 and two memory chips (DDR3, 256Mb).
For today everything
We can safely say that the board from Intel (if we consider only the Arduino component) provides the same low level of input as the Arduino (albeit with a significantly higher cost of the board). But this is not even half the possibilities!
On Intel Galileo, you can run a fully functional version of linux - Yocto, while you can use the board as a normal linux computer. And having organized the interaction of the “linux-computer” and the “arduino-device” - to realize much more functionally advanced things.
In the following parts of the "workshop" I will try to highlight these opportunities. To be continued…
» The second part of the" workshop ": Galileo Gen2 - Linux & Arduino .
Source: https://habr.com/ru/post/248279/
All Articles