Unity UI in version 4.6
Good day.
Already for several days v 5.0.0.9 BETA is in open access, but from the name it is clear that it is still early to download and manage your project on it, so in this article I will write down the sights of UI in 4.6. Immediately, I’ll note: everything that is written below is purely IMHO, so you don’t need to come up with witty comments, since I don’t pretend with this article on Habr's CA, but I just want such an article on Habré, because if I came across a similar article as soon as UNITY 4.6 downloaded, it would be easier and more interesting to master the new UI. Here it is. Go.
The first thing I would like to draw your attention to is that in 4.6 the GameObject menu has been somewhat modified, now everything is intuitive and understandable. All we need in this article is in GameObject - UI - ....
Here we have a context menu for selecting the UI element we need.
What's important: each MD element must be a child of a Canvas.
')
Canvas is a kind of frame for storing a set of UIs. It can hold any number of items. You can also create any number of these same Canvas.
After this brief reference, we will understand what the Canvas consists of and what functions it has. We add it to the scene and see that it does not have a Transform component that is mandatory for all objects in Unity. Instead, it, like any other UI element, has a Rect Transform, which, in essence, is modified under the UI Transform.
Immediately after adding Canvas to the scene, you will see that it is much larger than your camera, and that the values in the Rect Transform cannot be changed. It should be so.
First things first.
Here we can configure one of the most important settings. Specifically - Render.
By default, the Render Mode field is set to Screen OverLay, which means that the UIs attached to this Canvas will be displayed on top of everything else on the scene, so you cannot change the values in the Rect Transform, just when Screen OverLay Canvas is just equal to screen proportions. When changing the ratio, the Canvas will resize accordingly.
The next value in Render Mode is Screen Space Camera.
With this value, the Canvas along with all UI elements will be rendered at a certain distance specified in the Plane Distance field. Also in this case, you must specify the camera that will display the UI.
Important: if I do not describe some fields in the components, then I do not consider it difficult for a beginner.
Fine?
We go further.
The next value of the Render Mode field (probably the most important) is World Space.
When this rendering method is selected, the options for editing values in the Rect Transform become available to us. I think, already from the name it is clear why this method is necessary. Not? Okay.
It allows us to add Canvas that are not tied to the screen, but tied to a place on the stage.
And now it is clear to everyone that this method makes it easy to implement very, very many features at once.For example: Nicky players over their heads.
It is also important: when adding a Canvas to the scene, one more element is added, namely the EventSystem.
Everything is simple: This element tracks events on the scene, so if you are going to add elements to the scene that users interact with, you don’t need to delete it.
I forgot to add that a button has also been added, for working with UI.
Everybody is here.
The next item we look at is Button.
The button, IMHO , like almost all other elements of the UI, is implemented perfectly.
Now its elements are in order:
With Rect Transform everything is clear. Everything is intuitive, but there is one detail that I would like to draw attention to.
These are anchors. Thanks to this feature, we finally have the opportunity to suffer less when developing for Android, since different ratios of screens are no longer scary.
The anchor system allows you to customize how exactly the UI element will change when the screen ratio changes.
Here, the anchors were fixed at the center of the parent object, so that when the screen ratio changes, the distance from the center of the parent object to the element remains unchanged.
And in this case, the anchors are fixed in the lower right corner of the parent object, therefore when changing the aspect ratio of the screen, the distance from the element to the lower right corner remains unchanged.
It makes no sense to describe these, because everything is very clear with gif 'ok.
In order to deal with other settings for the UI Button, you just need to know English or have an English-Russian dictionary. There is absolutely nothing, at least in half of the complex.
It is worth noting that the new UI system is incredibly flexible, and allows you to implement really worth things.
One of such sights of the new system is that each element of the MD is a script. Which can be attached via AddComponent. Those. You can easily create a button that will not have an image, but only text (this is a short, contrived example).
In general, the new system allows a lot of new things, and this is a big step for Unity.
This brief excursion into UI for versions 4.6 and above ends.
The article would not take place without:
- google.com
- unity3d.com
- alittle desire.
That's all folks!
Already for several days v 5.0.0.9 BETA is in open access, but from the name it is clear that it is still early to download and manage your project on it, so in this article I will write down the sights of UI in 4.6. Immediately, I’ll note: everything that is written below is purely IMHO, so you don’t need to come up with witty comments, since I don’t pretend with this article on Habr's CA, but I just want such an article on Habré, because if I came across a similar article as soon as UNITY 4.6 downloaded, it would be easier and more interesting to master the new UI. Here it is. Go.
The first thing I would like to draw your attention to is that in 4.6 the GameObject menu has been somewhat modified, now everything is intuitive and understandable. All we need in this article is in GameObject - UI - ....
Here we have a context menu for selecting the UI element we need.
Right here.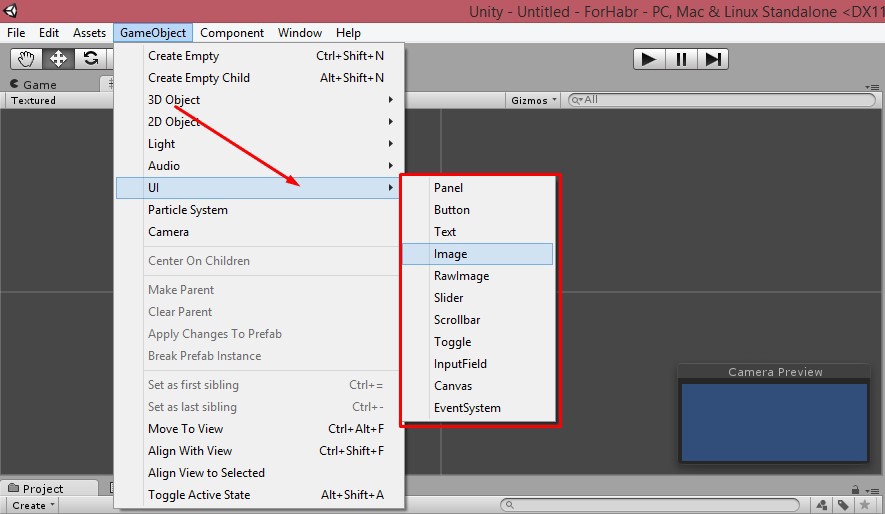
What's important: each MD element must be a child of a Canvas.
')
Canvas is a kind of frame for storing a set of UIs. It can hold any number of items. You can also create any number of these same Canvas.
After this brief reference, we will understand what the Canvas consists of and what functions it has. We add it to the scene and see that it does not have a Transform component that is mandatory for all objects in Unity. Instead, it, like any other UI element, has a Rect Transform, which, in essence, is modified under the UI Transform.
Still.
Immediately after adding Canvas to the scene, you will see that it is much larger than your camera, and that the values in the Rect Transform cannot be changed. It should be so.
First things first.
Still.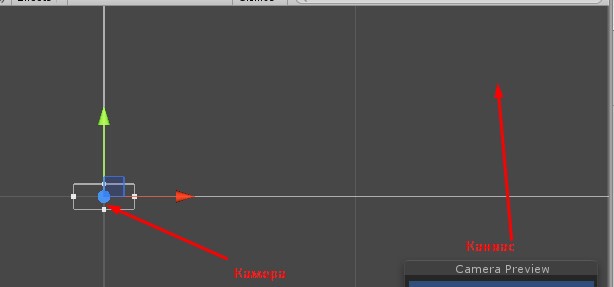
The next element is the Canvas.
Still.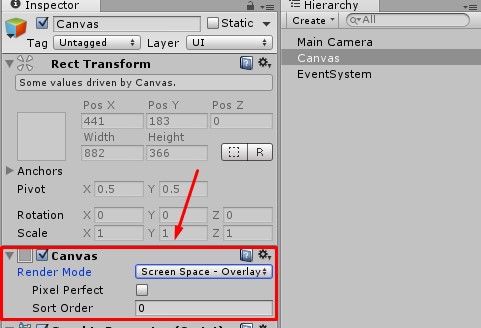
Here we can configure one of the most important settings. Specifically - Render.
By default, the Render Mode field is set to Screen OverLay, which means that the UIs attached to this Canvas will be displayed on top of everything else on the scene, so you cannot change the values in the Rect Transform, just when Screen OverLay Canvas is just equal to screen proportions. When changing the ratio, the Canvas will resize accordingly.
Still.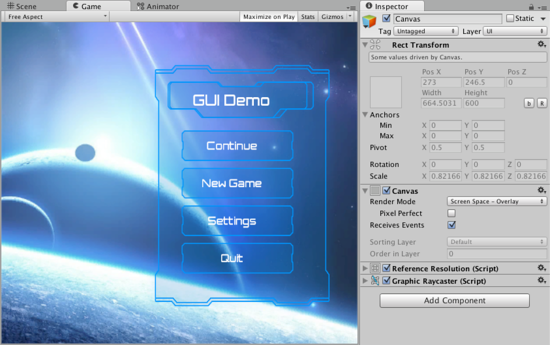
The next value in Render Mode is Screen Space Camera.
With this value, the Canvas along with all UI elements will be rendered at a certain distance specified in the Plane Distance field. Also in this case, you must specify the camera that will display the UI.
Important: if I do not describe some fields in the components, then I do not consider it difficult for a beginner.
Fine?
We go further.
The next value of the Render Mode field (probably the most important) is World Space.
When this rendering method is selected, the options for editing values in the Rect Transform become available to us. I think, already from the name it is clear why this method is necessary. Not? Okay.
It allows us to add Canvas that are not tied to the screen, but tied to a place on the stage.
And now it is clear to everyone that this method makes it easy to implement very, very many features at once.
It is also important: when adding a Canvas to the scene, one more element is added, namely the EventSystem.
Everything is simple: This element tracks events on the scene, so if you are going to add elements to the scene that users interact with, you don’t need to delete it.
I forgot to add that a button has also been added, for working with UI.
Still.
Everybody is here.
The next item we look at is Button.
The button, IMHO , like almost all other elements of the UI, is implemented perfectly.
Now its elements are in order:
Still.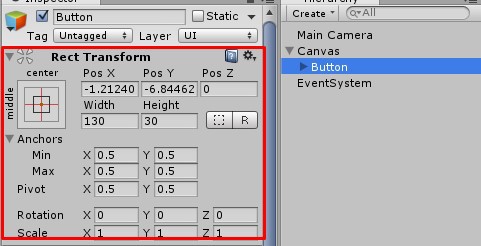
With Rect Transform everything is clear. Everything is intuitive, but there is one detail that I would like to draw attention to.
These are anchors. Thanks to this feature, we finally have the opportunity to suffer less when developing for Android, since different ratios of screens are no longer scary.
How it works?
The anchor system allows you to customize how exactly the UI element will change when the screen ratio changes.
Example.
Here, the anchors were fixed at the center of the parent object, so that when the screen ratio changes, the distance from the center of the parent object to the element remains unchanged.
One more example.
And in this case, the anchors are fixed in the lower right corner of the parent object, therefore when changing the aspect ratio of the screen, the distance from the element to the lower right corner remains unchanged.
One more example.
One more example.
It makes no sense to describe these, because everything is very clear with gif 'ok.
In order to deal with other settings for the UI Button, you just need to know English or have an English-Russian dictionary. There is absolutely nothing, at least in half of the complex.
It is worth noting that the new UI system is incredibly flexible, and allows you to implement really worth things.
One of such sights of the new system is that each element of the MD is a script. Which can be attached via AddComponent. Those. You can easily create a button that will not have an image, but only text (this is a short, contrived example).
In general, the new system allows a lot of new things, and this is a big step for Unity.
This brief excursion into UI for versions 4.6 and above ends.
The article would not take place without:
- google.com
- unity3d.com
- a
That's all folks!
Source: https://habr.com/ru/post/248273/
All Articles