Create an environment for PyQt5 in Linux MInt (Ubuntu)


Qt has been updated to the fifth version a long time ago and with it PyQt, but finding information on them in the Russian-language segment is not an easy task. Under the cat a detailed tutorial for those who are just starting to get acquainted with a bunch of Qt + python3.
Objective: build and configure the environment, go from installing PyQt5 and creating a form in Qt Designer to running a portable binary under Windows (yes, that's right, developing for Mint, compiling for linux and windows).
')
Installation paths
Based on the fact that we are completely new, I will try to use the paths in the system, which are used by default, or which we will create based on the following allocation logic:
- All necessary files and folders are stored in the dev directory in the user's home directory, i.e. ~ / dev /
- We will use virtual environments for python and store them in the envs directory, i.e. ~ / dev / envs /
- Our projects will be stored in the src directory, i.e. ~ / dev / src /
If you already have your own file allocation hierarchy, you will have to adjust the paths in the commands below.
Setting up the environment
Create a directory structure. Open the console and run:
cd ~ mkdir -p dev/envs dev/src cd dev/envs We put the package that we need to build in the future:
sudo apt-get install python3-dev Put pip and virtualenv:
wget https://bootstrap.pypa.io/get-pip.py sudo python3 get-pip.py rm get-pip.py sudo pip install virtualenv Create a virtual environment, activate it and update the packages:
virtualenv --prompt="[pyqt5] " pyqt5 source pyqt5/bin/activate pip install -U pip setuptools We put Qt5. When choosing the installation path, I left the “default” ~ / Qt . If you choose another, you need to change the path in the commands below:
# x64- # http://www.qt.io/download-open-source/#section-2 wget http://download.qt-project.org/official_releases/online_installers/qt-opensource-linux-x64-online.run chmod u+x qt-opensource-linux-x64-online.run ./qt-opensource-linux-x64-online.run rm qt-opensource-linux-x64-online.run # x86- # http://www.qt.io/download-open-source/#section-2 # wget http://download.qt-project.org/official_releases/online_installers/qt-opensource-linux-x86-online.run # chmod u+x qt-opensource-linux-x86-online.run # ./qt-opensource-linux-x86-online.run # rm qt-opensource-linux-x86-online.run We put SIP - the module necessary for work of PyQt:
# http://www.riverbankcomputing.com/software/sip/download wget http://sourceforge.net/projects/pyqt/files/sip/sip-4.16.5/sip-4.16.5.tar.gz tar xvzf sip-4.16.5.tar.gz cd sip-4.16.5/ python configure.py -d ~/dev/envs/pyqt5/lib/python3.4/site-packages/ make sudo make install sudo make clean cd .. rm -rf sip* Put the PyQt:
wget http://sourceforge.net/projects/pyqt/files/PyQt5/PyQt-5.4/PyQt-gpl-5.4.tar.gz tar xvzf PyQt-gpl-5.4.tar.gz cd PyQt-gpl-5.4/ # x64-, . # x86, ~/Qt/5.4/gcc_64/bin/qmake . # , , python configure.py --destdir ~/dev/envs/pyqt5/lib/python3.4/site-packages/ --qmake ~/Qt/5.4/gcc_64/bin/qmake make sudo make install sudo make clean cd .. rm -rf PyQt* That's all. The environment is set and ready to go. To check, run the command:
python -c "from PyQt5.QtCore import QT_VERSION_STR;from PyQt5.Qt import PYQT_VERSION_STR;from sip import SIP_VERSION_STR;print('Qt version: ',QT_VERSION_STR);print('SIP version: ',SIP_VERSION_STR);print('PyQt version: ',PYQT_VERSION_STR)" The answer should look like this:
Qt version: 5.4.0 SIP version: 4.16.5 PyQt version: 5.4 To check that everything is really installed in the virtual environment, open a new terminal window and repeat the verification command:
In response, an ImportError error should appear. A new terminal window can then be closed.
Create application
Go to the directory with our source code and create a project directory:
cd ../src/ mkdir pyqt_test cd pyqt_test/ Next we need Qt Designer. If you didn’t change the Qt installation, you can start it with the command:
# x64-. # x86 gcc_64 . ~/Qt/5.4/gcc_64/bin/designer This is what Qt Designer runs on my system:

In this guide, I will not elaborate on the description of the interface of the designer, we will go through the simplest way to the minimum ready form. If you need more detailed information - Google It!
In the dialog box, select "Widget" (the last item in the list of "templates / forms") and click the "Create" button. The widget editing form will open:

Drag a button from the menu on the left to the form and save the resulting form with the name test.ui to the ~ / dev / src / pyqt_test / directory :

Tips & Tricks: By pressing [Crtl + R] you can run your form and “touch” it in real time.
We convert the interface file from the XML form into a clear python form:
pyuic5 test.ui > test_ui.py I do not want to edit anything in the file created by the PyQt converter, so we will describe our slots in a separate file. Create a test_slots.py file and open it in your favorite editor. The file fill should look something like this:
""" . """ # from datetime import datetime # from test_ui import Ui_Form # , class MainWindowSlots(Ui_Form): # def set_time(self): # '::' str_time = datetime.now().strftime('%H:%M:%S') # self.pushButton.setText(str_time) return None Then, create another file called main.py, in which we describe the main logic:
""" . , . """ # import sys # from PyQt5.QtWidgets import QApplication, QWidget # from test_slots import MainWindowSlots # , class MainWindow(MainWindowSlots): # def __init__(self, form): # Ui_Form self.setupUi(form) # self.connect_slots() # def connect_slots(self): self.pushButton.clicked.connect(self.set_time) return None if __name__ == '__main__': # app = QApplication(sys.argv) # , UI window = QWidget() # UI ui = MainWindow(window) # window.show() # "" sys.exit(app.exec_()) This completes our application. Run from console
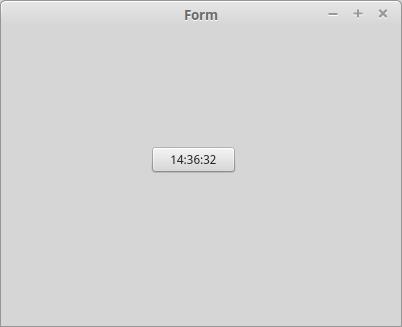
python main.py we should see a form with a button in the middle, clicking on which changes the name of the button to the system date.
Packing in an executable for Linux
The packer will require some magic when installing.
Download the package without installing it and unpack it:
cd ../../envs/pyqt/ pip install -d . cx_freeze tar xvfz cx_Freeze-4.3.4.tar.gz Open your favorite editor file cx_Freeze-4.3.4 / setup.py. I am using SublimeText:
subl cx_Freeze-4.3.4/setup.py We edit line number 84 so that it looks like in the picture:

Tips & Tricks: Did you know that if you run SublimeText from a virtual environment, then the default interpreter will be from a virtual environment?
Save the changes, close the editor, install the package, go back to the source folder, start the packaging:
cd cx_Freeze-4.3.4 python setup.py install rm ../cx_Freeze-4.3.4.tar.gz cd ../../../src/pyqt_test cxfreeze main.py --target-dir=nix_build After that, a dist directory will appear in the source directory, in which among the many files you can see the file without the main extension - this is our binary, ready to run and carry. Frankly, the size of the distributor is a bit upsetting: on my machine it is 70.1 MB, but you should not forget that there are packed there: python, PyQt, Qt and some system-wide libraries. The cxfreeze build script is configured quite flexibly, but I will leave the selection of optimal parameters to the reader’s conscience. I can only say that happiness lies in the compression, optimization and manual limitation of dependencies.
Pack in an executable file for Windows
Unfortunately, there will be no miracle. I don’t know how to build exe directly from a Linux system. Therefore, you have to dance with wine.
We close the terminal opened at the very beginning:
deactivate exit Open a new, put the latest version of wine:
cd dev sudo add-apt-repository ppa:ubuntu-wine/ppa sudo apt-get update sudo apt-get install wine1.7 After that, download windows-versions of the packages already familiar to us and launch the installation from under wine:
# https://www.python.org/downloads/windows/ wget https://www.python.org/ftp/python/3.4.2/python-3.4.2.msi wine msiexec /i python-3.4.2.msi rm python-3.4.2.msi # http://www.riverbankcomputing.com/software/pyqt/download5 wget http://sourceforge.net/projects/pyqt/files/PyQt5/PyQt-5.4/PyQt5-5.4-gpl-Py3.4-Qt5.4.0-x32.exe wine PyQt5-5.4-gpl-Py3.4-Qt5.4.0-x32.exe rm PyQt5-5.4-gpl-Py3.4-Qt5.4.0-x32.exe # http://sourceforge.net/projects/cx-freeze/files/ wget http://downloads.sourceforge.net/project/cx-freeze/4.3.3/cx_Freeze-4.3.3.win32-py3.4.msi wine msiexec /i cx_Freeze-4.3.3.win32-py3.4.msi rm cx_Freeze-4.3.3.win32-py3.4.msi And then a little magic. Follow the link:
http://www.lfd.uci.edu/~gohlke/pythonlibs/#cx_freeze Download the current version of cx_Freeze for our interpreter and put it on top of the official one:
wine cx_Freeze-4.3.4.win32-py3.4.exe rm cx_Freeze-4.3.4.win32-py3.4.exe After that, it remains to check the performance. Go to the directory with the source, open the wine terminal, execute the familiar build command:
cd src/pyqt_test wine cmd cxfreeze main.py --target-dir=win_build It turned out that I did not have a windows machine at my disposal, so I was able to test the result only under wine. Exit the wine terminal (exit command), close the terminal. We go to distribute our program to everyone.
PS: All sources on github
Source: https://habr.com/ru/post/248189/
All Articles