Car Tutorial Guide (Unity3d) part 2 of 3
Part 1
Part 3
So, we will start studying our leadership.
If you studied the first part of this manual and collected the car, you are already at the stage where the car is quite efficient. But, if you tested a little car, you probably noticed that there is still an opportunity to improve driving.
')
This is where fine tuning takes place on the stage. In game development, fine tuning is an important part to make your game interesting, challenging and amazing. The idea is that when there are several cars in your game, you probably want to have different speed, resistance or you may want to change the light on the stage, etc.
The main strength of Unity3d is its tweakability — as you have seen, all public variables in scripts are shown in the inspector, so you can change the values without changing it in code. And even more powerful settings: as soon as you made a change, you can immediately see the result of the change. You will never have to recompile the game to see the result of the changes.
Now the most obvious thing that should be optimal is that the car cannot turn over very easily when turning (if you have not tried it, then play again and accelerate a little and then turn from side to side, the accelerated car will turn over quite easily ). The reason for this overturning is that we have not yet determined where the center of mass of the car is. All the forces that apply to the rigidbody of a car, they all apply to the center of mass in the rigidbody . Since the center of mass in a car is usually not the center of the car (probably not the center of mass, which Unity3d calculates), we want to establish the center of mass ourselves.
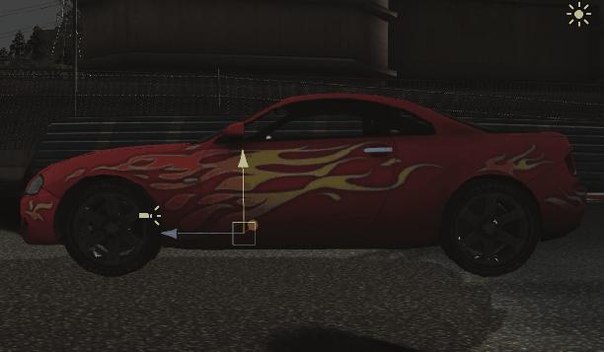
The position of the center of mass for a car depends on the placement of the engine and other factors, and it can change many times, from one car model to another. For a car in the draft of this manual, the center of mass may be slightly behind the engine and slightly higher than the height of the bottom of the car. You can see its position in this picture:
• Create a new game object and drag it to the game object “Car”.
• Rename it to CenterOfMass
• Reset the CenterOfMass coordinates (click on the small gear to the right of the Transform in
inspector and select “ Reset ”. This will give her the same position as her parent - the car (Car) .
• Adjust the position as you like. Do this by dragging or setting the position coordinates,
A good position for the center of mass of this car can be (0, 0.1, 0.65).
• In the inspector, assign CenterOfMass to the slot for it in the script of the “Car” component.
In general, it is bad to have CenterOfMass located on either side of the center on the x axis, because this will make the control very strange and therefore we will set the variable x to state 0 . You can also change the target on the camera so that the camera looks at the CenterOfMass (Center of Mass) of the vehicle and not at the vehicle itself. This will give a slightly different perception of the game - play a little and adjust these parameters to suit your needs.
Another factor that can greatly change the behavior of a car is its suspension properties. The main function of a car's suspension is to ensure constant contact of the wheels with the road surface, and therefore ensure maximum friction with the road. When the car passes through an unevenness (bump) on the road, the kinetic energy of the vertically moving wheels (and hence the moving suspension elements), through the suspension elements, is transferred to the body. If the car does not have an intermediate structure, this can easily lead to a complete loss of contact of the wheels with the road, and then the car will fall on the road without wheels due to gravity. Suspension is an intermediate structure.

We have three different variables for setting in the inspector - range (range), damper (damper) and spring (spring) . All of them are part of the WheelCollider class that we use on the wheels of a car. On the left we see a car with standard settings, and on the right we see it with a much larger suspension range . In a combination of spring and damper properties, you can make it behave like the formula for turning a car into a big truck. Of course, the graphics must necessarily coincide with the parameters in order to make the car believable with the original car of life!
This is the length of the suspension from the frame of the car (the smaller the value the closer to the frame).
The value set here determines the stiffness of the suspension spring (suspension spring) . Setting a very high value will make it more likely that the suspension will be fully stretched, so the wheels will be far away from the frame and installing a suspension of a very low value will make the car much more lively. When you study the settings of this value, it becomes clear that the weight of the car is also of great importance in the installation of suspension spring (suspension spring) . A very heavy car requires a spring with greater rigidity than a very light car. By default, we set the suspension spring less rigid than at the front, and the reason is that the center of mass is distributed more towards the front of the car, which need to be improved. Playing with different values for the front and rear suspension can produce very different results.
Dampening helps control movement in the suspension . Without Dampening, the suspension spring would be expanded and release its energy at an uncontrolled speed. This will lead to an extremely uncontrollable car. Depreciation (Dampening) while driving a car converts unnecessary kinetic energy into heat, which will be transferred far into hydraulic fluid, which makes the trip much easier.
When we added the Rigidbody to the car, we saw that it had drag property . This resistance is the inertia or air resistance that affects the rigidbody ; it impedes movement. When a car is developed, a lot of attention is often paid to its shape, which should minimize the friction of air resistance when driving. But since the car is designed to move forward, the form takes this into account - just look at the car model in the editor from the front (Front) and from the top (top) and you will realize that the front air flows around the car much more than the back or side.
We take this into account when creating our own drag multiplier property, which we use instead of the standard drag property built into RigidBody . Take a look at this component of the “Car” script in the inspector, where you will see that we have the variable Drag Multiplier , which has X, Y, Z values. This allows us to set different drag property values for the front, side and top of the car, simulating the actual conditions as if you were driving.

• The value of X is the resistance on the sides of the car.
• The value of Y is the resistance to the roof of the car.
• Z value is the resistance on the front of the car.
The value of X plays an important role in controlling the force, preventing the car from sliding sideways when turning. The higher the X value, the greater the resistance in the sides of the car. The Z value is by far the most interesting, because it can lead to a decrease or increase in the force that slows down the speed of the car. If you set it to a value less than 1, then you will get less resistance, faster acceleration and a high maximum speed. If more than 1, then the car must fight against a more powerful force, which makes the car slower. The drag values (Drag) are very sensitive, so we advise you to experiment with minor changes to fine tune the drag (Drag) . Since the car should not drive up, the value of Y is not so interesting to change it. The most important factor that regulates the car in the Y axis is the gravity factor, which affects the rigidbody .
Now we have come to more obvious variables that also have a fairly large influence on the behavior of the car. Variable maximum speed (Top Speed) is not an easy task: it sets how fast (or slow) your car can drive. Since our car model is much simpler than in a real car model, acceleration is affected (except drag ), the variable maximum speed (Top Speed) also indirectly affects acceleration. Created a car very quickly must achieve high speed. If you want to play with maximum speed and acceleration, you can try to adjust the values for maximum speed (Top Speed) and variable Z resistance (Drag Z) (air resistance in the front direction (Front) ).
To enable, we have two variables - the maximum turn (Maximum Turn) and the minimum turn (Minimum Turn) . Both mean how well the car turns. A high value means excellent turning capabilities, and a low value means very limited turning capabilities. We use them in the car's script to change the car's ability to “smoothly" turn the car at high speed.
• At very low speeds, this value is set for Maximum Turn .
• The higher the vehicle speed becomes, the closer the “turning ability” to the Minimum Turn value.
It all boils down to the fact that when the default value for the car (which is 10 for the minimum turn (Minimum Turn) and 15 for the maximum turn (Maximum Turn) ) is used, it is becoming harder to turn when the car drives fast. It looks more realistic, ensuring that you can’t just drive at full speed in a sharp turn and expect the car to “drive” into this turn. You can experiment with both values to make the car better or worse when turning at low or high speed.
Finally we got to change the gearbox (Number Of Gears) . When we get to the part where we study the car script (Car) we will see how it is used in the calculations. Since the car is based on a simple model, the transmission does not imitate the actual behavior of the gearbox . However, it is used to calculate the engine power, and perhaps more importantly, that it is used in the sound control script (controlling the sound) to change the sound of the engine, based on what the transmission is now and how fast we are currently driving. This creates a car sound on different gears, like a realistic car model. Setting the value of the gearbox (Number Of Gears) simply creates an illusion through the sound of how many gears the car has.
If you followed the manual and collected your own version of the car, now you have the knowledge necessary to implement it in your projects. The easiest way to transfer it between projects is to make the Unity Package (Unity Pack) from the required Prefabs
First, we will drag the car (Car) into the prefab (Prefab) so that we can use it again without making the assembly and settings:
• in the Project view, click “Create” and select “Prefab” . You will receive an empty prefab in the project view (Project view) called “new prefab” .
• Rename the Prefab to “Race Car” (race car) (good name) or any other name to your liking.
• Drag the “Car” game object (car) from the hierarchy panel (Hierarchy view) to the prefab .
This has already been done for you (located in Prefabs / Car ), but now you also have your own version of the car.
There are several parts that are needed besides Prefab Car (Automobile Prefab) in order to create a pack that will work from scratch. These are Skidmarks, Main_Camera and Directional_Light_Car_Road. Fortunately, they have already been transferred to the Prefabs . There are also a few scripts that we need to include in our pack that will not be included unless we specify them: SoundToggler.js, ImageEffects.cs and ImageEffectsBase.cs . The reason is that these scripts are not included in the scene, but are used with other scripts when the game is running. Image scripts ( ImageEffects.cs and ImageEffectsBase.cs ) are included in the Pro Standard Assets , but we include them in a pack so that they can be imported into a completely empty project and will work.

• In the Project view, select all of these items:
• Prefabs / VFX: Directional_Light_Car_Road, Main_Camera, Skidmarks
• scripts / Javascripts: SoundToggler.js
• Pro Standard Assets / Image Based / ImageEffects.cs and ImageEffectsBase.cs
• Car Prefab (Car Prefab) that you created.
• Click the Export Package button.
• In the pop-up window that appears, make sure that the dependencies (Include dependenci) include a check mark. This will collect all the assets (Assets) that you have selected, as well as all the assets that depend on them (Assets), except for assets (Assets), which are accessed only through scripts.
• Click the “Export” button, specify a name for your pack and save!
The process of importing your car in your own project:
• In your new project we will go to the Assets-> Import package ...
• Go to the pack you saved and open it.
• Make sure everything is selected (Click “ All ”), and then click Import.
• Unity will import all assets (Assets) and Prefabs will appear in the project view (Project view) , which you can already use in the project scene.
You can take a car for free and use it in your projects, and now you have the knowledge to create and customize cars and transfer them between projects - so please go ahead and make a really amazing racing game!
Part 3
So, we will start studying our leadership.
Part 2: Tweaking the car
If you studied the first part of this manual and collected the car, you are already at the stage where the car is quite efficient. But, if you tested a little car, you probably noticed that there is still an opportunity to improve driving.
')
This is where fine tuning takes place on the stage. In game development, fine tuning is an important part to make your game interesting, challenging and amazing. The idea is that when there are several cars in your game, you probably want to have different speed, resistance or you may want to change the light on the stage, etc.
The main strength of Unity3d is its tweakability — as you have seen, all public variables in scripts are shown in the inspector, so you can change the values without changing it in code. And even more powerful settings: as soon as you made a change, you can immediately see the result of the change. You will never have to recompile the game to see the result of the changes.
Center of mass
Now the most obvious thing that should be optimal is that the car cannot turn over very easily when turning (if you have not tried it, then play again and accelerate a little and then turn from side to side, the accelerated car will turn over quite easily ). The reason for this overturning is that we have not yet determined where the center of mass of the car is. All the forces that apply to the rigidbody of a car, they all apply to the center of mass in the rigidbody . Since the center of mass in a car is usually not the center of the car (probably not the center of mass, which Unity3d calculates), we want to establish the center of mass ourselves.
The position of the center of mass for a car depends on the placement of the engine and other factors, and it can change many times, from one car model to another. For a car in the draft of this manual, the center of mass may be slightly behind the engine and slightly higher than the height of the bottom of the car. You can see its position in this picture:
• Create a new game object and drag it to the game object “Car”.
• Rename it to CenterOfMass
• Reset the CenterOfMass coordinates (click on the small gear to the right of the Transform in
inspector and select “ Reset ”. This will give her the same position as her parent - the car (Car) .
• Adjust the position as you like. Do this by dragging or setting the position coordinates,
A good position for the center of mass of this car can be (0, 0.1, 0.65).
• In the inspector, assign CenterOfMass to the slot for it in the script of the “Car” component.
In general, it is bad to have CenterOfMass located on either side of the center on the x axis, because this will make the control very strange and therefore we will set the variable x to state 0 . You can also change the target on the camera so that the camera looks at the CenterOfMass (Center of Mass) of the vehicle and not at the vehicle itself. This will give a slightly different perception of the game - play a little and adjust these parameters to suit your needs.
Suspension
Another factor that can greatly change the behavior of a car is its suspension properties. The main function of a car's suspension is to ensure constant contact of the wheels with the road surface, and therefore ensure maximum friction with the road. When the car passes through an unevenness (bump) on the road, the kinetic energy of the vertically moving wheels (and hence the moving suspension elements), through the suspension elements, is transferred to the body. If the car does not have an intermediate structure, this can easily lead to a complete loss of contact of the wheels with the road, and then the car will fall on the road without wheels due to gravity. Suspension is an intermediate structure.
Additional explanation from mrsom
The characteristics of the elastic element (spring) and damping (shock absorber) define the coupling characteristic of the moving suspension elements and the body. Essentially asking the frequency response of this connection. Thus, the system can be optimized for the absorption of smaller or larger irregularities with minimal loss of tire contact with the surface. These parameters also affect the rolls and the redistribution of weight between the wheels in turns, thereby having a significant impact on handling in different modes of movement.
The ratio of the parameters of the front and rear axles determine the character of the car in the limit modes on the turn (the so-called "steering"). It is redundant (the rear axle comes off the trajectory earlier than the front one), insufficient (the front pulls down earlier) and neutral (the derailment occurs simultaneously).
Further, for example, we can point out that if the stiffness of the rear suspension is greater than the front, then, other things being equal, we will get a tendency to oversteer and vice versa.
We have three different variables for setting in the inspector - range (range), damper (damper) and spring (spring) . All of them are part of the WheelCollider class that we use on the wheels of a car. On the left we see a car with standard settings, and on the right we see it with a much larger suspension range . In a combination of spring and damper properties, you can make it behave like the formula for turning a car into a big truck. Of course, the graphics must necessarily coincide with the parameters in order to make the car believable with the original car of life!
Suspension range
This is the length of the suspension from the frame of the car (the smaller the value the closer to the frame).
Suspension springs
The value set here determines the stiffness of the suspension spring (suspension spring) . Setting a very high value will make it more likely that the suspension will be fully stretched, so the wheels will be far away from the frame and installing a suspension of a very low value will make the car much more lively. When you study the settings of this value, it becomes clear that the weight of the car is also of great importance in the installation of suspension spring (suspension spring) . A very heavy car requires a spring with greater rigidity than a very light car. By default, we set the suspension spring less rigid than at the front, and the reason is that the center of mass is distributed more towards the front of the car, which need to be improved. Playing with different values for the front and rear suspension can produce very different results.
Depreciation
Dampening helps control movement in the suspension . Without Dampening, the suspension spring would be expanded and release its energy at an uncontrolled speed. This will lead to an extremely uncontrollable car. Depreciation (Dampening) while driving a car converts unnecessary kinetic energy into heat, which will be transferred far into hydraulic fluid, which makes the trip much easier.
Resistance multiplier
When we added the Rigidbody to the car, we saw that it had drag property . This resistance is the inertia or air resistance that affects the rigidbody ; it impedes movement. When a car is developed, a lot of attention is often paid to its shape, which should minimize the friction of air resistance when driving. But since the car is designed to move forward, the form takes this into account - just look at the car model in the editor from the front (Front) and from the top (top) and you will realize that the front air flows around the car much more than the back or side.
We take this into account when creating our own drag multiplier property, which we use instead of the standard drag property built into RigidBody . Take a look at this component of the “Car” script in the inspector, where you will see that we have the variable Drag Multiplier , which has X, Y, Z values. This allows us to set different drag property values for the front, side and top of the car, simulating the actual conditions as if you were driving.
• The value of X is the resistance on the sides of the car.
• The value of Y is the resistance to the roof of the car.
• Z value is the resistance on the front of the car.
The value of X plays an important role in controlling the force, preventing the car from sliding sideways when turning. The higher the X value, the greater the resistance in the sides of the car. The Z value is by far the most interesting, because it can lead to a decrease or increase in the force that slows down the speed of the car. If you set it to a value less than 1, then you will get less resistance, faster acceleration and a high maximum speed. If more than 1, then the car must fight against a more powerful force, which makes the car slower. The drag values (Drag) are very sensitive, so we advise you to experiment with minor changes to fine tune the drag (Drag) . Since the car should not drive up, the value of Y is not so interesting to change it. The most important factor that regulates the car in the Y axis is the gravity factor, which affects the rigidbody .
Speed, turn and gearbox
Now we have come to more obvious variables that also have a fairly large influence on the behavior of the car. Variable maximum speed (Top Speed) is not an easy task: it sets how fast (or slow) your car can drive. Since our car model is much simpler than in a real car model, acceleration is affected (except drag ), the variable maximum speed (Top Speed) also indirectly affects acceleration. Created a car very quickly must achieve high speed. If you want to play with maximum speed and acceleration, you can try to adjust the values for maximum speed (Top Speed) and variable Z resistance (Drag Z) (air resistance in the front direction (Front) ).
To enable, we have two variables - the maximum turn (Maximum Turn) and the minimum turn (Minimum Turn) . Both mean how well the car turns. A high value means excellent turning capabilities, and a low value means very limited turning capabilities. We use them in the car's script to change the car's ability to “smoothly" turn the car at high speed.
• At very low speeds, this value is set for Maximum Turn .
• The higher the vehicle speed becomes, the closer the “turning ability” to the Minimum Turn value.
It all boils down to the fact that when the default value for the car (which is 10 for the minimum turn (Minimum Turn) and 15 for the maximum turn (Maximum Turn) ) is used, it is becoming harder to turn when the car drives fast. It looks more realistic, ensuring that you can’t just drive at full speed in a sharp turn and expect the car to “drive” into this turn. You can experiment with both values to make the car better or worse when turning at low or high speed.
Finally we got to change the gearbox (Number Of Gears) . When we get to the part where we study the car script (Car) we will see how it is used in the calculations. Since the car is based on a simple model, the transmission does not imitate the actual behavior of the gearbox . However, it is used to calculate the engine power, and perhaps more importantly, that it is used in the sound control script (controlling the sound) to change the sound of the engine, based on what the transmission is now and how fast we are currently driving. This creates a car sound on different gears, like a realistic car model. Setting the value of the gearbox (Number Of Gears) simply creates an illusion through the sound of how many gears the car has.
Export car in the form of a pack
If you followed the manual and collected your own version of the car, now you have the knowledge necessary to implement it in your projects. The easiest way to transfer it between projects is to make the Unity Package (Unity Pack) from the required Prefabs
First, we will drag the car (Car) into the prefab (Prefab) so that we can use it again without making the assembly and settings:
• in the Project view, click “Create” and select “Prefab” . You will receive an empty prefab in the project view (Project view) called “new prefab” .
• Rename the Prefab to “Race Car” (race car) (good name) or any other name to your liking.
• Drag the “Car” game object (car) from the hierarchy panel (Hierarchy view) to the prefab .
This has already been done for you (located in Prefabs / Car ), but now you also have your own version of the car.
There are several parts that are needed besides Prefab Car (Automobile Prefab) in order to create a pack that will work from scratch. These are Skidmarks, Main_Camera and Directional_Light_Car_Road. Fortunately, they have already been transferred to the Prefabs . There are also a few scripts that we need to include in our pack that will not be included unless we specify them: SoundToggler.js, ImageEffects.cs and ImageEffectsBase.cs . The reason is that these scripts are not included in the scene, but are used with other scripts when the game is running. Image scripts ( ImageEffects.cs and ImageEffectsBase.cs ) are included in the Pro Standard Assets , but we include them in a pack so that they can be imported into a completely empty project and will work.
• In the Project view, select all of these items:
• Prefabs / VFX: Directional_Light_Car_Road, Main_Camera, Skidmarks
• scripts / Javascripts: SoundToggler.js
• Pro Standard Assets / Image Based / ImageEffects.cs and ImageEffectsBase.cs
• Car Prefab (Car Prefab) that you created.
• Click the Export Package button.
• In the pop-up window that appears, make sure that the dependencies (Include dependenci) include a check mark. This will collect all the assets (Assets) that you have selected, as well as all the assets that depend on them (Assets), except for assets (Assets), which are accessed only through scripts.
• Click the “Export” button, specify a name for your pack and save!
The process of importing your car in your own project:
• In your new project we will go to the Assets-> Import package ...
• Go to the pack you saved and open it.
• Make sure everything is selected (Click “ All ”), and then click Import.
• Unity will import all assets (Assets) and Prefabs will appear in the project view (Project view) , which you can already use in the project scene.
You can take a car for free and use it in your projects, and now you have the knowledge to create and customize cars and transfer them between projects - so please go ahead and make a really amazing racing game!
Source: https://habr.com/ru/post/248185/
All Articles