High DPI values in Windows
Windows, starting with Vista, provides two mechanisms for adapting applications to monitors with a high pixel density (dots per inch, DPI): enlarged system fonts and full-blown windows. Unfortunately, trying to get some of your applications to work in any of the modes may be unsuccessful, thanks to a combination of negligent developers and bad decisions made by Microsoft.
This page is designed to help users understand and correct possible problems when setting high DPI values. Please note that we will consider only traditional Windows applications, not the Windows Store ("Metro", "Modern UI") applications. The latter use the new WinRT API, which provides its own scaling mechanism.
From translator
In this article, the following abbreviations that I found to translate are not advisable: Graphical User Interface (GUI), Points Per Inch (DPI), DPI-Aware applications — applications that can display their GUI correctly, without distortion, Graphic Interface Devices (GDI). My comments (in italics) .
Scaling methods
Traditionally, native Windows desktop applications use two display mechanisms:
Initially, most monitors had a pixel density of about 96 dots per inch. So the GUI using this feature looked about the same on any system. But, as soon as the pixel density increases, the GUI elements of such applications decrease in terms of centimeters or inches (real, which are measured using the ruler attached to the monitor) . Small text and other small details become harder to see.
To fix the situation, Microsoft decided that it was a good idea to incorporate some method of scaling to Windows. One of the two methods described below (Windows XP or Vista) is used when the user sets the DPI with a value higher than the standard 96 dpi. Both methods try to increase the size of the image elements.
Scaling in the style of Windows XP
The first of these methods, as you can guess, appeared in Windows XP. This method, in fact, is not a scaling method for GUI applications per se. Only system fonts and some elements of the system user interface (I would call it “NOT scaling” in the style of Windows XP) are scaled, at higher DPI settings.
')
All other application elements are still displayed at a 1: 1 scale. The only difference in their appearance is that any text and some GUI elements that are displayed using system functions suddenly become larger. For example, the text on the buttons. This causes obvious problems that we will discuss later.
Scaling in the style of Windows Vista or DPI virtualization
Windows Vista introduced the second option with a strange name, “scaling the display”, without any clarification, apparently to finally confuse users. We will use a more descriptive name - the DPI virtualization method. When this method is enabled, Windows still scales in the Windows XP style. As before, the sizes of all system fonts and some elements of the system interface increase.
The difference is that applications that can properly use high DPI values should report this to Windows. Such applications should set the new DPI-Aware flag, either by calling the Win32 API function “SetProcessDPIAware”, or, preferably, by embedding a manifest with the dpiAware flag. But if an application does not have a DPI-Aware flag, Windows behaves differently, first it forms an internal display at a scale of 96 dpi (emulating a DPI application of 96) , and then scales the resulting image in accordance with the current DPI settings before output to the screen.
This would be a fantastic method of scaling if all our monitors had a pixel density of the latest iPhones (326 dpi). Unfortunately, this is not the case. Application windows scaled this way look too blurry, with the popular resolution of 120 dpi (@homm is not a resolution, by the way). Therefore, Microsoft defaults to DPI virtualization by default if you select a pixel density less than or equal to 120 DPI.
How to change DPI settings
In Windows 7/8, open the Control Panel, then select Appearance and Personalization, then Display, and finally choose Set Font Size (DPI) (Windows 7) or Custom Size Settings ( Windows 8). You will see the following dialog box (Windows 7, almost identical in Windows 8):
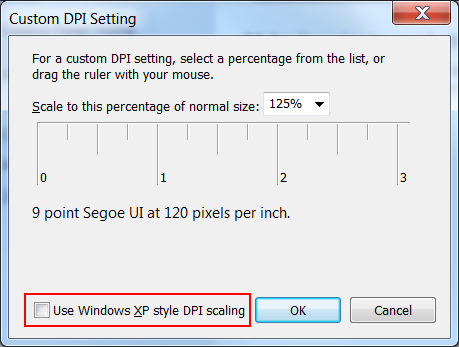

In the drop-down list, you can select the desired DPI setting as a percentage, where 100% corresponds to 96 DPI, 125% - as in the screenshot, corresponds to 120 dots per inch (you can more accurately record the value manually) . Before Windows 8, the actual DPI value (“pixels per inch”) was displayed next to the size of the system font. Windows 8, for unknown reasons, does not show the DPI value, so you have to calculate it yourself.
You can also attach a ruler (which has a scale in inches) to the screen, and try to combine the marking on it with the marking on the screen by changing the value in the drop-down list. The box circled in red below determines whether to use only Windows XP-style scaling, or also a new DPI virtualization method. If the box is not checked, as in the screenshot, then DPI virtualization is enabled.
Reclamation. This dialog is an example of a user-friendly interface. At first glance it seems that this is a checkbox to disable scaling in the style of Windows XP. But this scaling method (which only increases the system fonts and other elements of the system's user interface — scaling Windows XP) is always included when choosing a high DPI value. In fact, this flag controls whether this method will be the only (Use only scales in Windows XP style) , or the DPI virtualization method will also be used for applications that do not have the DPI-Aware flag. So this flag does not control the scaling method specified in its name, but controls another scaling method that is not mentioned anywhere - and allows you to use the new method when the box is unchecked!
Error in Windows 8. In addition to this, in Windows 8 this is an error dialog box. As a rule, everything works as in Windows 7, but the state of the flag is not saved on DPI values of 150% or higher. When you check this box, DPI virtualization is properly disabled. However, the checkbox itself remains unchecked the next time you open this dialog.
Changes in Windows 8.1, or why is everything blurry?
In Windows 8.1, the flag for scaling in the Windows XP style has disappeared, and now DPI virtualization is never used at DPI values up to 120 inclusive, but is always used at higher values for those programs that do not have the DPI-Aware flag. If some applications seem fuzzy to you, you must manually disable DPI virtualization for them.
Windows 8.1 allows you to use multiple monitors with different DPI values. However, this feature also makes use of DPI virtualization for traditional applications that move between monitors with different DPI values. To avoid this, you can turn off the “DPI scaling” settings using the new option “I want to select one scale for all displays”.
Also, Windows 8.1 adds a special switch for setting 200% and a new API, so that developers can selectively disable DPI virtualization.
Help, my system fonts are not the right size!
Sometimes, after changing the DPI settings, you may notice that some system fonts have become too large or too small for new installations. The likely reason is that you are using a custom desktop theme based on your old DPI settings. Windows does not scale custom theme fonts.
If you actually created a custom desktop theme and want to save it, you will have to adapt the fonts yourself to the new DPI settings. However, Windows has the annoying habit of "helpfully" creating user themes without your knowledge, for any reason. So, if you have never created a custom desktop theme, simply delete it and return to the standard theme.
In Windows 7/8, open the Control Panel, select Appearance and Personalization, and then Personalize. If you see the selected entry in the “My Themes” line, this means that Windows uses the user's theme, the system fonts of which Windows will not scale. Choose a standard theme, for example, the first entry in the Aero Themes section (Windows 7) or the Default Themes section (Windows 8) and delete unwanted entries in the My Themes section. Now, all system fonts should be displayed correctly.
Types of applications, how they are scaled (or not scaled)
Now let's look at what methods should be used for existing Windows applications at high DPI values. The following table summarizes, we will look at different cases in more detail later.
Applications that don’t care about DPI at all are either very old or poorly written, but nevertheless still used. One famous example is Apple's iTunes for Windows. Here, developers use the system fonts for the GUI and, without worrying about the actual font sizes, they tightly tie the window sizes to a resolution of 96 DPI, naturally distorting the GUI, as the font sizes increase at higher DPI values.
Such applications require a new method of scaling "DPI virtualization", unfortunately, this often makes the interface blurry. Otherwise, you will run into problems starting from clipping text to overlapping controls, sometimes making the GUI completely unusable (fortunately, this rarely happens). Over the years I have collected several samples of screenshots of incorrect applications.
Applications that can customize their GUI to different DPI values, but do not have the DPI-Aware flag - These are typical applications of the Windows XP era. Here, developers took care to get the actual font sizes of the system before creating the GUI. Such applications are displayed correctly when using scaling in the style of Windows XP. Unfortunately, since they do not set the DPI-Aware flag to inform Windows of this fact, for them, by default, “DPI virtualization” will be used, making their GUI fuzzy. You may not like this, so you may want to forcefully use the Windows XP scaling style for such applications.
Applications that can customize their GUI to different DPI values with the DPI-Aware flag - This is the newest type of application that is completely seamless, regardless of the DPI settings. The DPI-Aware flag is set automatically for Windows Presentation Foundation (WPF) and GDI + applications, as these APIs provide built-in scaling tools. Developers using the old GDI API and (surprisingly) Windows Forms need to manually tag their DPI-Aware applications.
Applications that are not adapted to changing the DPI, but having the DPI-Aware flag is even worse than completely ignoring the DPI value. In the examples you will find GUI applications that are well scalable up to 120 DPI, but not higher, or JavaFX applications. Here we can not do anything, because we do not have the ability to force Windows to use DPI virtualization for such programs. After the DPI-Aware flag is set, the application must scale itself. We can only "cut" developers to fix their product - or use something else.
Choosing a scaling method for your applications
Once you have decided that you want to use a high DPI value, your choice of scaling method depends on the applications in which you are working. Keep in mind that to disable “DPI virtualization” means to check the box (check box) with the incorrect name “Use scales in Windows XP style” and vice versa.
We remind you that in Windows 8.1 there is no longer a choice in this matter. If you are working at a resolution of 120 dpi (125%), each program will have to use Windows XP-style scaling, and if you work at a higher resolution, each program that is not DPI-Aware will use the default " DPI virtualization.
Refusal of DPI virtualization for individual applications
After you decide to enable DPI virtualization or you are running Windows 8.1, with a resolution of more than 120 dpi, you can check the system for DPI-Aware applications that do not have the appropriate flag. And return them the ability to use scaling in the style of Windows XP, for which they are intended. There are two ways to do this, the first works only for 32-bit applications, the second is universal and is also suitable for 64-bit applications.
32-bit applications - It's simple: right-click on the executable file in Windows Explorer, select the "Properties" dialog box, go to the "Compatibility" tab and check the "Disable image scaling with high screen resolution" box. That's all, in Windows 8.1 it also works for 64-bit applications.
64-bit applications - For no apparent reason, it is possible to annoy users of 64-bit applications, in Windows 8 and earlier, the above flag is disabled for 64-bit applications, although the option itself is quite functional if you make the changes directly to the registry! So start the registry editor and go to this key:
HKEY_CURRENT_USER \ Software \ Microsoft \ Windows NT \ CurrentVersion \ AppCompatFlags \ Layers
Now add a string value (REG_SZ), whose name is the full path to the executable file of the application and whose value is HIGHDPIAWARE. I recommend that you first change a few 32-bit applications, as described above, so that you can see some examples of the values in this registry key.
We looked at how you can use the DPI settings on Windows Vista and later. And if you ever wondered what the compatibility option is for - “Disable image scaling at high screen resolution”. And why it does not do anything on your system, now you know: it is effective only if you have the DPI virtualization system-wide option enabled and only for applications that do not set the DPI-Aware flag properly, but correctly use scaling in Windows XP style.
Further reading
For more information, see the MSDN article Writing High-DPI Win32 Applications . DPI-Aware Desktop and Win32 Applications . This is a lengthy article that can be used for a screening program.
Unfortunately, the article is currently only covers Windows XP through 7. See the Word Preview for Windows 8 and 8.1.
Outside of Microsoft, Gastón Hillar has published two articles targeting Windows 8.1 at Dr. Dobb's. C / C ++ sample code for the Win32 API.
You can’t make it a lot of fun and have a lot to do. with regard to DPI scaling.
PS Link on the topic and how to see the DPI-Aware application flag.
Thanks homm for the help.
This page is designed to help users understand and correct possible problems when setting high DPI values. Please note that we will consider only traditional Windows applications, not the Windows Store ("Metro", "Modern UI") applications. The latter use the new WinRT API, which provides its own scaling mechanism.
- From translator
- Scaling methods
- How to change DPI settings
- Types of applications, how they are scaled (or not scaled)
- Further reading for developers (no translation)
From translator
In this article, the following abbreviations that I found to translate are not advisable: Graphical User Interface (GUI), Points Per Inch (DPI), DPI-Aware applications — applications that can display their GUI correctly, without distortion, Graphic Interface Devices (GDI). My comments (in italics) .
Scaling methods
Traditionally, native Windows desktop applications use two display mechanisms:
- Graphical Device Interface (GDI) functions for accessing the display. As a rule, GDI coordinates are measured directly in screen pixels, regardless of monitor size and pixel density.
- And text output using Windows system fonts. This is not mandatory, but most applications use system fonts for most of their graphical user interface (GUI).
Initially, most monitors had a pixel density of about 96 dots per inch. So the GUI using this feature looked about the same on any system. But, as soon as the pixel density increases, the GUI elements of such applications decrease in terms of centimeters or inches (real, which are measured using the ruler attached to the monitor) . Small text and other small details become harder to see.
To fix the situation, Microsoft decided that it was a good idea to incorporate some method of scaling to Windows. One of the two methods described below (Windows XP or Vista) is used when the user sets the DPI with a value higher than the standard 96 dpi. Both methods try to increase the size of the image elements.
Scaling in the style of Windows XP
The first of these methods, as you can guess, appeared in Windows XP. This method, in fact, is not a scaling method for GUI applications per se. Only system fonts and some elements of the system user interface (I would call it “NOT scaling” in the style of Windows XP) are scaled, at higher DPI settings.
')
All other application elements are still displayed at a 1: 1 scale. The only difference in their appearance is that any text and some GUI elements that are displayed using system functions suddenly become larger. For example, the text on the buttons. This causes obvious problems that we will discuss later.
Scaling in the style of Windows Vista or DPI virtualization
Windows Vista introduced the second option with a strange name, “scaling the display”, without any clarification, apparently to finally confuse users. We will use a more descriptive name - the DPI virtualization method. When this method is enabled, Windows still scales in the Windows XP style. As before, the sizes of all system fonts and some elements of the system interface increase.
The difference is that applications that can properly use high DPI values should report this to Windows. Such applications should set the new DPI-Aware flag, either by calling the Win32 API function “SetProcessDPIAware”, or, preferably, by embedding a manifest with the dpiAware flag. But if an application does not have a DPI-Aware flag, Windows behaves differently, first it forms an internal display at a scale of 96 dpi (emulating a DPI application of 96) , and then scales the resulting image in accordance with the current DPI settings before output to the screen.
This would be a fantastic method of scaling if all our monitors had a pixel density of the latest iPhones (326 dpi). Unfortunately, this is not the case. Application windows scaled this way look too blurry, with the popular resolution of 120 dpi (@homm is not a resolution, by the way). Therefore, Microsoft defaults to DPI virtualization by default if you select a pixel density less than or equal to 120 DPI.
How to change DPI settings
In Windows 7/8, open the Control Panel, then select Appearance and Personalization, then Display, and finally choose Set Font Size (DPI) (Windows 7) or Custom Size Settings ( Windows 8). You will see the following dialog box (Windows 7, almost identical in Windows 8):
In the drop-down list, you can select the desired DPI setting as a percentage, where 100% corresponds to 96 DPI, 125% - as in the screenshot, corresponds to 120 dots per inch (you can more accurately record the value manually) . Before Windows 8, the actual DPI value (“pixels per inch”) was displayed next to the size of the system font. Windows 8, for unknown reasons, does not show the DPI value, so you have to calculate it yourself.
You can also attach a ruler (which has a scale in inches) to the screen, and try to combine the marking on it with the marking on the screen by changing the value in the drop-down list. The box circled in red below determines whether to use only Windows XP-style scaling, or also a new DPI virtualization method. If the box is not checked, as in the screenshot, then DPI virtualization is enabled.
Reclamation. This dialog is an example of a user-friendly interface. At first glance it seems that this is a checkbox to disable scaling in the style of Windows XP. But this scaling method (which only increases the system fonts and other elements of the system's user interface — scaling Windows XP) is always included when choosing a high DPI value. In fact, this flag controls whether this method will be the only (Use only scales in Windows XP style) , or the DPI virtualization method will also be used for applications that do not have the DPI-Aware flag. So this flag does not control the scaling method specified in its name, but controls another scaling method that is not mentioned anywhere - and allows you to use the new method when the box is unchecked!
Error in Windows 8. In addition to this, in Windows 8 this is an error dialog box. As a rule, everything works as in Windows 7, but the state of the flag is not saved on DPI values of 150% or higher. When you check this box, DPI virtualization is properly disabled. However, the checkbox itself remains unchecked the next time you open this dialog.
Changes in Windows 8.1, or why is everything blurry?
In Windows 8.1, the flag for scaling in the Windows XP style has disappeared, and now DPI virtualization is never used at DPI values up to 120 inclusive, but is always used at higher values for those programs that do not have the DPI-Aware flag. If some applications seem fuzzy to you, you must manually disable DPI virtualization for them.
Windows 8.1 allows you to use multiple monitors with different DPI values. However, this feature also makes use of DPI virtualization for traditional applications that move between monitors with different DPI values. To avoid this, you can turn off the “DPI scaling” settings using the new option “I want to select one scale for all displays”.
Also, Windows 8.1 adds a special switch for setting 200% and a new API, so that developers can selectively disable DPI virtualization.
Help, my system fonts are not the right size!
Sometimes, after changing the DPI settings, you may notice that some system fonts have become too large or too small for new installations. The likely reason is that you are using a custom desktop theme based on your old DPI settings. Windows does not scale custom theme fonts.
If you actually created a custom desktop theme and want to save it, you will have to adapt the fonts yourself to the new DPI settings. However, Windows has the annoying habit of "helpfully" creating user themes without your knowledge, for any reason. So, if you have never created a custom desktop theme, simply delete it and return to the standard theme.
In Windows 7/8, open the Control Panel, select Appearance and Personalization, and then Personalize. If you see the selected entry in the “My Themes” line, this means that Windows uses the user's theme, the system fonts of which Windows will not scale. Choose a standard theme, for example, the first entry in the Aero Themes section (Windows 7) or the Default Themes section (Windows 8) and delete unwanted entries in the My Themes section. Now, all system fonts should be displayed correctly.
Types of applications, how they are scaled (or not scaled)
Now let's look at what methods should be used for existing Windows applications at high DPI values. The following table summarizes, we will look at different cases in more detail later.
| DPI-Aware flag not set | DPI-Aware flag set | |
| Not DPI-Aware | Need to use DPI virtualization | Need fixes from developers |
| DPI-Aware | Need to use Windows XP style scaling | Always scaled correctly |
Applications that don’t care about DPI at all are either very old or poorly written, but nevertheless still used. One famous example is Apple's iTunes for Windows. Here, developers use the system fonts for the GUI and, without worrying about the actual font sizes, they tightly tie the window sizes to a resolution of 96 DPI, naturally distorting the GUI, as the font sizes increase at higher DPI values.
Such applications require a new method of scaling "DPI virtualization", unfortunately, this often makes the interface blurry. Otherwise, you will run into problems starting from clipping text to overlapping controls, sometimes making the GUI completely unusable (fortunately, this rarely happens). Over the years I have collected several samples of screenshots of incorrect applications.
Sample application, works only when DPI is equal to 96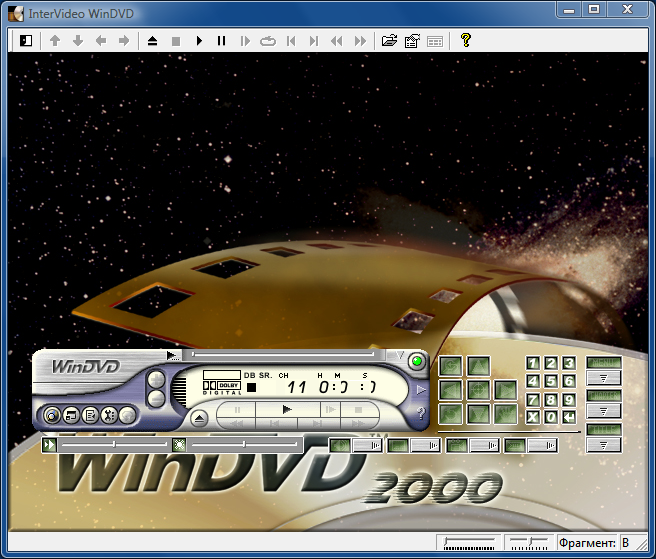
150% resolution (144 DPI)
150% resolution (144 DPI)
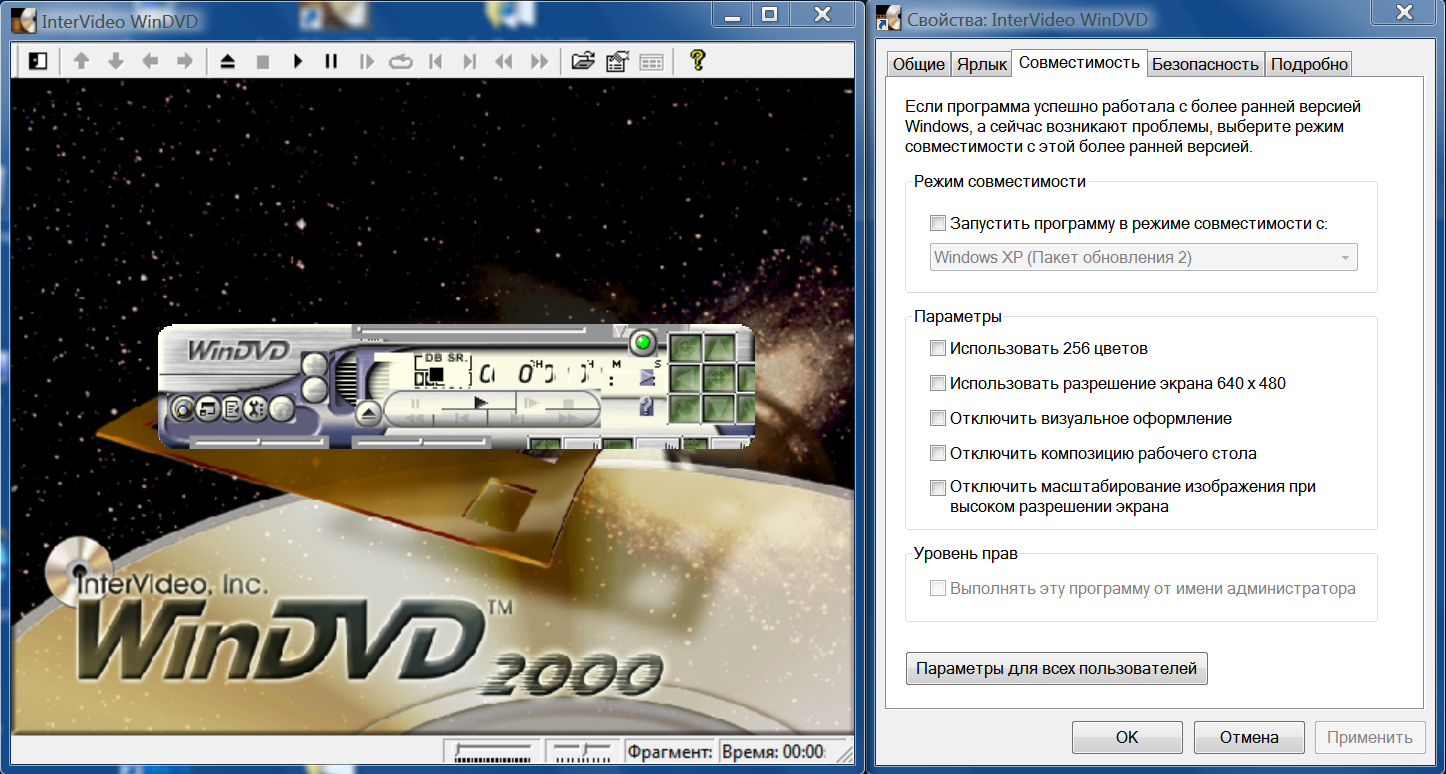
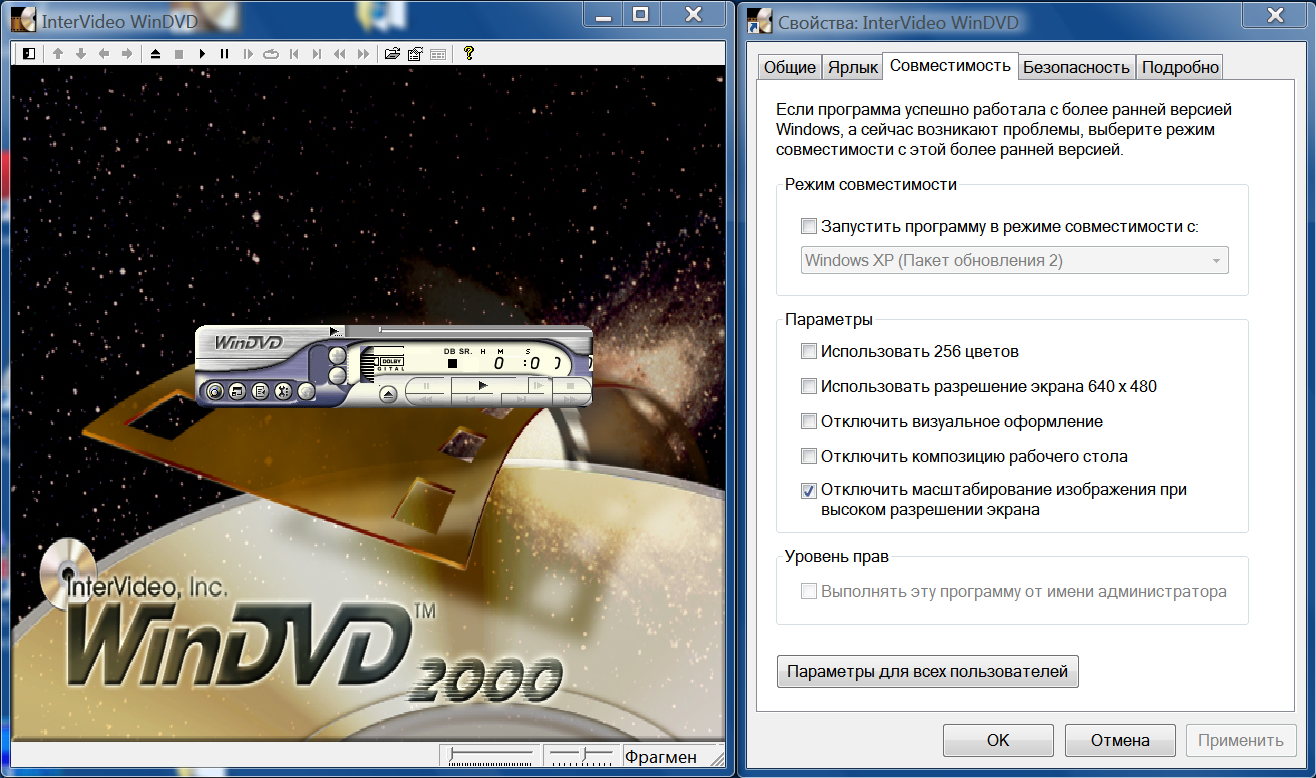
Applications that can customize their GUI to different DPI values, but do not have the DPI-Aware flag - These are typical applications of the Windows XP era. Here, developers took care to get the actual font sizes of the system before creating the GUI. Such applications are displayed correctly when using scaling in the style of Windows XP. Unfortunately, since they do not set the DPI-Aware flag to inform Windows of this fact, for them, by default, “DPI virtualization” will be used, making their GUI fuzzy. You may not like this, so you may want to forcefully use the Windows XP scaling style for such applications.
An example of such an application and a resolution of 150% (144 DPI)

Applications that can customize their GUI to different DPI values with the DPI-Aware flag - This is the newest type of application that is completely seamless, regardless of the DPI settings. The DPI-Aware flag is set automatically for Windows Presentation Foundation (WPF) and GDI + applications, as these APIs provide built-in scaling tools. Developers using the old GDI API and (surprisingly) Windows Forms need to manually tag their DPI-Aware applications.
Applications that are not adapted to changing the DPI, but having the DPI-Aware flag is even worse than completely ignoring the DPI value. In the examples you will find GUI applications that are well scalable up to 120 DPI, but not higher, or JavaFX applications. Here we can not do anything, because we do not have the ability to force Windows to use DPI virtualization for such programs. After the DPI-Aware flag is set, the application must scale itself. We can only "cut" developers to fix their product - or use something else.
Choosing a scaling method for your applications
Once you have decided that you want to use a high DPI value, your choice of scaling method depends on the applications in which you are working. Keep in mind that to disable “DPI virtualization” means to check the box (check box) with the incorrect name “Use scales in Windows XP style” and vice versa.
- If you are so incredibly lucky to use only those applications that are both DPI-Aware and set the desired flag, then it does not matter which scaling method you choose. All applications will use Windows XP-style scaling, and DPI virtualization will never be used.
- If you use only well-written DPI-Aware applications, but some of them do not set the required flag, you can disable DPI virtualization. Thus, all applications will be displayed correctly without any blurring due to scaling. If your monitor has a very high pixel density, such that scaled bitmaps no longer look blurry, you may want to enable DPI virtualization anyway.
- If you have one or several applications that are not suitable for changing DPI and do not have a DPI-Aware flag, you must enable DPI virtualization if you are not ready to put up with a skewed GUI application. Unfortunately, there is another problem, because Microsoft implemented this option is inconvenient. You can enable DPI virtualization for the entire system, not for a single application, and then selectively disable it for individual applications.
We remind you that in Windows 8.1 there is no longer a choice in this matter. If you are working at a resolution of 120 dpi (125%), each program will have to use Windows XP-style scaling, and if you work at a higher resolution, each program that is not DPI-Aware will use the default " DPI virtualization.
Refusal of DPI virtualization for individual applications
After you decide to enable DPI virtualization or you are running Windows 8.1, with a resolution of more than 120 dpi, you can check the system for DPI-Aware applications that do not have the appropriate flag. And return them the ability to use scaling in the style of Windows XP, for which they are intended. There are two ways to do this, the first works only for 32-bit applications, the second is universal and is also suitable for 64-bit applications.
32-bit applications - It's simple: right-click on the executable file in Windows Explorer, select the "Properties" dialog box, go to the "Compatibility" tab and check the "Disable image scaling with high screen resolution" box. That's all, in Windows 8.1 it also works for 64-bit applications.
64-bit applications - For no apparent reason, it is possible to annoy users of 64-bit applications, in Windows 8 and earlier, the above flag is disabled for 64-bit applications, although the option itself is quite functional if you make the changes directly to the registry! So start the registry editor and go to this key:
HKEY_CURRENT_USER \ Software \ Microsoft \ Windows NT \ CurrentVersion \ AppCompatFlags \ Layers
Now add a string value (REG_SZ), whose name is the full path to the executable file of the application and whose value is HIGHDPIAWARE. I recommend that you first change a few 32-bit applications, as described above, so that you can see some examples of the values in this registry key.
We looked at how you can use the DPI settings on Windows Vista and later. And if you ever wondered what the compatibility option is for - “Disable image scaling at high screen resolution”. And why it does not do anything on your system, now you know: it is effective only if you have the DPI virtualization system-wide option enabled and only for applications that do not set the DPI-Aware flag properly, but correctly use scaling in Windows XP style.
Further reading
For more information, see the MSDN article Writing High-DPI Win32 Applications . DPI-Aware Desktop and Win32 Applications . This is a lengthy article that can be used for a screening program.
Unfortunately, the article is currently only covers Windows XP through 7. See the Word Preview for Windows 8 and 8.1.
Outside of Microsoft, Gastón Hillar has published two articles targeting Windows 8.1 at Dr. Dobb's. C / C ++ sample code for the Win32 API.
You can’t make it a lot of fun and have a lot to do. with regard to DPI scaling.
PS Link on the topic and how to see the DPI-Aware application flag.
Thanks homm for the help.
Source: https://habr.com/ru/post/248135/
All Articles