Auto Balcony Lighting for Arduino
Approximately a couple of months ago I decided to get carried away with electronics. In particular, I wanted to play around with the Arduino. But for pampering, it is quite expensive to order the original one, so I used a well-known Chinese website. There at a discount I found the Arduino Uno clone in the starter kit. He ordered.
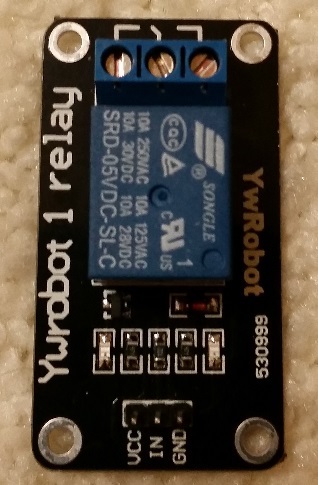
After about 3 weeks I received my “toy” and, probably, like everything, I began to indulge in blinking LEDs. This, of course, quickly tired, I wanted something more serious. There was a thought to make automatic switching on / off the light on one of the balconies (I often go to smoke). Since uno is too “bold” for such a task, on the same site I ordered at a discount nano, motion sensors, textolite dummies, a 220V to 5V power supply and a relay.
Another month has passed ...
Need to try. At first, as it should, I assembled a circuit on a brainboard. Everything works, added a potentiometer to adjust the sensitivity, fine.
')
I decided to collect the whole thing already on the board. As it turned out, the relay was made on a large board and did not fit on my breadboard, sawed it from the sides (fortunately there were no contacts / tracks). And also, that would solder the relay unit directly into the board had to solder the contacts on the other side. It turned out something like this:
On the right, it turned out a bit uneven, as the path passed there.
The most difficult, in my opinion, was to make the tracks on the board. The thin copper wire, flux and tin helped me in this. It turned out quite "clumsy", but, I repeat, this is my first experience, and I wanted to finish and test as soon as possible.
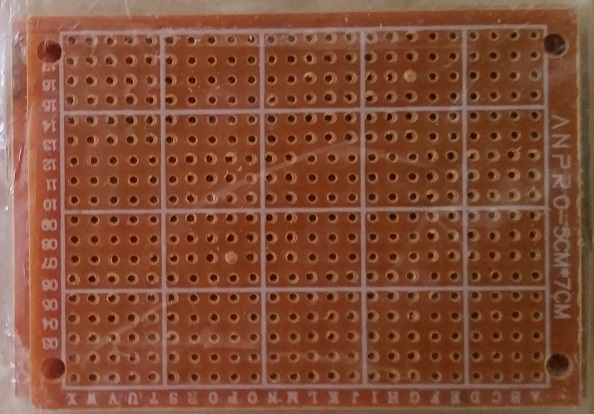
Fortunately, everything fit on the board 5x7 cm, it is also good that the board has mounting holes, which I will use after making the plexiglas case.
The motion sensor is deliberately not made fixed, since there is an idea to make it on the "horns", so that you can change its direction. Because it has not yet decided where the finished device will be attached.
The program was collected by a little from all sorts of tutorials on the sensors. In the instructions for the motion sensor, it was said that he should be given to tune in when he first started, from 10 to 30 seconds. I missed this moment, because I did not see its meaning at all. The device works exactly the same as with it, and without it. The only difference is the time spent on calibration to the initial readiness.
The principle of operation is as follows: when motion is detected by a sensor, the reading of the photoresistor is compared with the threshold one (necessary for the operation of the relay), which is regulated by a potentiometer. If everything satisfies, the relay is activated for 3 minutes, after which, if the movement is not fixed, the relay is turned off.
The threshold values of the photoresistor were removed by covering it with a finger and pointing a 2000 lumen flashlight at it.
Given the New Year holidays, the daily arrivals of guests, as well as the "unbearable contribution" to the work of my colleague, it took 12-15 hours to complete the production.
Please do not judge strictly. This is my first article and the first more or less serious experience with arduino and soldering iron. And constructive criticism is very welcome. Even, I would say, necessary.
Thank you for your time. I hope in the near future I will supplement the article with the final version of my device, in the body and with a demonstration of work.
PS
I would like to mention my delight at the ordered power supply, with a power of 4 W, it has dimensions of only 22x30x18 mm, and the price is only about 200 rubles.
Pps
All the work done is certainly much more expensive than the finished version from our Asian friends. But still with your own hands - much more interesting.
After about 3 weeks I received my “toy” and, probably, like everything, I began to indulge in blinking LEDs. This, of course, quickly tired, I wanted something more serious. There was a thought to make automatic switching on / off the light on one of the balconies (I often go to smoke). Since uno is too “bold” for such a task, on the same site I ordered at a discount nano, motion sensors, textolite dummies, a 220V to 5V power supply and a relay.
Another month has passed ...
Parcel received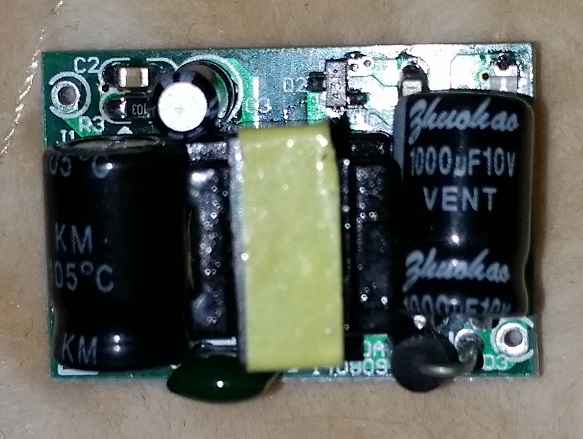
Need to try. At first, as it should, I assembled a circuit on a brainboard. Everything works, added a potentiometer to adjust the sensitivity, fine.
')
I decided to collect the whole thing already on the board. As it turned out, the relay was made on a large board and did not fit on my breadboard, sawed it from the sides (fortunately there were no contacts / tracks). And also, that would solder the relay unit directly into the board had to solder the contacts on the other side. It turned out something like this:
Relay after file modification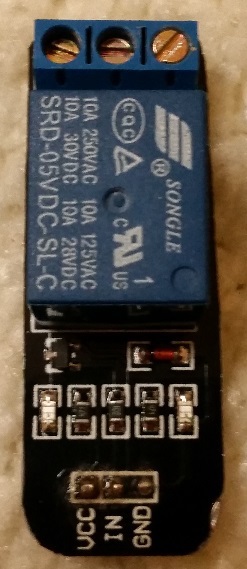
On the right, it turned out a bit uneven, as the path passed there.
The most difficult, in my opinion, was to make the tracks on the board. The thin copper wire, flux and tin helped me in this. It turned out quite "clumsy", but, I repeat, this is my first experience, and I wanted to finish and test as soon as possible.
Tracks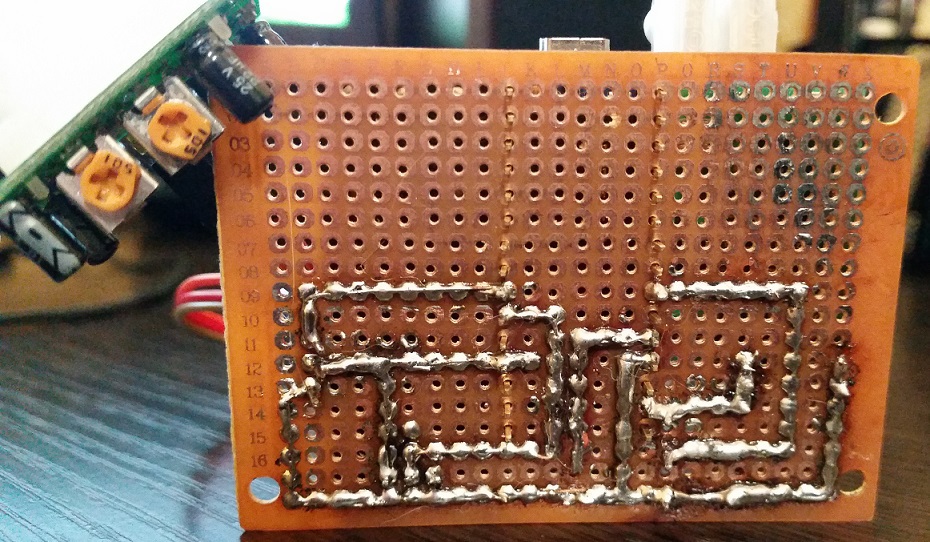
Fortunately, everything fit on the board 5x7 cm, it is also good that the board has mounting holes, which I will use after making the plexiglas case.
The result of the work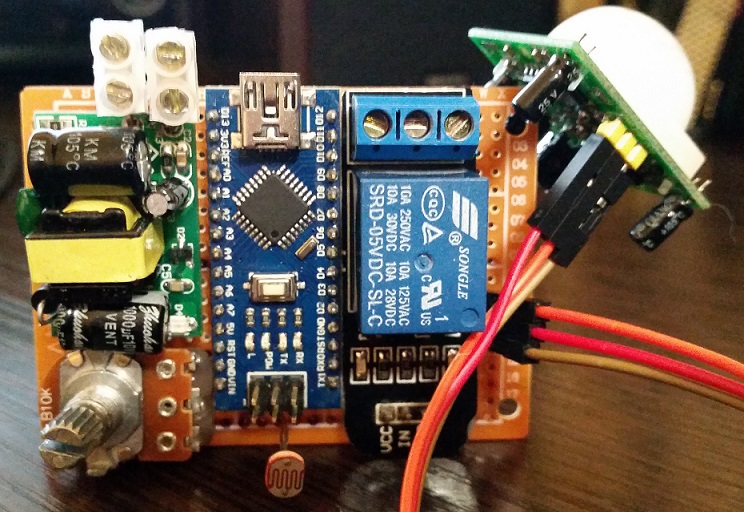
The motion sensor is deliberately not made fixed, since there is an idea to make it on the "horns", so that you can change its direction. Because it has not yet decided where the finished device will be attached.
The program was collected by a little from all sorts of tutorials on the sensors. In the instructions for the motion sensor, it was said that he should be given to tune in when he first started, from 10 to 30 seconds. I missed this moment, because I did not see its meaning at all. The device works exactly the same as with it, and without it. The only difference is the time spent on calibration to the initial readiness.
Sketch
int const Pot = A5; int const Light = A7; int const Relay = 3; int const Move = 4; int const pause = 180000; // 3 :) long unsigned int lowIn; boolean lockLow = true; boolean takeLowTime; void setup() { pinMode(Move, INPUT); pinMode(Relay, OUTPUT); digitalWrite(Relay, HIGH); } void loop() { int moveVal = digitalRead(Move); int lightVal = analogRead(Light); int potVal = analogRead(Pot); int lightLimit = map(potVal, 0, 1023, 500, 1000); if (moveVal == HIGH && lightVal < lightLimit) { if (lockLow) { lockLow = false; digitalWrite(Relay, LOW); } takeLowTime = true; } else { if (takeLowTime) { lowIn = millis(); takeLowTime = false; } if (!lockLow && millis() - lowIn > pause) { lockLow = true; digitalWrite(Relay, HIGH); } } } The principle of operation is as follows: when motion is detected by a sensor, the reading of the photoresistor is compared with the threshold one (necessary for the operation of the relay), which is regulated by a potentiometer. If everything satisfies, the relay is activated for 3 minutes, after which, if the movement is not fixed, the relay is turned off.
The threshold values of the photoresistor were removed by covering it with a finger and pointing a 2000 lumen flashlight at it.
Given the New Year holidays, the daily arrivals of guests, as well as the "unbearable contribution" to the work of my colleague, it took 12-15 hours to complete the production.
Colleague
Please do not judge strictly. This is my first article and the first more or less serious experience with arduino and soldering iron. And constructive criticism is very welcome. Even, I would say, necessary.
Thank you for your time. I hope in the near future I will supplement the article with the final version of my device, in the body and with a demonstration of work.
PS
I would like to mention my delight at the ordered power supply, with a power of 4 W, it has dimensions of only 22x30x18 mm, and the price is only about 200 rubles.
Pps
All the work done is certainly much more expensive than the finished version from our Asian friends. But still with your own hands - much more interesting.
Source: https://habr.com/ru/post/248079/
All Articles