Torment with LED cube 4x4x4 (Arduino + 74HC595)
Hello, dear habravchane!
I finally have something to tell you and show. I hope the story will be interesting not only to me.
I will talk about my experience working with Ardiuno UNO and even show you what I finally got. If you are not tired of this yet - welcome under cat.
Is this what you did during the New Year holidays? Rested, right? I spent most of the holidays with arduinka.
First assembled a cube of 27 LEDs (it seems, according to this instruction here ). I do not post a sketch of the original version of the work (as in the video), because it is necessary to completely rewrite it, taking into account new knowledge. But first, it worked like this:
UPD: now this cube is controlled by the IR remote control: sketch , IRremote library, LedCube library. Immediately I give links to library files so that there are no problems with different versions. I will draw the wiring diagram a little later, sorry.
It seemed to me a little, and I believed in myself. Therefore, I decided to build the same cube, but from 64 LEDs. Bad business is not tricky, especially when it is not necessary to work. First I assembled a die using several similar instructions (like this one and this one ). It turned out like this ( sketch ):
To manage such a cube was quite simple. The problem was that all 20 outputs in my Arduino UNO were occupied by LEDs, but I also wanted to connect some sensors and other delights.
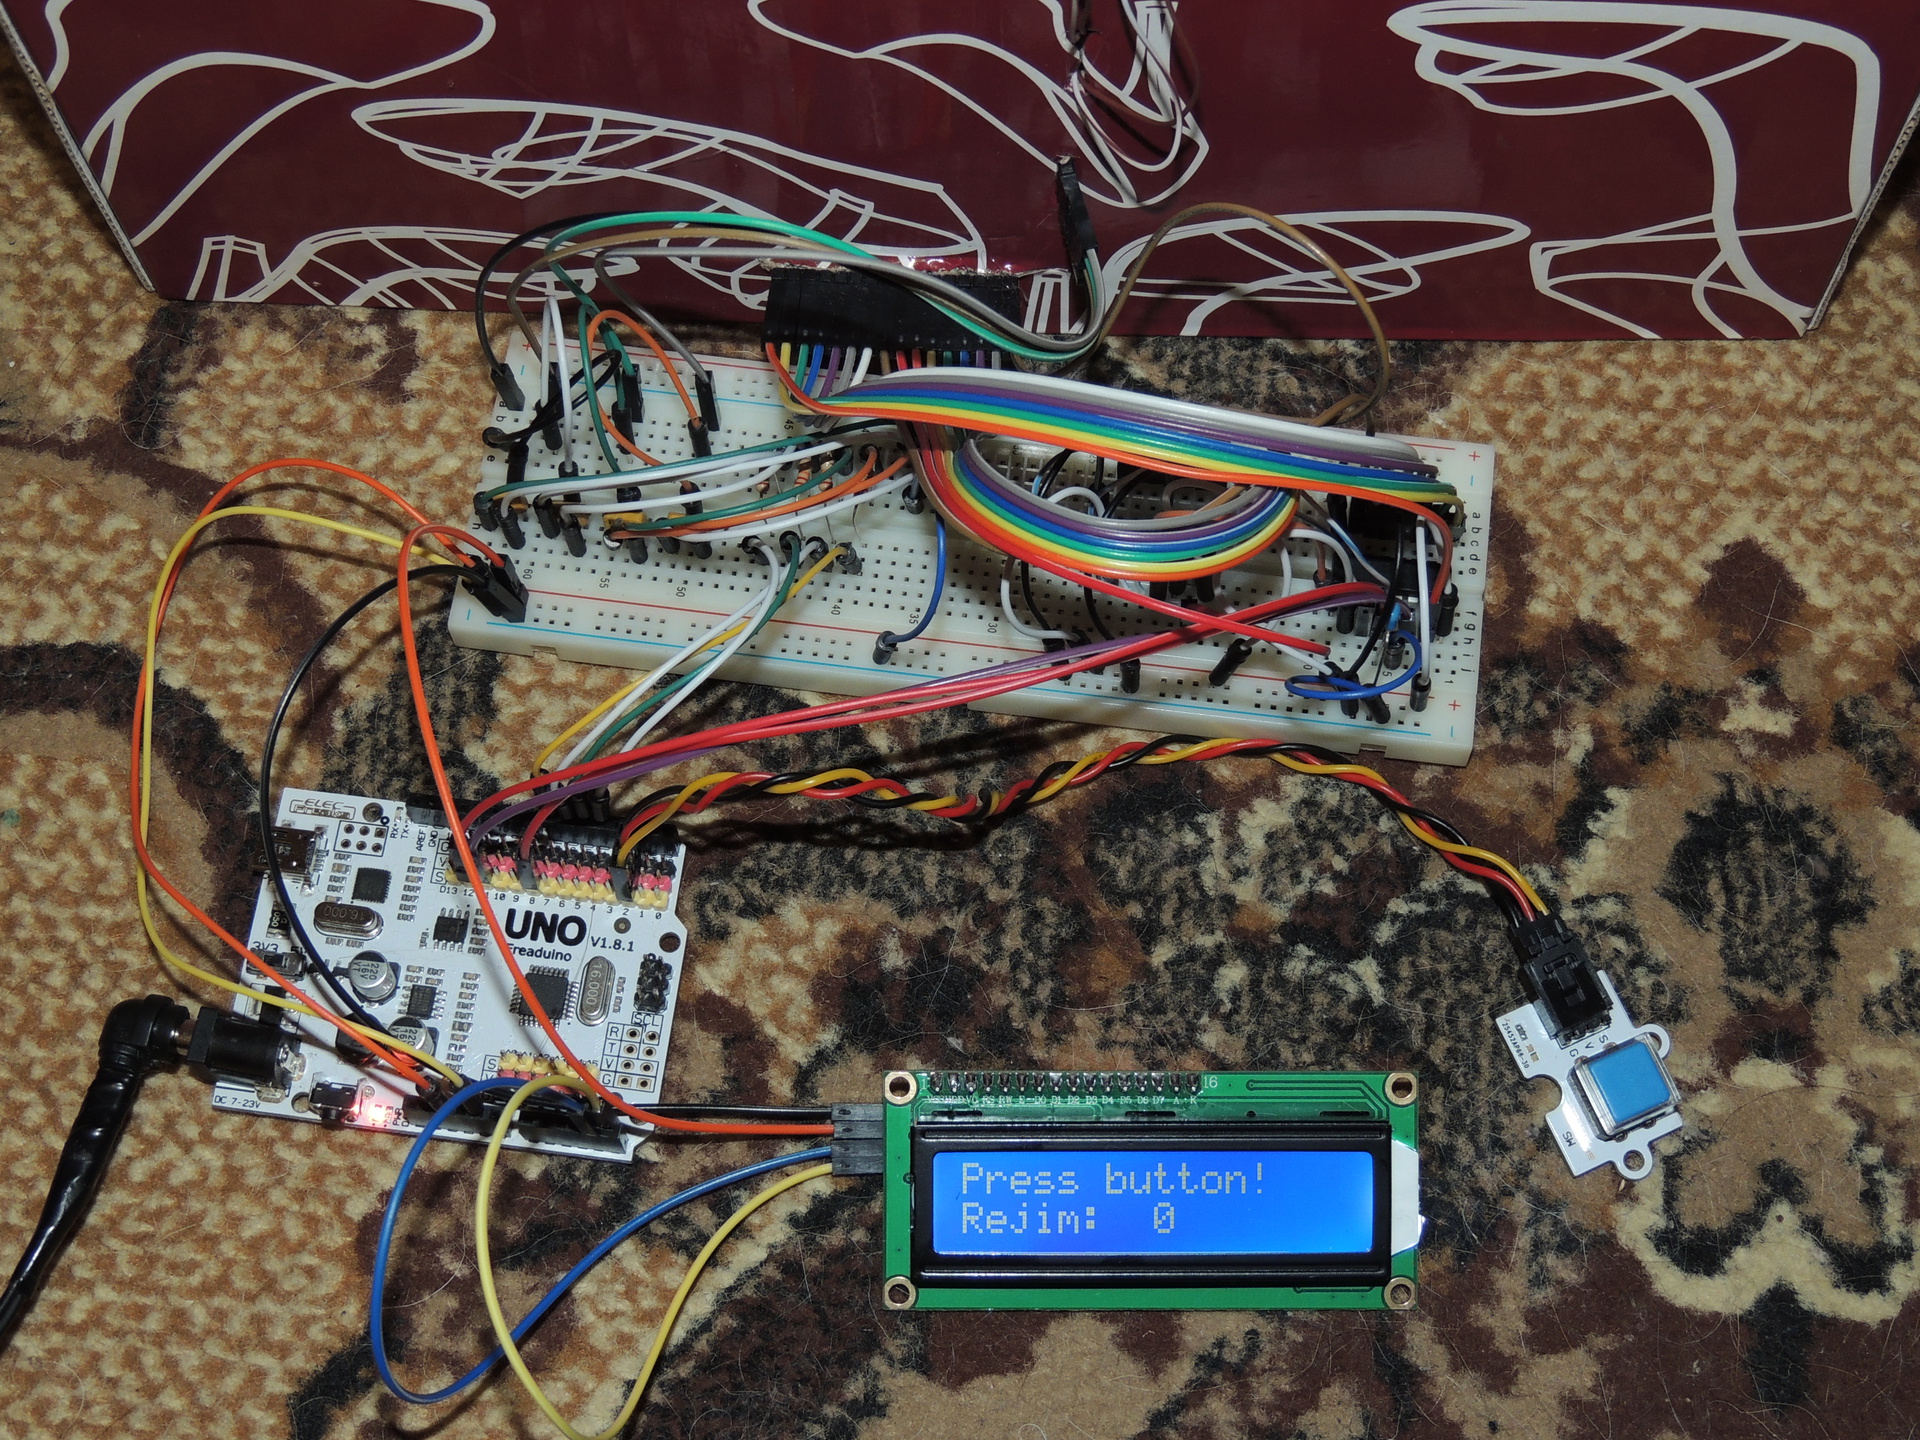
As a result of a certain number of nerves killed and thanks to the help of good people, I managed to reconnect my cube to arduinka using two 74HC595 shift registers ( instruction ). During the writing of the program, I managed to understand the language a little better, although some things in my program still seem like magic to me. Connection scheme of the cube to Arduino (made in Fritzing 0.9.1b.64. Sorry for the quality, for the first time I worked with this program).
Actually, it became a little more difficult to control the cube, but we managed to connect a two-line display, which displays the name of the cube's operation mode and the number of this mode (it is convenient to pick the program, seeing this info), and a button that switches the cube's operation mode.
Yes, I forgot to say. My wife leads computer science in the same school and, looking at my torment, she had the thought of an elective course for grade 9 (so far everything is in the form of an idea and rough sketches) for working with Arduinka. Hopefully, something will come out of this.
UPD: added a sketch for 3x cube with links to used libraries and 4x cube connection diagram.
UPD2: added photos and video. Updated the 4x4x4 cube connection scheme on GoogleDisk.
I finally have something to tell you and show. I hope the story will be interesting not only to me.
I will talk about my experience working with Ardiuno UNO and even show you what I finally got. If you are not tired of this yet - welcome under cat.
Introduction
I am a teacher of physics, computer science and astronomy in ordinary high school. I managed to work as a sysadmin-enikeyschik and friends with computers a little, I know how to work with sites a little, I understand php and MySQL a little. But in programming, I'm a little more than zero. This should slightly reduce your anger from reading the program I wrote, which I will show a little further.
')
In the spring of 2014, at the regional conference, he met LEGO WeDo and electronic collectors of LART-M LLC. I liked this business very much, but it was not with me.
It so happened that at the beginning of the school year I was offered to lead a robotics circle with LEGO Mindstorms NXT. Even the lack of experience with these sets did not bother the director of the regional house of childhood and youth. So far, it seems everyone is happy with me.
I got involved, I started to like robotics, but the prices for Lego just killed. Then I came across this article . I contacted the company involved in the delivery of these kits to us and we agreed on a trial purchase of one set and further cooperation in the field of introducing this case to schools. After receiving this set in my tenacious pens, I began to try and use foul language ... I’ll tell you about the problems associated with this set if it is interesting. The main thing is not this.
At first I, of course, tried to connect sensors / buttons / diodes. Everything worked and sparkled. I even spoke at one regular regional conference and “broke the bank”. And there were only 2 photoresistors, 2 LEDs, 1 speaker, 1 button, 3 mirrors, 1 potentiometer (there were no more buttons at that time) and 1 laser pointer. This resulted in a small house that did the following:
1) light the LED above the entrance door when it is dark outside;
2) play a simple melody when they press the doorbell button;
3) light the LED in the “guard room” when someone rings the doorbell (all of a sudden the guard in headphones listens to music);
4) when unscrewing the potentiometer to the maximum (it will be necessary to replace the second button, the benefit now it is) the alarm went on - the internal photoresistor began to respond to the interruption of the laser beam from the pointer through the mirror system directed to it "from the street". When crossing the beam in the “guard room”, a siren rang and the LED came on.
After becoming acquainted with this set, I began to actively read about the Arduino and, in the end, I ordered a set with an Arduino UNO (or rather, a Chinese equivalent with a wild name) and a bunch of details on Aliexpress. And then Ostap suffered (s) ...
')
In the spring of 2014, at the regional conference, he met LEGO WeDo and electronic collectors of LART-M LLC. I liked this business very much, but it was not with me.
It so happened that at the beginning of the school year I was offered to lead a robotics circle with LEGO Mindstorms NXT. Even the lack of experience with these sets did not bother the director of the regional house of childhood and youth. So far, it seems everyone is happy with me.
I got involved, I started to like robotics, but the prices for Lego just killed. Then I came across this article . I contacted the company involved in the delivery of these kits to us and we agreed on a trial purchase of one set and further cooperation in the field of introducing this case to schools. After receiving this set in my tenacious pens, I began to try and use foul language ... I’ll tell you about the problems associated with this set if it is interesting. The main thing is not this.
At first I, of course, tried to connect sensors / buttons / diodes. Everything worked and sparkled. I even spoke at one regular regional conference and “broke the bank”. And there were only 2 photoresistors, 2 LEDs, 1 speaker, 1 button, 3 mirrors, 1 potentiometer (there were no more buttons at that time) and 1 laser pointer. This resulted in a small house that did the following:
1) light the LED above the entrance door when it is dark outside;
2) play a simple melody when they press the doorbell button;
3) light the LED in the “guard room” when someone rings the doorbell (all of a sudden the guard in headphones listens to music);
4) when unscrewing the potentiometer to the maximum (it will be necessary to replace the second button, the benefit now it is) the alarm went on - the internal photoresistor began to respond to the interruption of the laser beam from the pointer through the mirror system directed to it "from the street". When crossing the beam in the “guard room”, a siren rang and the LED came on.
Scary house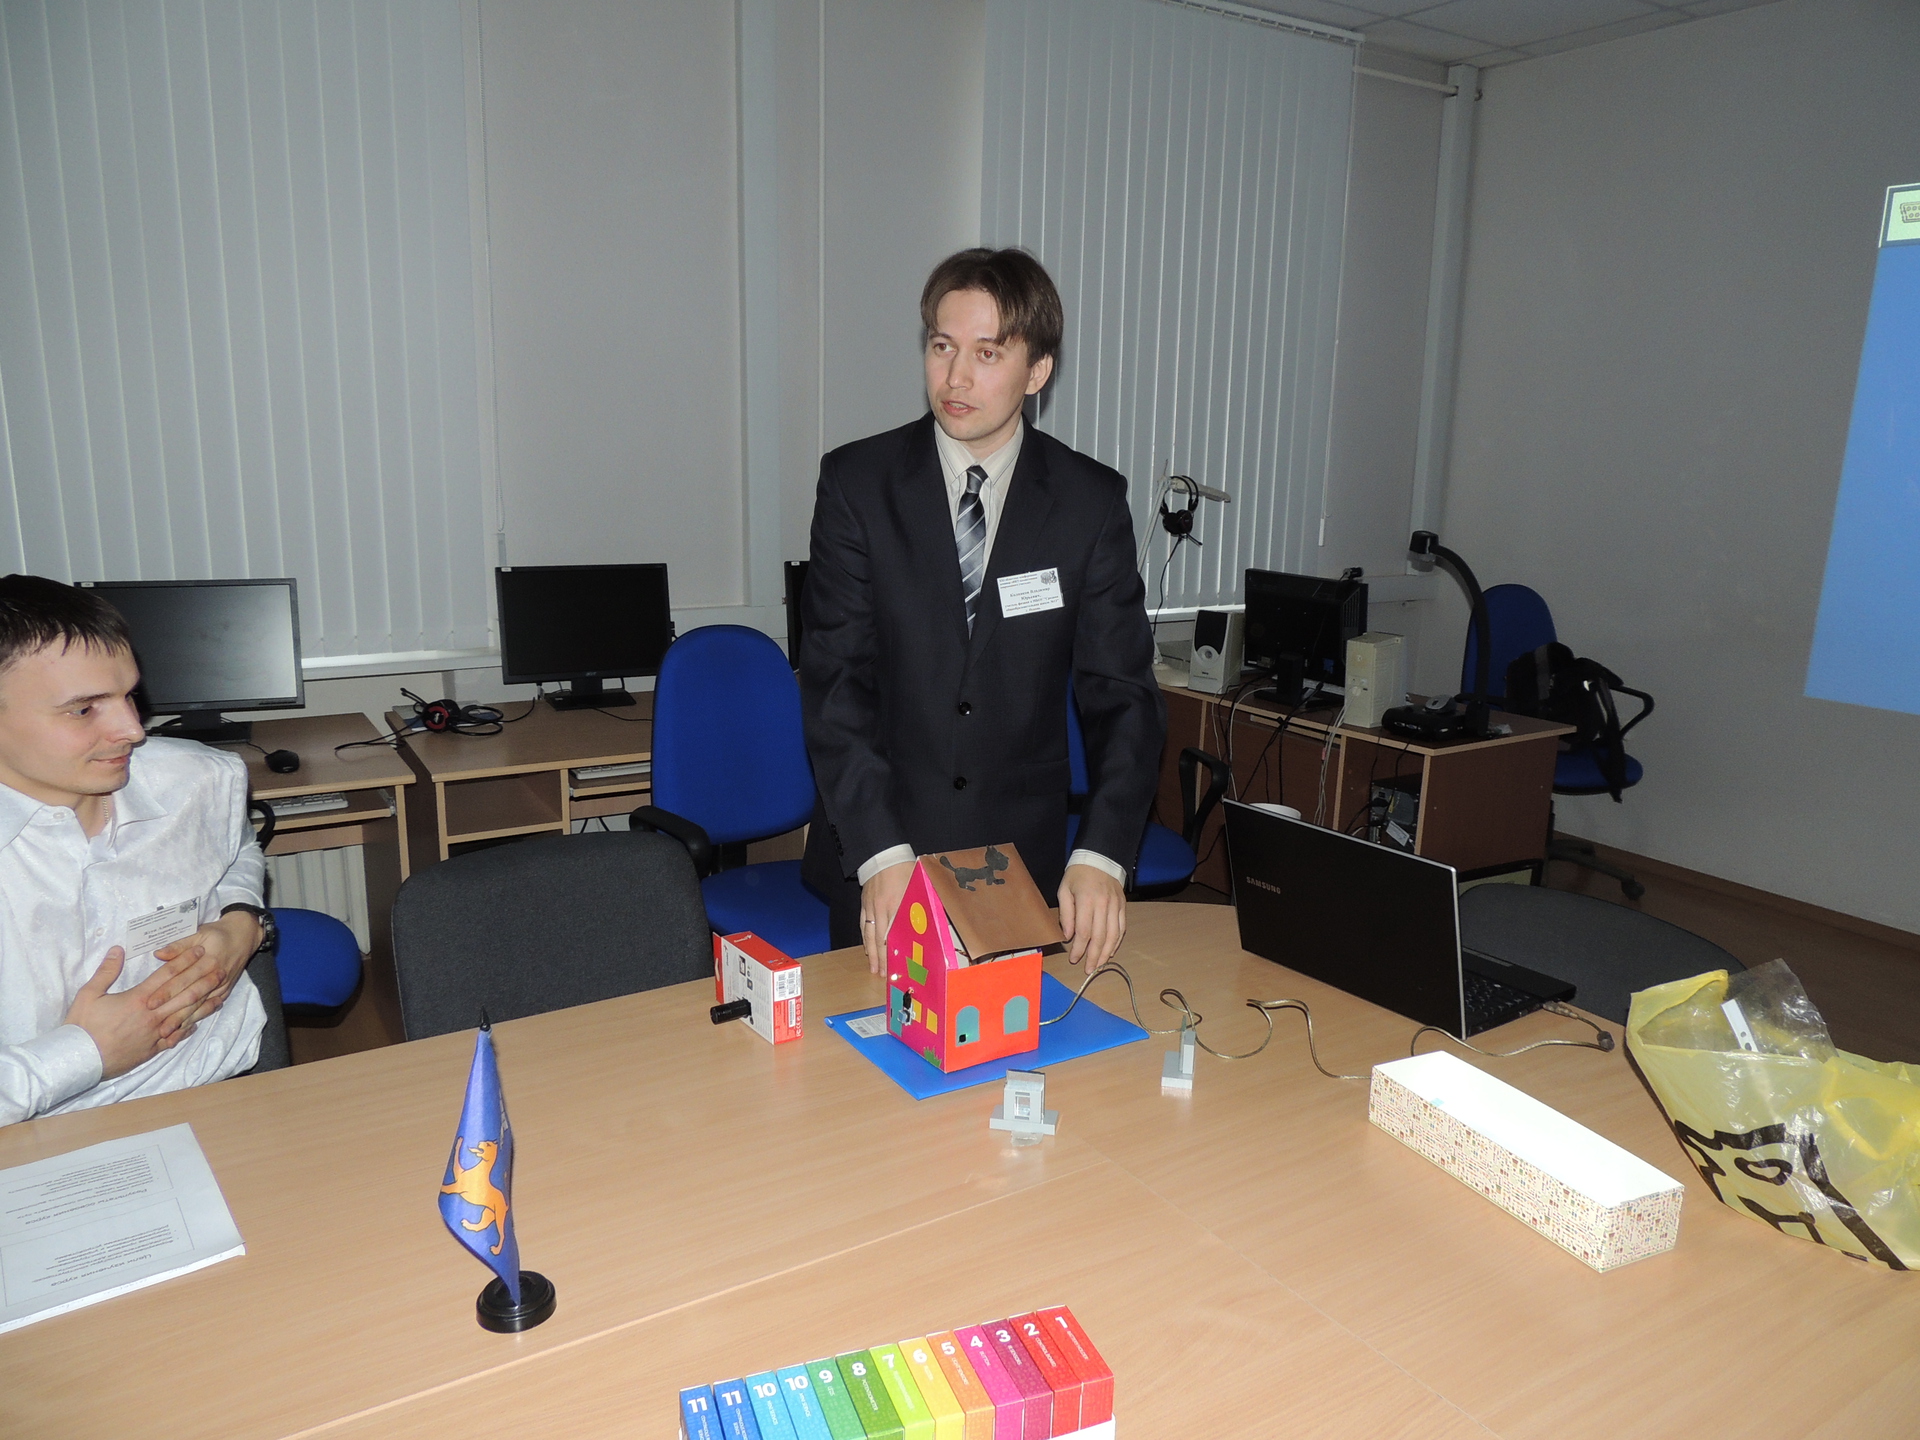
After becoming acquainted with this set, I began to actively read about the Arduino and, in the end, I ordered a set with an Arduino UNO (or rather, a Chinese equivalent with a wild name) and a bunch of details on Aliexpress. And then Ostap suffered (s) ...
Is this what you did during the New Year holidays? Rested, right? I spent most of the holidays with arduinka.
First assembled a cube of 27 LEDs (it seems, according to this instruction here ). I do not post a sketch of the original version of the work (as in the video), because it is necessary to completely rewrite it, taking into account new knowledge. But first, it worked like this:
LED cube 3x3x3
UPD: now this cube is controlled by the IR remote control: sketch , IRremote library, LedCube library. Immediately I give links to library files so that there are no problems with different versions. I will draw the wiring diagram a little later, sorry.
It seemed to me a little, and I believed in myself. Therefore, I decided to build the same cube, but from 64 LEDs. Bad business is not tricky, especially when it is not necessary to work. First I assembled a die using several similar instructions (like this one and this one ). It turned out like this ( sketch ):
LED cube 4x4x4
To manage such a cube was quite simple. The problem was that all 20 outputs in my Arduino UNO were occupied by LEDs, but I also wanted to connect some sensors and other delights.
UPD2: a photo with a bunch of wires
First version. All 20 ports are busy on Arduinka:

As a result of a certain number of nerves killed and thanks to the help of good people, I managed to reconnect my cube to arduinka using two 74HC595 shift registers ( instruction ). During the writing of the program, I managed to understand the language a little better, although some things in my program still seem like magic to me. Connection scheme of the cube to Arduino (made in Fritzing 0.9.1b.64. Sorry for the quality, for the first time I worked with this program).
UPD2: a few more pictures with a bunch of wires
The second version. On Arduinka, only 7 ports are occupied by the cube, but everything is assembled on a breadboard and used about 70 wires:

The final version. All small parts are soldered and hidden in a box:


The final version. All small parts are soldered and hidden in a box:
Actually, it became a little more difficult to control the cube, but we managed to connect a two-line display, which displays the name of the cube's operation mode and the number of this mode (it is convenient to pick the program, seeing this info), and a button that switches the cube's operation mode.
UPD2: Video of the almost final version of the cube
Yes, I forgot to say. My wife leads computer science in the same school and, looking at my torment, she had the thought of an elective course for grade 9 (so far everything is in the form of an idea and rough sketches) for working with Arduinka. Hopefully, something will come out of this.
What else do you want to do
1) connect a microphone to the cube and turn the cube into a light-music installation. Unfortunately, it is not very successful. The microphone in the kit responds only if it is blown (an amplifier is needed, but not yet).
2) add different effects to the cube.
3) show the benefits of arduinka in physics lessons - I want to measure the speed of an object (2 photoresistors + 2 laser pointers), but for now this is not very successful either.
4) learn how to manage servomotors properly and finally make a typewriter! While at connection of two servomotors it turns out to manage only one, the second constantly turns in one direction.
5) learn how to control arduinka via bluetooth. There is a module, but so far the work with it is not very glued.
6) wait for the arrival of a few more sensors / screens from Aliexpress and do something else interesting.
7) to interest pupils and at least some of them to teach this all ...
UPD: added a sketch for 3x cube with links to used libraries and 4x cube connection diagram.
UPD2: added photos and video. Updated the 4x4x4 cube connection scheme on GoogleDisk.
Source: https://habr.com/ru/post/247855/
All Articles