Herringbone, light up! Part 1: Garland and build software for OpenWRT
Hi, Habr!
On December 28, four days before the New Year, I had a problem: I realized that having Christmas lights on the market was a rare Chinese trash. The fact is that I have a small artificial Christmas tree at my home, as well as a small child - so I didn’t want 220 V to be present on the Christmas tree in any way, and I didn’t need garlands of several hundred light bulbs. And he quickly discovered that after crossing out everything falling under these items, only “hug and cry” products remain in the nearby stores.
So I had to make a garland myself. And this garland has an IP address.
')

However, seriously speaking, I pursued two goals: not only making a garland for myself, but also to show you how you can make various projects on our Black Swift nanocomputer , from knee to quite professional, to show you that this is quite simple and fast. . With a fair discussion of various interesting points.
The text is designed for people who more or less understand how programs write, know how to hold a soldering iron in their hands, but no more than that - which side to approach the nanocomputer with OpenWRT remains a mystery. Let's try to guess it, especially since the whole process does not require any special (beyond the above framework) knowledge or special equipment - programmers, adapters, etc.
Since this is the first article on the topic, I will break it into three parts so that a huge sheet cannot be made:
In real time, all three parts easily fit into the framework of the "project of the day off."
So, the garland itself. The range of the nearest stores was wide, but sad, therefore, having come to Chip-i-Dip's site (they have, let's say, not cheap, but on December 28 there were few alternatives), I also decided to solder it myself.

For the garland we need a lot of wire with a cross section of 0.2-0.3 sq. Mm, many multi-colored LEDs (I chose Betlux with an angle of 160 degrees - bright, large with a wide angle, convenient to install), and a lot of resistors. However, there are half as many resistors as there are LEDs: I decided to turn on the LEDs in opposite directions, so only one resistor is needed for each pair. This reduces the number of wires, although it complicates the management of the garland.
The legs of the LEDs were bent by 90 degrees right at the base of the case (you shouldn’t do that at all - the cases do not count on such load application, but for yourself and with an understanding of the risk of breaking a pair of LEDs - it is possible), after which they are soldered in pairs. It is convenient to combine blue with yellow and red with green - not only in terms of color combinations, but also because these Betlux models have different colors for switching on the LED. With this combination of colors, the same conclusions are connected together, which reduces confusion.
One pair is soldered to each pair, the nominal is considered to be standard R> (U - 2.5) / 0.02, where U is the power supply voltage of the string, 2.5 V is the approximate voltage drop on the LED (depending on the color, but we are large accuracy is not needed), 0.02 A is the maximum current through the LED. When powering the garland from +5 V, 125 Ohm is obtained, respectively, we take resistors for 130 or 150 Ohm. Specifically, I had a bag of 1 kΩ resistors and a 15 V power supply, so I fed the garland from 15 V, and put an additional 5 V stabilizer on the board - but you don’t have to do that.
I had 80 LEDs in the festoon (thanks, good seller, for pouring all four colors into one bag!), 40 of them can work simultaneously with counter-parallel switching, this is 0.8 A. That is, a trivial charge from a mobile phone 5 In 1 And for happiness is enough.
The wires were cut, stripped, sealed and shrouded. This is the most trivial part, I will note only two points: firstly, by the middle you feel like a Chinese girl on a conveyor belt and you begin to appreciate seconds, secondly, I made a garland of two independent branches — red-green and blue-yellow.
To manage this farm, four half bridges are needed: two for each branch in order to provide the possibility of switching the polarity of the power supply of the LEDs and, accordingly, to choose the color. Fortunately, there is such a wonderful chip as the L293D, in which four half bridges are assembled.
The scheme is relatively banal:
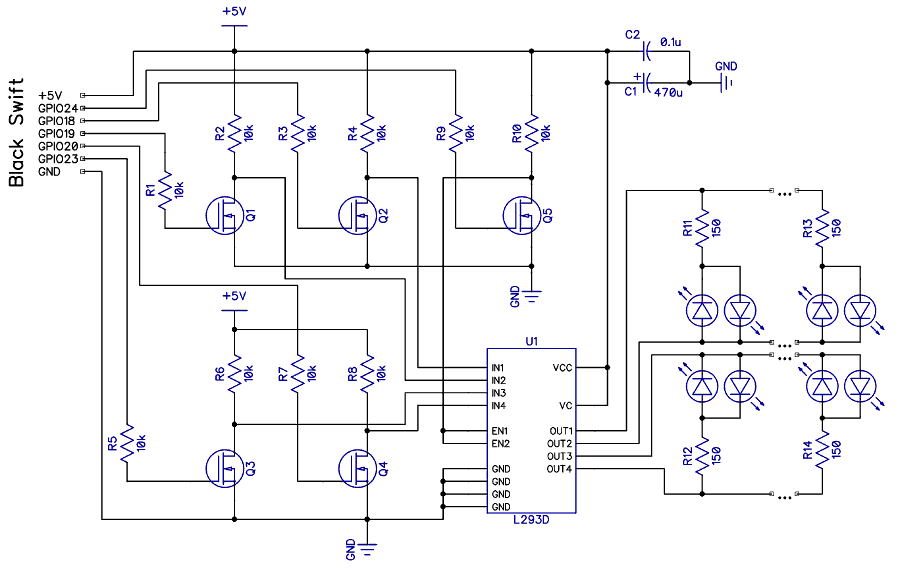
Five input transistors (any low-power N-MOSFETs are suitable) are needed to match voltage levels: Black Swift works from +3.3 V, L293 - from +5 V. In principle, in some cases, you can connect the output of 3.3-V circuits to input 5-V without matching, but be careful: first, you need to be sure that the voltage of “1” at the output of the first is enough for a confident switch of the second, and secondly, and more importantly, in the opposite direction, nothing beyond 0 .. .3.3 B will not fly under any circumstances.
For bilateral approval there are special chips (although it can be bilateral on transistors), but since we have a one-way agreement, we are doing it for a long time on the December 29 calendar from the first available transistors. I had it IRLML6344, if you're interested.
Putting it all on a breadboard and connecting Black Swift:
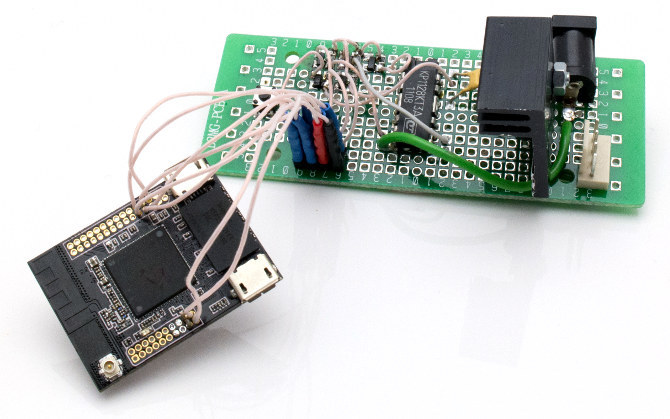
Please note that it is connected to me in a very simple way: the wires to the GPIO and power lines are simply soldered. Not the most universal way, but very simple and reliable. There is no need for a separate stabilizer for BSB - it can be powered from the same +5 V as the L293D.
I will write the main application in C, and therefore I need an assembly environment. Unfortunately, the native environment - OpenWRT SDK - works only under Linux, fortunately, I have a home server under CentOS 6.
If you also have this or similar, you just need to download and unpack on it the standard SDK for the platform ar71xx . It is only for the x86-64 platform.
If you have Linux running on some old 32-bit processor (I know, many have it), then we have compiled an SDK for you under 32 bits. Here it is .
If you don’t have Linux at all, then we’ve created for you a virtual machine image for Oracle VirtualBox with CentOS 6 installed in it and already unpacked into the / home / openwrt / Openwrt-SDK-BB folder with the aforementioned SDK. OS and SDK are 32-bit, so they work on just about everything; passwords are root / openwrt and openwrt / openwrt. Here is this image .
So, we download the virtual machine, unpack the zip file in vdi, run VirtualBox, create a new VM for 32-bit Linux and specify the existing vdi-file as the disk for it. Launch, boot, do cd Openwrt-SDK-BB - and voila, we are ready to go.
Build packages are in the packages directory, which is currently empty. More specifically, in the original version there are not the packages themselves, but only the Makefile, which indicates where the source package is from where to download - and during assembly they are downloaded, unpacked and compiled. At least, 99 out of 100 examples on assembly under OpenWRT this scheme is described.
In our case, this is quite inconvenient - it is unlikely that you will be first to upload a program for managing a homemade Christmas tree garland on GitHub. Therefore, we will write a Makefile, which will take the source immediately, without downloading them from anywhere.
So, the ways will be:
packages / treelights - shared folder
packages / treelights / src - source of the program
packages / treelights / Makefiles - OpenWRT instructions
Now we write the OpenWRT Makefile itself. He does not control exactly how the package will be assembled, this is the business of other makefiles that will already be inside src - he describes what OpenWRT should do with this good.
Putting such a Makefile in packages / treelights /, and the source of the program in packages / treelights / src /, we can safely run make menuconfig from the root of the OpenWRT SDK folder
The package configuration menu will open, inside which our Christmas tree lights controiller utility will be turned off by default. We put the cursor on it, press the space bar - a mark (M) appears in front of the utility, meaning that it will be assembled in a separate package.
Exit the menuconfig, saving the configuration, and run the actual build of the package with the command make package / treelights / compile
If everything goes well, after a few seconds a subdirectory appears in the bin / ar71xx / folder, in which our package is located in the ipk file. We take it from there to a convenient place, connect to the included Black Swift, for example, using WinSCP, copy this file onto it. Open your favorite SSH client, connect it to the BSB console and run the opkg install treelights * ipk command. A few more seconds - and you can run the program, it is in / usr / bin / treelights and ready to go. Uninstalling the program - opkg remove treelights, updating - again opkg install, you do not need to manually delete the old version before the update.
If the build passes with an error - run it again with the command make package / treelights / compile V = 99, which displays the detailed output of the compiler, with all the errors.
If we have several packages that need to be built at the same time - just say make or make V = 99, without specifying a specific package. Everything that was included in the menuconfig will be collected. The command make clean erases the intermediate files created during the build, the make dirclean - intermediate and final files, make distclean erases everything, returning the folder to its original state.
Other details about the assembly under OpenWRT can be found on the official site .
On December 28, four days before the New Year, I had a problem: I realized that having Christmas lights on the market was a rare Chinese trash. The fact is that I have a small artificial Christmas tree at my home, as well as a small child - so I didn’t want 220 V to be present on the Christmas tree in any way, and I didn’t need garlands of several hundred light bulbs. And he quickly discovered that after crossing out everything falling under these items, only “hug and cry” products remain in the nearby stores.
So I had to make a garland myself. And this garland has an IP address.
')
However, seriously speaking, I pursued two goals: not only making a garland for myself, but also to show you how you can make various projects on our Black Swift nanocomputer , from knee to quite professional, to show you that this is quite simple and fast. . With a fair discussion of various interesting points.
The text is designed for people who more or less understand how programs write, know how to hold a soldering iron in their hands, but no more than that - which side to approach the nanocomputer with OpenWRT remains a mystery. Let's try to guess it, especially since the whole process does not require any special (beyond the above framework) knowledge or special equipment - programmers, adapters, etc.
Since this is the first article on the topic, I will break it into three parts so that a huge sheet cannot be made:
- Garland, Black Swift connection and build environment under OpenWRT in C / C ++
- Soft C, work with GPIO and software PWM
- Web interface and application for Android
In real time, all three parts easily fit into the framework of the "project of the day off."
So, the garland itself. The range of the nearest stores was wide, but sad, therefore, having come to Chip-i-Dip's site (they have, let's say, not cheap, but on December 28 there were few alternatives), I also decided to solder it myself.
For the garland we need a lot of wire with a cross section of 0.2-0.3 sq. Mm, many multi-colored LEDs (I chose Betlux with an angle of 160 degrees - bright, large with a wide angle, convenient to install), and a lot of resistors. However, there are half as many resistors as there are LEDs: I decided to turn on the LEDs in opposite directions, so only one resistor is needed for each pair. This reduces the number of wires, although it complicates the management of the garland.
The legs of the LEDs were bent by 90 degrees right at the base of the case (you shouldn’t do that at all - the cases do not count on such load application, but for yourself and with an understanding of the risk of breaking a pair of LEDs - it is possible), after which they are soldered in pairs. It is convenient to combine blue with yellow and red with green - not only in terms of color combinations, but also because these Betlux models have different colors for switching on the LED. With this combination of colors, the same conclusions are connected together, which reduces confusion.
One pair is soldered to each pair, the nominal is considered to be standard R> (U - 2.5) / 0.02, where U is the power supply voltage of the string, 2.5 V is the approximate voltage drop on the LED (depending on the color, but we are large accuracy is not needed), 0.02 A is the maximum current through the LED. When powering the garland from +5 V, 125 Ohm is obtained, respectively, we take resistors for 130 or 150 Ohm. Specifically, I had a bag of 1 kΩ resistors and a 15 V power supply, so I fed the garland from 15 V, and put an additional 5 V stabilizer on the board - but you don’t have to do that.
I had 80 LEDs in the festoon (thanks, good seller, for pouring all four colors into one bag!), 40 of them can work simultaneously with counter-parallel switching, this is 0.8 A. That is, a trivial charge from a mobile phone 5 In 1 And for happiness is enough.
The wires were cut, stripped, sealed and shrouded. This is the most trivial part, I will note only two points: firstly, by the middle you feel like a Chinese girl on a conveyor belt and you begin to appreciate seconds, secondly, I made a garland of two independent branches — red-green and blue-yellow.
To manage this farm, four half bridges are needed: two for each branch in order to provide the possibility of switching the polarity of the power supply of the LEDs and, accordingly, to choose the color. Fortunately, there is such a wonderful chip as the L293D, in which four half bridges are assembled.
The scheme is relatively banal:
Five input transistors (any low-power N-MOSFETs are suitable) are needed to match voltage levels: Black Swift works from +3.3 V, L293 - from +5 V. In principle, in some cases, you can connect the output of 3.3-V circuits to input 5-V without matching, but be careful: first, you need to be sure that the voltage of “1” at the output of the first is enough for a confident switch of the second, and secondly, and more importantly, in the opposite direction, nothing beyond 0 .. .3.3 B will not fly under any circumstances.
For bilateral approval there are special chips (although it can be bilateral on transistors), but since we have a one-way agreement, we are doing it for a long time on the December 29 calendar from the first available transistors. I had it IRLML6344, if you're interested.
Putting it all on a breadboard and connecting Black Swift:
Please note that it is connected to me in a very simple way: the wires to the GPIO and power lines are simply soldered. Not the most universal way, but very simple and reliable. There is no need for a separate stabilizer for BSB - it can be powered from the same +5 V as the L293D.
OpenWRT preparation
I will write the main application in C, and therefore I need an assembly environment. Unfortunately, the native environment - OpenWRT SDK - works only under Linux, fortunately, I have a home server under CentOS 6.
If you also have this or similar, you just need to download and unpack on it the standard SDK for the platform ar71xx . It is only for the x86-64 platform.
If you have Linux running on some old 32-bit processor (I know, many have it), then we have compiled an SDK for you under 32 bits. Here it is .
If you don’t have Linux at all, then we’ve created for you a virtual machine image for Oracle VirtualBox with CentOS 6 installed in it and already unpacked into the / home / openwrt / Openwrt-SDK-BB folder with the aforementioned SDK. OS and SDK are 32-bit, so they work on just about everything; passwords are root / openwrt and openwrt / openwrt. Here is this image .
So, we download the virtual machine, unpack the zip file in vdi, run VirtualBox, create a new VM for 32-bit Linux and specify the existing vdi-file as the disk for it. Launch, boot, do cd Openwrt-SDK-BB - and voila, we are ready to go.
Build packages are in the packages directory, which is currently empty. More specifically, in the original version there are not the packages themselves, but only the Makefile, which indicates where the source package is from where to download - and during assembly they are downloaded, unpacked and compiled. At least, 99 out of 100 examples on assembly under OpenWRT this scheme is described.
In our case, this is quite inconvenient - it is unlikely that you will be first to upload a program for managing a homemade Christmas tree garland on GitHub. Therefore, we will write a Makefile, which will take the source immediately, without downloading them from anywhere.
So, the ways will be:
packages / treelights - shared folder
packages / treelights / src - source of the program
packages / treelights / Makefiles - OpenWRT instructions
Now we write the OpenWRT Makefile itself. He does not control exactly how the package will be assembled, this is the business of other makefiles that will already be inside src - he describes what OpenWRT should do with this good.
include $(TOPDIR)/rules.mk # , , . PKG_* - . PKG_NAME:=treelights PKG_VERSION:=0.0.1 PKG_RELEASE:=1 # , . PKG_BUILD_DIR:=$(BUILD_DIR)/$(PKG_NAME) include $(INCLUDE_DIR)/package.mk # # OpenWRT , , , # "Christmas tree lights controller", URL # DEPENDS - , # C, libstdc++ define Package/treelights SECTION:=base CATEGORY:=Utilities DEFAULT:=n TITLE:=Christmas tree lights controller URL:=http://black-swift.com DEPENDS:=+libstdcpp endef # . - , define Package/treelights/description Christmas tree lights controller endef # # 1. # 2. src define Build/Prepare mkdir -p $(PKG_BUILD_DIR) $(CP) ./src/* $(PKG_BUILD_DIR)/ endef # , define Build/Configure $(call Build/Configure/Default,--with-linux-headers=$(LINUX_DIR)) endef # # 1. ( , ) # 2. # ( , -) - # define Package/treelights/install $(INSTALL_DIR) $(1)/usr/bin $(INSTALL_BIN) $(PKG_BUILD_DIR)/treelights $(1)/usr/bin/ endef $(eval $(call BuildPackage,treelights)) Putting such a Makefile in packages / treelights /, and the source of the program in packages / treelights / src /, we can safely run make menuconfig from the root of the OpenWRT SDK folder
The package configuration menu will open, inside which our Christmas tree lights controiller utility will be turned off by default. We put the cursor on it, press the space bar - a mark (M) appears in front of the utility, meaning that it will be assembled in a separate package.
Exit the menuconfig, saving the configuration, and run the actual build of the package with the command make package / treelights / compile
If everything goes well, after a few seconds a subdirectory appears in the bin / ar71xx / folder, in which our package is located in the ipk file. We take it from there to a convenient place, connect to the included Black Swift, for example, using WinSCP, copy this file onto it. Open your favorite SSH client, connect it to the BSB console and run the opkg install treelights * ipk command. A few more seconds - and you can run the program, it is in / usr / bin / treelights and ready to go. Uninstalling the program - opkg remove treelights, updating - again opkg install, you do not need to manually delete the old version before the update.
If the build passes with an error - run it again with the command make package / treelights / compile V = 99, which displays the detailed output of the compiler, with all the errors.
If we have several packages that need to be built at the same time - just say make or make V = 99, without specifying a specific package. Everything that was included in the menuconfig will be collected. The command make clean erases the intermediate files created during the build, the make dirclean - intermediate and final files, make distclean erases everything, returning the folder to its original state.
Other details about the assembly under OpenWRT can be found on the official site .
Source: https://habr.com/ru/post/247817/
All Articles