Three-dimensional background for the site in real time on JavaScript using three.js

Learning material from the resource Phyramid, who have just such a header of the site.
')
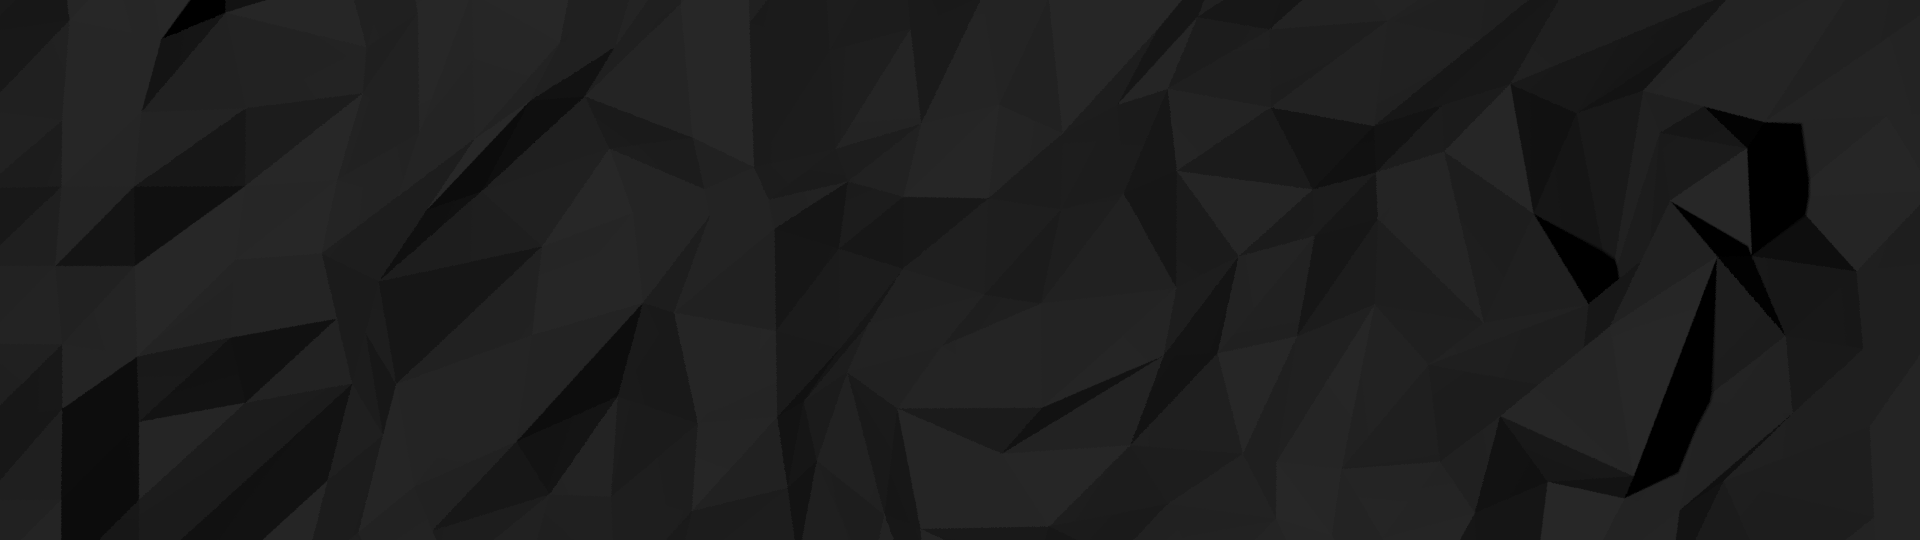
By updating our website in 2014, we made a three-dimensional background in a header consisting of geometric shapes in 3D Max. But then we thought that it would be much cooler to generate it in real time on JS. It is said - done, and with the help of the wonderful three.js framework, we made a simple scene. And that's how it was.
A note on the style of the code: at first we wanted to use only the functional style, but due to the peculiarities of the web and the work of the algorithm, we switched to OOP.
Create a surface
The first step was to create the main part of the scene. To do this, we created a plane with 100x100 segments, and then shifted the vertices randomly. The important point is that you need to set geometry.dynamic = true and geometry.normalsNeedUpdate = true so that three.js knows that the vertices will change and that he will need to recalculate the lighting.
var makePlaneGeometry = function(width, height, widthSegments, heightSegments) { var geometry = new THREE.PlaneGeometry(width, height, widthSegments, heightSegments); var X_OFFSET_DAMPEN = 0.5; var Y_OFFSET_DAMPEN = 0.1; var Z_OFFSET_DAMPEN = 0.1; var randSign = function() { return (Math.random() > 0.5) ? 1 : -1; }; for (var vertIndex = 0; vertIndex < geometry.vertices.length; vertIndex++) { geometry.vertices[vertIndex].x += Math.random() / X_OFFSET_DAMPEN * randSign(); geometry.vertices[vertIndex].y += Math.random() / Y_OFFSET_DAMPEN * randSign(); geometry.vertices[vertIndex].z += Math.random() / Z_OFFSET_DAMPEN * randSign(); } geometry.dynamic = true; geometry.computeFaceNormals(); geometry.computeVertexNormals(); geometry.normalsNeedUpdate = true; return geometry; }; var makePlane = function(geometry) { var material = new THREE.MeshBasicMaterial({color: 0x00576b, wireframe: true}); var plane = new THREE.Mesh(geometry, material); return plane; }; var init = function(container, viewWidth, viewHeight) { var scene = makeScene(); // (...) var plane = makePlane(makePlaneGeometry(400, 400, 100, 100)); scene.add(plane); // (...) }; Playing with the frame
Simple material for the frame helped visualize the model:
var material = new THREE.MeshBasicMaterial({color: 0x00576b, wireframe: true}); TrackballControls.js was used to move around the stage. And that's what we got as a result:

Cool, but not yet polished. Add real material and light.
Adding material and light
To achieve the desired appearance, the ambient occlusion shading model was required. In addition, you need to make visible the edges of the model without smoothing. Therefore, the lambert material with flat shading fit perfectly:
var material = new THREE.MeshLambertMaterial({color: 0xffffff, shading: THREE.FlatShading}); Two light sources were used. The first - ambient, was placed for uniform illumination. The second, directional, created all these cool shadows that give the model a polygonal look.
var makeLights = function() { var ambientLight = new THREE.AmbientLight(0x1a1a1a); this.scene.add(ambientLight); var dirLight = new THREE.DirectionalLight(0xdfe8ef, 0.09); dirLight.position.set(5, 2, 1); this.scene.add(dirLight); }; Camera placement
We wanted to place a camera looking at a plane from about a 45 degree angle, which is pretty simple. Having played with the camera, we chose an angle of 75 degrees, which gives the effect of observation "from the top of the mountain."
var camera = new THREE.PerspectiveCamera(fov, aspectRatio, 0.1, 1000); camera.up = new THREE.Vector3(0, 1, 0); camera.rotation.x = 75 * Math.PI / 180; camera.position.z = zPos; The field of view caused problems, because on wide canvases the scene looked strange, something like when setting up an FOV in Quake by 180 degrees. We wrote a code for a rough FOV calculation based on the screen resolution.
Haze and alpha-blending
The picture is already beginning to resemble our goal, but there is one problem. The boundaries of the plane are clearly visible. Here is a prime example of this, with the camera looking down.

First, we wanted to transform the plane into a sphere, and place the camera inside the sphere, in the center. The approach seemed to solve the problem, but the surface already looked wrong and was going to fold at the poles.
The solution was to add an exponential haze, which turned out very cool. After the alpha blending was turned on, the haze smoothly turned into the background of the splash screen and gave a cool effect.
var renderer = new THREE.WebGLRenderer({antialiasing: true, alpha: true}); (...) scene.fog = new THREE.FogExp2(0x222228, 0.003); Here is a picture with enhanced smoke effect:

Interactivity (part one - the mouse)
Finally, the scene began to look right, but management was still imperfect. TrackballControls allows you to move freely around the stage, but we only had to allow turns about the Z axis. We decided to write controls from scratch, based on the demo with a rotating cube from three.js
When the user moves the mouse, it is necessary to turn off autorotation and remember the distance the mouse was moved to add it to the rotation around Z in the next frame.
var registerMouseMove = function(event) { this.autorotation = false; var mouseXOnMouseMove = event.clientX - (this.width / 2); var MOUSE_MOVE_DAMPENING = 0.0075; this.targetRotation = this.targetRotationOnMouseDown + (mouseXOnMouseMove - this.mouseXOnMouseDown) * MOUSE_MOVE_DAMPENING; }; A click handler is also required so that movements are registered only if the user holds down the mouse button (and memorize the original position of the mouse to calculate the distance).
var registerMouseDown = function(event) { startMouseMovementDetection(); this.mouseXOnMouseDown = event.clientX - (this.width / 2); this.targetRotationOnMouseDown = this.targetRotation; }; All that remains is to make a turn.
if (this.autorotation) { this.object.rotation.z += OBJECT_AUTOROTATION_AMOUNT; } else { this.object.rotation.z -= (this.targetRotation + this.object.rotation.z) * TARGET_ROTATION_DAMPENING; } We added another restriction on movement - if an object is moving too slowly, we consider that it is noise or residual phenomena from the last dragging, therefore we return the rotation method to the state of autorotation.
if (Math.abs(this.targetRotation + this.object.rotation.z) < OBJECT_ROTATION_THRESHOLD) { this.autorotation = true; } Interactivity (part two - touch)
Almost done! Another thing we need to do is control by touch. It works about the same as mouse control.
var registerTouchDown = function(event) { if (event.touches.length === 1) { this.mouseXOnMouseDown = event.touches[0].pageX - (this.width / 2); this.mouseYOnMouseDown = event.touches[0].pageY - (this.height / 2); this.targetRotationOnMouseDown = this.targetRotation; } } But there is a problem. On devices with a touch screen, the gesture responsible for moving the scene is also responsible for scrolling the page. This had a bad effect on handling, because in practice we turned off scrolling.
Because of this, we had to check the direction of pulling. If it is mostly horizontal, then we rotate the plane. If it was mostly vertical, we did nothing and allowed the default events to happen.
function registerTouchMove(event) { if (event.touches.length === 1) { var MOUSE_MOVE_DAMPENING = 0.01; this.autorotation = false; var mouseXOnMouseMove = event.touches[0].pageX - (this.width / 2); var mouseYOnMouseMove = event.touches[0].pageY - (this.height / 2); var xDiff = mouseXOnMouseMove - this.mouseXOnMouseDown; var yDiff = mouseYOnMouseMove - this.mouseYOnMouseDown; if (Math.abs(xDiff) > Math.abs(yDiff)) { event.preventDefault(); this.targetRotation = this.targetRotationOnMouseDown + xDiff * MOUSE_MOVE_DAMPENING; } } } Resize resolution update
Last but not least, the ability to dynamically update the entire image when the browser window is resized.
var updateDimensions = function() { this.width = this.container.offsetWidth; this.height = this.container.offsetHeight; var aspectRatio = this.width / this.height; var fov = fovForAspectRatio(aspectRatio); var zPos = cameraZPositionForFov(fov); this.camera.aspect = aspectRatio; this.camera.fov = fov; this.camera.position.z = zPos; this.camera.updateProjectionMatrix(); this.renderer.setSize(this.width, this.height); }; results
Done! This is how it comes out when viewing it in full screen (we have a fullscreen view on page 404). Living example .

Creating a 3D header was a very exciting experience, and we are impressed with the power of three.js. We hope that this article will help you create similar things.
Source: https://habr.com/ru/post/247811/
All Articles