Guide to the Car Tutorial (Unity3d) part 1 of 3
This is a translated guide for a project link or an alternative link to a project with corrected errors under Unity3d 4.6 .
PS The original manual is in the project itself in the form of 3 PDF files, in the Assets folder.
This archive has been replaced by UnityPacked. In this project, the archive is already filled with scripts copied to C # located in the Assets \ Scripts \ CSharpScripts folder . Installation Procedure:
')
1) Run Unity3d and create an empty project.
2) Import our project> (Assets / Import Package / Custom Package) .
3) We are waiting for the import of all resources and voila our project is imported.
4) ATTENTION !!! if you want to use all C # scripts, you must remove the JS scripts from the project and from
Prefabs, then unzip the archive of C # scripts and use these scripts.
Special thanks to the Zionn Game Room team for translating official and unofficial Unity3d video tutorials into Russian. And so, we proceed to the study of our leadership.
Part 2
Part 3
The goal of this guide is to show you how to create a racing game in Unity3d . We will create a car from 3D-models, scripts and components. We provide you with a complete racing simulator project where you can play and explore the finished scenes. We will also provide you with a scene that is completely ready to play, except for the car over which you can practice using this guide.
Let's start with what this guide is about. It is divided into three parts, which are independent of each other:
1. Car assembly
How to assemble a car prefab (Car Prefab) from a 3D model, scripts and components. This is the current section.
2. Tweaking car
How to set up a car.
3. Under the hood
A deeper look at the source code that drives the car.
The guide is not intended for beginners as a Unity3d training. You need to have a basic understanding of how Unity3d is organized, you need to know what a Game Object (GameObject), Components (Scripts), etc. are. Together we will analyze a lot of material, some things will be analyzed in a basic way, some are deepened.
• The rest of the scripts.
• Unity3d basics. We will not go into details with an explanation of the basics of the scripts and components of Unity3d . There are many other resources for this at:
link number 1
link number 2
The user guide and scripts of Unity3d are valuable satellites when studying this guide. We invite you to visit these resources when you come across embedded components or features that you would like to learn more about.
The approach to the study is analogous to “Monkey sees, the monkey repeats”: you follow the instructions that we give about creating a car and changing its variables.
I hope you will understand how it works all together and begin to understand this yourself. Feel free to learn.
In the last and longest part we dive deeper into the source code, which causes the car to drive.
This is not a linear walkthrough, but we will consider most of what is happening.
We are sure that you will learn a lot after reading all the manuals.
Download the archive with the project folder or an alternative link to the project with corrected errors under Unity3d 4.6 . Start by opening the scene with the name ' CompleteScene '. This scene has a customized car, you can try to play by pressing the Play button. This will show you the final result of what we are going to do.
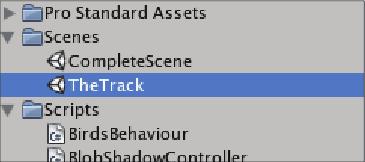
When you finish playing, open a scene called 'TheTrack' . This scene contains everything you need for a racing simulator, with the exception of the most important part - the car.
Now drag the car model into the scene. In the project view, you find it in Models / Car / catamount ,
Depending on where you dragged the car, you probably want to change its position to a more suitable one.
I suggest that you change the car’s position in the inspector to (860, 102.3, 878) and set its Y-rotation (Rotate) 130.

This is just a 3D car model. If you look at the inspector, you will see that it contains many child objects, such as the “body” of the car, the car window and the wheel. It also contains two simple grids, which we will use for the colliders of the car. Do not worry, they are not visible now, we will change it. Spend some time studying how the car is arranged and how they are related to each other in the hierarchy.
For several reasons, we created a layer for the car. With the game object 'Car' sorted out, go to the inspector and select "Car" in the layers drop-down menu. In the context menu, click "Yes, change child object (Yes, change children)" to apply, the changes are applied to all objects in the car hierarchy.
The “Car” game object has an animation component that is installed by default. Since this is not what we are going to use, go ahead and clean up a bit by clicking on the small wheel on the right of the Animation Component and select "Remove Component" .
Now we will configure the collision components (Collision) for the car, preventing it from falling off the stage when the scene is active. Instead of using complex grids as colliders (colliders) based on a real machine grid, we created two grids, which are much simpler, which correspond to the top and bottom of the car. To improve performance, we use these grids as a collision model.
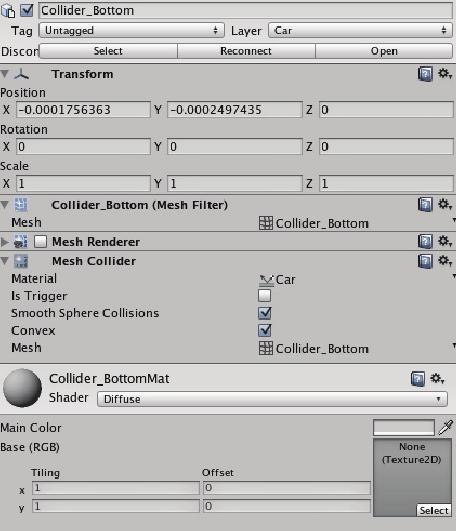
• Click on the game object Collider_Bottom , which is located as a child of the object 'Car' (car).
• Go to the Component / Physics menu and click MeshCollider to add to the game object.
• Click Material in the drop-down selector on the newly added MeshCollider component and select the physics material .
• Check to check the two boxes (checkbox) 'Smooth Sphere Collisions' and 'Convex'
• Since colliders will be invisible, remove the MeshRenderer and MeshFilter components from the game object (Click on the small gear wheel on the right of the components and select the 'Remove Component' option) .
• Do the same as described above for the game object Collider_Top .
We are going to change the shadow settings for the Car model for two reasons. First of all, turning off shadows in objects that actually do not need it is a very good practice for improving performance. Secondly, we believe that the car will look better when we adjust the shadows. This can be more pleasing to the eye when the shadows appear and disappear on the car, while it is moving at high speed around the scene. If you want more realistic shadow behavior, this is quite possible. Just change the settings according to your desires.
The settings that we use for different parts of the car are as follows:
Body: Cast Shadows enabled. Receive Shadows disabled
Body Interior: Cast Shadows enabled. Receive Shadows disabled
Car Windows: Cast and Receive Shadows disabled
DiscBrakes: Cast and Receive Shadows disabled
Wheels: Cast Shadows enabled. Receive shadows disabled.
Now let's start adding the components necessary for the correct operation of the car (game object 'Car' )
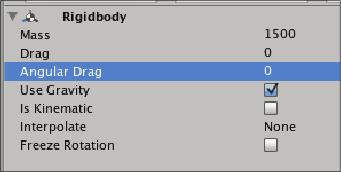
First of all, we need a way to control the position of the car in the world with the help of a physical simulation, and the built-in component Rigidbody is perfect for this. Select the “Car” game object, go to the Components menu and select Physics / RigidBody . Confirm the message Unity3d , which informs you about the loss of prefab connections and observe how the game object now has a Rigidbody component attached as one of its components.
• The car obviously weighs more than just one kilogram, so let's start with a change in mass (Mass) in Rigidbody for something more realistic, say 1500 kg .
• Next we have the ability to change the angularDrag property, these are forces that slow down the speed and rotation of the Rigidbody . We will control the resistance of the car using scripts, so just set the angularDrag property to 0 .
• Find the Car.js script in the 'scripts / JavaScripts' folder and drag it onto the “Car” game object. This script is the “engine” of the car, we will focus on the explanation of the script in more detail at the end of this guide.
The “Car.js” script component has many different variables that will be explained when we start setting up the car, and we will tell you in more detail when we learn the code. Now we just want to set up what we need in order to be able to drive a car on the highway.

First of all, the “Car” script should know about the wheels that the car has. In the inspector, you will see front wheels (Front Wheels) and rear wheels (Rear Wheels) , note that both can be expanded by clicking on the small arrow to the left of the name.
• Set the size (size) of the front (Front) and rear wheels (Rear Wheels) to 2 , leaving space for the two front wheels and the two rear wheels.
• Now open the WheelFL, WheelFR, WheelRL and WheelRR in the inspector. You will see that each of them has a brake disc (DiscBrake) as a child object, and the fact that each brake disc (DiscBrake) has a wheel as a child object.
• Drag the DiscBrakeFL and DiscBrakeFR into two open slots for (Front Wheels) front wheels in the “Car” script, as well as DiscBrakeRL and DiscBrakeRR to the slots for (Rear Wheels) rear wheels .
• You may ask - why are disc brakes on wheels? And the explanation is simple: Disc brakes as parent game objects, so installing discs like wheels will include tires.
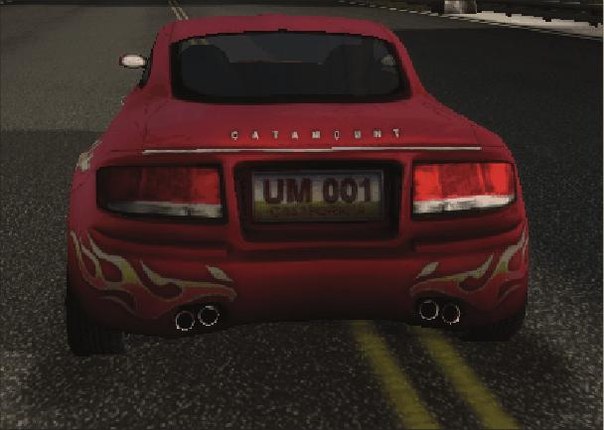
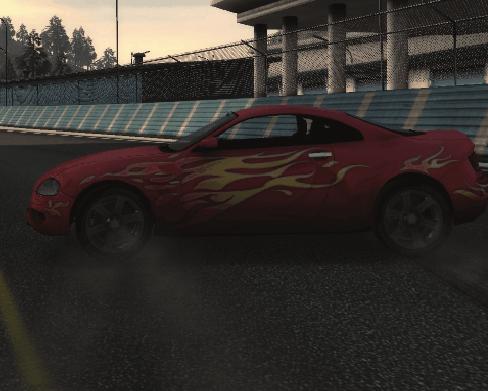
Directional light will make the car have a good blob shadow on the road, if shadows are allowed in your project. We also want to add a shadow under the car, as shown in this image.
To do this, we will use a projector that projects a Blob shadow resembling the shape of a car on the road directly below the car. A projector is built into a component that works just like a real projector. You specify the texture you want to transfer, and based on the settings for the projector and (distance to the target), the shadow will be based on those textures of objects that are in the path of the projector's light.
• In the hierarchy, create an empty game object and drag it onto the “Car” car to make it the child object of the “Car” game object.
• Name the object “Blob shadow projector”
• Add a Projector component to the Blob shadow of this projector (Component-> Renderer-> Projector)
• Set on projectors the settings Near Clip Plane = 0,1, Far Clip Plane = 50, Field of View = 30.
• Assign a Blob_shadow material to the material slot.
• In “Ignore Layers”, select “Everything” , and then uncheck the “Road” layer, as a result of which the projector will cast a shadow over the road for Blob .
• Add the BlobShadowController.js script (in the Scripts / CSharpScripts folder in the project window)
The position and rotation of the component ( Projector ) of the projector is updated every frame in the BlobShadowController.js script which is quite simple. In short, he is 10 meters above the car and gets its rotation coordinates based on the rotation of the car. You can take a look at the script and try to change the value if you want the Blob shadow of the car on the road to look different.
Some of the things that make the process of driving a car even more fun are skidding around the corner of the track or making a U-turn at high speed. To enhance the effect of the wheels sliding on the road, we are going to add some tire tracks on the surface when the car slides.
So we will install tire tracks if we add an existing script that controls all tire tracks in the scene. This controller is responsible for creating a grid that represents tire tracks. Each wheel knows its position and whether it will slip or not. We use this information to register a point in the world where we want to set a skidmark relative to the skidmark controller. We allow each wheel to track previous skidmark points so that tire tracks from several wheels are not mixed up.
We have created a prefab , for this you can simply drag it to the scene:
• Drag Skidmarks prefab from Prefabs-> VFX-> Skidmarks onto the stage.
We set the intensity of the tire tracks by adjusting the color of each created vertex. The intensity is determined by how strong the wheel skid. In order to create this effect, we use a customized shader that uses alpha from each vertex when rendering brake tracks. As with a car, there are a few things that can be changed to make tire tracks better suited to the car you are trying to build.
The Max Marks variable defines the number of positions for tire tracks that can exist on the scene at any time. All wheels use the same tire marks, so this number is calculated on all wheels. When the tracks reach the maximum number of tires, the first position will be overwritten. Increasing this number will also increase the total length of all parts of the tracks from the tires in the scene.
The variable ( Mark Width ) defines the width of the tracks from the tires. It must be adjusted to fit the wheels of the vehicle created. If this is a big truck you are trying to make a very wide skidmark that we need, and if this is a “supersonic car” with ultra-thin tires made for setting a speed record, a very thin skidmark will look more realistic.
When the grid for tire tracks is created, it will be created using points calculated from the wheels to place the skidmark on the road. These points will most often be straight on the surface during wheel folding. When two grids are immediately on top of each other, this can lead to some flickering in the game.
To prevent this, the variable Ground Offset is introduced. The mesh will be created and lifted the full length of the offset in the direction normal to the surface. So, if some flicker exists or tire tracks intersect with the surface, try increasing the offset. To further ensure that tire tracks remain on the ground, shaders are used for tire tracks, an offset has been created, and assigned to another Rendering queue.
When a new point is added to the SkidmarkController, it must be at (Min Distance) the minimum distance from the last point of the skidmark (tire tracks) . This guarantees you a productive addition of tire marks to very small areas. Do not set this value too large, although it may make tire tracks too large, and in addition, the increased distance may seem as if they are lagging behind the wheels ie. tire marks appear behind the wheels. Reducing the value will to some extent smooth out the tire tracks , creating the illusion that the tracks are closer to the wheels.
The textures of tires for wheels from the truck are very different in comparison with the textures of tires on wheels from Formula 1 (Formula-1) . Textures for tire marks (skidmarks) will be created on the surface. If you have created a different type of car with very different wheels, you will need to change this texture if you want the tire tracks to match the wheels.
• Add the SoundController.js script to the game object “Car” (Drag it from Scripts / JavaScripts / SoundController.js ).
The Sound Controller component has several slots for audio files to which we need to assign different audio files. Audio files are located in the Sound / Car folder in the project window .
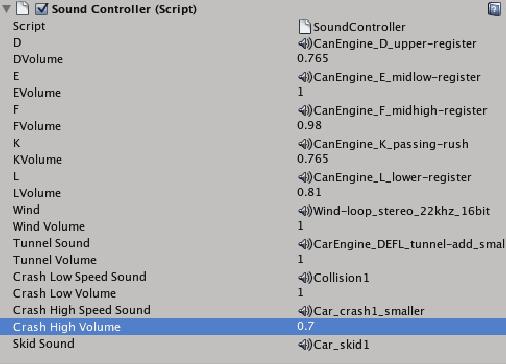
Drag:
• Drag and drop CarEngine_D_upper-register to slot D. Set the volume to 0.565.
• Drag and drop CarEngine_E_midlow-register to slot E. Set the volume to 0.8
• CarEngine_F_midhigh-register drag to slot F. Set the volume to 0.78
• Drag CarEngine_K_passing-rush to slot K. Set the volume to 0.565
• CarEngine_L_lower-register drag to slot L. Set the volume to 0.71
• Wind-loop_stereo_22khz_16bit drag to slot Wind . Set the volume to 0.8
• Drag and drop CarEngine_DEFL_tunnel-add_small onto the Tunnel Sound slot . Set the volume to 0.8
• Collision1 drag to the slot Crash Low Speed Sound. Set the volume to 0.8
• Car_crash1_smaller drag to the slot Crash High Speed Sound. Set the volume to 0.5
• Car_skid1 drag to the Skid Sound slot .
• CarTutorialSong drag to the Background Music slot . Set the volume to 1 .
Volume settings , of course, these are just the settings we offer. You can “play” with different values to get the exact sound image that you imagine. Or you could go even further and create your own settings menu for the sound, letting you adjust the volume of the music and effects separately in the game.
Finally, drag the following scripts onto the car (Car) game object:
• LightmapperObjectUV.js from (scripts / JavaScripts)
• CrashController.js from (scripts / JavaScripts)
• Generate2DRe fl ection.cs from (scripts / CSharpScripts)
We have one last thing to do before we can try out the game we have just created. The camera must follow the car, otherwise the car will simply get out of sight as soon as we start moving.
• Go to Main_Camera (Main Camera ) and drag it to the “Car” game object and point the camera as you like to control the car (within the “Car Camera” component of the Car Camera ).
PS The original manual is in the project itself in the form of 3 PDF files, in the Assets folder.
This archive has been replaced by UnityPacked. In this project, the archive is already filled with scripts copied to C # located in the Assets \ Scripts \ CSharpScripts folder . Installation Procedure:
')
1) Run Unity3d and create an empty project.
2) Import our project> (Assets / Import Package / Custom Package) .
3) We are waiting for the import of all resources and voila our project is imported.
4) ATTENTION !!! if you want to use all C # scripts, you must remove the JS scripts from the project and from
Prefabs, then unzip the archive of C # scripts and use these scripts.
Special thanks to the Zionn Game Room team for translating official and unofficial Unity3d video tutorials into Russian. And so, we proceed to the study of our leadership.
Part 2
Part 3
Introduction
The goal of this guide is to show you how to create a racing game in Unity3d . We will create a car from 3D-models, scripts and components. We provide you with a complete racing simulator project where you can play and explore the finished scenes. We will also provide you with a scene that is completely ready to play, except for the car over which you can practice using this guide.
What will we learn?
Let's start with what this guide is about. It is divided into three parts, which are independent of each other:
1. Car assembly
How to assemble a car prefab (Car Prefab) from a 3D model, scripts and components. This is the current section.
2. Tweaking car
How to set up a car.
3. Under the hood
A deeper look at the source code that drives the car.
The necessary conditions
The guide is not intended for beginners as a Unity3d training. You need to have a basic understanding of how Unity3d is organized, you need to know what a Game Object (GameObject), Components (Scripts), etc. are. Together we will analyze a lot of material, some things will be analyzed in a basic way, some are deepened.
We will not study:
• The rest of the scripts.
• Unity3d basics. We will not go into details with an explanation of the basics of the scripts and components of Unity3d . There are many other resources for this at:
link number 1
link number 2
The user guide and scripts of Unity3d are valuable satellites when studying this guide. We invite you to visit these resources when you come across embedded components or features that you would like to learn more about.
The approach to the study is analogous to “Monkey sees, the monkey repeats”: you follow the instructions that we give about creating a car and changing its variables.
I hope you will understand how it works all together and begin to understand this yourself. Feel free to learn.
In the last and longest part we dive deeper into the source code, which causes the car to drive.
This is not a linear walkthrough, but we will consider most of what is happening.
We are sure that you will learn a lot after reading all the manuals.
Part 1: Build a car
Download the archive with the project folder or an alternative link to the project with corrected errors under Unity3d 4.6 . Start by opening the scene with the name ' CompleteScene '. This scene has a customized car, you can try to play by pressing the Play button. This will show you the final result of what we are going to do.
When you finish playing, open a scene called 'TheTrack' . This scene contains everything you need for a racing simulator, with the exception of the most important part - the car.
Now drag the car model into the scene. In the project view, you find it in Models / Car / catamount ,
Depending on where you dragged the car, you probably want to change its position to a more suitable one.
I suggest that you change the car’s position in the inspector to (860, 102.3, 878) and set its Y-rotation (Rotate) 130.
For the rest of the tutorial, this game object will be called “Car” , so you can rename it now.
This is just a 3D car model. If you look at the inspector, you will see that it contains many child objects, such as the “body” of the car, the car window and the wheel. It also contains two simple grids, which we will use for the colliders of the car. Do not worry, they are not visible now, we will change it. Spend some time studying how the car is arranged and how they are related to each other in the hierarchy.
For several reasons, we created a layer for the car. With the game object 'Car' sorted out, go to the inspector and select "Car" in the layers drop-down menu. In the context menu, click "Yes, change child object (Yes, change children)" to apply, the changes are applied to all objects in the car hierarchy.
The “Car” game object has an animation component that is installed by default. Since this is not what we are going to use, go ahead and clean up a bit by clicking on the small wheel on the right of the Animation Component and select "Remove Component" .
Collision Addition
Now we will configure the collision components (Collision) for the car, preventing it from falling off the stage when the scene is active. Instead of using complex grids as colliders (colliders) based on a real machine grid, we created two grids, which are much simpler, which correspond to the top and bottom of the car. To improve performance, we use these grids as a collision model.
• Click on the game object Collider_Bottom , which is located as a child of the object 'Car' (car).
• Go to the Component / Physics menu and click MeshCollider to add to the game object.
• Click Material in the drop-down selector on the newly added MeshCollider component and select the physics material .
• Check to check the two boxes (checkbox) 'Smooth Sphere Collisions' and 'Convex'
• Since colliders will be invisible, remove the MeshRenderer and MeshFilter components from the game object (Click on the small gear wheel on the right of the components and select the 'Remove Component' option) .
• Do the same as described above for the game object Collider_Top .
Shadow settings for a specific car model
We are going to change the shadow settings for the Car model for two reasons. First of all, turning off shadows in objects that actually do not need it is a very good practice for improving performance. Secondly, we believe that the car will look better when we adjust the shadows. This can be more pleasing to the eye when the shadows appear and disappear on the car, while it is moving at high speed around the scene. If you want more realistic shadow behavior, this is quite possible. Just change the settings according to your desires.
The settings that we use for different parts of the car are as follows:
Terms:
enabled
disabled - disabled
Cast Shadows - Drop Shadows
Receive Shadows - Received Shadows
Body - car body
Body Interior - cabin body
Car Windows - car windows
DiscBrakes - Disc Brakes
Wheels - Wheels.
Body: Cast Shadows enabled. Receive Shadows disabled
Body Interior: Cast Shadows enabled. Receive Shadows disabled
Car Windows: Cast and Receive Shadows disabled
DiscBrakes: Cast and Receive Shadows disabled
Wheels: Cast Shadows enabled. Receive shadows disabled.
Adding car components
Now let's start adding the components necessary for the correct operation of the car (game object 'Car' )
First of all, we need a way to control the position of the car in the world with the help of a physical simulation, and the built-in component Rigidbody is perfect for this. Select the “Car” game object, go to the Components menu and select Physics / RigidBody . Confirm the message Unity3d , which informs you about the loss of prefab connections and observe how the game object now has a Rigidbody component attached as one of its components.
• The car obviously weighs more than just one kilogram, so let's start with a change in mass (Mass) in Rigidbody for something more realistic, say 1500 kg .
• Next we have the ability to change the angularDrag property, these are forces that slow down the speed and rotation of the Rigidbody . We will control the resistance of the car using scripts, so just set the angularDrag property to 0 .
• Find the Car.js script in the 'scripts / JavaScripts' folder and drag it onto the “Car” game object. This script is the “engine” of the car, we will focus on the explanation of the script in more detail at the end of this guide.
The “Car.js” script component has many different variables that will be explained when we start setting up the car, and we will tell you in more detail when we learn the code. Now we just want to set up what we need in order to be able to drive a car on the highway.
First of all, the “Car” script should know about the wheels that the car has. In the inspector, you will see front wheels (Front Wheels) and rear wheels (Rear Wheels) , note that both can be expanded by clicking on the small arrow to the left of the name.
• Set the size (size) of the front (Front) and rear wheels (Rear Wheels) to 2 , leaving space for the two front wheels and the two rear wheels.
• Now open the WheelFL, WheelFR, WheelRL and WheelRR in the inspector. You will see that each of them has a brake disc (DiscBrake) as a child object, and the fact that each brake disc (DiscBrake) has a wheel as a child object.
• Drag the DiscBrakeFL and DiscBrakeFR into two open slots for (Front Wheels) front wheels in the “Car” script, as well as DiscBrakeRL and DiscBrakeRR to the slots for (Rear Wheels) rear wheels .
• You may ask - why are disc brakes on wheels? And the explanation is simple: Disc brakes as parent game objects, so installing discs like wheels will include tires.
Adding blob shadows
Directional light will make the car have a good blob shadow on the road, if shadows are allowed in your project. We also want to add a shadow under the car, as shown in this image.
To do this, we will use a projector that projects a Blob shadow resembling the shape of a car on the road directly below the car. A projector is built into a component that works just like a real projector. You specify the texture you want to transfer, and based on the settings for the projector and (distance to the target), the shadow will be based on those textures of objects that are in the path of the projector's light.
• In the hierarchy, create an empty game object and drag it onto the “Car” car to make it the child object of the “Car” game object.
• Name the object “Blob shadow projector”
• Add a Projector component to the Blob shadow of this projector (Component-> Renderer-> Projector)
• Set on projectors the settings Near Clip Plane = 0,1, Far Clip Plane = 50, Field of View = 30.
• Assign a Blob_shadow material to the material slot.
• In “Ignore Layers”, select “Everything” , and then uncheck the “Road” layer, as a result of which the projector will cast a shadow over the road for Blob .
• Add the BlobShadowController.js script (in the Scripts / CSharpScripts folder in the project window)
The position and rotation of the component ( Projector ) of the projector is updated every frame in the BlobShadowController.js script which is quite simple. In short, he is 10 meters above the car and gets its rotation coordinates based on the rotation of the car. You can take a look at the script and try to change the value if you want the Blob shadow of the car on the road to look different.
Tire tracks
Some of the things that make the process of driving a car even more fun are skidding around the corner of the track or making a U-turn at high speed. To enhance the effect of the wheels sliding on the road, we are going to add some tire tracks on the surface when the car slides.
So we will install tire tracks if we add an existing script that controls all tire tracks in the scene. This controller is responsible for creating a grid that represents tire tracks. Each wheel knows its position and whether it will slip or not. We use this information to register a point in the world where we want to set a skidmark relative to the skidmark controller. We allow each wheel to track previous skidmark points so that tire tracks from several wheels are not mixed up.
We have created a prefab , for this you can simply drag it to the scene:
• Drag Skidmarks prefab from Prefabs-> VFX-> Skidmarks onto the stage.
We set the intensity of the tire tracks by adjusting the color of each created vertex. The intensity is determined by how strong the wheel skid. In order to create this effect, we use a customized shader that uses alpha from each vertex when rendering brake tracks. As with a car, there are a few things that can be changed to make tire tracks better suited to the car you are trying to build.
Maximum tire tracks
The Max Marks variable defines the number of positions for tire tracks that can exist on the scene at any time. All wheels use the same tire marks, so this number is calculated on all wheels. When the tracks reach the maximum number of tires, the first position will be overwritten. Increasing this number will also increase the total length of all parts of the tracks from the tires in the scene.
Tire width
The variable ( Mark Width ) defines the width of the tracks from the tires. It must be adjusted to fit the wheels of the vehicle created. If this is a big truck you are trying to make a very wide skidmark that we need, and if this is a “supersonic car” with ultra-thin tires made for setting a speed record, a very thin skidmark will look more realistic.
Ground displacement
When the grid for tire tracks is created, it will be created using points calculated from the wheels to place the skidmark on the road. These points will most often be straight on the surface during wheel folding. When two grids are immediately on top of each other, this can lead to some flickering in the game.
To prevent this, the variable Ground Offset is introduced. The mesh will be created and lifted the full length of the offset in the direction normal to the surface. So, if some flicker exists or tire tracks intersect with the surface, try increasing the offset. To further ensure that tire tracks remain on the ground, shaders are used for tire tracks, an offset has been created, and assigned to another Rendering queue.
Minimum distance
When a new point is added to the SkidmarkController, it must be at (Min Distance) the minimum distance from the last point of the skidmark (tire tracks) . This guarantees you a productive addition of tire marks to very small areas. Do not set this value too large, although it may make tire tracks too large, and in addition, the increased distance may seem as if they are lagging behind the wheels ie. tire marks appear behind the wheels. Reducing the value will to some extent smooth out the tire tracks , creating the illusion that the tracks are closer to the wheels.
Textures
The textures of tires for wheels from the truck are very different in comparison with the textures of tires on wheels from Formula 1 (Formula-1) . Textures for tire marks (skidmarks) will be created on the surface. If you have created a different type of car with very different wheels, you will need to change this texture if you want the tire tracks to match the wheels.
Adding sounds
• Add the SoundController.js script to the game object “Car” (Drag it from Scripts / JavaScripts / SoundController.js ).
The Sound Controller component has several slots for audio files to which we need to assign different audio files. Audio files are located in the Sound / Car folder in the project window .
Drag:
• Drag and drop CarEngine_D_upper-register to slot D. Set the volume to 0.565.
• Drag and drop CarEngine_E_midlow-register to slot E. Set the volume to 0.8
• CarEngine_F_midhigh-register drag to slot F. Set the volume to 0.78
• Drag CarEngine_K_passing-rush to slot K. Set the volume to 0.565
• CarEngine_L_lower-register drag to slot L. Set the volume to 0.71
• Wind-loop_stereo_22khz_16bit drag to slot Wind . Set the volume to 0.8
• Drag and drop CarEngine_DEFL_tunnel-add_small onto the Tunnel Sound slot . Set the volume to 0.8
• Collision1 drag to the slot Crash Low Speed Sound. Set the volume to 0.8
• Car_crash1_smaller drag to the slot Crash High Speed Sound. Set the volume to 0.5
• Car_skid1 drag to the Skid Sound slot .
• CarTutorialSong drag to the Background Music slot . Set the volume to 1 .
Volume settings , of course, these are just the settings we offer. You can “play” with different values to get the exact sound image that you imagine. Or you could go even further and create your own settings menu for the sound, letting you adjust the volume of the music and effects separately in the game.
Completion and assembly
Finally, drag the following scripts onto the car (Car) game object:
• LightmapperObjectUV.js from (scripts / JavaScripts)
• CrashController.js from (scripts / JavaScripts)
• Generate2DRe fl ection.cs from (scripts / CSharpScripts)
We have one last thing to do before we can try out the game we have just created. The camera must follow the car, otherwise the car will simply get out of sight as soon as we start moving.
• Go to Main_Camera (Main Camera ) and drag it to the “Car” game object and point the camera as you like to control the car (within the “Car Camera” component of the Car Camera ).
Source: https://habr.com/ru/post/247667/
All Articles