Creating a 3D scanner from a webcam, laser, and a handful of radio components
Last year my friend and I were at summer school. It was necessary to make a project on it. After reading two articles about creating 3d scanners ( one , two ), we decided to try our hand at assembling it and, if possible, improve its design. We could not even imagine what would come of it, much less imagine that we would win with him at several science and engineering exhibitions. But in order. Who is interested to know the result, welcome under the cut (many photos).
At first we decided to build a laser range finder. It was made based on an article on the amateur radio forum. Just a laser pointer and a camera. A Java program was written for image processing. For one measurement, two photographs were taken: with a laser and without a laser. After comparing them, we could definitely find a laser point. After it worked, the range finder was installed on a platform that could rotate in two planes. Before I show what happened, you need to be warned - there are not so many materials at summer school, so we collected a prototype from what we had:

')
The camera is visible immediately, and the laser is the brass cylinder above it. To rotate the platform, we used two stepper motors, which in turn were connected to the control board on the Atmega32 microcontroller. The laser was connected to it. The board itself was connected to the computer via a USB-> UART adapter. The program on the computer took pictures, processed them, entered the coordinates of the obtained points into a file and sent commands to the control board.
The result was interesting. Yes, we found the distance. Yes, we could “aim” at any point in the hemisphere above the scanner. And our joy knew no bounds. But when we estimated the scan time of this hemisphere, it turned out to be 48 hours. And it's not in the camera. And not even in Java. And the fact that the installation was so flimsy that it fluctuated after each turn for five seconds. I had to take a measurement, turn around and wait for five seconds until it stops swinging. And in addition, the library for the camera turned it on before each shot and then turned it off. It took 1-2 seconds. But the summer school was ending, and there was no time to redo it: it was already the night before the project was handed over. Or rather morning. The next day we presented our project at a competition before a scientific jury and unexpectedly won. Probably because of this victory, we decided to continue our work on this project.
In fact, the summer is over, and the school year has begun. The desire to work was gone. The installation was planned to be completed by the next competition, which was a whole month before. Month. And then suddenly three days. But for a month we decided to change the installation. To assemble it strong, install a lens on the laser pointer, which will create a laser line. This would allow to scan 720 points at once (there was an HD camera in the scanner). Here are just three days made their adjustments:
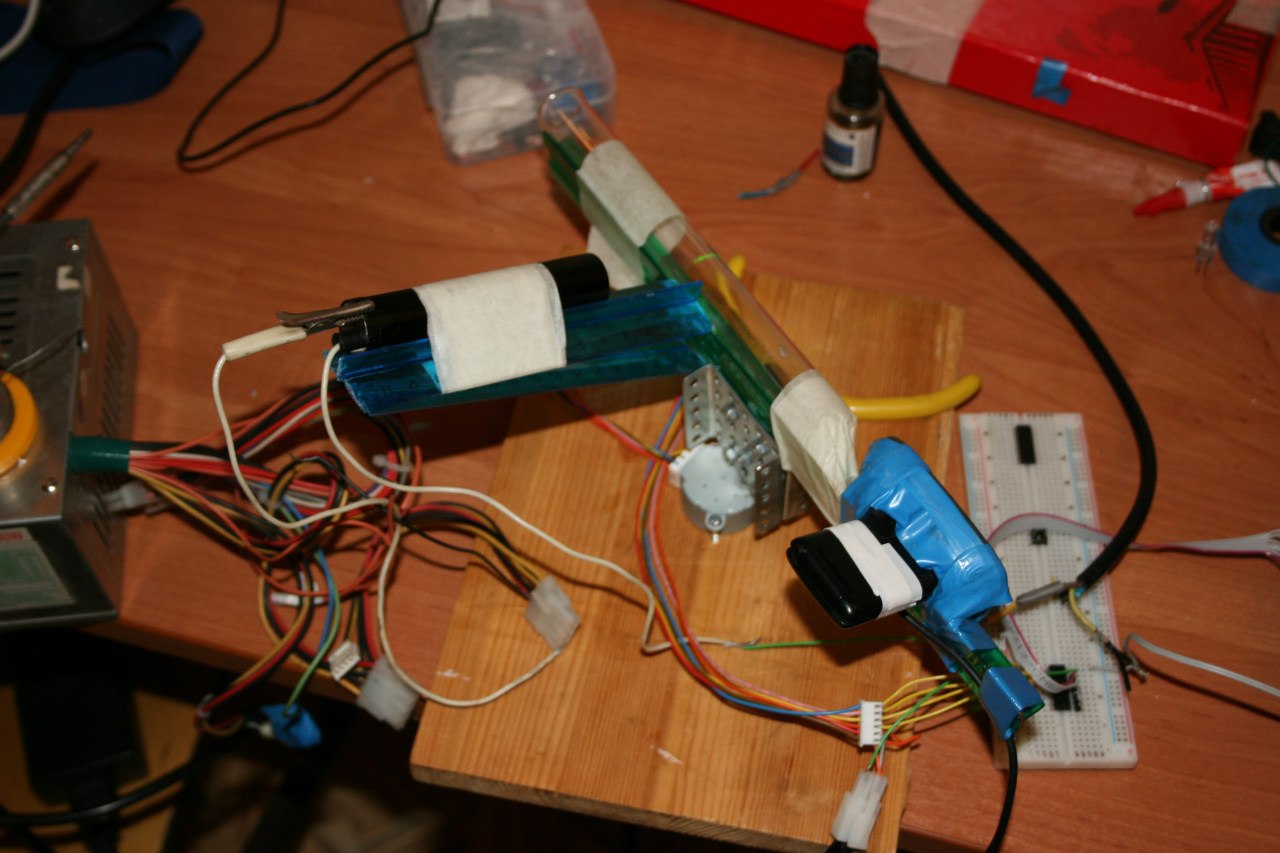
The second scanner is assembled from plastic sight lines, glue, masking tape, and is held only by blue electrical tape. Instead of a lens there is a test tube. A green laser shines on this tube. The reflected beam creates a more or less uniform laser strip on the screen. The range finder is fixed only on one motor, which rotates it in the horizontal plane. The control board was replaced with STM32VLDiscovery. I just know the STM32 better, and even Atmega burned down, and the programmer was lost a long time ago. It does not look very good, but it works! The oscillations decreased, and the speed increased accordingly. But not much. A very interesting catch was discovered here - the Chinese laser pointer did not turn on right away, but gradually increased its power within a second. Thus, a second for oscillations, a second for warming up the laser, a second for a snapshot, and two of them. So we get 4 seconds. But in one measurement we find the distance to 720 points! The scan process looked like this:

And the result is:
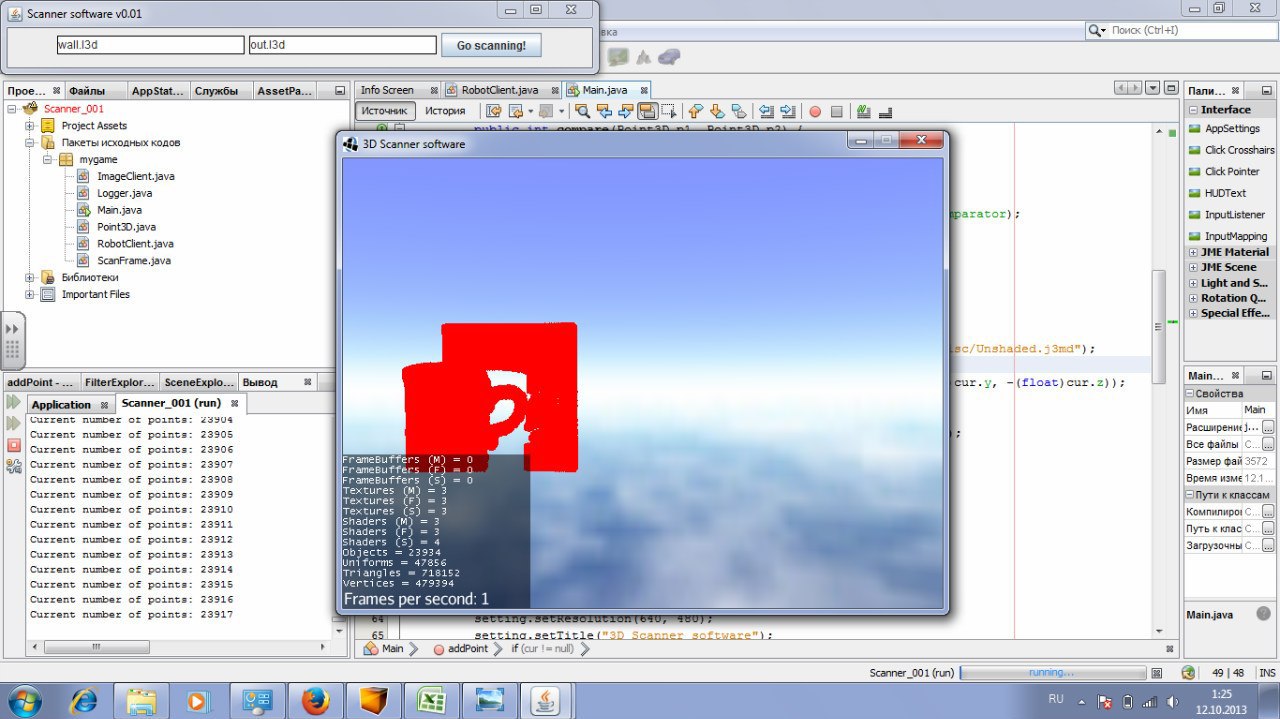
The picture does not look very interesting, but the circle was in the program volume. It was possible to see it from different sides.
And what is the actual competition? But nothing! We finished scanning everything at 4 in the morning, and at 9 in the morning on the stand we found out that the laser burned out. As it turned out, while we were carrying him from the hotel to the stand, it was raining, and when turned on, it burned down. And it looks inoperative in such a way that it is difficult to believe in the words “it worked 5 hours ago”. We were upset. The desire to continue to evaporate with the smoke from the laser. But still it was collected ...
And it was collected again for the competition. And we prepared for it for a long time and thoroughly. More than a week. And here is the result:

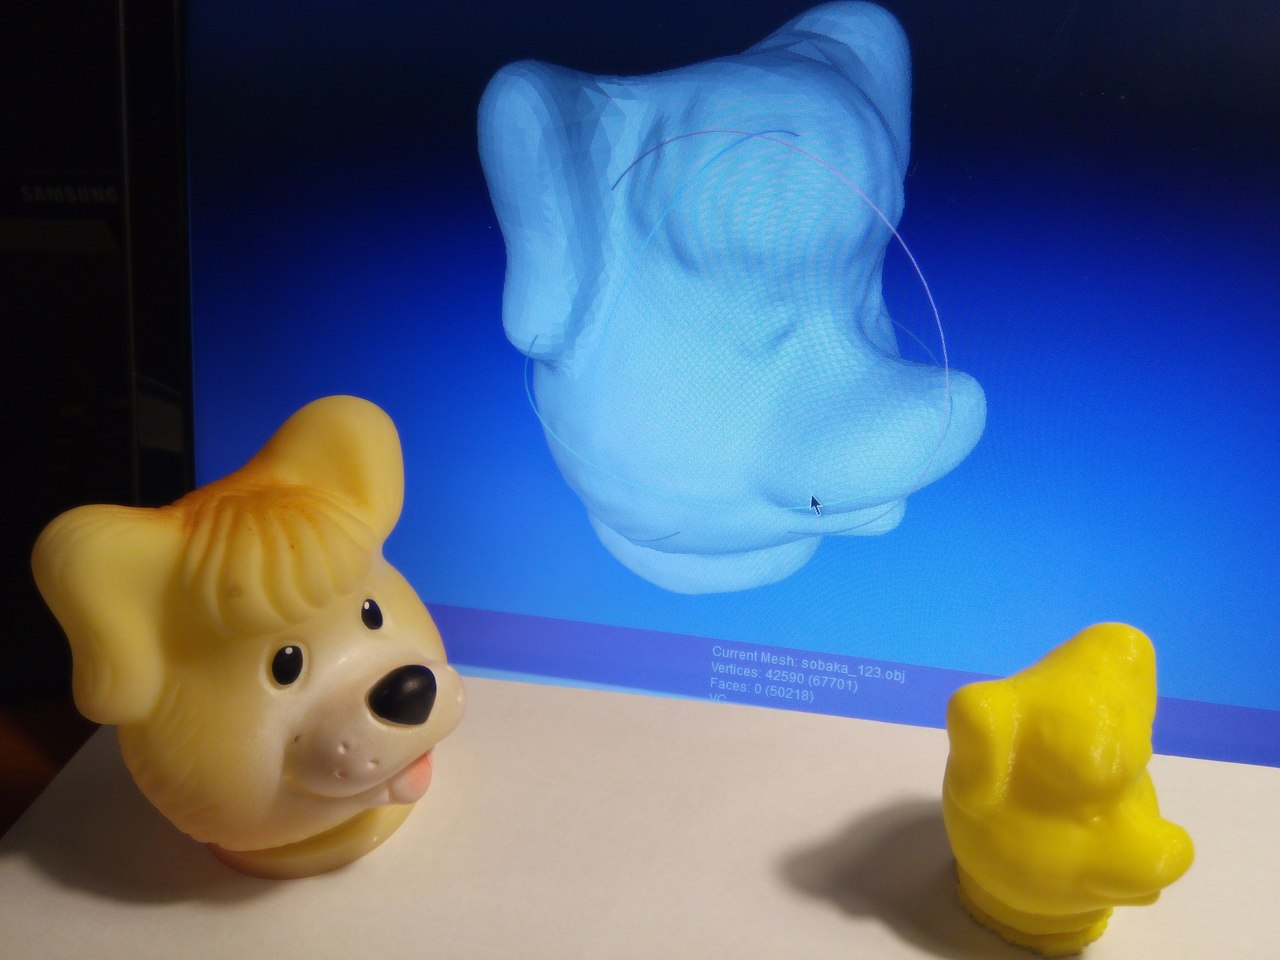
The first thing that catches your eye is that now we are scanning not the area around the scanner, but an object that rotates on the platform. And also we got the right lens, collected everything fine, rewrote the program, and also replaced the debug board with a self-made one. And now we take only one shot per dimension. The laser is powerful enough, and the lens is good enough to uniquely find the laser in the photo. Because of this, we do not wait for the laser to warm up - it is always on. And now the camera is turned on only once. That is, time is spent mostly on the rotation of the platform and image processing. The program added a menu for selecting accuracy. Scanning time - from two to ten minutes. Depending on the chosen accuracy. At maximum accuracy, it turns out that the platform rotates by 0.5 degrees per step, and the distance is determined with an accuracy of 0.33 mm. The platform is driven by a stepper motor through a gearbox. The platform itself is a large disk, and the rubber roller on the motor shaft is small. Motor and laser controlled STM32F050F4 microcontroller through field effect transistors. At the very beginning of the article is a scan of the toy, obtained with the help of this scanner. Since the scanner issues a cloud of dots in the .obj format, after triangulation we can print the scanned object on a 3D printer, which is seen in the same photo. On the screen, we can see the model after triangulation. No manual work was done on the model.
We won the competition. And he gave access to the international competition Intel ISEF. So we started working on the next scanner.

At the moment this is the latest version of the scanner that we have collected. For comparison, on the platform is the second version. We tried to approach the development of the fourth scanner with all the thoroughness with which we could. The installation was drawn in the CAD system, the details were cut out with a laser, everything was painted, nothing superfluous sticks out from the outside. Changes: the platform is now really gear. It is cut from plexiglass and has 652 cloves around the edges. This solves a problem that badly spoiled the scans in the previous scanner: the rubber roller slipped a little, due to which the platform was often not rotated 360 degrees. The scans were either with a “cut out piece” or with an overlap. Here we always knew exactly how the platform was turned. Laser power made adjustable software. Due to this, it was possible to change the laser power on the move, avoiding illumination of unnecessary parts in low light conditions of the room. To control all the electronics, they decided not to make a new board, but simply to use the debugging F401RE-Nucleo. It has an ST-LinkV2.1 installed, which works as a debugger and a USB-> UART adapter.
The accuracy was amazing: Angular resolution of 0.14 degrees. According to the distance of 0.125 mm. The scan area is a cylinder 20 cm high and 30 cm in diameter. The price of all parts and laser cutting at the time of its creation (May 2014) was less than 4,000 rubles.
In the process of use, we only set maximum accuracy once. Scanning lasted 15-20 minutes. Received almost 2 million points. The laptop refused to calculate the model from the point cloud. The experiment is no longer repeated.
In the near future, we plan to resume work on the project, and therefore we will refine the program and the installation. I hope in the near future we will write about the step-by-step assembly, lay out the drawings, programs and everything else. This article does not fit.
Thanks to everyone who read to the end!
UPD:
A colleague found a video about the scanner's work, which we shot at ISEF:
Yes, most of the videos are not interesting, but at the end of the model is on a laptop.
And here are some examples of scanned objects. But they all belong to the third version of the scanner.
Dropbox
In the file model.obj you can clearly see what happens when this rubber roller on the motor slips - the dog has three eyes. Scanning stopped, which made the cut. All files are point clouds. You can open it with MeshLab. Models are not handled. Fully raw data. From above you can see "white spots" - areas without points. The camera does not see them. Also white spots can be seen in other places. They appear either on too dark areas, or when overlapping surfaces. For example, in the stn_10.obj file, the goat horns overlap each other, due to which the inner surface of the horns was not scanned.

First prototype
At first we decided to build a laser range finder. It was made based on an article on the amateur radio forum. Just a laser pointer and a camera. A Java program was written for image processing. For one measurement, two photographs were taken: with a laser and without a laser. After comparing them, we could definitely find a laser point. After it worked, the range finder was installed on a platform that could rotate in two planes. Before I show what happened, you need to be warned - there are not so many materials at summer school, so we collected a prototype from what we had:

')
The camera is visible immediately, and the laser is the brass cylinder above it. To rotate the platform, we used two stepper motors, which in turn were connected to the control board on the Atmega32 microcontroller. The laser was connected to it. The board itself was connected to the computer via a USB-> UART adapter. The program on the computer took pictures, processed them, entered the coordinates of the obtained points into a file and sent commands to the control board.
The result was interesting. Yes, we found the distance. Yes, we could “aim” at any point in the hemisphere above the scanner. And our joy knew no bounds. But when we estimated the scan time of this hemisphere, it turned out to be 48 hours. And it's not in the camera. And not even in Java. And the fact that the installation was so flimsy that it fluctuated after each turn for five seconds. I had to take a measurement, turn around and wait for five seconds until it stops swinging. And in addition, the library for the camera turned it on before each shot and then turned it off. It took 1-2 seconds. But the summer school was ending, and there was no time to redo it: it was already the night before the project was handed over. Or rather morning. The next day we presented our project at a competition before a scientific jury and unexpectedly won. Probably because of this victory, we decided to continue our work on this project.
Version two
In fact, the summer is over, and the school year has begun. The desire to work was gone. The installation was planned to be completed by the next competition, which was a whole month before. Month. And then suddenly three days. But for a month we decided to change the installation. To assemble it strong, install a lens on the laser pointer, which will create a laser line. This would allow to scan 720 points at once (there was an HD camera in the scanner). Here are just three days made their adjustments:

The second scanner is assembled from plastic sight lines, glue, masking tape, and is held only by blue electrical tape. Instead of a lens there is a test tube. A green laser shines on this tube. The reflected beam creates a more or less uniform laser strip on the screen. The range finder is fixed only on one motor, which rotates it in the horizontal plane. The control board was replaced with STM32VLDiscovery. I just know the STM32 better, and even Atmega burned down, and the programmer was lost a long time ago. It does not look very good, but it works! The oscillations decreased, and the speed increased accordingly. But not much. A very interesting catch was discovered here - the Chinese laser pointer did not turn on right away, but gradually increased its power within a second. Thus, a second for oscillations, a second for warming up the laser, a second for a snapshot, and two of them. So we get 4 seconds. But in one measurement we find the distance to 720 points! The scan process looked like this:

And the result is:

The picture does not look very interesting, but the circle was in the program volume. It was possible to see it from different sides.
And what is the actual competition? But nothing! We finished scanning everything at 4 in the morning, and at 9 in the morning on the stand we found out that the laser burned out. As it turned out, while we were carrying him from the hotel to the stand, it was raining, and when turned on, it burned down. And it looks inoperative in such a way that it is difficult to believe in the words “it worked 5 hours ago”. We were upset. The desire to continue to evaporate with the smoke from the laser. But still it was collected ...
Third version
And it was collected again for the competition. And we prepared for it for a long time and thoroughly. More than a week. And here is the result:

The first thing that catches your eye is that now we are scanning not the area around the scanner, but an object that rotates on the platform. And also we got the right lens, collected everything fine, rewrote the program, and also replaced the debug board with a self-made one. And now we take only one shot per dimension. The laser is powerful enough, and the lens is good enough to uniquely find the laser in the photo. Because of this, we do not wait for the laser to warm up - it is always on. And now the camera is turned on only once. That is, time is spent mostly on the rotation of the platform and image processing. The program added a menu for selecting accuracy. Scanning time - from two to ten minutes. Depending on the chosen accuracy. At maximum accuracy, it turns out that the platform rotates by 0.5 degrees per step, and the distance is determined with an accuracy of 0.33 mm. The platform is driven by a stepper motor through a gearbox. The platform itself is a large disk, and the rubber roller on the motor shaft is small. Motor and laser controlled STM32F050F4 microcontroller through field effect transistors. At the very beginning of the article is a scan of the toy, obtained with the help of this scanner. Since the scanner issues a cloud of dots in the .obj format, after triangulation we can print the scanned object on a 3D printer, which is seen in the same photo. On the screen, we can see the model after triangulation. No manual work was done on the model.
We won the competition. And he gave access to the international competition Intel ISEF. So we started working on the next scanner.
Fourth version

At the moment this is the latest version of the scanner that we have collected. For comparison, on the platform is the second version. We tried to approach the development of the fourth scanner with all the thoroughness with which we could. The installation was drawn in the CAD system, the details were cut out with a laser, everything was painted, nothing superfluous sticks out from the outside. Changes: the platform is now really gear. It is cut from plexiglass and has 652 cloves around the edges. This solves a problem that badly spoiled the scans in the previous scanner: the rubber roller slipped a little, due to which the platform was often not rotated 360 degrees. The scans were either with a “cut out piece” or with an overlap. Here we always knew exactly how the platform was turned. Laser power made adjustable software. Due to this, it was possible to change the laser power on the move, avoiding illumination of unnecessary parts in low light conditions of the room. To control all the electronics, they decided not to make a new board, but simply to use the debugging F401RE-Nucleo. It has an ST-LinkV2.1 installed, which works as a debugger and a USB-> UART adapter.
The accuracy was amazing: Angular resolution of 0.14 degrees. According to the distance of 0.125 mm. The scan area is a cylinder 20 cm high and 30 cm in diameter. The price of all parts and laser cutting at the time of its creation (May 2014) was less than 4,000 rubles.
In the process of use, we only set maximum accuracy once. Scanning lasted 15-20 minutes. Received almost 2 million points. The laptop refused to calculate the model from the point cloud. The experiment is no longer repeated.
Conclusion
In the near future, we plan to resume work on the project, and therefore we will refine the program and the installation. I hope in the near future we will write about the step-by-step assembly, lay out the drawings, programs and everything else. This article does not fit.
Thanks to everyone who read to the end!
UPD:
A colleague found a video about the scanner's work, which we shot at ISEF:
Yes, most of the videos are not interesting, but at the end of the model is on a laptop.
And here are some examples of scanned objects. But they all belong to the third version of the scanner.
Dropbox
In the file model.obj you can clearly see what happens when this rubber roller on the motor slips - the dog has three eyes. Scanning stopped, which made the cut. All files are point clouds. You can open it with MeshLab. Models are not handled. Fully raw data. From above you can see "white spots" - areas without points. The camera does not see them. Also white spots can be seen in other places. They appear either on too dark areas, or when overlapping surfaces. For example, in the stn_10.obj file, the goat horns overlap each other, due to which the inner surface of the horns was not scanned.
Source: https://habr.com/ru/post/247423/
All Articles