Turn the Arduino into a full-fledged AVRISP programmer
I welcome all users of Habr , in particular those who suffer from the Arduino theme, as I do.
I have long been asked - is it possible to flash hex files with Arduino? Change fyuzy? Read firmware? And all that ... The answer is - it is possible, and today I will tell you how I do it.
')
(This video duplicates the information below)
Arduino is like a great start for a beginner, but you need to grow further, the world of microcontrollers is great and gives great opportunities, but, alas, the Arduino is a fairly narrow profile.
A little background:
One fine day, I came across a great project on ATtiny13, but alas, the author uploaded only a hex file and a scheme to the network, and of course, I could not try it in hardware. I was tormented by this question more and more, and then I accidentally stumbled upon one video on the network, where the author claimed that he, with the help of Arduino, flashed another microcontroller, having only a hex-file, and the scheme itself. It was he who suggested to me - use SinaProg, but with Arduino files ...
Going on SinaProg, I downloaded SinaProg 2.1.1.RUS , but he refused to work with Arduino, because I threw a couple of files from the Arduino IDE into the SinaProg 2.1.1 \ data \ folder and it all worked.
Let's go briefly on the possibilities of the software:

In the Hex-file block, select hex or eep (the first is the firmware, the second is the contents of the non-volatile memory).
And the part where the ">" button, we can see all sorts of messages, like "OK", or "ERROR", the button ">" itself opens the Avrdude logs.
In the flash block there are buttons:
Program - write the hex file to the microcontroller (possible when Hex-file is selected);
Verify - check the firmware, which is in the microcontroller, and the hex-file (in other words, their comparison), if everything is normal - the program says OK;
Read - read the hex file.
With the EEPROM block, everything is analogous.
Next, the Device block, here you can select the desired microcontroller, here is the entire list of supported (list ripped from the Device.txt file, which lies in the SinaProg 2.1.1 \ data \ folder):
Here they are a pair of three
Joke, how many of them:
AT90CAN128
AT90CAN32
AT90CAN64
AT90PWM2
AT90PWM2B
AT90PWM3
AT90PWM3B
AT90USB1286
AT90USB1287
AT90USB162
AT90USB646
AT90USB647
AT90USB82
AT90s1200
AT90s2313
AT90s2323
AT90s2333
AT90s2343
AT90s4414
AT90s4433
AT90s4434
AT90s8515
AT90s8535
ATmega103
ATmega128
ATmega1280
ATmega1281
ATmega1284P
ATmega128RFA1
ATmega16
ATmega161
ATmega162
ATmega163
ATmega164P
ATmega168
ATmega169
ATmega2560
ATmega2561
ATmega32
ATmega324P
ATmega325
ATmega3250
ATmega328P
ATmega329
ATmega3290
ATmega3290P
ATmega329P
ATmega48
ATmega64
ATmega640
ATmega644
ATmega644P
ATmega645
ATmega6450
ATmega649
ATmega6490
ATmega8
ATmega8515
ATmega8535
ATmega88
ATtiny11
ATtiny12
ATtiny13
ATtiny15
ATtiny22 2343
ATtiny2313
ATtiny24
ATtiny25
ATtiny26
ATtiny261
ATtiny44
ATtiny45
ATtiny461
ATtiny84
ATtiny85
ATtiny861
ATtiny88
ATxmega64A1
ATxmega128A1
ATxmega128A1D
ATxmega192A1
ATxmega256A1
ATxmega64A3
ATxmega128A3
ATxmega192A3
ATxmega256A3
ATxmega256A3B
ATxmega16A4
ATxmega32A4
ATxmega64A4
ATxmega128A4
As you can see, there are all popular ATmel microcontrollers, in particular ATmega328P, ATmega8, ATtiny13, ATtiny2313 and all other ...
Next - the Search button, if you press it, the program will try to read the signatures of the microcontroller that is connected to the programmer, in other words, it will look for the microcontroller. Then he can answer “OK” or “ERROR” in the information block, if everything is normal or not, respectively.
In the Fuses block, there are presets for ATmega8 to work at different frequencies, but, alas, only for ATmega8 and ATmega32, you can add in the Fuse.txt file (which lies in the SinaProg 2.1.1 \ data \ folder).
There is a Program button - to record presets, we look at the paragraph above.
As well as Advanced - a dashing button, after pressing it you can see the following window:
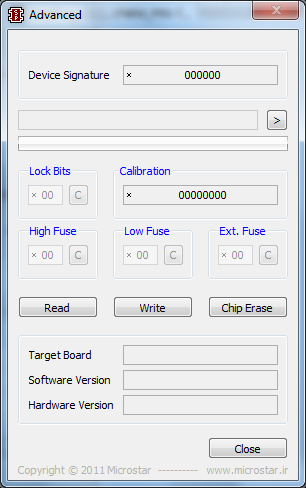
Device signature - some tsiferki, I understand this is the identifier of the microcontroller, according to them the program identifies what kind of microcontroller we are suing.
Information part, all as above.
Just below are the fyuzy ... if you already combed, do not forget to first read them with the Read button (so as not to change important fusions on purpose, for example, "SPIEN" or "RSTDSBL" ), write the fyus - Write button, Chip Erase button erases the microcontroller, something about reminds - formatting a flash drive on a computer (but fuses are not installed by default, so don't forget about it).
A few words about fusion bits are such as fine adjustments of the microcontroller, then the frequency is raised, then reduced, then on / off clocking from the internal RC chain, something else ... well, you can climb there only as a last resort, otherwise you can block a microcontroller (to cheat so that it stops working, seriously), and without the Atmega fusebit doctor anyway .
Here is the first link from Google for the query "fyuzov calculator", but I warn you, poking something there, not knowing why, and then writing it into the microcontroller will not lead to anything good, I know.
Further, some kind of information block, did not delve too much. Well, the exit button, I think you already guessed it, even if you do not know English.
So, the last block of the main window of the program - Programmer , then the type of programmer is selected, if you use Arduino as a programmer - put everything, as I have on the screen, just not COM19, I have it, you will probably have another one In any case, not exactly COM1, the first is the system one, relevant only for programmers that connect to the real COM port, for example, the Gromov Programmer . There may not be a COM port on the laptop, but on computers, as a rule, there is still a COM port, especially those that are older. You can use another programmer, for example, USBASP , just don’t forget to select it in the list, I set the speed for it to be the same as in the case of AVRISP.
List of supported programmers:
Not enough to be
Gromov
USBtiny
Alf
Arduino
AT ISP
AVR109
AVR910
AVR911
AVRISP
AVRISP 2
AVRISP mkII
AVRISP v2
Bascom
Blaster
BSD
Butterfly
C2N232I
DAPA
DASA
DASA 3
Dragon_dw
Dragon_HVSP
Dragon_isp
Dragon_JTAG
Dragon_PP
DT006
ERE-ISP-AVR
Frank-STK200
Futurlec
JTAG 1
JTAG 1Slow
JTAG 2Slow
JTAG 2
JTAG 2Fast
JTAG 2ISP
JTAG 2dW
JTAG mkI
JTAG mkII
MIB510
pAVR
Picoweb
Pony-STK200
ponyser
SI Prog
SP12
STK200
STK500
STK500 HVSP
STK500 PP
STK500 v1
STK500 v2
STK600
STK600 HVSP
STK600 PP
USBasp
Xil
Personally, I tested only on AVRISP programmers (Arduino with ArduinoISP stitched sketch) and USBasp, on two microcontrollers - ATmega8 and ATtiny13.
In order to be able to sew / read / change fyyuz / kill the microcontroller with the help of Arduino, you first need to sew up the sketch ArduinoISP, connecting everything, as I wrote, for example here:
ATtiny13 firmware and programming with Arduino .
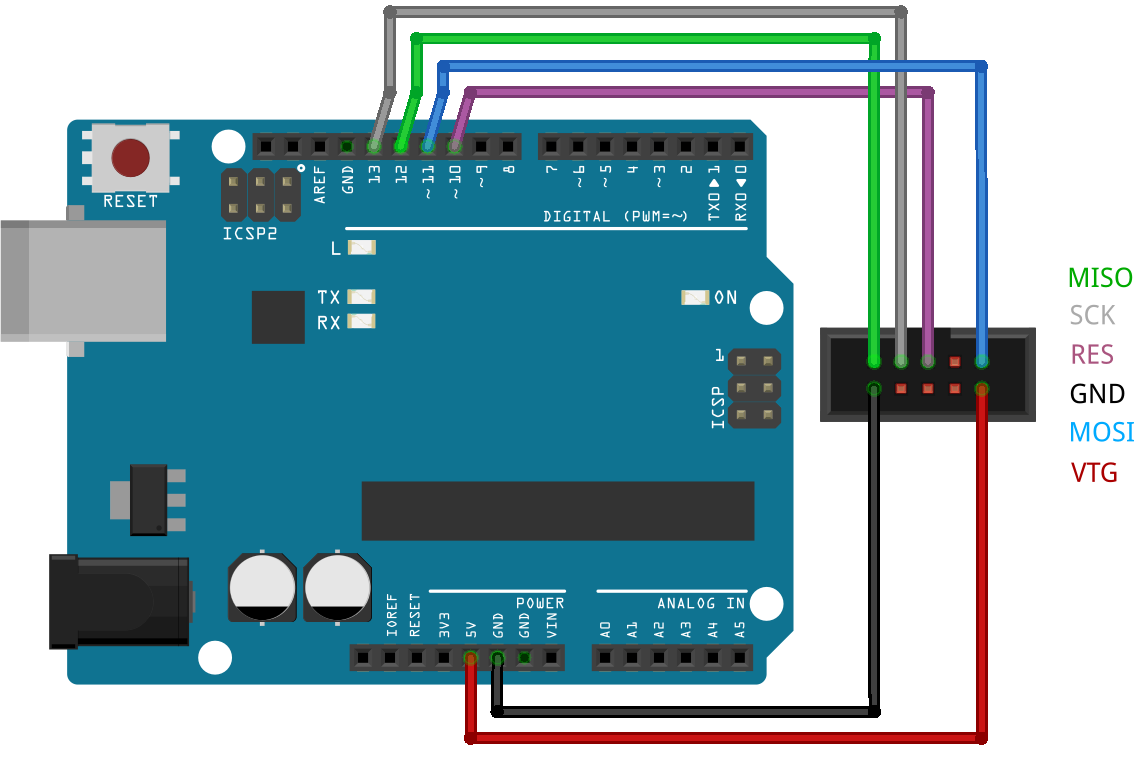
In a nutshell, we connect the pins Reset, MOSI, MISO, SCK of the microcontroller, which we will flash / read the firmware / change the fyuza as indicated in the sketch in the comments, namely:
... // pin name: not-mega: mega(1280 and 2560) // slave reset: 10: 53 // MOSI: 11: 51 // MISO: 12: 50 // SCK: 13: 52 ... Here is an example of connecting to the ATmega8 arduine:
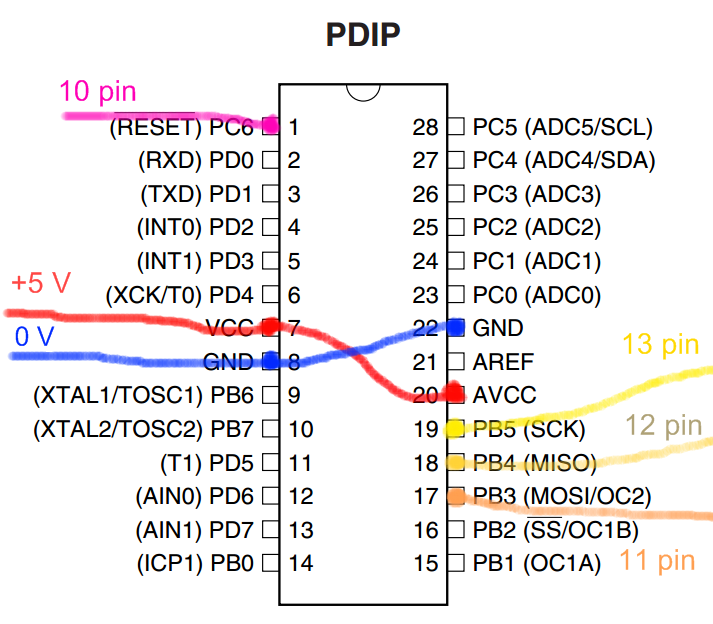
Well, by analogy ... We are looking for a map of pins, for example, in the datasheet (technical documentation on the MK) of the microcontroller we are interested in, here, for example, the first link from Google for the request “ATmega8 pdf”.
Well, I will not torment more, here is a link to the program with files from the Arduino IDE .
Link to the thread on the Russian-language forum Arduino ;
Fyuzov calculator ;
ATtiny13 firmware and programming with Arduino ;
All my publications .
PS I had such that ATtiny13 stopped flashing, trying to program it, after I tried to run it at a frequency of 128 kHz, I dug out somewhere, such a slightly modified ArduinoISP code that causes the firmware / change of fuses to go slower once and maybe even some kind of magic, did not understand, honestly.
Source: https://habr.com/ru/post/247329/
All Articles