The Art of Virtual Conducting OpenStack: Working with Heat

In the previous article, we described the basic principles of working with API and console utilities that control the individual components of the Openstack platform (nova, cinder, glance, neutron). Today we will look at how you can build a ready-made infrastructure from virtual devices using the Heat orchestration module.
To work with Heat, you need the python-heat package, which is present in the repositories of most modern distributions. If you read our previous article, then most likely you have already installed it along with the rest of the Openstack console management utilities. If not, it can be installed from the PyPI repository using the PIP utility. All installation instructions can be found on the Access tab in the control panel.
')
Basic concepts
Before we start talking about specific practical aspects of working with Heat, we will clarify the meaning of the basic concepts - “stack” and “pattern”.
A stack is a collection of cloud resources (machines, logical volumes, networks, etc.) that are combined into an integral structure.
A template is a stack description. Usually it is presented as a text file in a special format. The template contains a description of resources and their relationships. At the same time, resources can be described in any order: the stack is built automatically. The stacks created earlier can be used as a resource for description in other templates, which allows you to create so-called nested stacks.
The structure of templates and the rules of their writing, we consider a practical example. We will create a stack consisting of two servers, a local network and a router, through which the output to an open network will be performed.
Template Formats
Templates can be presented in several formats. We will use the HOT format. It was created specifically for the project Heat and has a fairly simple and understandable syntax. The format is based on YAML, so when editing text it is important to monitor the use of spaces in the indents and their hierarchy.
CFN (AWS CloudFormation) is also supported for compatibility with templates used in Amazon EC2.
Template structure
We will create the stack using the following template
heat_template_version: 2013-05-23 description: Basic template of two servers, one network and one router parameters: key_name: type: string description: Name of keypair to assign to servers for ssh authentication public_net_id: type: string description: UUID of public network to outer world server_flavor: type: string description: UUID of virtual hardware configurations that are called flavors in openstack private_net_name: type: string description: Name of private network (L2 level) private_subnet_name: type: string description: Name of private network subnet (L3 level) router_name: type: string description: Name of router that connects private and public networks server1_name: type: string description: Custom name of server1 virtual machine server2_name: type: string description: Custom name of server2 virtual machine image_centos7: type: string description: UUID of glance image with centos 7 distro image_debian7: type: string description: UUID of glance image with debian 7 distro resources: private_net: type: OS::Neutron::Net properties: name: { get_param: private_net_name } private_subnet: type: OS::Neutron::Subnet properties: name: { get_param: private_subnet_name } network_id: { get_resource: private_net } allocation_pools: - start: "192.168.0.10" end: "192.168.0.254" cidr: "192.168.0.0/24" enable_dhcp: True gateway_ip: "192.168.0.1" router: type: OS::Neutron::Router properties: name: { get_param: router_name } external_gateway_info: { "enable_snat": True, "network": { get_param: public_net_id }} router_interface: type: OS::Neutron::RouterInterface properties: router_id: { get_resource: router } subnet_id: { get_resource: private_subnet } server1: type: OS::Nova::Server properties: name: { get_param: server1_name } block_device_mapping: - volume_size: 5 volume_id: { get_resource: "server1_disk" } device_name: "/dev/vda" config_drive: "False" flavor: { get_param: server_flavor } image: { get_param: image_centos7 } key_name: { get_param: key_name } networks: - port: { get_resource: server1_port } server1_disk: type: OS::Cinder::Volume properties: name: server1_disk image: { get_param: image_centos7 } size: 5 server1_port: type: OS::Neutron::Port properties: network_id: { get_resource: private_net } fixed_ips: - subnet_id: { get_resource: private_subnet } server1_floating_ip: type: OS::Neutron::FloatingIP properties: floating_network_id: { get_param: public_net_id } port_id: { get_resource: server1_port } depends_on: router_interface server2: type: OS::Nova::Server properties: name: { get_param: server2_name } block_device_mapping: - volume_size: 5 volume_id: { get_resource: "server2_disk" } device_name: "/dev/vda" config_drive: "False" flavor: { get_param: server_flavor } image: { get_param: image_debian7 } key_name: { get_param: key_name } networks: - port: { get_resource: server2_port } server2_disk: type: OS::Cinder::Volume properties: name: server2_disk image: { get_param: image_debian7 } size: 5 server2_port: type: OS::Neutron::Port properties: network_id: { get_resource: private_net } fixed_ips: - subnet_id: { get_resource: private_subnet } outputs: server1_private_ip: description: private ip within local subnet of server1 with installed Centos 7 distro value: { get_attr: [ server1_port, fixed_ips, 0, ip_address ] } server1_public_ip: description: floating_ip that is assigned to server1 server value: { get_attr: [ server1_floating_ip, floating_ip_address ] } server2_private_ip: description: private ip within local subnet of server2 with installed Debian 7 distro value: { get_attr: [ server2, first_address ] } Consider its structure in more detail.
The template consists of several blocks. The first one indicates the version of the template and the description format used. Each new release of the openstack platform maintains its own set of properties and attributes, which is gradually changing. In the examples we give, the 2013-05-23 version is used. It supports all features implemented with the release of the Icehouse release. The second block provides a general description of the template and its purpose.
heat_template_version: 2013-05-23 description: > Basic template of two servers, one network and one router Parameter block
parameters: key_name: type: string description: Name of keypair to assign to servers for ssh authentication public_net_id: type: string description: UUID of public network to outer world default: 98863f6c-638e-4b48-a377-01f0e86f34ae server_flavor: type: string description: UUID of virtual hardware configurations that are called flavors in openstack private_net_name: type: string description: The Name of private network (L2 level) private_subnet_name: type: string description: the Name of private subnet (L3 level) router_name: type: string description: The Name of router that connects private and public networks server1_name: type: string description: Custom name of server1 virtual machine server2_name: type: string description: Custom name of server2 virtual machine image_centos7: type: string description: UUID of glance image with centos 7 distro image_debian7: type: string description: UUID of glance image with debian 7 distro Then we list some additional parameters that will be passed to Heat when creating the stack. The key_name parameter specifies a pair of keys to connect to the created server via ssh. And in the server_flavor and public_net_id parameters are the identifiers (UUID) of the “hardware” configuration of the virtual machine and the public network. Here we specify arbitrary names for new devices and machines.
Resource block
resources: private_net: type: OS::Neutron::Net properties: name: { get_param: private_net_name } private_subnet: type: OS::Neutron::Subnet properties: name: { get_param: private_subnet_name } network_id: { get_resource: private_net } allocation_pools: - start: "192.168.0.10" end: "192.168.0.254" cidr: "192.168.0.0/24" enable_dhcp: True gateway_ip: "192.168.0.1" router: type: OS::Neutron::Router properties: name: { get_param: router_name } external_gateway_info: { "enable_snat": True, "network": { get_param: public_net_id}} router_interface: type: OS::Neutron::RouterInterface properties: router_id: { get_resource: router } subnet_id: { get_resource: private_subnet } server1: type: OS::Nova::Server properties: name: { get_param: server1_name } block_device_mapping: - volume_size: 5 volume_id: { get_resource: "server1_disk" } device_name: "/dev/vda" config_drive: "False" flavor: { get_param: server_flavor } image: { get_param: image_server1 } key_name: { get_param: key_name } networks: - port: { get_resource: server1_port } server1_disk: type: OS::Cinder::Volume properties: name: server1_disk image: { get_param: image_server1 } size: 5 server1_port: type: OS::Neutron::Port properties: network_id: { get_resource: private_net } fixed_ips: - subnet_id: { get_resource: private_subnet } server1_floating_ip: type: OS::Neutron::FloatingIP properties: floating_network_id: { get_param: public_net_id } port_id: { get_resource: server1_port } depends_on: router_interface server2: type: OS::Nova::Server properties: name: { get_param: server2_name } block_device_mapping: - volume_size: 5 volume_id: { get_resource: "server2_disk" } device_name: "/dev/vda" config_drive: "False" flavor: { get_param: server_flavor } image: { get_param: image_server2 } key_name: { get_param: key_name } networks: - port: { get_resource: server2_port } server2_disk: type: OS::Cinder::Volume properties: name: server2_disk image: { get_param: image_server2 } size: 5 server2_port: type: OS::Neutron::Port properties: network_id: { get_resource: private_net } fixed_ips: - subnet_id: { get_resource: private_subnet } The next block describes the created resources: networks, router, servers and others. In this part of the template, we describe the general local area network (private_net) and its subnet, for which the range of addresses used is indicated and DHCP support is enabled.
The next stage is the creation of a router and an interface on it. Through this interface, the router connects to the created local network. Then the servers are listed. Each server should have a port and a disk. For the first server, in contrast to the second, a floating IP address is also specified (floating_ip), with which the external address from the public network can be associated with the gray address from the local one.
server1_floating_ip: type: OS::Neutron::FloatingIP properties: floating_network_id: { get_param: public_net_id } port_id: { get_resource: server1_port } depends_on: router_interface Pay attention to how parameters and resources are used when describing new devices. Above, we have provided a fragment of the description of the floating IP address resource for the first server. In its properties, we need to specify the public network UUID, from where it will take a floating IP address (floating_network_id) and a server port UUID (port_id), with which this address will be associated. In the get_param function, we indicate that the value should be taken from the public_net_id parameter (we will describe how to use the parameters below). Port Id of the first server yet; it will appear only after the server is created. The get_resource function just indicates that immediately after creating the server1_port resource, its value should be used as the UUID for the port_id.
Resource DELETE failed: Conflict: Router interface for subnet 8958ffad-7622-4d98-9fd9-6f4423937b59 on router 7ee9754b-beba-4301-9bdd-166117c5e5a6 cannot be deleted, as it is required by one or more floating IPs. According to this message, the router cannot be removed, because floating IP addresses are attached to the network associated with this router. It is expected that when you remove the stack, you must first remove the floating IP-addresses, and then the router and its associated network. The problem is that all the resources of the components neutron, cinder, nova, glance are independent of each other entities, between which relationships and relationships are established.
In most cases, Heat determines the desired order of creating resources and building relationships between them when creating a stack. When removing a stack, these links will also be taken into account: they will determine the order in which resources are deleted. But sometimes, as in the example above, errors occur. Using the depends_on directive, we explicitly stated that the floating IP address is associated with the router and the interface on it. Thanks to this connection, now the IP address will be created after the router is created and the interface on it. When deleting, everything will happen in reverse order: first, the floating IP address will be deleted, and then the router and its interface.
In the last section of the template, we describe the virtual device parameters we need to get their values after the stack has been created.
Output block
outputs: server1_private_ip: description: private ip address within local subnet of server 1 with installed Centos7 distro value: { get_attr: [ server1_port, fixed_ips, 0, ip_address]} server1_public_ip: description: floating ip that is assigned to server1 server value: { get_attr: [ server1_floating_ip, floating_ip_address ]} server2_private_ip: description: private ip address within local subnet of server2 with installed Debian7 distro value: { get_attr: [ server2, first_address ]} In the above fragment, we indicate that we want to obtain the following values for the resources created during the assembly process: the address of the first server in the local network, the public address of the first server (floating IP address) and the address of the second server in the local network. For each parameter we specified its short description and the requested value. To do this, we use the function get_attr, which requires two values, where the first is the name of the resource, the second is its attributes.
Pay attention to the different ways of obtaining the address in the local network from the first and second servers. Both options are valid and equivalent. The difference is that in the first case the Neutron component is accessed (if you remember, the server1_port type is “OS :: Neutron :: Port”) and the first IP address is taken from the fixed_ips attribute. In the second case, which is often mentioned in the examples of templates on the network, the nova component is accessed (the server2 resource is of the type “OS :: Nova :: Server”) and the first_address attribute.
Such components of the Openstack platform as Neutron and Cinder appeared later than Nova. Therefore, Nova used to be used for a much larger number of functions, including for managing disks and networks. With the full development of Neutron and Cinder, this need was no longer necessary, but was left for compatibility. The Nova policy is gradually being revised, and some functions are eventually declared obsolete. It is possible that the first_address attribute will not be supported soon.
value: { get_attr: [ server1_port, fixed_ips, 0, ip_address]} value: { get_attr: [ server2, first_address ]} For more information about the templates and the rules for their preparation can be found in the official manual .
Stack creation
Having prepared the template, check it for syntax errors and for compliance with the standard:
$ heat template-validate -f publication.yml If the template is correct, the output will be presented in JSON format.
{ "Description": "Basic template of two servers, one network and one router\n", "Parameters": { "server2_name": { "NoEcho": "false", "Type": "String", "Description": "", "Label": "server2_name" }, "private_subnet_name": { "NoEcho": "false", "Type": "String", "Description": "the Name of private subnet", "Label": "private_subnet_name" }, "key_name": { "NoEcho": "false", ... Then proceed directly to creating the stack:
$ heat stack-create TESTA -f testa.yml -P key_name="testa" \ -P public_net_id="ab2264dd-bde8-4a97-b0da-5fea63191019" \ -P server_flavor="1406718579611-8007733592" \ -P private_net_name=localnet -P private_subnet_name="192.168.0.0/24" \ -P router_name=router -P server1_name=Centos7 -P server2_name=Debian7 \ -P image_server1="CentOS 7 64-bit" \ -P image_server2="ba78ce9b-f800-4fb2-ad85-a68ca0f19cb8" It is inconvenient to manually transfer the parameters to the Heat client each time: you can easily make a mistake. To avoid this drawback, we will create an additional file that repeats the format of the main template, but contains only the most basic parameters.
parameters: key_name: testa public_net_id: ab2264dd-bde8-4a97-b0da-5fea63191019 server_flavor: myflavor private_net_name: localnet private_subnet_name: 192.168.0.0/24 router_name: router server1_name: Centos7 server2_name: Debian7 image_server1: CentOS 7 64-bit image_server2: ba78ce9b-f800-4fb2-ad85-a68ca0f19cb8 In this case, creating a stack using the console utility Heat will be simplified.

To find out the necessary values of the parameters passed to Heat, we can use the standard set of utilities for working with Openstack. For example, to find the public network identifier public_net_id, you can use Neutron:

To find out the server_flavor and image_server1 name or identifier, image_server2 you can use the corresponding utilities in the same way.
Stack operations
After creating the stack, you need to make sure that everything went without errors, and also to find out which IP addresses were assigned to the servers (first of all, the public IP of the first server).
A list of all created stacks can be obtained using the heat-list command. Her output will include information about the status of each stack:

The cause of the creation error can be obtained from general information about the stack. As can be seen from the output, we incorrectly specified the UUID of the local network to which the port of the server we are creating should be connected - because of this, an error occurred. Also, errors often occur due to the lack of free resources (limits for the number of used cores, RAM, and others are set for each project).
Spoiler
If the stack was created successfully, then in the general output of the stack-show command, the outputs section will also appear, containing the values of interest.
Spoiler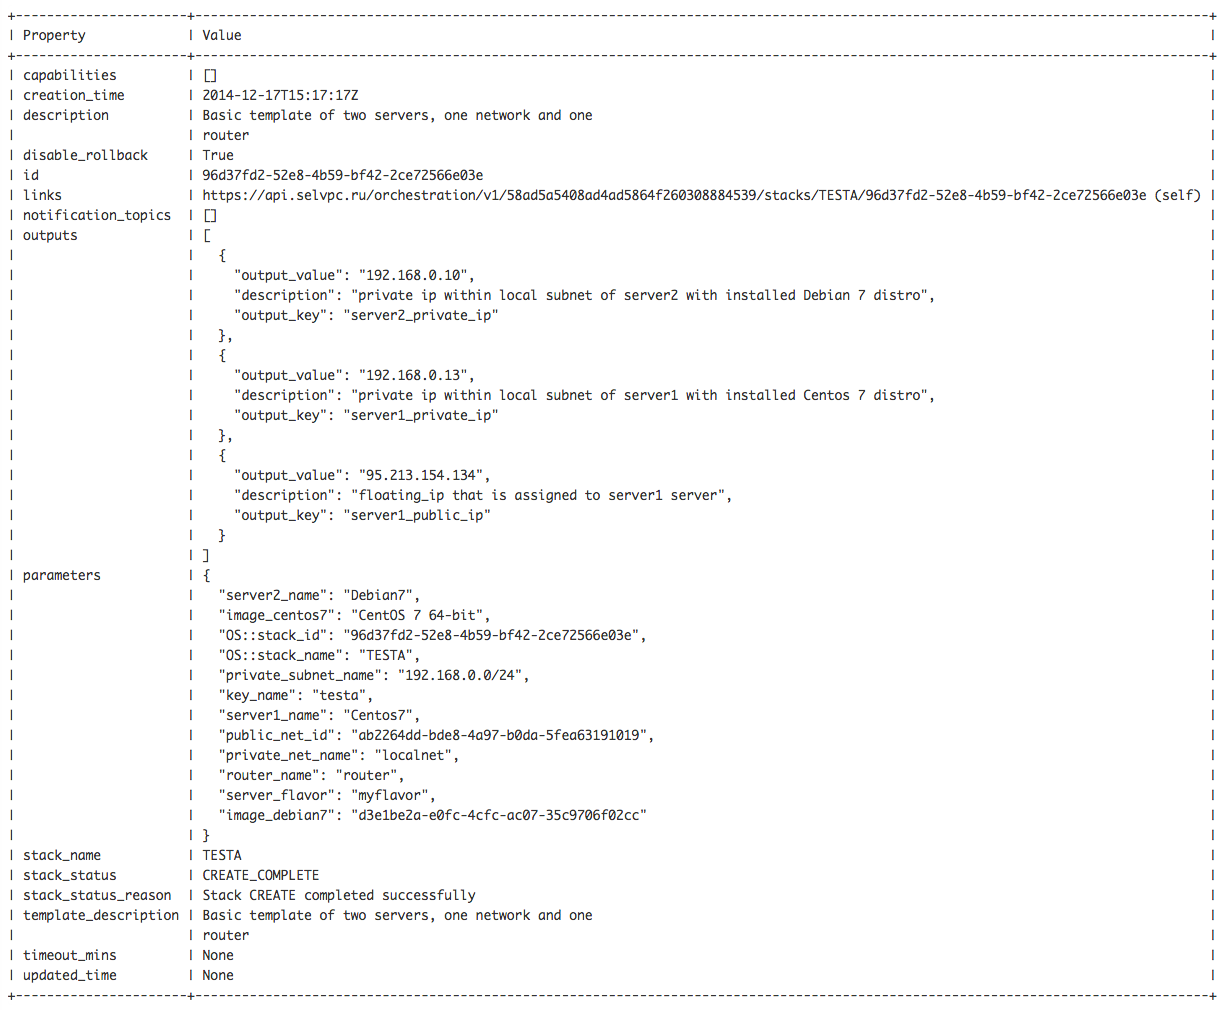
For most cases, the output of the heat stack-show command is too large and detailed. Finding in this output some small but important detail (for example, the IP address of the first server) is extremely difficult. If we are only interested in the value of the floating address of the first server, then we can get it by the following command, where, after the stack name, we also indicate the conclusion we described about the public IP address:
$ heat output-show TESTA server1_public_ip "95.213.154.192" Removing a stack is easy — using the heat stack-delete command:

In a situation when it is necessary to temporarily free up system resources without removing the stack itself, you can pause it with the heat action-suspend command and return it to working state later via heat action-resume.
We considered only the most frequently used, in our opinion, stack operations (and did not concern the management of individual resources), events, stack updates during its operation, and other features. More information can be obtained from the official documentation or with the help of the heat help command.
Conclusion
In this article, we learned about the basic principles of the openstack Heat orchestration module, which gives us an additional level of abstraction when working with the cloud and eliminates a lot of routine actions.
Of course, the possibilities of Heat are not limited. We did not mention the important ability to transfer the so-called user data (user_data) to the machine being created, which will be executed inside the machine when it is first loaded. Strictly speaking, Heat transfers data to the machine for execution not independently, but through the Nova component. But due to the possibility of describing the links between the resources Heath, it is possible not to limit the conditions for the execution of the transmitted data to a single machine.
For example, you need to create several machines, one of which will act as a database server, and the rest will connect to it by IP address. Through the use of templates, we can not think about the sequence of creating machines and their network settings. As soon as the corresponding resources are created, all the necessary values, including the ip address of the database server, will be transferred to user_data.
To fully utilize these features, you need to understand how the data is transmitted inside the machine and how they are processed. We will talk about this in more detail in the next article.
Readers who for one reason or another can not leave comments here are invited to our blog .
Source: https://habr.com/ru/post/247307/
All Articles