PyOpenGL with shaders

The previous article covered the basics of working with OpenGL in Python. To display graphics, the built-in functions of the glut module and the fixed OpenGL pipeline without shaders were used. At the request of habrahabr.ru users, on the basis of the previous lesson, a PyOpenGL application template was created using shaders and buffer objects.
Luxury graphics, as in the previous article, should not be expected. The purpose of this article is to demonstrate the ability to work with shaders and buffer objects using the PyOpenGL module.
So, for the work we need:
- Python interpreter ( link ).
- PyCharm development environment ( link ) (or any other for your taste, even a notebook will do).
- PyOpenGL library ( link ).
In the development environment, we will create and save a new file with Python code.
To work with 3D graphics (in particular, OpenGL), you need to import several modules:
from OpenGL.GL import * from OpenGL.GLUT import * The glut module will be used to create windows and handle keystrokes. Additionally, we import the random function from the module of the same name (useful for changing the color of the polygon):
from random import random Training.
Initialize the display mode using double buffering and RGB colors (double buffering avoids flickering during screen redrawing):
glutInitDisplayMode(GLUT_DOUBLE | GLUT_RGB) Set the initial size of the window (width, height):
glutInitWindowSize(300, 300) Specify the initial position of the window relative to the upper left corner of the screen:
glutInitWindowPosition(50, 50) Perform OpenGl initialization:
glutInit(sys.argv) Create a window with the title “Shaders!”:
glutCreateWindow(b"Shaders!") We define the procedure responsible for displaying graphics on the screen:
glutDisplayFunc(draw) Define a procedure that runs when a program is “idle”:
glutIdleFunc(draw) We define the procedure responsible for handling special keys:
glutSpecialFunc(specialkeys) Set the gray color to clear the screen:
glClearColor(0.2, 0.2, 0.2, 1) Up to this point, the code was practically indistinguishable from that used in the previous article, but now everything changes a lot, the shaders come into play!
For convenience, we create a procedure that prepares the shader for use:
# ( , ) def create_shader(shader_type, source): # shader = glCreateShader(shader_type) # glShaderSource(shader, source) # glCompileShader(shader) # return shader Using the create_shader procedure, create a vertex shader:
# # - vertex = create_shader(GL_VERTEX_SHADER, """ varying vec4 vertex_color; void main(){ gl_Position = gl_ModelViewProjectionMatrix * gl_Vertex; vertex_color = gl_Color; }""") In the same way, create a fragmentary shader:
# "" fragment = create_shader(GL_FRAGMENT_SHADER, """ varying vec4 vertex_color; void main() { gl_FragColor = vertex_color; }""") Create an empty shader object:
program = glCreateProgram() We connect vertex and fragment shaders to the program:
glAttachShader(program, vertex) glAttachShader(program, fragment) “Putting together” a shader program:
glLinkProgram(program) We inform OpenGL to use this shader program when displaying objects on the screen:
glUseProgram(program) Now we need to decide what and what color to display on the screen. To do this, create two arrays. The first array - with the coordinates of the vertices (three vertices of three coordinates):
pointdata = [[0, 0.5, 0], [-0.5, -0.5, 0], [0.5, -0.5, 0]] The second array - with colors for each vertex (one color for each):
pointcolor = [[1, 1, 0], [0, 1, 1], [1, 0, 1]] These two arrays can be combined into one, but for clarity and convenience of perception, they are separated. This preparatory activities are completed and you can start the main program cycle:
glutMainLoop() Next, we consider the procedures responsible for handling keystrokes and, in fact, the display of objects on the screen.
Keystroke handler
The specialkeys procedure is responsible for handling keystrokes in our program. In the specialkeys code, depending on which arrow on the keyboard was pressed, we, using the glRotatef procedure, rotate along the x or y axes, clockwise or in the opposite direction, by 5 degrees. When you press the END key, we fill the pointcolor array with random numbers in the range of 0 to 1, thereby changing the color of the displayed polygon. Procedure code specialkeys:
# def specialkeys(key, x, y): # pointcolor global pointcolor # if key == GLUT_KEY_UP: # glRotatef(5, 1, 0, 0) # 5 X if key == GLUT_KEY_DOWN: # glRotatef(-5, 1, 0, 0) # -5 X if key == GLUT_KEY_LEFT: # glRotatef(5, 0, 1, 0) # 5 Y if key == GLUT_KEY_RIGHT: # glRotatef(-5, 0, 1, 0) # -5 Y if key == GLUT_KEY_END: # END # pointcolor 0-1 pointcolor = [[random(), random(), random()], [random(), random(), random()], [random(), random(), random()]] Redrawing procedure.
For the redrawing in our program, the procedure draw is responsible. First, clear the screen and fill it with gray:
glClear(GL_COLOR_BUFFER_BIT) Enable the use of arrays of vertices and colors:
glEnableClientState(GL_VERTEX_ARRAY) glEnableClientState(GL_COLOR_ARRAY) Next, we specify OpenGL where to take an array of vertices, for this we use the procedure glVertexPointer:
glVertexPointer(3, GL_FLOAT, 0, pointdata) The first parameter of this procedure determines how many coordinates are used for one vertex, the second parameter determines the data type for each coordinate, the third parameter determines the offset between the vertices in the array. If the vertices go one after another, then the offset is 0. The fourth parameter indicates the first coordinate of the first vertex in the array.
Similarly, let's specify OpenGL where to get an array of colors:
glColorPointer(3, GL_FLOAT, 0, pointcolor) All the necessary data is indicated, it remains only to draw everything. Using the glDrawArrays procedure, we can display the entire contents of the arrays on the screen in one pass:
glDrawArrays(GL_TRIANGLES, 0, 3) The first parameter of this procedure determines what type of primitives will be used when displaying objects on the screen (triangles, points, lines, etc.), the second parameter should indicate the initial index in the specified arrays, the third parameter we indicate the number of primitives to be drawn (in our case these are 3 vertices - 9 coordinates).
Disable the use of arrays of vertices and colors and display everything drawn in memory on the screen:
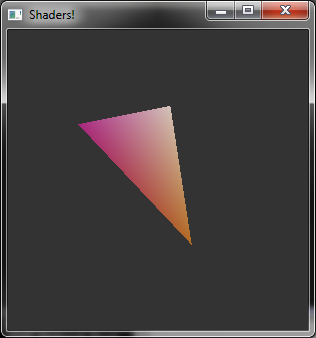
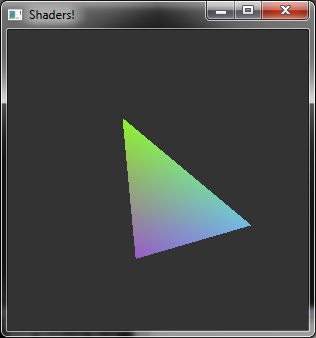
glDisableClientState(GL_VERTEX_ARRAY) glDisableClientState(GL_COLOR_ARRAY) glutSwapBuffers() As a result, in the program window, we see a triangle with smooth color transitions. The triangle can be rotated using the arrow keys. When you press the END button, the color of the triangle changes to random.
')
All program code:
# -*- coding: utf-8 -*- # : from OpenGL.GL import * from OpenGL.GLUT import * #import sys # random random from random import random # pointcolor ( ) global pointcolor # def specialkeys(key, x, y): # pointcolor global pointcolor # if key == GLUT_KEY_UP: # glRotatef(5, 1, 0, 0) # 5 X if key == GLUT_KEY_DOWN: # glRotatef(-5, 1, 0, 0) # -5 X if key == GLUT_KEY_LEFT: # glRotatef(5, 0, 1, 0) # 5 Y if key == GLUT_KEY_RIGHT: # glRotatef(-5, 0, 1, 0) # -5 Y if key == GLUT_KEY_END: # END # pointcolor 0-1 pointcolor = [[random(), random(), random()], [random(), random(), random()], [random(), random(), random()]] # ( , ) def create_shader(shader_type, source): # shader = glCreateShader(shader_type) # glShaderSource(shader, source) # glCompileShader(shader) # return shader # def draw(): glClear(GL_COLOR_BUFFER_BIT) # glEnableClientState(GL_VERTEX_ARRAY) # glEnableClientState(GL_COLOR_ARRAY) # # , : # - # - # - # , 0 # - glVertexPointer(3, GL_FLOAT, 0, pointdata) # , : # , glColorPointer(3, GL_FLOAT, 0, pointcolor) # : # - (, , .) # - # - ( 3 - 9 ) glDrawArrays(GL_TRIANGLES, 0, 3) glDisableClientState(GL_VERTEX_ARRAY) # glDisableClientState(GL_COLOR_ARRAY) # glutSwapBuffers() # # # RGB ( ) glutInitDisplayMode(GLUT_DOUBLE | GLUT_RGB) # (, ) glutInitWindowSize(300, 300) # # glutInitWindowPosition(50, 50) # OpenGl glutInit(sys.argv) # "Shaders!" glutCreateWindow(b"Shaders!") # , glutDisplayFunc(draw) # , "" glutIdleFunc(draw) # , glutSpecialFunc(specialkeys) # glClearColor(0.2, 0.2, 0.2, 1) # : # # - vertex = create_shader(GL_VERTEX_SHADER, """ varying vec4 vertex_color; void main(){ gl_Position = gl_ModelViewProjectionMatrix * gl_Vertex; vertex_color = gl_Color; }""") # : # "" fragment = create_shader(GL_FRAGMENT_SHADER, """ varying vec4 vertex_color; void main() { gl_FragColor = vertex_color; }""") # program = glCreateProgram() # c glAttachShader(program, vertex) # glAttachShader(program, fragment) # "" glLinkProgram(program) # OpenGL glUseProgram(program) # ( ) pointdata = [[0, 0.5, 0], [-0.5, -0.5, 0], [0.5, -0.5, 0]] # ( ) pointcolor = [[1, 1, 0], [0, 1, 1], [1, 0, 1]] # glutMainLoop() The result of the program (pictures):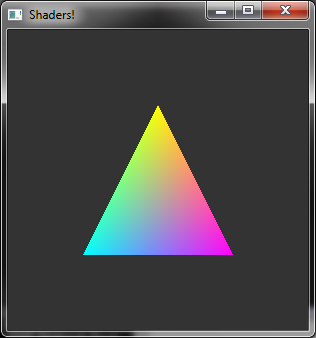
and some videos:
Source: https://habr.com/ru/post/247123/
All Articles