Arduino programming in CLion
In this article, I’ll talk about a small how to development for Arduino at CLion www.jetbrains.com/clion .
CLion is a new IDE for C / C ++ from JetBrains. The style and behavior is very similar to IDEA (IDE for Java). And since I am writing in Java under IDEA using “chips” this is an IDE, I would like to transfer all these “chips” and use case development to development for Arduino.
In general, I tried different IDEs for Arduino - the Arduino IDE, Eclipse with a plugin for Arduino, Eclipse with a plugin for AVR, Atmel Studio, Visual Studio with a VisualMicro plugin and ReSharper C ++. Recently, I stopped at Eclipse with a plugin for Arduino. Still, some of the usual features from IDEA were lacking.
And finally, JetBrains made an IDE for C \ C ++ - CLion. But so far without the Arduino plugin. But with CMake support. Here you can use it!
The Arduino support task youtrack.jetbrains.com/issue/CPP-364 refers to the CMake build for Arduino github.com/queezythegreat/arduino-cmake and we ’ll use it.
')
To do this, install the Arduino SDK in the folder specified in the arduino-cmake (in Win this is Program Files (x86) \ Arduino). You need to use exactly the 1.0.x version, since version 1.5.x is not supported. I took the latest version 1.0.6.
Then we download github.com/queezythegreat/arduino-cmake , then all the work will be based on it. For Windows, in the cmake / Platform / Arduino.cmake file, correct in lines 1177, 1178 the names of the variables with TARGET_PATH on TARGET_NAME. This must be done because in Windows the path to the hex file of the avrdude firmware is not correctly formed. Most likely because of the Win-like path with a drive letter. I did not find how to screen this, so I simply indicated a relative path. Moreover, before calling the avrdude command, a transition occurs to the directory with the hex file. These changes are needed to make the upload program in the Arduino. If not done, it will only compile.
Then just in CLion we open this CMake project, through File-> Import project.
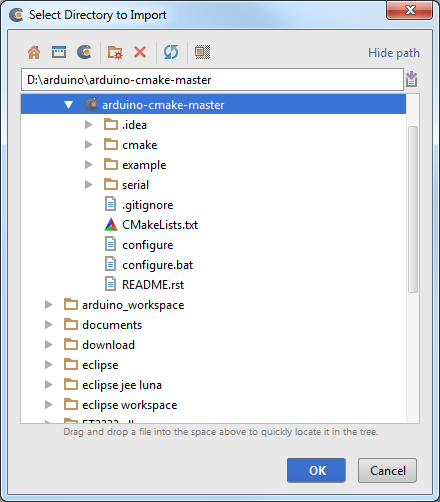
We wait a little while for CLion to process the CMake files. And that's all, the project is ready.
To configure this project for downloading to Arduino, you need to select a specific Arduino board and a port with Arduino to download the program. In an example project, this is configured in example / CMakeLists.txt. All configuration information with examples is in arduino-cmake / README.rst
At first I tried to use “sketches” from Arduino, but in CLion they didn’t have autocomplite working, although the context (in CLion at the bottom right) was specified correctly. Therefore, I just used a cpp file, which by its content was only a couple of lines longer than the “sketch”.
When setting up my CMakeLists.txt, I used an example from duinoworks.bakketti.com/?p=11
First, create a serial folder in the root folder of the application (on the same level as the example folder) and add two files there - serial.cpp with the program code and CMakeLists.txt with the project settings.
Content serial / CMakeLists.txt
Please note that I chose an Arduino Nano with ATMEGA328 on COM8 as the motherboard. The list of all supported boards is in C: \ Program Files (x86) \ Arduino \ hardware \ arduino \ boards.txt (this is the name of the parameter to the point - uno, atmega328, diecimila, etc.)
Content serial / serial.cpp
And we connect the serial folder - in the root CMakeLists.txt we add the line
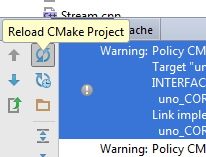
Then in CLion in the CMake window, select the Reload CMake project:
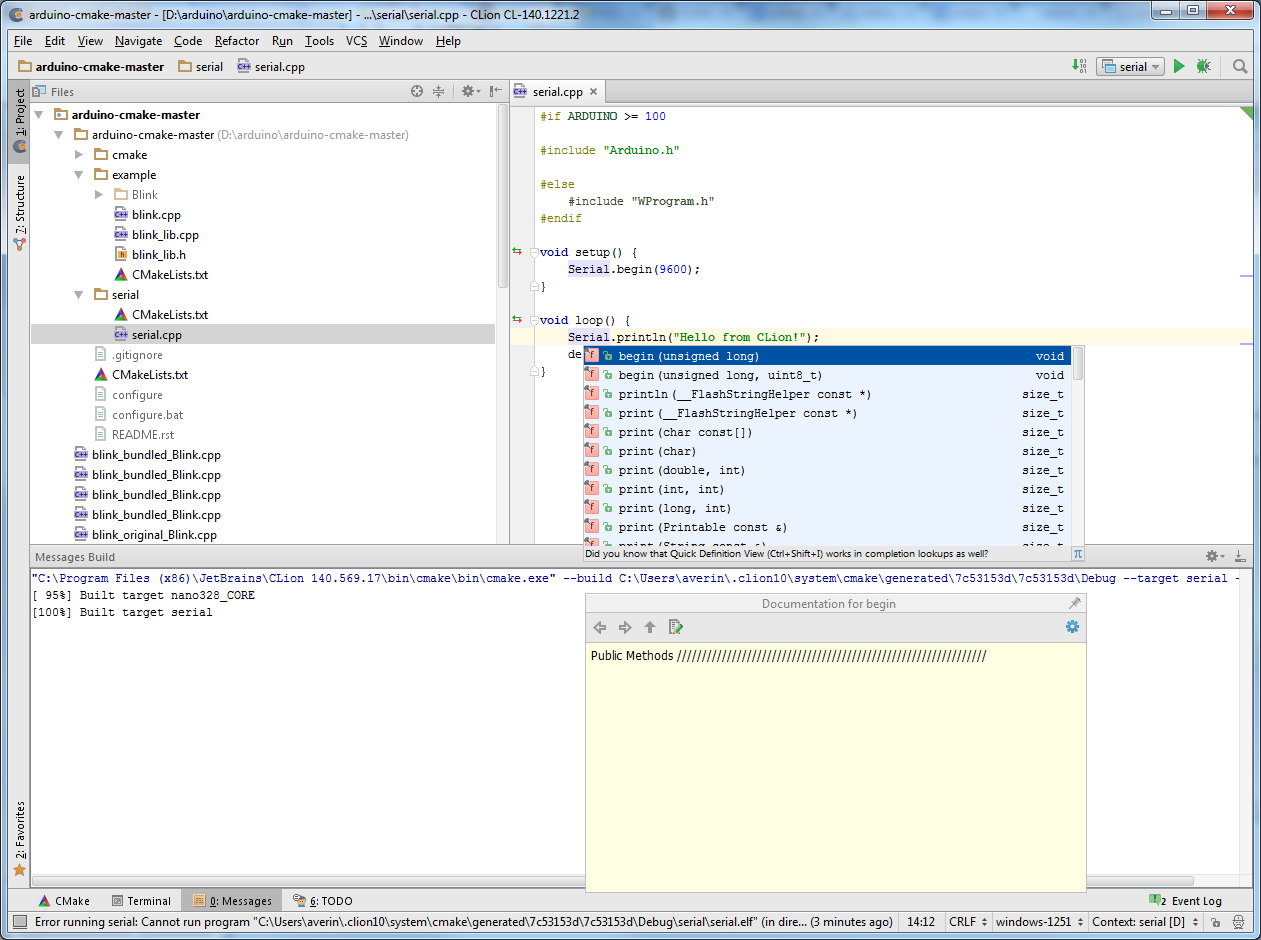
Then you can write the code as usual. Example code editing with autocomplite support:
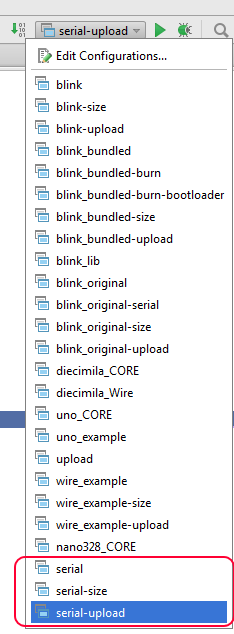
CLion should create serial, serial-size, serial-upload configurations. We are interested in the serial-upload configuration - it collects and loads the program.
Select it and press either Run-> Buid (Ctrl + F9) or just the Run or Debug buttons near the drop-down list with configurations. In the first case there will be an assembly and loading in Arduino, in the second it is the same, but the elf file will also try to start, which will not work and there will be an error, but this does not affect the result.
To work with the Arduino Library, you must explicitly specify the path to the libraries folder. This can be done by adding
I have an example of a program on GitHub:
github.com/TimReset/arduino-cmake
Now from CLion you cannot connect to the COM port to communicate with the Arduino - for this I used the monitoring capabilities of the COM port from the Arduino IDE or Eclipse. Although in arduino-cmake you can add the task of starting the COM port monitoring program (specify set ($ {PROJECT_NAME} _SERIAL <Program_name @ SERIAL_PORT @) in CMakeLists.txt). Also, when loading a program via avrdude COM, the port should not be used by anyone (for example, you cannot connect to it in parallel via the Arduino IDE), otherwise the download will not occur, but there will not be any errors. So with each download you need to close the connection.
For myself, so far I decided to use CLion in development - it supports the basic possibilities for writing C \ C ++ code, which is quite enough for me, plus a familiar development environment. Although it practically does not work with CMakeLists.txt so far - there is only syntax highlighting, but even commenting does not work.
CLion is a new IDE for C / C ++ from JetBrains. The style and behavior is very similar to IDEA (IDE for Java). And since I am writing in Java under IDEA using “chips” this is an IDE, I would like to transfer all these “chips” and use case development to development for Arduino.
In general, I tried different IDEs for Arduino - the Arduino IDE, Eclipse with a plugin for Arduino, Eclipse with a plugin for AVR, Atmel Studio, Visual Studio with a VisualMicro plugin and ReSharper C ++. Recently, I stopped at Eclipse with a plugin for Arduino. Still, some of the usual features from IDEA were lacking.
And finally, JetBrains made an IDE for C \ C ++ - CLion. But so far without the Arduino plugin. But with CMake support. Here you can use it!
arduino-cmake
The Arduino support task youtrack.jetbrains.com/issue/CPP-364 refers to the CMake build for Arduino github.com/queezythegreat/arduino-cmake and we ’ll use it.
')
To do this, install the Arduino SDK in the folder specified in the arduino-cmake (in Win this is Program Files (x86) \ Arduino). You need to use exactly the 1.0.x version, since version 1.5.x is not supported. I took the latest version 1.0.6.
Then we download github.com/queezythegreat/arduino-cmake , then all the work will be based on it. For Windows, in the cmake / Platform / Arduino.cmake file, correct in lines 1177, 1178 the names of the variables with TARGET_PATH on TARGET_NAME. This must be done because in Windows the path to the hex file of the avrdude firmware is not correctly formed. Most likely because of the Win-like path with a drive letter. I did not find how to screen this, so I simply indicated a relative path. Moreover, before calling the avrdude command, a transition occurs to the directory with the hex file. These changes are needed to make the upload program in the Arduino. If not done, it will only compile.
Then just in CLion we open this CMake project, through File-> Import project.
We wait a little while for CLion to process the CMake files. And that's all, the project is ready.
To configure this project for downloading to Arduino, you need to select a specific Arduino board and a port with Arduino to download the program. In an example project, this is configured in example / CMakeLists.txt. All configuration information with examples is in arduino-cmake / README.rst
Creating your own program
At first I tried to use “sketches” from Arduino, but in CLion they didn’t have autocomplite working, although the context (in CLion at the bottom right) was specified correctly. Therefore, I just used a cpp file, which by its content was only a couple of lines longer than the “sketch”.
When setting up my CMakeLists.txt, I used an example from duinoworks.bakketti.com/?p=11
First, create a serial folder in the root folder of the application (on the same level as the example folder) and add two files there - serial.cpp with the program code and CMakeLists.txt with the project settings.
Content serial / CMakeLists.txt
# Set a variable for commands below set(PROJECT_NAME serial) # Define your project and language project(${PROJECT_NAME} C CXX) set(${PROJECT_NAME}_BOARD nano328) # Define the source code set(${PROJECT_NAME}_SRCS serial.cpp) # Define the port for uploading code to the Arduino set(${PROJECT_NAME}_PORT COM8) # Command to generate code arduino firmware (.hex file) generate_arduino_firmware(${PROJECT_NAME}) Please note that I chose an Arduino Nano with ATMEGA328 on COM8 as the motherboard. The list of all supported boards is in C: \ Program Files (x86) \ Arduino \ hardware \ arduino \ boards.txt (this is the name of the parameter to the point - uno, atmega328, diecimila, etc.)
Content serial / serial.cpp
#if ARDUINO >= 100 #include "Arduino.h" #else #include "WProgram.h" #endif void setup() { Serial.begin(9600); } void loop() { Serial.println("Hello from CLion!"); delay(5000); } And we connect the serial folder - in the root CMakeLists.txt we add the line
add_subdirectory(serial) Then in CLion in the CMake window, select the Reload CMake project:
Then you can write the code as usual. Example code editing with autocomplite support:
CLion should create serial, serial-size, serial-upload configurations. We are interested in the serial-upload configuration - it collects and loads the program.
Select it and press either Run-> Buid (Ctrl + F9) or just the Run or Debug buttons near the drop-down list with configurations. In the first case there will be an assembly and loading in Arduino, in the second it is the same, but the elf file will also try to start, which will not work and there will be an error, but this does not affect the result.
Work with Arduino Library
To work with the Arduino Library, you must explicitly specify the path to the libraries folder. This can be done by adding
link_directories(${ARDUINO_SDK}/libraries) in root cmakelists.txt. Further, the program simply connects the header as usual, for example #include "LiquidCrystal.h" Example
I have an example of a program on GitHub:
github.com/TimReset/arduino-cmake
Conclusion
Now from CLion you cannot connect to the COM port to communicate with the Arduino - for this I used the monitoring capabilities of the COM port from the Arduino IDE or Eclipse. Although in arduino-cmake you can add the task of starting the COM port monitoring program (specify set ($ {PROJECT_NAME} _SERIAL <Program_name @ SERIAL_PORT @) in CMakeLists.txt). Also, when loading a program via avrdude COM, the port should not be used by anyone (for example, you cannot connect to it in parallel via the Arduino IDE), otherwise the download will not occur, but there will not be any errors. So with each download you need to close the connection.
For myself, so far I decided to use CLion in development - it supports the basic possibilities for writing C \ C ++ code, which is quite enough for me, plus a familiar development environment. Although it practically does not work with CMakeLists.txt so far - there is only syntax highlighting, but even commenting does not work.
Source: https://habr.com/ru/post/247017/
All Articles