YACTL: Another Christmas tree garland
Why?
Before the new year, many decorate and decorate Christmas trees with all sorts of trinkets and, of course, a garland of lights.
On Habré, there have recently been several variations on homemade garlands, but there are less than 100,500 and therefore I thought that this was clearly not enough. In order not to anger the spirit of the New Year, I bring my version of Christmas tree garland as a gift to this great spirit.
Also, this project was conceived as part of primary education for his son in the style of “I do and tell what, how and why, and the son looks and asks tricky questions on the subject and not so much”. For this reason, I tried to make everything as simple and affordable as possible.
')
Of what?
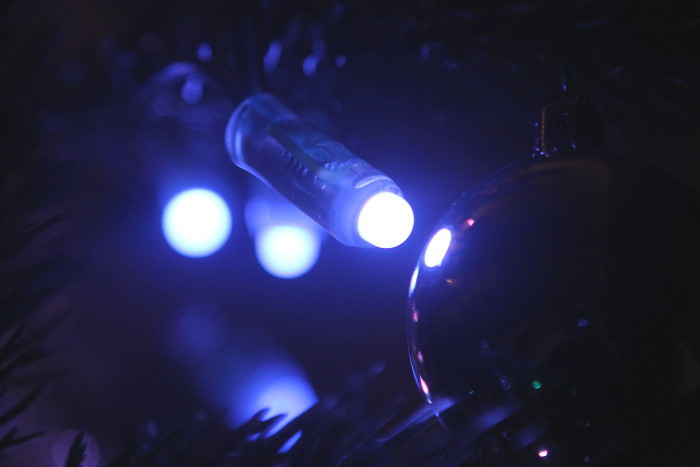
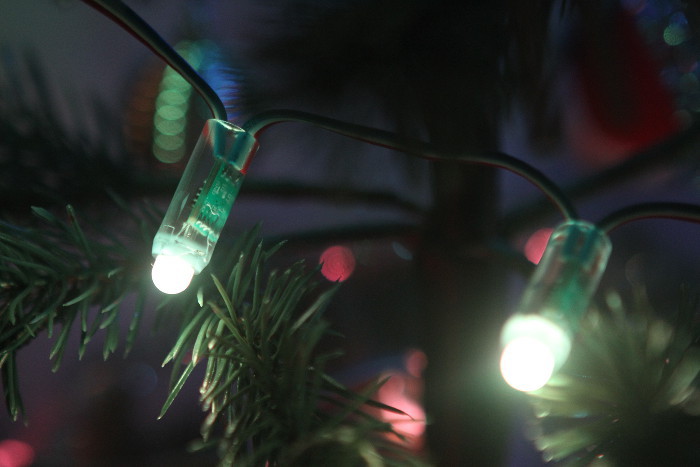
Rummaging a bit in my boxes, I found several tapes of individually addressable RGB LEDs. In the wild, they have different names - WS2801, WS2811, WS2812, Neopixels, etc.
The main highlight of these tapes is that you can control any RGB LED individually and change the RGB color components and brightness.
The differences between the tapes are electrical. If it is very rough, then they can be described something like this:
WS2801 is the very first version. Data is transmitted via two signal wires - DATA and CLOCK. The power they have is usually 12 volts. RGB LED is connected separately.
WS2811 is a newer version. Data is transmitted over a single wire - DATA. There is no CLOCK signal, since the WS2811 controller itself considers time intervals and it is necessary to follow them in its code. Usually powered by 5 volts. RGB LED is also connected separately.
WS2812 is the same as WS2811, but is built into the LED (for example, 5050), so it makes the tape more compact and with a more dense arrangement of the LEDs. Usually powered by 5 volts. Chip-LED has 6 pins.
WS2812B is like WS2812, but with the difference that the power supply for the LEDs and the microcircuit itself is combined (all options have a higher power supply separate). Chip-LED has 4 outputs.
Any variations of LED strips can be bought on eBay, Alibaba / AliExpress and in stores of this type.
In terms of programming, the difference is very nicely smoothed using the FastLED @ GitHub library. That is, you can easily combine different types of programmable tapes in one project, which I did not hesitate to use. The son, however, did not appreciate papa's resourcefulness and convenience of the library.
I found three tapes here: one based on the WS2801 controller (25 LEDs) and two based on the WS2811 controller (20 and 15 LEDs). Total 60 LEDs get puppy joy.
Two WS2811 I connected together in series.
As the inquisitive mind of the reader has already guessed, a controller is needed to control such LED strips. Initially, I planned to use the Arduino Pro Mini board because of its compactness and readiness, but for some reason I did not find one in my bottomless bins. But I found Teensy 3.1 (Cortex-M4 @ 72MHz, 256KB Flash, 64KB RAM). This is a little overkill, but better a lot than a little.
Since I use 12 and 5 volt tapes together, I powered the whole circuit from a 12V / 1A power supply with conversion to 5 volts to power the second tape and the microcontroller board. I transformed the pulse DC-DC module KIS-3R33S based on MP2307DN, which gives up to 3A at the output and almost does not heat up. Of course, the module can be replaced with something like 7805, but it will be necessary to take care of proper cooling (this is about 1-1.5 watts for every 10 LEDs).
List of components:
- Custom addressable LED strips based on WS2801, WS2811, etc.
- 12V / 1A power supply. At maximum brightness, 60 LEDs consumed about 800 mA. I turn them on half-brightness and get 400 mA of consumption
- Module microcontroller Teensy 3.1. Also Arduino or other suitable module or microcontroller will do.
- DC-DC converter KIS-3R33S. There are many options and it all depends on the power requirements.

How to connect?
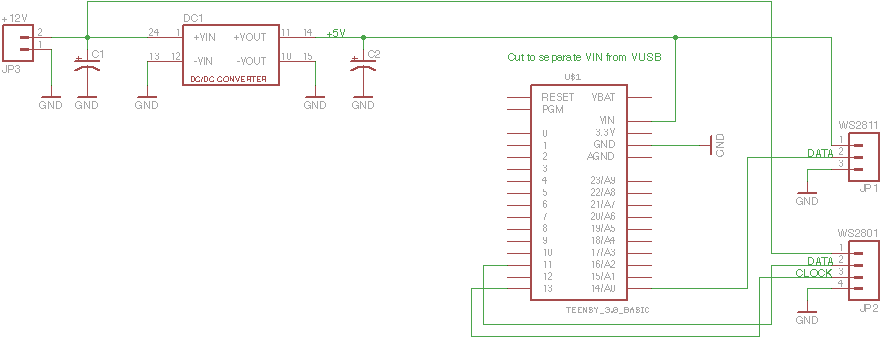
There is practically no scheme, since everything is connected quite simply:
Teensy 3.1 is powered by 5 volts. On these 5 volts sits a WS2811 ribbon. At 12 volts sits a tape based on WS2801.
WS2801 tape is connected to Teensy 3.1 like this: DATA - 11, CLOCK - 13.
WS2811 tape is connected to Teensy 3.1: DATA - 14.
A bundle of wires and parts was successfully crammed into a box for storing four AA elements. I usually collect something so simple and quick in such boxes.

What is magic?
Magic in the code that controls all this disgrace and enthralls three-year-old son.
I posted my code on GitHub: github.com/nochkin/LightBottle (I need the github.com/FastLED/FastLED library)
In the code, everything is quite simple - a pseudo-random color is chosen, into which the LED smoothly changes and the current color moves on along the LED strip. On the Christmas tree it looks as if the light falls down. Or to the top if, for example, to turn over the Christmas tree (son's advice) or hang the ribbons themselves on the contrary (my irrational suggestion).
At the very beginning of the code, I derived some variables for configuration:
LEDS1_NUM / LEDS1_PIN - the number of LEDs and pin connecting the first tape
LEDS2_NUM / LEDS2_PIN - the number of LEDs and pin connecting the second tape
LEDS_SATURATION - maximum color saturation
LEDS_BRIGHTNESS - maximum brightness (60 LEDs approximate consumption was 800 mA at brightness of 255, 400 mA at 128 and 200 mA at 64)
hueStep - color change step in one cycle
UPDATE_DELAY - the speed of "running" color on the tape
In setup (), both tapes are configured, so if there is only one tape, you can leave only one line that corresponds to the tape controller and reset LEDS2_NUM.
And the cartoon?
I attach this video crafts. I apologize for the phone quality and portrait orientation.
I also want to send congratulations to all the habrovans. Cheers cheers!
Source: https://habr.com/ru/post/246977/
All Articles