New Year, garland, arduino
He began to study the topic of smart homes, came to Arduino and there was a need to practice on cats. And then the New Year is coming ... The point is clear, we will make a ten-channel garland. In principle, I have been friends with a soldering iron since childhood in color music, but for the last 20 years I have been programming more and more.
Basically, components were bought on ebay. Some, in the local radio store, but in the store they are 2-3 times more expensive. The Chinese rule.
I started by drawing a circuit and tracing the board. Looked at several programs, stopped at CadSoft Eagle . If you deal with the management, all that needs to be done. Autotracing proved to be nothing - completely illogical placement of parts and countless transitions between layers. As a result, I drew a scheme in Eagle Schematic, I did the tracing manually in the Eagle Board - all the details were already connected by lines, it only remained to place where it was necessary and draw the tracks. After a little practice, everything is quite convenient.
I studied how the boards are being hunted, the printer method - the iron was not impressed at all.
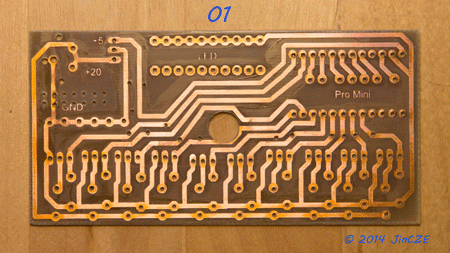
I bought a textolite with a positive photoresist in the store, printed a board on a film (without inversion), put a film on textolite, exposed it to the solarium for two and a half minutes, showed it in a 1.5% solution of sodium hydroxide (NaOH) and etched it in a 30% solution of ferric chloride (FeCl3).
')
The result is a fairy tale! Everything is very clear, small letters remained in their places. Further we puddle, we solder.
As it was already written on Habré, in order to program the Arduino Pro Mini without dancing with a tambourine, you need to buy the correct USB to TTL UART module with pin DTR.
Program logic: one branch of the garland (24 diodes) - one bit, i.e. the state of ten branches is set by ten bits of the number (0 - everything is off, 2 ^ 10-1 - everything is on).
There are a number of switching patterns. When powering the program starts to iterate over the templates in random order.
- If you briefly press the button, it switches to completely random activation of each branch.
- The average pressing of the button changes in the cycle the multiplicity of the delay, i.e. The base delay of 500ms is multiplied by 1-3.
- Long press of the button takes the device to the service mode. At first, all the branches light up, then with a short press of a button, each button lights up in sequence.
For a long time, he stumbled into the standard function of raising to the power of pow () - it returned not at all what was expected. I have not yet opened the documentation and have not found that in pow () arguments are float, the result is double, and there are some misunderstandings when casting to int. As a result, I had to use a self-written recursive int power (int, int).
Then came the hell of hell - wiring 240 diodes. And each, note, two legs. A total of 480 is obtained. Definitely not the most efficient time spent in life. Still stepped on a rake with a thermogun. It perfectly shrinks heat shrinkage, but at the same time the strands of a twisted pair fuse into a single unit. It looks without damage, but all the wires are shorted. One branch completely reworked.
The result was a wonderful festoon:
Happy New Year, everyone, happiness and health!
List of used parts:
1. Arduino Pro Mini, 5V, 16M
2. Resistors R1-R10 - 220 kOhm, all the rest, including current-organizing LEDs, 220 Ohm
3. N-channel field effect transistor Q1-Q10 - IRFZ44N. In principle, the current in the LED circuits flows small, transistors or assembly can be taken and less powerful. At 20V power supply and a 24-LED circuit, the current is about 20 mA
4. Dell laptop power supply. Gives out + 20V
5. Linear voltage regulator 5V for Arduino power supply - ST78S05. Heats strongly, had to be put on the radiator.
6. Condensers to stabilizer 220u / 35V, 47u / 16V
7. 240x LED 5mm + 11x LED 3mm for indication
8. Button
9. 10m UTP cable, which was cut and diodes were soldered to its conductors.
Sources in the archive :
- scheme EAGLE v7.2.0 * .sch file
- export scheme * .png
- board for printing on film * .pdf
- processing * .ino source for Arduino IDE
Basically, components were bought on ebay. Some, in the local radio store, but in the store they are 2-3 times more expensive. The Chinese rule.
I started by drawing a circuit and tracing the board. Looked at several programs, stopped at CadSoft Eagle . If you deal with the management, all that needs to be done. Autotracing proved to be nothing - completely illogical placement of parts and countless transitions between layers. As a result, I drew a scheme in Eagle Schematic, I did the tracing manually in the Eagle Board - all the details were already connected by lines, it only remained to place where it was necessary and draw the tracks. After a little practice, everything is quite convenient.
I studied how the boards are being hunted, the printer method - the iron was not impressed at all.
I bought a textolite with a positive photoresist in the store, printed a board on a film (without inversion), put a film on textolite, exposed it to the solarium for two and a half minutes, showed it in a 1.5% solution of sodium hydroxide (NaOH) and etched it in a 30% solution of ferric chloride (FeCl3).
')
The result is a fairy tale! Everything is very clear, small letters remained in their places. Further we puddle, we solder.
As it was already written on Habré, in order to program the Arduino Pro Mini without dancing with a tambourine, you need to buy the correct USB to TTL UART module with pin DTR.
Program logic: one branch of the garland (24 diodes) - one bit, i.e. the state of ten branches is set by ten bits of the number (0 - everything is off, 2 ^ 10-1 - everything is on).
There are a number of switching patterns. When powering the program starts to iterate over the templates in random order.
- If you briefly press the button, it switches to completely random activation of each branch.
- The average pressing of the button changes in the cycle the multiplicity of the delay, i.e. The base delay of 500ms is multiplied by 1-3.
- Long press of the button takes the device to the service mode. At first, all the branches light up, then with a short press of a button, each button lights up in sequence.
For a long time, he stumbled into the standard function of raising to the power of pow () - it returned not at all what was expected. I have not yet opened the documentation and have not found that in pow () arguments are float, the result is double, and there are some misunderstandings when casting to int. As a result, I had to use a self-written recursive int power (int, int).
Then came the hell of hell - wiring 240 diodes. And each, note, two legs. A total of 480 is obtained. Definitely not the most efficient time spent in life. Still stepped on a rake with a thermogun. It perfectly shrinks heat shrinkage, but at the same time the strands of a twisted pair fuse into a single unit. It looks without damage, but all the wires are shorted. One branch completely reworked.
The result was a wonderful festoon:
Happy New Year, everyone, happiness and health!
List of used parts:
1. Arduino Pro Mini, 5V, 16M
2. Resistors R1-R10 - 220 kOhm, all the rest, including current-organizing LEDs, 220 Ohm
3. N-channel field effect transistor Q1-Q10 - IRFZ44N. In principle, the current in the LED circuits flows small, transistors or assembly can be taken and less powerful. At 20V power supply and a 24-LED circuit, the current is about 20 mA
4. Dell laptop power supply. Gives out + 20V
5. Linear voltage regulator 5V for Arduino power supply - ST78S05. Heats strongly, had to be put on the radiator.
6. Condensers to stabilizer 220u / 35V, 47u / 16V
7. 240x LED 5mm + 11x LED 3mm for indication
8. Button
9. 10m UTP cable, which was cut and diodes were soldered to its conductors.
Sources in the archive :
- scheme EAGLE v7.2.0 * .sch file
- export scheme * .png
- board for printing on film * .pdf
- processing * .ino source for Arduino IDE
Source: https://habr.com/ru/post/246783/
All Articles