PyOpenGL for beginners and some New Year mood

Due to its flexibility and simplicity, the Python language allows you to easily and quickly write a variety of applications and utilities. I use this language mainly for writing small scripts that facilitate the execution of various tasks related to system administration. As it turned out, Python can also be used for not quite “traditional” tasks, for example, for displaying 3D graphics. This will be my small pre-New Year post.
In this article I will try to show how easy it is to work with OpenGL in Python. Draw on the screen we will be a Christmas 3D tree. The Christmas tree will be rather sketchy, so if you expected luxurious graphics with shaders from the post, you can no longer read, you will not be interested.
')
To work with "non-Pythonic" libraries (for example, OpenGL), modules are needed that provide the ability to call library functions directly from a Python program. The PyOpenGL library is a module that makes it easy to work with OpenGL, GLU, and GLUT functions in Python programs, as well as with a number of OpenGL extensions.
So, for the work we need:
- Python interpreter ( link ).
- PyCharm development environment ( link ) (or any other for your taste, even a notebook will do).
- PyOpenGL library ( link ).
In the development environment, we will create and save a new file with Python code (it has the extension .py).
To work with 3D graphics (in particular, OpenGL), you need to import several modules:
from OpenGL.GL import * from OpenGL.GLU import * from OpenGL.GLUT import * We will, as far as possible, use the functions from the glut module in order not to write “extra” code and not reinvent the next bikes.
Initialize the display mode using double buffering and RGB colors (double buffering avoids flickering during screen redrawing):
glutInitDisplayMode(GLUT_DOUBLE | GLUT_RGB) Set the initial size of the window (width, height):
glutInitWindowSize(300, 300) Specify the initial position of the window relative to the upper left corner of the screen:
glutInitWindowPosition(50, 50) Perform OpenGl initialization:
glutInit(sys.argv) Create a window with the title “Happy New Year!”:
glutCreateWindow(b"Happy New Year!") Run the main program loop:
glutMainLoop() If we start the program for execution, we will see an empty window with the title “Happy New Year!”. This is wonderful, but the main thing is missing - the Christmas tree! Therefore, we will not rest on our laurels and move on.
Before you start drawing a Christmas tree, you need to carry out a series of preparatory activities or, in other words, perform initialization. To do this, create a separate procedure and do not forget to call it before starting the main program loop. In our program, the initialization procedure is as follows:
# def init(): global xrot # x global yrot # y global ambient # global greencolor # global treecolor # global lightpos # xrot = 0.0 # x = 0 yrot = 0.0 # y = 0 ambient = (1.0, 1.0, 1.0, 1) # - RGB, - greencolor = (0.2, 0.8, 0.0, 0.8) # treecolor = (0.9, 0.6, 0.3, 0.8) # lightpos = (1.0, 1.0, 1.0) # xyz glClearColor(0.5, 0.5, 0.5, 1.0) # gluOrtho2D(-1.0, 1.0, -1.0, 1.0) # glRotatef(-90, 1.0, 0.0, 0.0) # 90 glLightModelfv(GL_LIGHT_MODEL_AMBIENT, ambient) # glEnable(GL_LIGHTING) # glEnable(GL_LIGHT0) # glLightfv(GL_LIGHT0, GL_POSITION, lightpos) # The variables xrot and yrot determine the angle of rotation along the x and y axes (we will need this later in order to be able to inspect the tree from all sides). The ambient array defines the parameters of ambient lighting: color and brightness. Next, two variables (greencolor, treecolor) are defined, which determine the green color for the needles and brown color for the trunk.
The glClearColor function determines the color with which the screen will be painted before each new redraw cycle. Function gluOrtho2D determine the boundaries of the drawing horizontally and vertically. Using the glRotatef function, we move 90 degrees along the X axis, so we can see the Christmas tree better. Use the glLightModelfv function to set up a diffuse lighting model. Turn on the lighting with the glEnable (GL_LIGHTING) command. Just turn on the lighting is not enough, you need to add at least one light source. We do this with the glEnable (GL_LIGHT0) function. And finally, move aside the newly created light source:
glLightfv(GL_LIGHT0, GL_POSITION, lightpos) At this initialization OpenGL can be considered complete. Only one preparatory event remains: we need to create a procedure that handles keystrokes and tell glut to use it (to do this, before starting the main program loop, we will execute the function glutSpecialFunc (specialkeys). The specialkeys procedure itself looks like this:
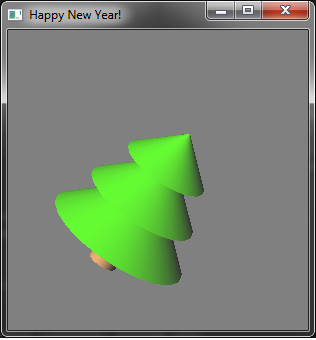
# def specialkeys(key, x, y): global xrot global yrot # if key == GLUT_KEY_UP: # xrot -= 2.0 # X if key == GLUT_KEY_DOWN: # xrot += 2.0 # X if key == GLUT_KEY_LEFT: # yrot -= 2.0 # Y if key == GLUT_KEY_RIGHT: # yrot += 2.0 # Y glutPostRedisplay() # In the specialkeys code, depending on which arrow on the keyboard was pressed, we either decrease or increase the values of the variables xrot or yrot, and then use the glutPostRedisplay function to redraw the screen.
Everything, now it is possible to start the main thing - drawing a Christmas tree! As with the specialkeys function, let glut know which procedure to use to redraw the screen: glutDisplayFunc (draw). The draw procedure itself looks like this:
# def draw(): global xrot global yrot global lightpos global greencolor global treecolor glClear(GL_COLOR_BUFFER_BIT) # glPushMatrix() # "" glRotatef(xrot, 1.0, 0.0, 0.0) # X xrot glRotatef(yrot, 0.0, 1.0, 0.0) # Y yrot glLightfv(GL_LIGHT0, GL_POSITION, lightpos) # # # : 2 , , glMaterialfv(GL_FRONT_AND_BACK, GL_DIFFUSE, treecolor) glTranslatef(0.0, 0.0, -0.7) # Z -0.7 # 0.1, 0.2 # glutSolidCylinder(0.1, 0.2, 20, 20) # # : 2 , , glMaterialfv(GL_FRONT_AND_BACK, GL_DIFFUSE, greencolor) glTranslatef(0.0, 0.0, 0.2) # Z 0.2 # () 0.5, 0.5 # glutSolidCone(0.5, 0.5, 20, 20) glTranslatef(0.0, 0.0, 0.3) # Z -0.3 glutSolidCone(0.4, 0.4, 20, 20) # 0.4, 0.4 glTranslatef(0.0, 0.0, 0.3) # Z -0.3 glutSolidCone(0.3, 0.3, 20, 20) # 0.3, 0.3 glPopMatrix() # "" glutSwapBuffers() # The glClear (GL_COLOR_BUFFER_BIT) function is used to fill the screen with gray. A pair of functions glPushMatrix () and glPopMatrix () allows us to rotate only the Christmas tree. The function glLightfv (GL_LIGHT0, GL_POSITION, lightpos) “rotates” the light source along with the Christmas tree, thanks to this, it remains “static” lit. The function glMaterialfv (GL_FRONT_AND_BACK, GL_DIFFUSE, color) sets a two-sided drawing mode, diffused lighting and sets the color with which the object is drawn. We draw needles using the function glutSolidCone (0.5, 0.5, 20, 20), and the tree trunk using the function glutSolidCylinder (0.1, 0.2, 20, 20). The first two parameters of these functions determine the radius and height, and the last two - the number of elements that make up the shapes (polygons). After all the parts of the Christmas tree are drawn in the memory of the video card, calling the function glutSwapBuffers () displays them on the screen.
All program code:
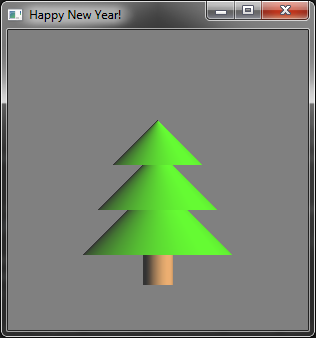
# : from OpenGL.GL import * from OpenGL.GLU import * from OpenGL.GLUT import * import sys # global xrot # x global yrot # y global ambient # global greencolor # global treecolor # global lightpos # # def init(): global xrot # x global yrot # y global ambient # global greencolor # global treecolor # global lightpos # xrot = 0.0 # x = 0 yrot = 0.0 # y = 0 ambient = (1.0, 1.0, 1.0, 1) # RGB, - greencolor = (0.2, 0.8, 0.0, 0.8) # treecolor = (0.9, 0.6, 0.3, 0.8) # lightpos = (1.0, 1.0, 1.0) # xyz glClearColor(0.5, 0.5, 0.5, 1.0) # gluOrtho2D(-1.0, 1.0, -1.0, 1.0) # glRotatef(-90, 1.0, 0.0, 0.0) # 90 glLightModelfv(GL_LIGHT_MODEL_AMBIENT, ambient) # glEnable(GL_LIGHTING) # glEnable(GL_LIGHT0) # glLightfv(GL_LIGHT0, GL_POSITION, lightpos) # # def specialkeys(key, x, y): global xrot global yrot # if key == GLUT_KEY_UP: # xrot -= 2.0 # if key == GLUT_KEY_DOWN: # xrot += 2.0 # if key == GLUT_KEY_LEFT: # yrot -= 2.0 # Y if key == GLUT_KEY_RIGHT: # yrot += 2.0 # Y glutPostRedisplay() # # def draw(): global xrot global yrot global lightpos global greencolor global treecolor glClear(GL_COLOR_BUFFER_BIT) # glPushMatrix() # "" glRotatef(xrot, 1.0, 0.0, 0.0) # X xrot glRotatef(yrot, 0.0, 1.0, 0.0) # Y yrot glLightfv(GL_LIGHT0, GL_POSITION, lightpos) # # # : 2 , , glMaterialfv(GL_FRONT_AND_BACK, GL_DIFFUSE, treecolor) glTranslatef(0.0, 0.0, -0.7) # Z -0.7 # 0.1, 0.2 # glutSolidCylinder(0.1, 0.2, 20, 20) # # : 2 , , glMaterialfv(GL_FRONT_AND_BACK, GL_DIFFUSE, greencolor) glTranslatef(0.0, 0.0, 0.2) # Z 0.2 # () 0.5, 0.5 # glutSolidCone(0.5, 0.5, 20, 20) glTranslatef(0.0, 0.0, 0.3) # Z -0.3 glutSolidCone(0.4, 0.4, 20, 20) # 0.4, 0.4 glTranslatef(0.0, 0.0, 0.3) # Z -0.3 glutSolidCone(0.3, 0.3, 20, 20) # 0.3, 0.3 glPopMatrix() # "" glutSwapBuffers() # # # RGB (, , ) glutInitDisplayMode(GLUT_DOUBLE | GLUT_RGB) # (, ) glutInitWindowSize(300, 300) # glutInitWindowPosition(50, 50) # OpenGl glutInit(sys.argv) # "Happy New Year!" glutCreateWindow(b"Happy New Year!") # , glutDisplayFunc(draw) # , glutSpecialFunc(specialkeys) # init() # glutMainLoop() The result of the program (Christmas tree in all its glory):
and some videos:
Using the functionality discussed in the post, it is quite possible to draw not only New Year trees, but also three-dimensional graphics, and models of various systems.
I hope this article will be useful for someone and will encourage further study of the Python language and the OpenGL specification.
Happy New Year, comrades !!!
PS Link to the next post about PyOpenGL with shaders.
Source: https://habr.com/ru/post/246625/
All Articles