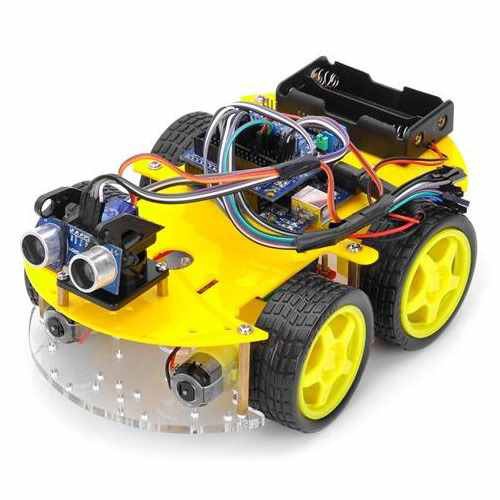
Robotale: a radio-controlled machine with Arduino and Bluetooth, which will help to learn the basics of working with Arduino and not only
Learning the basics of electronics (and indeed learning) is best done online. Not just to learn the rules, schemes, etc., but immediately try to learn in practice. And this possibility is a radio-controlled machine with ARDUINO and Bluetooth.
The roots of the device are Chinese, in the English manual even not all the hieroglyphs are removed. However, this is a very interesting project that can teach a lot. The fact is that both hardware and software can be changed here, with the addition of new modules and add-ons for software.
')
What is Robotale?

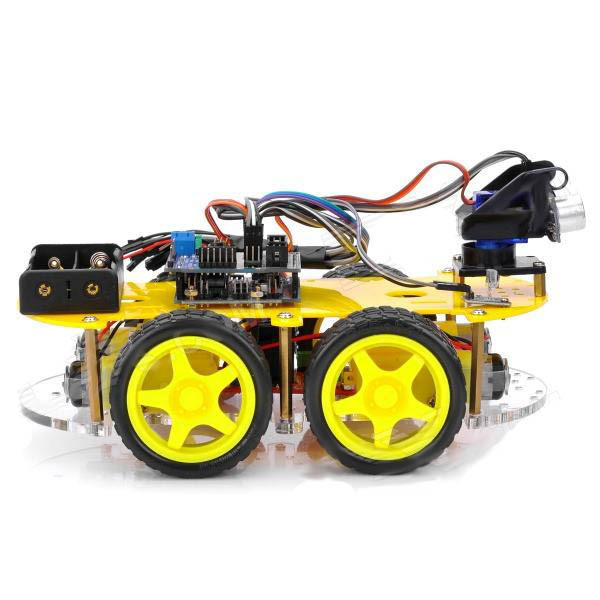
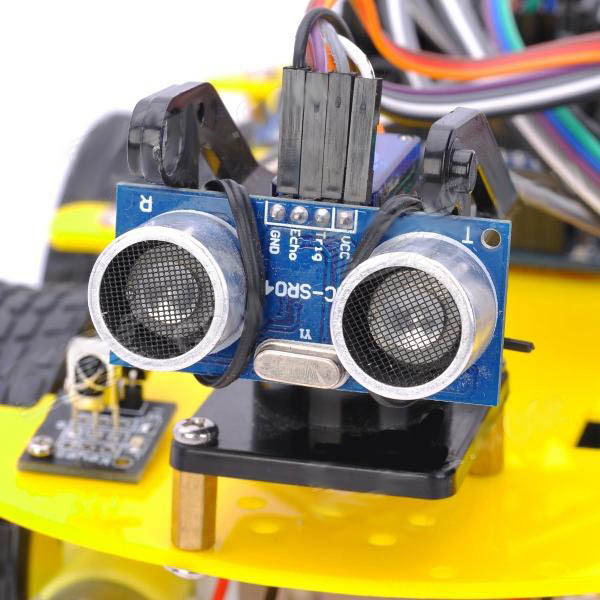
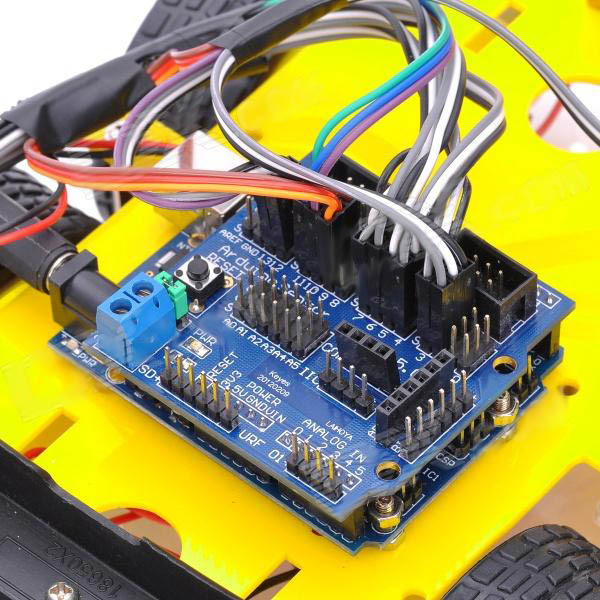
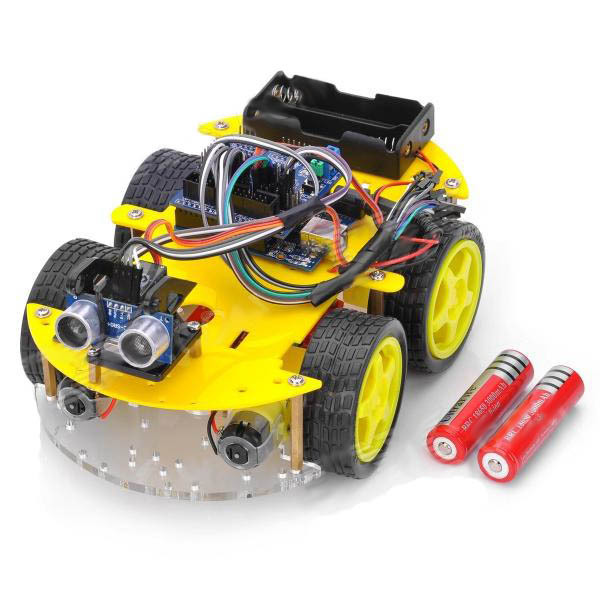
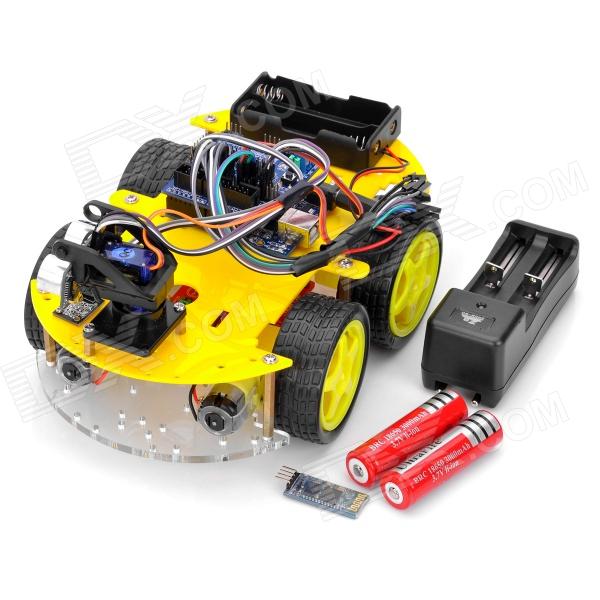
The developers are positioning the project as a learning and developing electronic system, based on the Arduino microcontroller atmega-328 core. In addition, there is a Bluetooth module, an infrared module, sensors that help the device to avoid obstacles. Included - a number of programs to control the device, and an expansion card that allows you to install additional modules, adding functionality to the device.

Device characteristics
- Electric motor: 6-9V (4 pieces, 1 for each of the wheels);
- Four wheels;
- Motor mount;
- 2 plexiglass boards;
- Control Board L298N;
- ARDUINO UNO328;
- Expansion board with sensors;
- PTZ;
- Servo;
- Ultrasound module;
- Infrared sensor;
- Remote control;
- Adapter;
- Bluetooth module.
Screwdrivers, screws, USB cable are supplied with the device.
How it works?
The machine comes disassembled, so you have to assemble it with your own hands. Despite the abundance of parts, the assembly is quite simple, and the child will cope with it (although this requires some experience with a screwdriver and, sometimes, soldering). At the initial stage, a person who assembles this car from separate parts will be able to understand how all this works and interacts.
After everything is assembled, you need to install a control program for the Arduino Uno on a PC or laptop from which device management and software revision will be performed.
If desired, the set of hardware and programs can be changed and supplemented - here only the desire and opportunity (experience) of this desire to fulfill it play a role. The Robotale Kit is an advanced electronic designer that can be used by both children and adults. Of course, working with Arduino is not so easy, but it will be more interesting to learn in the process of assembling a machine and connecting additional modules.
For example, you can add a Bluetooth module, and teach the car to understand the commands that are transmitted wirelessly. By the way, in this device, when pairing with a Bluetooth gadget, you need to enter the pairing code "1234". After that, you can try to manage.
For example, you can make it so that when you press the letter “R” on the keyboard of a mobile device or laptop (device associated with a typewriter), the red pin13 LED flashes. This can be achieved using the following program area:
Code
char val;
int ledpin = 13;
void setup ()
{
Serial.begin (9600);
pinMode (ledpin, OUTPUT);
}
void loop ()
{
val = Serial.read ();
if (val == 'r')
{
digitalWrite (ledpin, HIGH);
delay ((500);
digitalWrite (ledpin, LOW);
delay (500);
Serial.println ("keyes");
}
}
int ledpin = 13;
void setup ()
{
Serial.begin (9600);
pinMode (ledpin, OUTPUT);
}
void loop ()
{
val = Serial.read ();
if (val == 'r')
{
digitalWrite (ledpin, HIGH);
delay ((500);
digitalWrite (ledpin, LOW);
delay (500);
Serial.println ("keyes");
}
}
And then:
Code number 2
********************************
int MotorRight1 = 5;
int MotorRight2 = 6;
int MotorLeft1 = 10;
int MotorLeft2 = 11;
void setup ()
{
Serial.begin (9600);
pinMode (MotorRight1, OUTPUT); // pin 8 (pwm)
pinMode (MotorRight2, OUTPUT); // pin 9 (pwm)
pinMode (MotorLeft1, OUTPUT); // pin 10 (pwm)
pinMode (MotorLeft2, OUTPUT); // pin 11 (pwm)
}
void go () / / Forward
{
digitalWrite (MotorRight1, LOW);
digitalWrite (MotorRight2, HIGH);
digitalWrite (MotorLeft1, LOW);
digitalWrite (MotorLeft2, HIGH);
}
void left () / / turn right
{
digitalWrite (MotorRight1, HIGH);
digitalWrite (MotorRight2, LOW);
digitalWrite (MotorLeft1, LOW);
digitalWrite (MotorLeft2, HIGH);
}
void right () / / turn left
{
digitalWrite (MotorRight1, LOW);
digitalWrite (MotorRight2, HIGH);
digitalWrite (MotorLeft1, HIGH);
digitalWrite (MotorLeft2, LOW);
}
void stop () / / stop
{
digitalWrite (MotorRight1, LOW);
digitalWrite (MotorRight2, LOW);
digitalWrite (MotorLeft1, LOW);
digitalWrite (MotorLeft2, LOW);
}
void back () / / Check out
{
digitalWrite (MotorRight1, HIGH);
digitalWrite (MotorRight2, LOW);
digitalWrite (MotorLeft1, HIGH);
digitalWrite (MotorLeft2, LOW) ;;
}
void loop ()
{
char val = Serial.read ();
Serial.write (val);
if (-1! = val) {
if ('W' == val)
go ();
else if ('A' == val)
left ();
else if ('D' == val)
right ();
else if ('S' == val)
back ();
else if ('Q' == val)
stop ();
delay (500);
}
else
{
/ / Stop ();
delay (500);
}
}
If you need to use all the functions, including the recognition of the infrared signal, commands of the Bluetooth module and other features, you should use this code:
*******************************
# Include <IRremote.h>
# Include <Servo.h>
*********************** Definition of motor pin ******************** ****
int MotorRight1 = 5;
int MotorRight2 = 6;
int MotorLeft1 = 10;
int MotorLeft2 = 11;
int counter = 0;
const int irReceiverPin = 2; / / OUTPUT signals IR receiver connected to pin 2
char val;
*********************** Set to detect the IRcode ****************** ** *****
long IRfront = 0x00FFA25D; / / Forward code
long IRback = 0x00FF629D; // check out
long IRturnright = 0x00FFC23D; / / Right
long IRturnleft = 0x00FF02FD; // Left
long IRstop = 0x00FFE21D; / / Stop
long IRcny70 = 0x00FFA857; // CNY70 self-propelled mode
long IRAutorun = 0x00FF 906F; // self-propelled mode ultrasound
long IRturnsmallleft = 0x00FF22DD;
************************* Defined CNY70 pin ******************* * ****************
const int SensorLeft = 7; // Left sensor input pin
const int SensorMiddle = 4; / / The sensor input pin
const int SensorRight = 3; // Right sensor input pin
int sl; // Left sensor status
int SM; / / The status
int SR; / / Right sensor
IRrecv irrecv (irReceiverPin); // Define an object to receive infrared signals IRrecv
decode_results results; / / Decoding results in decode_results
************************* Defined ultrasound pin ****************** ** **********
int inputPin = 13; / / define pin ultrasonic signal receiver rx
int outputPin = 12; / / define ultrasonic signal transmitter pin 'tx
int Fspeedd = 0; / / in front of distance
int Rspeedd = 0; / / the right distance
int Lspeedd = 0; / / left distance
int directionn = 0; / / = 8 post = 2 front left and right = 6 = 4
Servo myservo; / / set myservo
int delay_time = 250; / / settling time after steering servo motors
int Fgo = 8; / / Forward
int Rgo = 6; // turn right
int Lgo = 4; // turn left
int Bgo = 2; / / reverse
************************************************ ******************** (SETUP)
void setup ()
{
Serial.begin (9600);
pinMode (MotorRight1, OUTPUT); // pin 8 (pwm)
pinMode (MotorRight2, OUTPUT); // pin 9 (pwm)
pinMode (MotorLeft1, OUTPUT); // pin 10 (pwm)
pinMode (MotorLeft2, OUTPUT); // pin 11 (pwm)
irrecv.enableIRIn (); // Start infrared decoding
pinMode (SensorLeft, INPUT); / / define left Sensors
pinMode (SensorMiddle, INPUT); / / definition sensors
pinMode (SensorRight, INPUT); // definition of the right sensor
digitalWrite (2, HIGH);
pinMode (inputPin, INPUT); / / define ultrasound input pin
pinMode (outputPin, OUTPUT); / / define ultrasonic output pin
myservo.attach (9); / / define servo motor output section 5 pin (PWM)
}
************************************************ ****************** (Void)
void advance (int a) / / Forward
{
digitalWrite (MotorRight1, LOW);
digitalWrite (MotorRight2, HIGH);
digitalWrite (MotorLeft1, LOW);
digitalWrite (MotorLeft2, HIGH);
delay (a * 100);
}
void right (int b) / / turn right (single wheel)
{
digitalWrite (MotorLeft1, LOW);
digitalWrite (MotorLeft2, HIGH);
digitalWrite (MotorRight1, LOW);
digitalWrite (MotorRight2, LOW);
delay (b * 100);
}
void left (int c) / / turn left (single wheel)
{
digitalWrite (MotorRight1, LOW);
digitalWrite (MotorRight2, HIGH);
digitalWrite (MotorLeft1, LOW);
digitalWrite (MotorLeft2, LOW);
delay (c * 100);
}
void turnR (int d) / / turn right (wheel)
{
digitalWrite (MotorRight1, HIGH);
digitalWrite (MotorRight2, LOW);
digitalWrite (MotorLeft1, LOW);
digitalWrite (MotorLeft2, HIGH);
delay (d * 100);
}
void turnL (int e) / / turn left (wheel)
{
digitalWrite (MotorRight1, LOW);
digitalWrite (MotorRight2, HIGH);
digitalWrite (MotorLeft1, HIGH);
digitalWrite (MotorLeft2, LOW);
delay (e * 100);
}
void stopp (int f) / / Stop
{
digitalWrite (MotorRight1, LOW);
digitalWrite (MotorRight2, LOW);
digitalWrite (MotorLeft1, LOW);
digitalWrite (MotorLeft2, LOW);
delay (f * 100);
}
void back (int g) // Check out
{
digitalWrite (MotorRight1, HIGH);
digitalWrite (MotorRight2, LOW);
digitalWrite (MotorLeft1, HIGH);
digitalWrite (MotorLeft2, LOW) ;;
delay (g * 100);
}
void detection () / / measure three angles (front Left. Right)
{
int delay_time = 250; / / settling time after steering servo motors
ask_pin_F (); / / read from front
if (Fspeedd <10) / / if the distance is less than 10 cm in front of
{
stopp (1); // clear the output data
back (2); // check out 0.2 seconds
}
if (Fspeedd <25) // if the distance is less than 25 cm in front of
{
stopp (1); // clear the output data
ask_pin_L (); / / read from left
delay (delay_time); / / wait for stable servo motor
ask_pin_R (); / / read the right distance
delay (delay_time); / / wait for stable servo motor
If (Lspeedd> Rspeedd) / / If the distance is greater than the right from the left
{
directionn = Lgo; / / go left
}
if (Lspeedd <= Rspeedd) / if the distance
{
directionn = Rgo; / / go right
}
if (Lspeedd <15 && Rspeedd <15) // if the distance is less than 10 cm
{
directionn = Bgo; // to go after
}
}
else / / add as greater than 25 cm in front of
{
directionn = Fgo; // to move forward
}
}
************************************************ **********************************
void ask_pin_F () / / Measure the distance from the front
{
myservo.write (90);
digitalWrite (outputPin, LOW); // make ultrasonic transmitter low voltage 2 μs
delayMicroseconds (2);
digitalWrite (outputPin, HIGH); // make ultrasonic transmitting high voltage 10 μ s, where at least 10 μ s
delayMicroseconds (10);
digitalWrite (outputPin, LOW); / / maintain low voltage ultrasonic transmitter
float Fdistance = pulseIn (inputPin, HIGH); // read worse time difference
Fdistance = Fdistance / 5.8 / 10; // will turn to time distance (unit: cm)
Serial.print ("F distance:"); // output distance (unit: cm)
Serial.println (Fdistance); // display the distance
Fspeedd = Fdistance; // will enter Fspeedd (former speed) from Reading
}
************************************************ ******************************=
void ask_pin_L () / / Measure the distance from the left
{
myservo.write (177);
delay (delay_time);
digitalWrite (outputPin, LOW); // make ultrasonic transmitter low voltage 2 μs
delayMicroseconds (2);
digitalWrite (outputPin, HIGH); // make ultrasonic transmitting high voltage 10 μ s, where at least 10 μ s
delayMicroseconds (10);
digitalWrite (outputPin, LOW); / / maintain low voltage ultrasonic transmitter
float Ldistance = pulseIn (inputPin, HIGH); // read worse time difference
Ldistance = Ldistance / 5.8 / 10; // will turn to time distance (unit: cm)
Serial.print ("L distance:"); // output distance (unit: cm)
Serial.println (Ldistance); // display the distance
Lspeedd = Ldistance; // will be read into the distance Lspeedd (left-speed)
}
************************************************ *******************************
void ask_pin_R () / / Measure the distance from the right
{
myservo.write (5);
delay (delay_time);
digitalWrite (outputPin, LOW); // make ultrasonic transmitter low voltage 2 μs
delayMicroseconds (2);
digitalWrite (outputPin, HIGH); // make ultrasonic transmitting high voltage 10 μ s, where at least 10 μ s
delayMicroseconds (10);
digitalWrite (outputPin, LOW); / / maintain low voltage ultrasonic transmitter
float Rdistance = pulseIn (inputPin, HIGH); // read worse time difference
Rdistance = Rdistance / 5.8 / 10; // will turn to time distance (unit: cm)
Serial.print ("R distance:"); // output distance (unit: cm)
Serial.println (Rdistance); // display the distance
Rspeedd = Rdistance; // will be read into the distance Rspeedd (Right-speed)
}
************************************************ ******************************* (LOOP)
void loop ()
{
SL = digitalRead (SensorLeft);
SM = digitalRead (SensorMiddle);
SR = digitalRead (SensorRight);
performCommand ();
************************************************ *************************** normal remote mode
if (irrecv.decode (& results))
{/ / Decoding is successful, you receive a set of infrared signals
/ ************************************************* ********************** /
if (results.value == IRfront) / / Forward
{
advance (10); // forward
}
/ ************************************************* ********************** /
if (results.value == IRback) / / Check out
{
back (10); // after retirement
}
/ ************************************************* ********************** /
if (results.value == IRturnright) / / turn right
{
right (6); // turn right
}
/ ************************************************* ********************** /
if (results.value == IRturnleft) / / turn left
{
left (6); / turn left);
}
/ ************************************************* ********************** /
if (results.value == IRstop) / / Stop
{
digitalWrite (MotorRight1, LOW);
digitalWrite (MotorRight2, LOW);
digitalWrite (MotorLeft1, LOW);
digitalWrite (MotorLeft2, LOW);
}
************************************************ *********************** cny70 model black self-propelled mode: LOW White:
if (results.value == IRcny70)
{
while (IRcny70)
{
SL = digitalRead (SensorLeft);
SM = digitalRead (SensorMiddle);
SR = digitalRead (SensorRight);
if (SM == HIGH) / / in sensors in black areas
{
if (SL == LOW & SR == HIGH) / / left and right black white, turn left
{
digitalWrite (MotorRight1, LOW);
digitalWrite (MotorRight2, HIGH);
analogWrite (MotorLeft1, 0);
analogWrite (MotorLeft2, 80);
}
else if (SR == LOW & SL == HIGH) / / left and right black white, turn right
{
analogWrite (MotorRight1, 0); / / right turn
analogWrite (MotorRight2, 80);
digitalWrite (MotorLeft1, LOW);
digitalWrite (MotorLeft2, HIGH);
}
else / / Both sides white, straight
{
digitalWrite (MotorRight1, LOW);
digitalWrite (MotorRight2, HIGH);
digitalWrite (MotorLeft1, LOW);
digitalWrite (MotorLeft2, HIGH);
analogWrite (MotorLeft1, 200);
analogWrite (MotorLeft2, 200);
analogWrite (MotorRight1, 200);
analogWrite (MotorRight2, 200);
}
}
else / / the sensors in the white area
{
if (SL == LOW & SR == HIGH) / / left and right black white, fast turn left
{
digitalWrite (MotorRight1, LOW);
digitalWrite (MotorRight2, HIGH);
digitalWrite (MotorLeft1, LOW);
digitalWrite (MotorLeft2, LOW);
}
else if (SR == LOW & SL == HIGH) / / left and right black white, quick right turn
{
digitalWrite (MotorRight1, LOW);
digitalWrite (MotorRight2, LOW);
digitalWrite (MotorLeft1, LOW);
digitalWrite (MotorLeft2, HIGH);
}
else / / are white, stop
{
digitalWrite (MotorRight1, HIGH);
digitalWrite (MotorRight2, LOW);
digitalWrite (MotorLeft1, HIGH);
digitalWrite (MotorLeft2, LOW) ;;
}
}
if (irrecv.decode (& results))
{
irrecv.resume ();
Serial.println (results.value, HEX);
if (results.value == IRstop)
{
digitalWrite (MotorRight1, HIGH);
digitalWrite (MotorRight2, HIGH);
digitalWrite (MotorLeft1, HIGH);
digitalWrite (MotorLeft2, HIGH);
break;
}
}
}
results.value = 0;
}
************************************************ self-propelled mode ultrasound ***********************
if (results.value == IRAutorun)
{
while (IRAutorun)
{
myservo.write (90); / / return to the pre-prepared position
detection (); / / measure
if (directionn == 8) / / If directionn (direction) = 8 (forward)
{
if (irrecv.decode (& results))
{
irrecv.resume ();
Serial.println (results.value, HEX);
if (results.value == IRstop)
{
digitalWrite (MotorRight1, LOW);
digitalWrite (MotorRight2, LOW);
digitalWrite (MotorLeft1, LOW);
digitalWrite (MotorLeft2, LOW);
break;
}
}
results.value = 0;
advance (1); / / normal forward
Serial.print ("Advance"); // display direction (forward)
Serial.print ("");
}
if (directionn == 2) / / If directionn (direction) = 2 (reverse)
{
if (irrecv.decode (& results))
{
irrecv.resume ();
Serial.println (results.value, HEX);
if (results.value == IRstop)
{
digitalWrite (MotorRight1, LOW);
digitalWrite (MotorRight2, LOW);
digitalWrite (MotorLeft1, LOW);
digitalWrite (MotorLeft2, LOW);
break;
}
}
results.value = 0;
back (8); // reverse (car)
turnL (3); / / move slightly to the left (to prevent stuck in dead alley)
Serial.print ("Reverse"); // display direction (backwards)
}
if (directionn == 6) / / If directionn (direction) = 6 (right turn)
{
if (irrecv.decode (& results))
{
irrecv.resume ();
Serial.println (results.value, HEX);
if (results.value == IRstop)
{
digitalWrite (MotorRight1, LOW);
digitalWrite (MotorRight2, LOW);
digitalWrite (MotorLeft1, LOW);
digitalWrite (MotorLeft2, LOW);
break;
}
}
results.value = 0;
back (1);
turnR (6); // turn right
Serial.print ("Right"); // display direction (turn left)
}
if (directionn == 4) / / If directionn (direction) = 4 (turn left)
{
if (irrecv.decode (& results))
{
irrecv.resume ();
Serial.println (results.value, HEX);
if (results.value == IRstop)
{
digitalWrite (MotorRight1, LOW);
digitalWrite (MotorRight2, LOW);
digitalWrite (MotorLeft1, LOW);
digitalWrite (MotorLeft2, LOW);
break;
}
}
results.value = 0;
back (1);
turnL (6); // turn left
Serial.print ("Left"); // display direction (turn right)
}
if (irrecv.decode (& results))
{
irrecv.resume ();
Serial.println (results.value, HEX);
if (results.value == IRstop)
{
digitalWrite (MotorRight1, LOW);
digitalWrite (MotorRight2, LOW);
digitalWrite (MotorLeft1, LOW);
digitalWrite (MotorLeft2, LOW);
break;
}
}
}
results.value = 0;
}
/ ************************************************* ********************** /
else
{
digitalWrite (MotorRight1, LOW);
digitalWrite (MotorRight2, LOW);
digitalWrite (MotorLeft1, LOW);
digitalWrite (MotorLeft2, LOW);
}
irrecv.resume (); // Continue to accept a set of infrared signals
}
}
void performCommand () {
if (Serial.available ()) {
val = Serial.read ();
}
if (val == 'f') {/ / Forward
advance (10);
} Else if (val == 'z') {/ / Stop Forward
stopp (10);
} Else if (val == 'b') {// Backward
back (10);
} Else if (val == 'y') {// Stop Backward
back (10);
} else if (val == 'l') {/ / Right
turnR (10);
} Else if (val == 'r') {/ / Left
turnL (10);
} Else if (val == 'v') {/ / Stop Turn
stopp (10);
} Else if (val == 's') {/ / Stop
stopp (10);
}
}
int MotorRight1 = 5;
int MotorRight2 = 6;
int MotorLeft1 = 10;
int MotorLeft2 = 11;
void setup ()
{
Serial.begin (9600);
pinMode (MotorRight1, OUTPUT); // pin 8 (pwm)
pinMode (MotorRight2, OUTPUT); // pin 9 (pwm)
pinMode (MotorLeft1, OUTPUT); // pin 10 (pwm)
pinMode (MotorLeft2, OUTPUT); // pin 11 (pwm)
}
void go () / / Forward
{
digitalWrite (MotorRight1, LOW);
digitalWrite (MotorRight2, HIGH);
digitalWrite (MotorLeft1, LOW);
digitalWrite (MotorLeft2, HIGH);
}
void left () / / turn right
{
digitalWrite (MotorRight1, HIGH);
digitalWrite (MotorRight2, LOW);
digitalWrite (MotorLeft1, LOW);
digitalWrite (MotorLeft2, HIGH);
}
void right () / / turn left
{
digitalWrite (MotorRight1, LOW);
digitalWrite (MotorRight2, HIGH);
digitalWrite (MotorLeft1, HIGH);
digitalWrite (MotorLeft2, LOW);
}
void stop () / / stop
{
digitalWrite (MotorRight1, LOW);
digitalWrite (MotorRight2, LOW);
digitalWrite (MotorLeft1, LOW);
digitalWrite (MotorLeft2, LOW);
}
void back () / / Check out
{
digitalWrite (MotorRight1, HIGH);
digitalWrite (MotorRight2, LOW);
digitalWrite (MotorLeft1, HIGH);
digitalWrite (MotorLeft2, LOW) ;;
}
void loop ()
{
char val = Serial.read ();
Serial.write (val);
if (-1! = val) {
if ('W' == val)
go ();
else if ('A' == val)
left ();
else if ('D' == val)
right ();
else if ('S' == val)
back ();
else if ('Q' == val)
stop ();
delay (500);
}
else
{
/ / Stop ();
delay (500);
}
}
If you need to use all the functions, including the recognition of the infrared signal, commands of the Bluetooth module and other features, you should use this code:
*******************************
# Include <IRremote.h>
# Include <Servo.h>
*********************** Definition of motor pin ******************** ****
int MotorRight1 = 5;
int MotorRight2 = 6;
int MotorLeft1 = 10;
int MotorLeft2 = 11;
int counter = 0;
const int irReceiverPin = 2; / / OUTPUT signals IR receiver connected to pin 2
char val;
*********************** Set to detect the IRcode ****************** ** *****
long IRfront = 0x00FFA25D; / / Forward code
long IRback = 0x00FF629D; // check out
long IRturnright = 0x00FFC23D; / / Right
long IRturnleft = 0x00FF02FD; // Left
long IRstop = 0x00FFE21D; / / Stop
long IRcny70 = 0x00FFA857; // CNY70 self-propelled mode
long IRAutorun = 0x00FF 906F; // self-propelled mode ultrasound
long IRturnsmallleft = 0x00FF22DD;
************************* Defined CNY70 pin ******************* * ****************
const int SensorLeft = 7; // Left sensor input pin
const int SensorMiddle = 4; / / The sensor input pin
const int SensorRight = 3; // Right sensor input pin
int sl; // Left sensor status
int SM; / / The status
int SR; / / Right sensor
IRrecv irrecv (irReceiverPin); // Define an object to receive infrared signals IRrecv
decode_results results; / / Decoding results in decode_results
************************* Defined ultrasound pin ****************** ** **********
int inputPin = 13; / / define pin ultrasonic signal receiver rx
int outputPin = 12; / / define ultrasonic signal transmitter pin 'tx
int Fspeedd = 0; / / in front of distance
int Rspeedd = 0; / / the right distance
int Lspeedd = 0; / / left distance
int directionn = 0; / / = 8 post = 2 front left and right = 6 = 4
Servo myservo; / / set myservo
int delay_time = 250; / / settling time after steering servo motors
int Fgo = 8; / / Forward
int Rgo = 6; // turn right
int Lgo = 4; // turn left
int Bgo = 2; / / reverse
************************************************ ******************** (SETUP)
void setup ()
{
Serial.begin (9600);
pinMode (MotorRight1, OUTPUT); // pin 8 (pwm)
pinMode (MotorRight2, OUTPUT); // pin 9 (pwm)
pinMode (MotorLeft1, OUTPUT); // pin 10 (pwm)
pinMode (MotorLeft2, OUTPUT); // pin 11 (pwm)
irrecv.enableIRIn (); // Start infrared decoding
pinMode (SensorLeft, INPUT); / / define left Sensors
pinMode (SensorMiddle, INPUT); / / definition sensors
pinMode (SensorRight, INPUT); // definition of the right sensor
digitalWrite (2, HIGH);
pinMode (inputPin, INPUT); / / define ultrasound input pin
pinMode (outputPin, OUTPUT); / / define ultrasonic output pin
myservo.attach (9); / / define servo motor output section 5 pin (PWM)
}
************************************************ ****************** (Void)
void advance (int a) / / Forward
{
digitalWrite (MotorRight1, LOW);
digitalWrite (MotorRight2, HIGH);
digitalWrite (MotorLeft1, LOW);
digitalWrite (MotorLeft2, HIGH);
delay (a * 100);
}
void right (int b) / / turn right (single wheel)
{
digitalWrite (MotorLeft1, LOW);
digitalWrite (MotorLeft2, HIGH);
digitalWrite (MotorRight1, LOW);
digitalWrite (MotorRight2, LOW);
delay (b * 100);
}
void left (int c) / / turn left (single wheel)
{
digitalWrite (MotorRight1, LOW);
digitalWrite (MotorRight2, HIGH);
digitalWrite (MotorLeft1, LOW);
digitalWrite (MotorLeft2, LOW);
delay (c * 100);
}
void turnR (int d) / / turn right (wheel)
{
digitalWrite (MotorRight1, HIGH);
digitalWrite (MotorRight2, LOW);
digitalWrite (MotorLeft1, LOW);
digitalWrite (MotorLeft2, HIGH);
delay (d * 100);
}
void turnL (int e) / / turn left (wheel)
{
digitalWrite (MotorRight1, LOW);
digitalWrite (MotorRight2, HIGH);
digitalWrite (MotorLeft1, HIGH);
digitalWrite (MotorLeft2, LOW);
delay (e * 100);
}
void stopp (int f) / / Stop
{
digitalWrite (MotorRight1, LOW);
digitalWrite (MotorRight2, LOW);
digitalWrite (MotorLeft1, LOW);
digitalWrite (MotorLeft2, LOW);
delay (f * 100);
}
void back (int g) // Check out
{
digitalWrite (MotorRight1, HIGH);
digitalWrite (MotorRight2, LOW);
digitalWrite (MotorLeft1, HIGH);
digitalWrite (MotorLeft2, LOW) ;;
delay (g * 100);
}
void detection () / / measure three angles (front Left. Right)
{
int delay_time = 250; / / settling time after steering servo motors
ask_pin_F (); / / read from front
if (Fspeedd <10) / / if the distance is less than 10 cm in front of
{
stopp (1); // clear the output data
back (2); // check out 0.2 seconds
}
if (Fspeedd <25) // if the distance is less than 25 cm in front of
{
stopp (1); // clear the output data
ask_pin_L (); / / read from left
delay (delay_time); / / wait for stable servo motor
ask_pin_R (); / / read the right distance
delay (delay_time); / / wait for stable servo motor
If (Lspeedd> Rspeedd) / / If the distance is greater than the right from the left
{
directionn = Lgo; / / go left
}
if (Lspeedd <= Rspeedd) / if the distance
{
directionn = Rgo; / / go right
}
if (Lspeedd <15 && Rspeedd <15) // if the distance is less than 10 cm
{
directionn = Bgo; // to go after
}
}
else / / add as greater than 25 cm in front of
{
directionn = Fgo; // to move forward
}
}
************************************************ **********************************
void ask_pin_F () / / Measure the distance from the front
{
myservo.write (90);
digitalWrite (outputPin, LOW); // make ultrasonic transmitter low voltage 2 μs
delayMicroseconds (2);
digitalWrite (outputPin, HIGH); // make ultrasonic transmitting high voltage 10 μ s, where at least 10 μ s
delayMicroseconds (10);
digitalWrite (outputPin, LOW); / / maintain low voltage ultrasonic transmitter
float Fdistance = pulseIn (inputPin, HIGH); // read worse time difference
Fdistance = Fdistance / 5.8 / 10; // will turn to time distance (unit: cm)
Serial.print ("F distance:"); // output distance (unit: cm)
Serial.println (Fdistance); // display the distance
Fspeedd = Fdistance; // will enter Fspeedd (former speed) from Reading
}
************************************************ ******************************=
void ask_pin_L () / / Measure the distance from the left
{
myservo.write (177);
delay (delay_time);
digitalWrite (outputPin, LOW); // make ultrasonic transmitter low voltage 2 μs
delayMicroseconds (2);
digitalWrite (outputPin, HIGH); // make ultrasonic transmitting high voltage 10 μ s, where at least 10 μ s
delayMicroseconds (10);
digitalWrite (outputPin, LOW); / / maintain low voltage ultrasonic transmitter
float Ldistance = pulseIn (inputPin, HIGH); // read worse time difference
Ldistance = Ldistance / 5.8 / 10; // will turn to time distance (unit: cm)
Serial.print ("L distance:"); // output distance (unit: cm)
Serial.println (Ldistance); // display the distance
Lspeedd = Ldistance; // will be read into the distance Lspeedd (left-speed)
}
************************************************ *******************************
void ask_pin_R () / / Measure the distance from the right
{
myservo.write (5);
delay (delay_time);
digitalWrite (outputPin, LOW); // make ultrasonic transmitter low voltage 2 μs
delayMicroseconds (2);
digitalWrite (outputPin, HIGH); // make ultrasonic transmitting high voltage 10 μ s, where at least 10 μ s
delayMicroseconds (10);
digitalWrite (outputPin, LOW); / / maintain low voltage ultrasonic transmitter
float Rdistance = pulseIn (inputPin, HIGH); // read worse time difference
Rdistance = Rdistance / 5.8 / 10; // will turn to time distance (unit: cm)
Serial.print ("R distance:"); // output distance (unit: cm)
Serial.println (Rdistance); // display the distance
Rspeedd = Rdistance; // will be read into the distance Rspeedd (Right-speed)
}
************************************************ ******************************* (LOOP)
void loop ()
{
SL = digitalRead (SensorLeft);
SM = digitalRead (SensorMiddle);
SR = digitalRead (SensorRight);
performCommand ();
************************************************ *************************** normal remote mode
if (irrecv.decode (& results))
{/ / Decoding is successful, you receive a set of infrared signals
/ ************************************************* ********************** /
if (results.value == IRfront) / / Forward
{
advance (10); // forward
}
/ ************************************************* ********************** /
if (results.value == IRback) / / Check out
{
back (10); // after retirement
}
/ ************************************************* ********************** /
if (results.value == IRturnright) / / turn right
{
right (6); // turn right
}
/ ************************************************* ********************** /
if (results.value == IRturnleft) / / turn left
{
left (6); / turn left);
}
/ ************************************************* ********************** /
if (results.value == IRstop) / / Stop
{
digitalWrite (MotorRight1, LOW);
digitalWrite (MotorRight2, LOW);
digitalWrite (MotorLeft1, LOW);
digitalWrite (MotorLeft2, LOW);
}
************************************************ *********************** cny70 model black self-propelled mode: LOW White:
if (results.value == IRcny70)
{
while (IRcny70)
{
SL = digitalRead (SensorLeft);
SM = digitalRead (SensorMiddle);
SR = digitalRead (SensorRight);
if (SM == HIGH) / / in sensors in black areas
{
if (SL == LOW & SR == HIGH) / / left and right black white, turn left
{
digitalWrite (MotorRight1, LOW);
digitalWrite (MotorRight2, HIGH);
analogWrite (MotorLeft1, 0);
analogWrite (MotorLeft2, 80);
}
else if (SR == LOW & SL == HIGH) / / left and right black white, turn right
{
analogWrite (MotorRight1, 0); / / right turn
analogWrite (MotorRight2, 80);
digitalWrite (MotorLeft1, LOW);
digitalWrite (MotorLeft2, HIGH);
}
else / / Both sides white, straight
{
digitalWrite (MotorRight1, LOW);
digitalWrite (MotorRight2, HIGH);
digitalWrite (MotorLeft1, LOW);
digitalWrite (MotorLeft2, HIGH);
analogWrite (MotorLeft1, 200);
analogWrite (MotorLeft2, 200);
analogWrite (MotorRight1, 200);
analogWrite (MotorRight2, 200);
}
}
else / / the sensors in the white area
{
if (SL == LOW & SR == HIGH) / / left and right black white, fast turn left
{
digitalWrite (MotorRight1, LOW);
digitalWrite (MotorRight2, HIGH);
digitalWrite (MotorLeft1, LOW);
digitalWrite (MotorLeft2, LOW);
}
else if (SR == LOW & SL == HIGH) / / left and right black white, quick right turn
{
digitalWrite (MotorRight1, LOW);
digitalWrite (MotorRight2, LOW);
digitalWrite (MotorLeft1, LOW);
digitalWrite (MotorLeft2, HIGH);
}
else / / are white, stop
{
digitalWrite (MotorRight1, HIGH);
digitalWrite (MotorRight2, LOW);
digitalWrite (MotorLeft1, HIGH);
digitalWrite (MotorLeft2, LOW) ;;
}
}
if (irrecv.decode (& results))
{
irrecv.resume ();
Serial.println (results.value, HEX);
if (results.value == IRstop)
{
digitalWrite (MotorRight1, HIGH);
digitalWrite (MotorRight2, HIGH);
digitalWrite (MotorLeft1, HIGH);
digitalWrite (MotorLeft2, HIGH);
break;
}
}
}
results.value = 0;
}
************************************************ self-propelled mode ultrasound ***********************
if (results.value == IRAutorun)
{
while (IRAutorun)
{
myservo.write (90); / / return to the pre-prepared position
detection (); / / measure
if (directionn == 8) / / If directionn (direction) = 8 (forward)
{
if (irrecv.decode (& results))
{
irrecv.resume ();
Serial.println (results.value, HEX);
if (results.value == IRstop)
{
digitalWrite (MotorRight1, LOW);
digitalWrite (MotorRight2, LOW);
digitalWrite (MotorLeft1, LOW);
digitalWrite (MotorLeft2, LOW);
break;
}
}
results.value = 0;
advance (1); / / normal forward
Serial.print ("Advance"); // display direction (forward)
Serial.print ("");
}
if (directionn == 2) / / If directionn (direction) = 2 (reverse)
{
if (irrecv.decode (& results))
{
irrecv.resume ();
Serial.println (results.value, HEX);
if (results.value == IRstop)
{
digitalWrite (MotorRight1, LOW);
digitalWrite (MotorRight2, LOW);
digitalWrite (MotorLeft1, LOW);
digitalWrite (MotorLeft2, LOW);
break;
}
}
results.value = 0;
back (8); // reverse (car)
turnL (3); / / move slightly to the left (to prevent stuck in dead alley)
Serial.print ("Reverse"); // display direction (backwards)
}
if (directionn == 6) / / If directionn (direction) = 6 (right turn)
{
if (irrecv.decode (& results))
{
irrecv.resume ();
Serial.println (results.value, HEX);
if (results.value == IRstop)
{
digitalWrite (MotorRight1, LOW);
digitalWrite (MotorRight2, LOW);
digitalWrite (MotorLeft1, LOW);
digitalWrite (MotorLeft2, LOW);
break;
}
}
results.value = 0;
back (1);
turnR (6); // turn right
Serial.print ("Right"); // display direction (turn left)
}
if (directionn == 4) / / If directionn (direction) = 4 (turn left)
{
if (irrecv.decode (& results))
{
irrecv.resume ();
Serial.println (results.value, HEX);
if (results.value == IRstop)
{
digitalWrite (MotorRight1, LOW);
digitalWrite (MotorRight2, LOW);
digitalWrite (MotorLeft1, LOW);
digitalWrite (MotorLeft2, LOW);
break;
}
}
results.value = 0;
back (1);
turnL (6); // turn left
Serial.print ("Left"); // display direction (turn right)
}
if (irrecv.decode (& results))
{
irrecv.resume ();
Serial.println (results.value, HEX);
if (results.value == IRstop)
{
digitalWrite (MotorRight1, LOW);
digitalWrite (MotorRight2, LOW);
digitalWrite (MotorLeft1, LOW);
digitalWrite (MotorLeft2, LOW);
break;
}
}
}
results.value = 0;
}
/ ************************************************* ********************** /
else
{
digitalWrite (MotorRight1, LOW);
digitalWrite (MotorRight2, LOW);
digitalWrite (MotorLeft1, LOW);
digitalWrite (MotorLeft2, LOW);
}
irrecv.resume (); // Continue to accept a set of infrared signals
}
}
void performCommand () {
if (Serial.available ()) {
val = Serial.read ();
}
if (val == 'f') {/ / Forward
advance (10);
} Else if (val == 'z') {/ / Stop Forward
stopp (10);
} Else if (val == 'b') {// Backward
back (10);
} Else if (val == 'y') {// Stop Backward
back (10);
} else if (val == 'l') {/ / Right
turnR (10);
} Else if (val == 'r') {/ / Left
turnL (10);
} Else if (val == 'v') {/ / Stop Turn
stopp (10);
} Else if (val == 's') {/ / Stop
stopp (10);
}
}
In fact, the machine is very flexible in setting up, you can write new programs for it, achieving expansion of functions (especially if you connect other modules - you can connect not only what is included, but also additional elements). What is shown above is just one example, and there are actually dozens of them.
Conclusion : The Robotale machine is designed to learn the basics of electronics, in particular, to study the principle of operation of ARDUINO. Training is conducted in an interactive form, and the owner of the car is trained, using the most effective way - an instant transition from theory to practice.
Source: https://habr.com/ru/post/246579/
All Articles