Arduino programming with ISP programmer
Programming an Arduino Uno on a “pure” C or Assembler is not much more difficult than using the standard programming language for Arduino. In this case, you can greatly win in performance and reduce the size of your program. Next, we will discuss how to reflash Arduino Uno R3 using an ISP programmer and AVR Studio 6.2.
So, we need the Arduino Uno R3 , any ISP programmer compatible with Atmel Studio 6 , one LED and a resistor, for example, 250 Ohms. For programming the Arduino, I use the Atmel ICE universal programmer. As I said, you can use any ISP programmer for Arduino programming. A list of supported programmers can be viewed directly in Atmel Studio.
Everyone knows that the Arduino Uno R3 uses an ATmega328P-PU microcontroller. That is what we will program. In fact, after recording our program, we will no longer have an Arduino, but simply a microcontroller with a strapping. Since we will erase the Arduino bootloader.
Unfortunately, the ATmega328P-PU microcontroller does not support “advanced” debugging via JTAG. You can, of course, debug your Arduino in Arduino Micro with breakpoints and output values to output (you need to explicitly ask what you want to get), but this approach is not always convenient, moreover, Atmel Studio has much more advanced debugging tools (view register states, memory monitoring, etc.). Therefore, we will limit ourselves to simply flashing our controller via ISP.
')
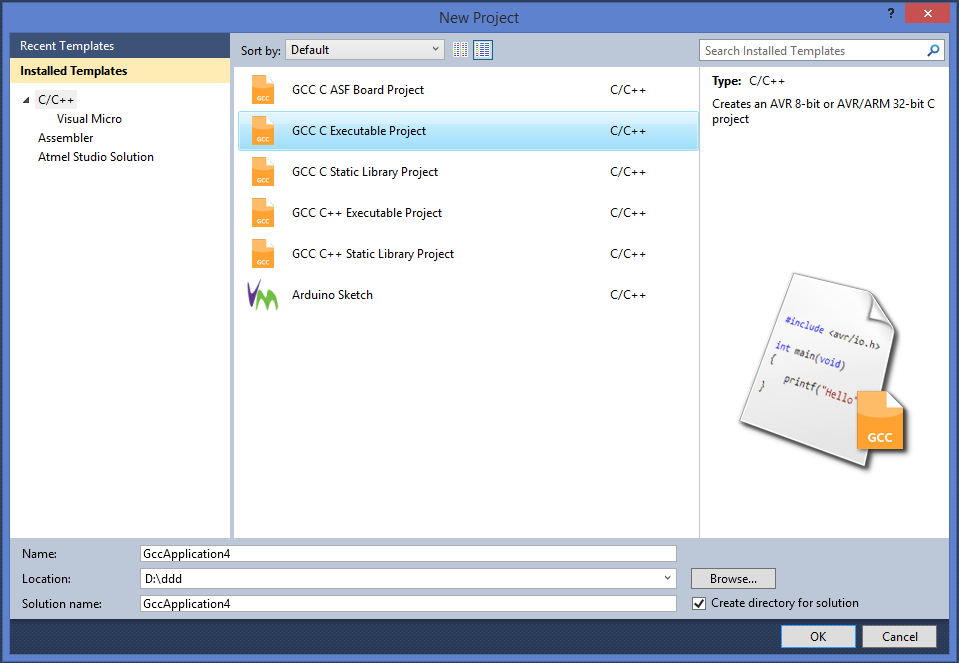
Open Atmel Studio and select the GCC C Exacutable Project , as shown in the figure.
Ok, project is created. Now we need to connect our programmer. I use Atmel ICE. This is a universal programmer that fits most Atmel AVR and ARM microcontrollers. We connect the programmer to the computer, then in Atmel Studio select the item Tools -> Device Programming . Important! If you have Russian Windows, do not create a project in my documents and in general with folders with a Russian name. It is better to create a separate folder on the disk with a name without Cyrillic, for example D: \ myprog. Just do not forget to run the studio with administrator rights.
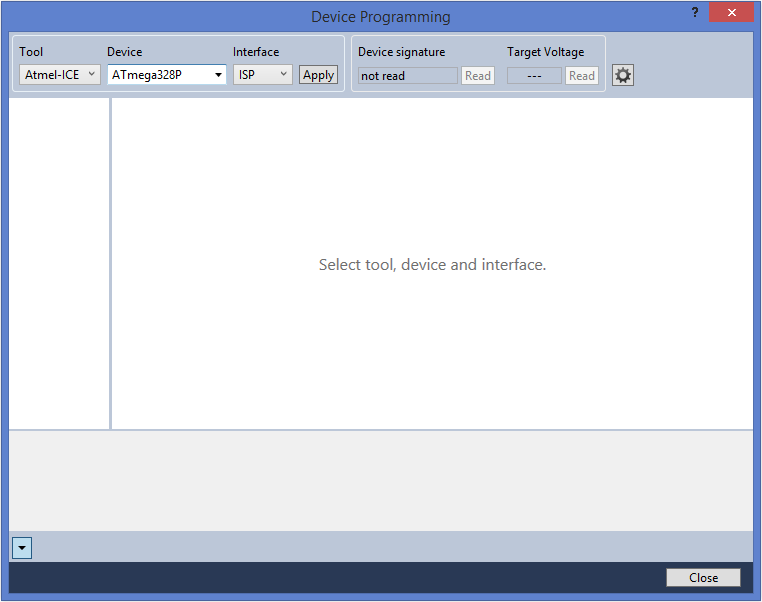
In the opened window, select the following options: Tool - a device for programming / debugging in this case, Atmel ICE, Device - a microcontroller that is going to be programmed, Interface - an interface through which our programmer will flash / debug a microcontroller, in this case only ISP is available.
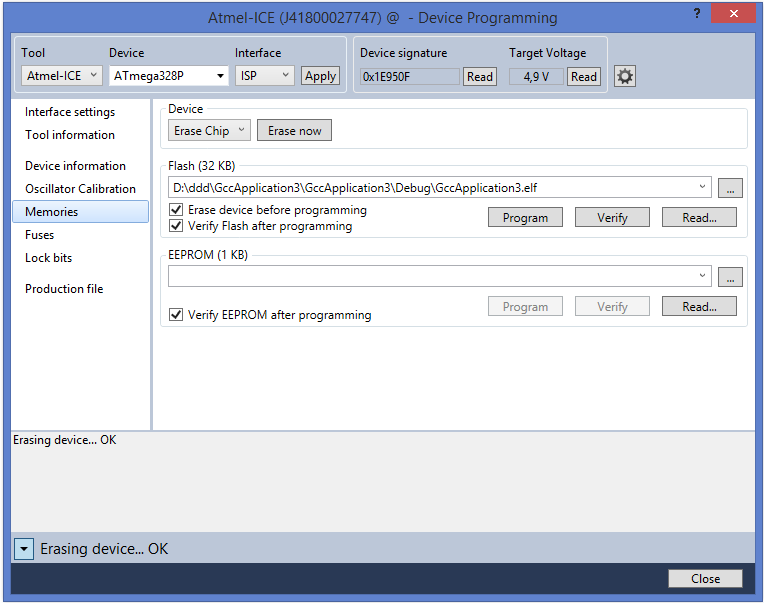
Press the Read button to get the device identifier and its operating voltage. If the Arduino is connected correctly, you should get a device number, for example 0x1E950F and a voltage of 4.9V.
Click Apply. After this, the settings for the programmer should appear as shown in the figure below.

Next, perform the following steps. Change the ISP Clock to 250. Then go to the Memories section and click the Erase now button. Important! After this action, you will not be able to use your Arduino with the Arduino IDE, since the bootloader will be removed.
Now we have everything ready for programming. Let's write a small program for the flashing LED.
Insert the LED into the breadboard and connect it through the current-limiting resistor. Connect the positive foot of the LED to the digital output 5 on the Arduino.
Now you need to figure out what leg of the microcontroller corresponds to the output on the board. For this we need a datasheet .
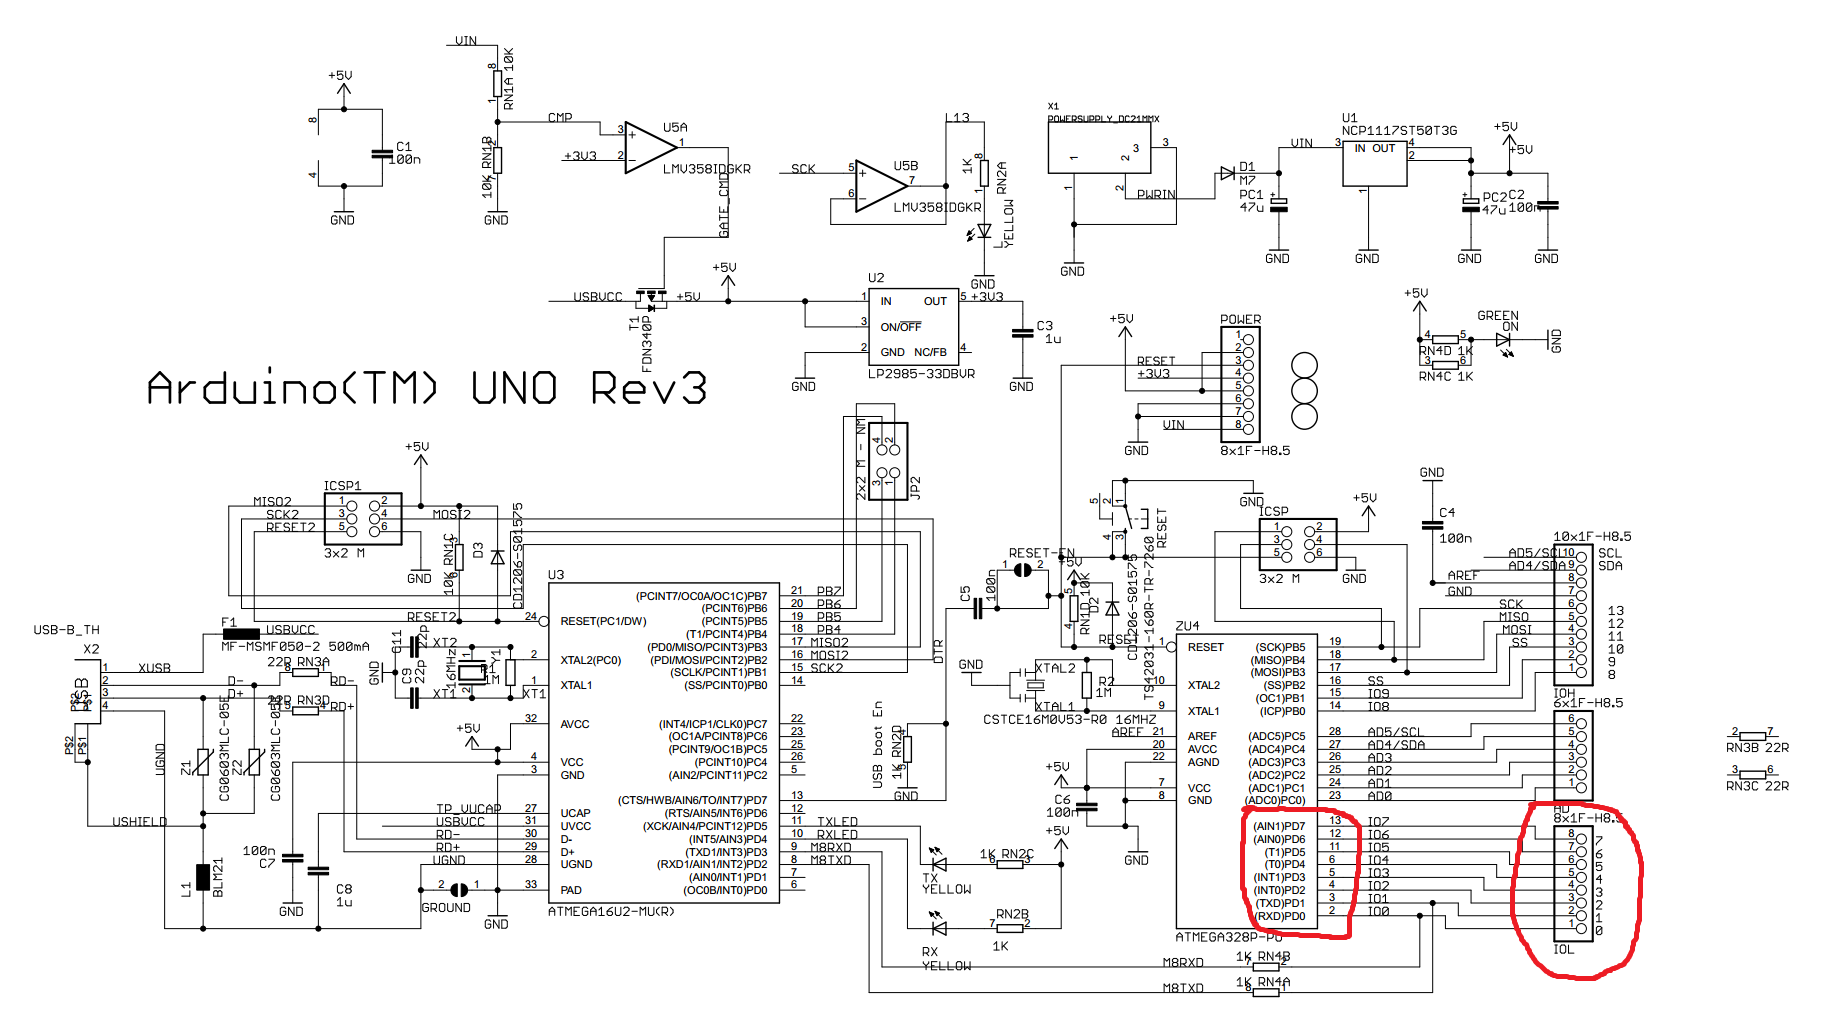
Since we want to control the LED using the 6th pin on the Arduino, we will use the PORTD register and the 5th bit which will apply voltage to the 11th leg of our microcontroller.
Place the following code in the project code file.
Press "Ctrl + Alt + F5" or select the menu item Debug -> Start Without Debugging . The LED will start blinking!
That's all ... Pay attention to the speed of the firmware and the size of the program. This example takes about 186 bytes, which is 0.6% of the controller's memory.

So, we need the Arduino Uno R3 , any ISP programmer compatible with Atmel Studio 6 , one LED and a resistor, for example, 250 Ohms. For programming the Arduino, I use the Atmel ICE universal programmer. As I said, you can use any ISP programmer for Arduino programming. A list of supported programmers can be viewed directly in Atmel Studio.
Everyone knows that the Arduino Uno R3 uses an ATmega328P-PU microcontroller. That is what we will program. In fact, after recording our program, we will no longer have an Arduino, but simply a microcontroller with a strapping. Since we will erase the Arduino bootloader.
Unfortunately, the ATmega328P-PU microcontroller does not support “advanced” debugging via JTAG. You can, of course, debug your Arduino in Arduino Micro with breakpoints and output values to output (you need to explicitly ask what you want to get), but this approach is not always convenient, moreover, Atmel Studio has much more advanced debugging tools (view register states, memory monitoring, etc.). Therefore, we will limit ourselves to simply flashing our controller via ISP.
')
Open Atmel Studio and select the GCC C Exacutable Project , as shown in the figure.
Ok, project is created. Now we need to connect our programmer. I use Atmel ICE. This is a universal programmer that fits most Atmel AVR and ARM microcontrollers. We connect the programmer to the computer, then in Atmel Studio select the item Tools -> Device Programming . Important! If you have Russian Windows, do not create a project in my documents and in general with folders with a Russian name. It is better to create a separate folder on the disk with a name without Cyrillic, for example D: \ myprog. Just do not forget to run the studio with administrator rights.
In the opened window, select the following options: Tool - a device for programming / debugging in this case, Atmel ICE, Device - a microcontroller that is going to be programmed, Interface - an interface through which our programmer will flash / debug a microcontroller, in this case only ISP is available.
Press the Read button to get the device identifier and its operating voltage. If the Arduino is connected correctly, you should get a device number, for example 0x1E950F and a voltage of 4.9V.
Click Apply. After this, the settings for the programmer should appear as shown in the figure below.
Next, perform the following steps. Change the ISP Clock to 250. Then go to the Memories section and click the Erase now button. Important! After this action, you will not be able to use your Arduino with the Arduino IDE, since the bootloader will be removed.
Now we have everything ready for programming. Let's write a small program for the flashing LED.
Insert the LED into the breadboard and connect it through the current-limiting resistor. Connect the positive foot of the LED to the digital output 5 on the Arduino.
Now you need to figure out what leg of the microcontroller corresponds to the output on the board. For this we need a datasheet .
Since we want to control the LED using the 6th pin on the Arduino, we will use the PORTD register and the 5th bit which will apply voltage to the 11th leg of our microcontroller.
Place the following code in the project code file.
#include <avr/io.h> #define F_CPU 16000000UL //16MHz #include <util/delay.h> int main(void) { DDRD |= 1<<6; PORTD &= ~1<<6; while(1) { PORTD |= 1<<6; _delay_ms(100); PORTD &= ~1<<6; _delay_ms(100); } } Press "Ctrl + Alt + F5" or select the menu item Debug -> Start Without Debugging . The LED will start blinking!
That's all ... Pay attention to the speed of the firmware and the size of the program. This example takes about 186 bytes, which is 0.6% of the controller's memory.
Source: https://habr.com/ru/post/246555/
All Articles