WebGL or Three.js vs Babylon.js game world
When I started writing my first toy on
three.js I didn’t think that actually three.js is the tip of the iceberg in the world of WebGL and that there are dozens of different frameworks and each of them has its own particular bias and three.js just one of them.Introduction
1. Basic elements
2. Grouping
3. Movement
4. Particles
5. Animation - 1
6. Animation - 2
7. Simple landscape
8. Static collisions
9. Dynamic collisions
10. Import models
11. Embedding physics engines
12. Shadows, fog
Continued - multiplayer shooter
')
Introduction
Immediately I will note that there is nothing holivarny except the name, the article does not. It was all thought of as just a review of various add-ons and libraries for games for THREE.JS , and BABYLON.JS to describe as another good library. But then, during the development process, it became clear that in many ways duplication often occurs. For example, the particle system in
three.js is expressed as a good addition, and in babylon.js it is built into the library itself and they are configured and work a little differently. The result was rather a review of the same in two different frameworks for WebGL .For obvious reasons, to make a detailed analysis of all existing libraries is simply impossible. Therefore, in the introduction I will limit myself to just a small overview of the most common and with a free license.
- three.js Pioneer and most famous library.
- babylon.js A worthy competitor for
three.js - turbulenz.com Often mentioned among the three most popular along with
babylonandthree.js, well, the number of stars on github speaks for itself.
Basicallyturbulenzpopularized as a library for creating toys, in particular, attracted the attention of quake
The following is a series of less popular frameworks:
- playcanvas.com Cute framework, cute demos. With
Gangnam Stylethey have a nice demo . - scenejs.org Nice library, probably the creators often had to make models related to medicine. Many examples prepared. The syntax is more similar to initializing
jqueryplugins. - voxel.js
- www.senchalabs.org/philogl at first glance, the examples did not make the expected impression.
- www.glge.org Another library.
- www.goocreate.com/blog Online editor, importer.
- www.kickjs.org will just mention here for statistics.
Perhaps this is all that can be listed. Separately, I want to mention that some of the engines for implementing realistic physics are in fact frameworks themselves, but about them just below.
1. Basic elements
Scene
First we need to add our scene to the page.
In THREE.JS, adding occurs with adding to
document.body renderer.domElement var renderer = new THREE.WebGLRenderer( {antialias:true} ); renderer.setSize( window.innerWidth, window.innerHeight ); document.body.appendChild( renderer.domElement ); In BABYLON.JS can not be a container for the scene of any
div for example. It all starts with creating a canvas : <canvas id="renderCanvas"></canvas> Like
three.js , the option also includes antialiasing . var canvas = document.getElementById("renderCanvas"); var engine = new BABYLON.Engine(canvas, true); Next, create the scene itself:
BABYLON.JS
scene gets the parameter engine . scene = new BABYLON.Scene(engine); THREE.JS
The scene is created as if separately. And all the elements of the scene are already added to it.
var scene = new THREE.Scene(); scene.add( sceneMesh ); After that, in THREE.JS, the
renderer is called in any function with the presence requestAnimationFrame is often called an animate or render , and in BABYLON.JS a callback in engine.runRenderLoop .In THREE.JS , most often all the logic of movements is added to
animate , for example, the flight of bullets, the rotation of objects, the running of bots and the like. function animate() { requestAnimationFrame(animate); renderer.render(scene, camera); } As it looks in BABYLON.JS , here, as a rule, some general constructions are sometimes added, counting frame rates, peaks, number of particles, and so on. Simply put, stats. There is a beautiful hook for various animations, more about this in the chapter on animation
engine.runRenderLoop(function () { scene.render(); stats.innerHTML = "FPS: <b>" + BABYLON.Tools.GetFps().toFixed() + "</b> }); Primitives
After initializing the scene, the first thing to do is create primitives.
At
babylon.js everything is similar in a babylon.js compact way. Adding an object to the stage is just an option, and in three.js simple manipulations with the assignments of materials look more compact.BABYLON.JS
var sphere = BABYLON.Mesh.CreateSphere("sphere1", 16, 2, scene); sphere.material = new BABYLON.StandardMaterial("texture1", scene); sphere.material.diffuseColor = new BABYLON.Color3(1, 0, 0); // sphere.material.alpha = 0.3; THREE.JS
var cube = new THREE.Mesh( new THREE.BoxGeometry( 1, 1, 1 ), new THREE.MeshBasicMaterial({ color: 0x00ff00 }) ); scene.add( cube ); Position for coordinates separately indicated the same way:
mesh.position.x = 1; mesh.position.y = 1; mesh.position.z = 1; And to immediately ask there are differences, for example in THREE.JS, you can write like this:
mesh.position.set(1, 1, 1); mesh.rotation.set(1, 1, 1); And in BABYLON.JS, if you don’t peek at the debugger, then basically:
mesh.position = new BABYLON.Vector3(1, 1, 1); Cameras
Both libraries have two of the most used cameras, although
babylon.js for example, has additional babylon.js with different filters and especially for tablets and other devices. Especially for this, you usually still need to connect hand.jsBABYLON.JS
FreeCamera- Essentially shows a perspective projection, but with the ability to assign keys to control, which is convenient to use in games from the first person, more details in the chapter about the movement of the characterArcRotateCamera- The camera assumes rotation around the specified axis, using the mouse or sensor, if you pre-connecthand.js
THREE.JS
PerspectiveCamera- a perspective projection camera, a slightly simplified analogue ofFreeCamera. Depends on proportions and visual field and shows the real world.OrthographicCamera- orthogonal projection camera, shows all the objects of the scene are the same, without proportions.
The
three.js plugin helps to rotate the scene in three.js with the mouse . In babylon.js similar feature is in ArcRotateCamera . new THREE.PerspectiveCamera( 45, width / height, 1, 1000 ); new THREE.OrthographicCamera( width / - 2, width / 2, height / 2, height / - 2, 1, 1000 ); From the extra there is still
CombinedCamera - allows you to set the focal length of the lens and switch between perspective and orthogonal projections. new THREE.CombinedCamera( width, height, fov, near, far, orthoNear, orthoFar ) Lighting
BABYLON.JS
Point Light- Point light, imitates a light spot.Directional Light- A directional slightly diffused light.Spot Light- More like a flashlight imitation, for example, can simulate the movement of a star.HemisphericLight- suitable to simulate a realistic environment, evenly illuminates.
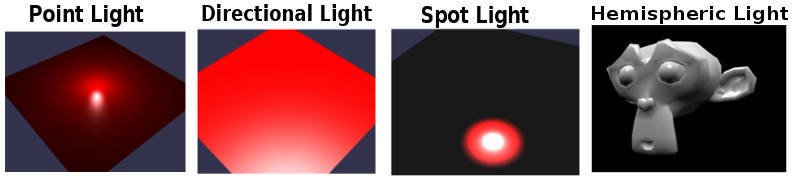
//Point Light new BABYLON.PointLight("Omni0", new BABYLON.Vector3(1, 10, 1), scene); //Directional Light new BABYLON.DirectionalLight("Dir0", new BABYLON.Vector3(0, -1, 0), scene); //Spot Light new BABYLON.SpotLight("Spot0", new BABYLON.Vector3(0, 30, -10), new BABYLON.Vector3(0, -1, 0), 0.8, 2, scene); //Hemispheric Light new BABYLON.HemisphericLight("Hemi0", new BABYLON.Vector3(0, 1, 0), scene); THREE.JS
AmbientLight- represents the overall lighting applied to all objects in the scene.AreaLightis a spatial light source that is sized - wide and high and oriented in space.DirectionalLight- represents a source of direct (directional) illumination - a stream of parallel rays in the direction of an object.HemisphereLight- represents hemispherical lightingSpotLight- represents the spotlight.
//ambientLight var ambientLight = new THREE.AmbientLight( 0x404040 ); //AreaLight areaLight1 = new THREE.AreaLight( 0xffffff, 1 ); areaLight1.position.set( 0.0001, 10.0001, -18.5001 ); areaLight1.width = 10; //DirectionalLight var directionalLight = new THREE.DirectionalLight( 0xffffff, 0.5 ); directionalLight.position.set( 0, 1, 0 ); //PointLight var pointLight = new THREE.PointLight( 0xff0000, 1, 100 ); pointLight.position.set( 50, 50, 50 ); //PointLight var spotLight = new THREE.SpotLight( 0xffffff ); spotLight.position.set( 100, 1000, 100 ); Materials
The approach to materials is already quite different, if
three.js has a list of possible materials, then babylon.js essentially has only one material and different properties are applied to it: transparency, texture mapping followed by their displacement along the axes and like thatA couple of examples:
BABYLON.JS
// var materialSphere6 = new BABYLON.StandardMaterial("texture1", scene); materialSphere6.diffuseTexture = new BABYLON.Texture("./tree.png", scene); // var materialSphere2 = new BABYLON.StandardMaterial("texture2", scene); materialSphere2.diffuseColor = new BABYLON.Color3(1, 0, 0); //Red materialSphere2.alpha = 0.3; 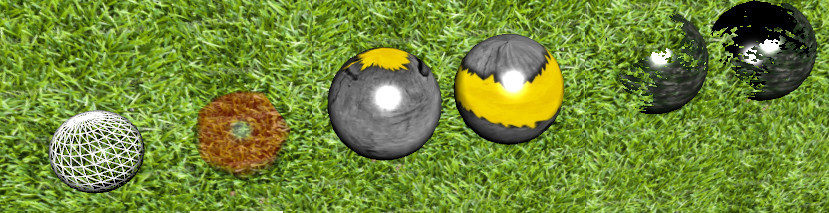
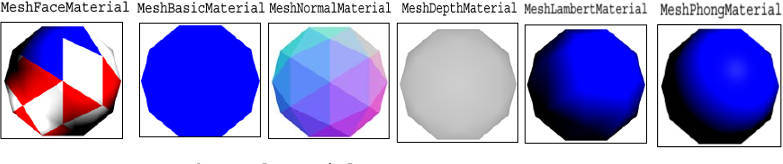
THREE.JS
MeshBasicMaterial- just assigns any color to the primitiveMeshNormalMaterial- a material with shading properties, combines the mixing of colors.MeshDepthMaterial- material with wireframe properties, looks black and whiteMeshLambertMaterial- material for non-shiny surfacesMeshPhongMaterial- material for shiny surfacesMeshFaceMaterial- can combine other types of materials and assign its own material to each polygon.
For example, the base scene for both libraries:
three.js
<html> <head> <title>My first Three.js app</title> <style> body { margin: 0; } canvas { width: 100%; height: 100% } </style> </head> <body> <script src="js/three.min.js"></script> <script> var scene = new THREE.Scene(); var camera = new THREE.PerspectiveCamera( 75, window.innerWidth/window.innerHeight, 0.1, 1000 ); var renderer = new THREE.WebGLRenderer(); renderer.setSize( window.innerWidth, window.innerHeight ); document.body.appendChild( renderer.domElement ); var geometry = new THREE.BoxGeometry( 1, 1, 1 ); var material = new THREE.MeshBasicMaterial( { color: 0x00ff00 } ); var cube = new THREE.Mesh( geometry, material ); scene.add( cube ); camera.position.z = 5; var render = function () { requestAnimationFrame( render ); renderer.render(scene, camera); }; render(); </script> </body> </html> babylon.js
<!doctype html> <html> <head> <meta charset="utf-8"> <title>Babylon - Basic scene</title> <style> #renderCanvas { width: 100%; height: 100%; } </style> <script src="babylon.js"></script> </head> <body> <canvas id="renderCanvas"></canvas> <script type="text/javascript"> var canvas = document.querySelector("#renderCanvas"); var engine = new BABYLON.Engine(canvas, true); var createScene = function () { var scene = new BABYLON.Scene(engine); scene.clearColor = new BABYLON.Color3(0, 1, 0); var camera = new BABYLON.FreeCamera("camera1", new BABYLON.Vector3(0, 5, -10), scene); camera.setTarget(BABYLON.Vector3.Zero()); camera.attachControl(canvas, false); var light = new BABYLON.HemisphericLight("light1", new BABYLON.Vector3(0, 1, 0), scene); light.intensity = .5; var sphere = BABYLON.Mesh.CreateSphere("sphere1", 16, 2, scene); sphere.position.y = 1; var ground = BABYLON.Mesh.CreateGround("ground1", 6, 6, 2, scene); return scene; }; var scene = createScene(); engine.runRenderLoop(function () { scene.render(); }); </script> </body> </html> If we talk about conciseness, then, looking at the basic scene, the number of lines comes out about the same, but then we will see that everything is not so simple.
2. Grouping
Perhaps, one of the most necessary things for the game, which is necessary for tying a weapon or spacecraft to a camera, weapons to a player, etc.
BABYLON.JS
There are several ways to group. The simplest and most obvious is to assign the
parent property. For example, if you need to fix some object behind the camera, then: var mesh = new BABYLON.Mesh.CreateBox('name', 1.0, scene); mesh.position = new BABYLON.Vector3( 1, -1, 5); mesh.parent = camera; And then we control the camera from the first person.
In THREE.JS, we need to create a parent object for all primitives and place other objects in it, and then manage this parent object at our discretion:
var parent = new THREE.Object3D(); parent.add( camera ); parent.add( mesh ); parent.position.y = 10; 3. Character movement
For games from the first person, it is necessary that the camera showing the perspective is controlled by the mouse and from the keyboard.
BABYLON.JS
It's all quite simple
FreeCamera allows FreeCamera to immediately control the movement. It is enough to specify camera.detachControl(canvas) . The camera can be set to a number of properties, for example, camera.speed = 1 speed, assign the “forward”, “backward”, “left”, “right” keys, etc. camera.keysUp = [38, 87]; camera.keysDown = [40, 83]; camera.keysLeft = [37, 65]; camera.keysRight = [39, 68]; It should be noted that the full mouse control is enabled only after connecting
PointerLock . The camera can be assigned to children who will ride with it. Accordingly, if we write a multiplayer game, then it is better to transfer the coordinates of the camera camera.position , camera.cameraRotation server for control.But with THREE.JS everything is much more complicated. The camera itself is just a camera, and to make it move you need to register a position change for each key press. Naturally, the smoothness of the movement will also have to worry.
To control the mouse, too, everything is not easy - to change, to substitute the coordinates in
mesh.rotation.set(x, y, z) is not enough. Here we are saved a little by an example from author's three.js . Therefore, I will focus only on a couple of parts. To rotate the camera with an object with the mouse, you first need to create one new THREE.Object3D() , put the other inside it and rotate it inside. Then we get the appearance of a turn around its axis. It all looks in abbreviated form like this: var pitchObject = new THREE.Object3D(); pitchObject.add( camera ); var yawObject = new THREE.Object3D(); yawObject.position.y = 10; yawObject.add( pitchObject ); var onMouseMove = function ( event ) { yawObject.rotation.y -= event.movementX * 0.002; pitchObject.rotation.x -= event.movementY * 0.002; pitchObject.rotation.x = Math.max( - Math.PI / 2, Math.min( Math.PI / 2, pitchObject.rotation.x ) ); }; document.addEventListener( 'mousemove', onMouseMove, false ); The keys, of course, need to move the first object.
4. Particles
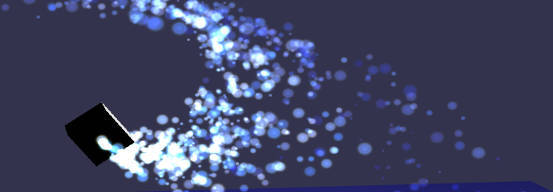
often necessary for drawing fire, explosions, salutes, shots and much more.
In BABYLON.JS, the system of the part is built in and replete with a large number of settings. But to reproduce any effect, you need to experiment or run on the forums to look for the one you like. Plus it is necessary to tie to the finished mesh. It can, of course, be made invisible, but one could simply make it possible to simply indicate the coordinates of the location.
An example of a small fire at babylon.js:
var particleSystem = new BABYLON.ParticleSystem("particles", 1000, scene); particleSystem.particleTexture = new BABYLON.Texture("./img/flare.png", scene); particleSystem.emitter = obj; // , // particleSystem.minEmitBox = new BABYLON.Vector3(-0.5, 1, -0.5); // Starting all from particleSystem.maxEmitBox = new BABYLON.Vector3(0.5, 1, 0.5); // To... // particleSystem.color1 = new BABYLON.Color4(1, 0.5, 0, 1.0); particleSystem.color2 = new BABYLON.Color4(1, 0.5, 0, 1.0); particleSystem.colorDead = new BABYLON.Color4(0, 0, 0, 0.0); // particleSystem.minSize = 0.3; particleSystem.maxSize = 1; // , max min particleSystem.minLifeTime = 0.2; particleSystem.maxLifeTime = 0.4; // particleSystem.emitRate = 600; particleSystem.blendMode = BABYLON.ParticleSystem.BLENDMODE_ONEONE; particleSystem.gravity = new BABYLON.Vector3(0, 0, 0); // particleSystem.direction1 = new BABYLON.Vector3(0, 4, 0); particleSystem.direction2 = new BABYLON.Vector3(0, 4, 0); particleSystem.minAngularSpeed = 0; particleSystem.maxAngularSpeed = Math.PI; // particleSystem.minEmitPower = 1; particleSystem.maxEmitPower = 3; particleSystem.updateSpeed = 0.007; particleSystem.start(); THREE.JS
It is connected using a third-party plug-in, but has the ability to immediately reproduce the prepared effects and set the time. The place of appearance of particles can be given by coordinates
Good particle engine for
three.jsProbably the nicest particle engine.
Ready examples with ready settings.
5. Animation - 1
As a rule, animation is needed to reproduce some effects, for example, the movements of celestial bodies, the movements of bots, and the like. There are several options for how to make different objects move, consider them in order.
BABYLON.JS
You can insert animation anywhere in the library standard way:
scene.registerBeforeRender(function () { mesh.position.x = 100 * Math.cos(alpha); donutmesh.position.y = 5; mesh.position.z = 100 * Math.sin(alpha); alpha += 0.01; }); Sometimes it is convenient for each object to call its animation.
THREE.JS
For
three.js there is an opportunity to make something move only in the loop of animation: var render = function () { requestAnimationFrame( render ); cube.rotation.x += 0.1; cube.rotation.y += 0.1; renderer.render(scene, camera); }; render(); 6. Animation - 2
In addition to the undefined animation in advance, when you do not know where to run, there is animation defined, when, for example, a character under certain circumstances makes two or three known steps or simulates, for example, automatic shooting.
BABYLON.JS
Simple animation with boxing resizing:
// 30 var animationBox = new BABYLON.Animation("tutoAnimation", "scaling.x", 30, BABYLON.Animation.ANIMATIONTYPE_FLOAT, BABYLON.Animation.ANIMATIONLOOPMODE_CYCLE); // var keys = []; keys.push({ frame: 0, value: 1 }); keys.push({ frame: 20, value: 0.2 }); keys.push({ frame: 100, value: 1 }); // animationBox.setKeys(keys); box1.animations.push(animationBox); // scene.beginAnimation(box1, 0, 100, true); THREE.JS
The animation basically involves manipulating
geometry.animation.hierarchy and invoking geometry.animation.hierarchyIt might look something like this.
var loader = new THREE.JSONLoader(); loader.load( "models/skinned/scout/scout.js", function( geometry ) { for ( var i = 0; i < geometry.animation.hierarchy.length; i ++ ) { var bone = geometry.animation.hierarchy[ i ]; var first = bone.keys[ 0 ]; var last = bone.keys[ bone.keys.length - 1 ]; last.pos = first.pos; last.rot = first.rot; last.scl = first.scl; } geometry.computeBoundingBox(); THREE.AnimationHandler.add( geometry.animation ); var mesh = new THREE.SkinnedMesh( geometry, new THREE.MeshFaceMaterial() ); mesh.position.set( 400, -250 - geometry.boundingBox.min.y * 7, 0 ); scene.add( mesh ); animation = new THREE.Animation( mesh, geometry.animation.name ); animation.play(); }); A small example: alteredqualia.com/three/examples/webgl_animation_skinning_tf2.html
7. Simple landscape
Often you need to create some kind of simple surrounding landscape, small hills or mountains. And so it was fast.
BABYLON.JS
It occurs by combining one original landscape image, which will be the background, and another black and white - it turns out like extrusion.
var groundMaterial = new BABYLON.StandardMaterial("ground", scene); groundMaterial.diffuseTexture = new BABYLON.Texture("./img/earth.jpg", scene); var ground = BABYLON.Mesh.CreateGroundFromHeightMap("ground", "./img/heightMap.jpg", 200, 200, 250, 0, 10, scene, false); ground.material = groundMaterial; 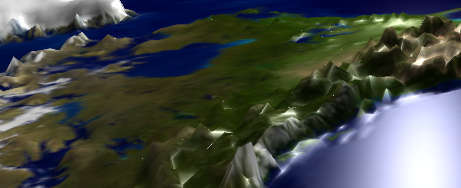
THREE.JS
There are additions with similar functionality.
There is a simple option, which is a ring of slides.
github.com/jeromeetienne/threex.montainsarena
var mesh = new THREEx.MontainsArena() scene.add(mesh) 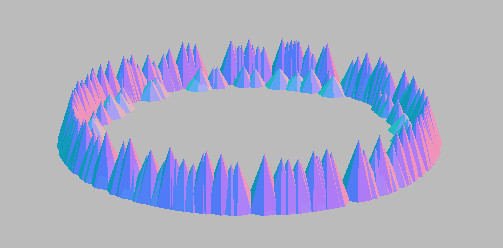
There are a little more difficult, procedurally generated surfaces.
var geometry = THREEx.Terrain.heightMapToPlaneGeometry(heightMap) THREEx.Terrain.heightMapToVertexColor(heightMap, geometry) var material = new THREE.MeshPhongMaterial({ shading :THREE.SmoothShading, vertexColors :THREE.VertexColors}); var mesh = new THREE.Mesh( geometry, material ); scene.add( mesh ); 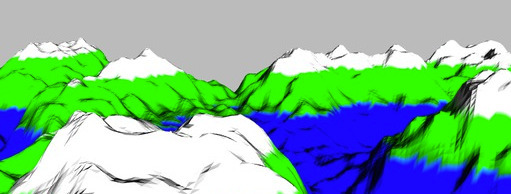
8. Static collisions
Collisions of objects in advance provided.
BABYLON.JS
For each object you can set:
But it should be noted that, for example, it is
checkCollisions to set up checkCollisions on a large number of objects or on a volume area, everything will slow down.It is better to write something like:
if ( mesh.position.y < 10 ) mesh.position.y = 10; And around some landscape bends it is better to build corridors from invisible primitives.
THREE.JS
You still have to manually check. Or using
RayCasting9. Dynamic collisions
They are used when you can’t exactly know if a single object will collide with another. And if it happens, then you need to somehow react to it.
Everything is identical, practically. Examples of balls hitting a bullet in objects.
BABYLON.JS
// meshList - scene.registerBeforeRender(function () { for (var i=0; i < meshList.length; i++ ){ if(bullet.intersectsMesh(meshList[i], true)) console.log(' , :' meshList[i].position); } }); THREE.JS
function animate() { requestAnimationFrame(animate); for(var res = 0; res < meshList.length; res++) { var intersections = raycaster.intersectObject(meshList[res]); if (intersections.length > 0) console.log(' , :' ballMeshes[i].position); } renderer.render(scene, camera); } 10. Import models
Here I experimented mostly only in
Blender so I can only speak for him.Installing and configuring imports looks the same.
- Download the exporter for
babylon.jsat github.com/BabylonJS/Babylon.js/tree/master/Exporters/Blender - Copy it to the directory
./Blender/2.XX/scripts/addons - restart
blender, and in the->orCtrl+Alt+Utabset the necessary tick. After that, the menu will be able to export to the desired format.
But at the import stage, something interesting begins.
BABYLON.JS
There are a couple of nuances. At first glance, everything is simple, when importing there are no additional check marks - I pressed the button and that's it. But then it turns out that some models were not imported, some seemed to be imported normally, but for some reason they do not respond to commands, position changes or scaling.
For example, if you import to
Blender in .obj format, and then export from Blender to .babylon , then there is a high probability that it may not work properly. , , .blend , , .babylon c AssetsManager // assetsManager var assetsManager = new BABYLON.AssetsManager(scene); // var meshTask = assetsManager.addMeshTask("obj task", "", "./", "obj.babylon"); // onSuccess onError : meshTask.onSuccess = function (task) { task.loadedMeshes[0].position = new BABYLON.Vector3(0, 0, 0); } // assetsManager onFinish, onTaskSuccess, onTaskError // assetsManager.onFinish = function (tasks) { engine.runRenderLoop(function () { scene.render(); }); }; . , .
THREE.JS
three.js . , ..die c ColladaLoader var loader = new THREE.ColladaLoader(); loader.load("obj.dae", function (result) { scene.add(result.scene); }); .js blender loader = new THREE.JSONLoader(); loader.load( "./model.js", function( geometry ) { mesh = new THREE.Mesh( geometry, new THREE.MeshNormalMaterial() ); mesh.scale.set( 10, 10, 10 ); mesh.position.y = 150; scene.add( mesh ); }); .obj var loader = new THREE.OBJLoader(); loader.load( './model.obj', function ( object ){ scene.add( object ); }); var loader = new THREE.SceneLoader(); loader.load('jet.json', function(res) { scene.add(res.scene); renderer.render(res.scene, camera); }); three.js .babylon var loader = new THREE.BabylonLoader( manager ); loader.load( 'models/babylon/skull.babylon', function ( babylonScene ) { scene.add( babylonScene ); }, onProgress, onError ); three.js : var manager = new THREE.LoadingManager(); manager.onProgress = function (item, loaded, total) { console.log( item, loaded, total ); }; var loader = new THREE.OBJLoader( manager ); loader.load( './model.obj', function (object) { }); 11. .
, . , , . , . , , .
. — , , , .
BABYLON.JS
oimo.js cannot.jsoimo.js babylon.js : // scene = new BABYLON.Scene(engine); scene.enablePhysics(new BABYLON.Vector3(0,-10,0), new BABYLON.OimoJSPlugin()); // grount.setPhysicsState({ impostor: BABYLON.PhysicsEngine.BoxImpostor, move:false}); // sphere.setPhysicsState({impostor:BABYLON.PhysicsEngine.SphereImpostor, move:true, mass:1, friction:0.5, restitution:0.5}); box.setPhysicsState({impostor:BABYLON.PhysicsEngine.BoxImpostor, move:true, mass:1, friction:0.5, restitution:0.1}); oimo.js babylon.js :blogs.msdn.com/b/davrous/archive/2014/11/18/understanding-collisions-amp-physics-by-building-a-cool-webgl-babylon-js-demo-with-oimo-js.aspx
pixelcodr.com/tutos/oimo/oimo.html
pixelcodr.com/tutos/physics/physics.html
THREE.JS
oimo.js // oimo.js var onRenderFcts= []; var world = new OIMO.World(); // onRenderFcts.push(function(delta){ world.step() }); // IOMO.Body three.js var mesh = new THREE.Mesh( new THREE.CubeGeometry(1,1,1), new THREE.MeshNormalMaterial() ) scene.add(mesh) var body = THREEx.Iomo.createBodyFromMesh(world, mesh) var updater = new THREEx.Iomo.Body2MeshUpdater(body, mesh) // updater.update() 12. .
BABYLON.JS
// var shadowGenerator = new BABYLON.ShadowGenerator(1024, light); shadowGenerator.getShadowMap().renderList.push(torus); ground.receiveShadows = true; // THREE.JS
// var mesh = new THREE.Mesh( new THREE.BoxGeometry( 1500, 220, 150 ), new THREE.MeshPhongMaterial({color:0xffdd99})); mesh.position.z = 20; mesh.castShadow = true; mesh.receiveShadow = true; scene.add( mesh ); // scene.fog = new THREE.Fog( 0x59472b, 1000, 500 ); // - 2 scene.fog = new THREE.FogExp2(0xD6F1FF, 0.0005); 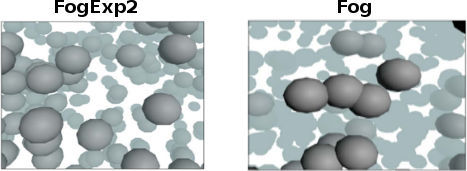
PS , , . , ,
WebGL , , . ..
THREE.JS
API
three.js
stemkoski
BABYLON.JS
API
babylon.js
babylon.js
Documentation
Source: https://habr.com/ru/post/246259/
All Articles