Joomla template design for a front-end developer completely unfamiliar with CMS

The word Jumla in Swahili means "all together", "as one".
Once upon a time, for quite a long time, I had installed HTML / CSS / JavsScript websites and had no idea about CMS.
The frightening moment was that, as I thought, owning PHP is extremely necessary, however, in fact, some basic knowledge turned out to be enough (simple code turns out to be understandable to the programmer of any other language, and it is not necessary to go into the wilds).
For a person who owns only the layout and scripts, it is enough to know some specific points, in order to start working with Joomla on the go.
Something in these moments is similar to other CMS, something is different.
I tried to present these moments briefly. If I knew them right away, I could start creating user-administered sites much faster.
So, if you own HTML, but have no idea about Joomla CMS, then you should click the button below.
For a general overview, the basic concepts of this CMS:
Template / Template - a set of folders / files that define the layout and design of site pages. On one site you can have many installed templates. Thus, you can change the design of the site in seconds, switching from one template to another.
The HTML template defines the areas of the page (as a rule, these are div blocks) in which certain content will be displayed. For example, as a rule, page content is displayed in the central area. The owner / author of the site will be able to create article articles using the built-in WYSIWYG editor, which will be displayed in this area.
Also in the HTML template can be defined areas for displaying various objects.
As a rule, these are areas such as: the header of the document (what is always displayed at the top), the footer (what is displayed at the bottom), the area for the menu, some areas on the sides. Here everything depends on the wishes of the author of the template. These areas are called positions.
The template has other functions that will be described below.
Module / Module - an object with HTML / PHP / CSS / JavaScript code that can be displayed in certain designated areas of the page. An example of typical models: site language switch, site authorization block, site search string, voting, etc.
Plugin / Plugin is an object with HTML / PHP / CSS / JavaScript code that can be embedded inside the page content. The difference from the module is only in the place of display on the page. The author of the article, when working in WYSIWYG editor, will be able to insert a certain code (like HTML code). On the site itself, this code will be replaced by an object similar to the module.
Component / Component - a global object that has many settings. As a rule, modules and plug-ins go in addition to the component. For example, a guest book, an online store, a forum can be a component. All these objects have many settings and can be displayed on a separate page.
WYSIWYG editor - online text editor (what you see is what you get). Using a simplified panel similar to the Microsoft Word or WordPad panel, you can create articles that the editor automatically converts to HTML code.
Both modules and plugins and components are extensions / extensions. With the help of extensions, installing the CMS itself, you can make from the site both an online store and a blog and a forum and what your heart desires.
All extensions are provided in the form of a zip archive, which can be downloaded / installed to the site through the administrative panel.
The main directory of extensions is the official Joomla website http://extensions.joomla.org/
Downloading from it you can be with a certain degree of confidence that the extension does not contain malicious or advertising code. At the very least, I would like to believe that all such extensions are promptly ruthlessly removed from the directory. I, like many, prefer the popular, and accordingly proven extensions, as their developers appreciate their reputation.
The CMS itself is developing and during its development it went through the stages of global changes, which resulted in the fact that currently there are several versions of the system. This is version 1.5 version 2.5 and version 3.x (3.x means that versions of the line 3 are compatible with each other - 3.1 3.2 and 3.3)
If you have a website on Joomla 2.5, then only extensions from this version are suitable for you, that is, extensions of different versions are incompatible.
')
How to install extensions and make settings I will not consider. The sensible schoolboy and the person far from IT will deal with it. I am more interested in the moments of developing and editing my own template and extension, as well as changing the design of third-party extensions.
You can find hundreds or even thousands of paid and free templates with a ready-made design and change them to your taste, but often they contain many completely unnecessary functions for you. A more professional approach would be to create your own template.
Blank blank template can be found on the network, but you can create from scratch.
The template is a folder archived in zip format archive.
The following files are necessary for the folder:
index.php - the main file that will describe the structure and design of the page
component.php - display of the page in a form acceptable to the printer
error.php - presentation for page 404
favicon.ico - icon for our site
template_preview.png and template_thumbnail.png - template preview pictures
templateDetails.xml - the file that contains the description of the template.
For convenience of structuring, inside the folder there are also subfolders with clear names:
css - for styles
images - for images
js - for scripts
language - for ini files with translation of texts into various languages.
Please note that for security reasons, each folder must contain an empty index.html file.
In the template folder may be present and html folder. This folder contains changes in appearance for any Joomla components - the so-called overrides.
In general, the template structure remains unchanged for Joomla 1.5, 2.5 and 3.x versions
Consider the contents of a simplified version of templateDetails.xml
After cap
<?xml version="1.0" encoding="utf-8"?> <!DOCTYPE install PUBLIC "-//Joomla! 2.5//DTD template 1.0//EN" "http://www.joomla.org/xml/dtd/1.6/template-install.dtd"> the main tag follows:
<extension version="2.5" type="template" client="site"> Next, the header with the description of the template:
<name>blanktemplate</name><!-- --> <creationDate>2014-12-20</creationDate><!-- --> <author>your name</author><!-- --> <copyright>Copyright 2014 alexalex.ru</copyright><!-- --> <authorEmail>admin@alexalex.ru</authorEmail><!-- e-mail --> <authorUrl>http://www.alexalex.ru</authorUrl><!-- --> <version>1.0.0</version><!-- --> Next, as a rule, there is a description of the template, which can be issued using HTML:
<description><![CDATA[ <h1> </h1> <p> <a href="http://www.alexalex.ru" target="_blank"> !</a>.</p> ]]></description> All files required for the template must be described in templateDetails.xml
<files> <folder>css</folder> <folder>images</folder> <folder>js</folder> <folder>language</folder> <filename>component.php</filename> <filename>error.php</filename> <filename>index.php</filename> <filename>index.html</filename> <filename>template_preview.png</filename> <filename>template_thumbnail.png</filename> <filename>favicon.ico</filename> <filename>templateDetails.xml</filename> </files> If you have not forgotten, then the page of our site will be divided into parts - positions.
Positions are usually located inside div blocks. An example of how positions can be located from joomla.org:

These positions also need to be specified in the template description. Number of positions according to your desire. Names you can come up with your own, or you can follow the standard names:
<positions> <position>top</position> <position>footer</position> <position>debug</position> </positions> If you have a multilingual website, then you need to describe the languages you use.
<languages folder="language"> <language tag="en-GB">en-GB/en-GB.tpl_blanktemplate.ini</language> <language tag="ru-RU">ru-RU/ru-RU.tpl_blanktemplate.ini</language> </languages> This description implies that inside the language folder you have 2 subfolders en-GB and ru-RU which contain files with translations. These files contain the text in the form “KEY = value”. And the key name must be typed in capital letters.
For example:
DEMOTEXT = “Sample Text”
Also in the template, you can describe various switches for changing the settings of the template that a simple user or a site administrator (not a programmer) can change. On the website, the switches look like the following:
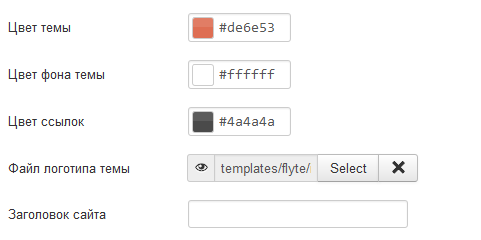
For example, consider the opportunity to set some color. Create one of the switches. To do this, add this piece of code:
<config> <fields name="params"> <fieldset name="basic"> <field name="templateBGColor" class="" type="color" default="#FFFFFF" label=" " description=" " /> </fieldset> </fields> </config> The value of this color can be displayed on the page. How to do this, read on.
Consider now the file index.php and try to make some layout.
At the very beginning of the file, add the code for php:
<?php defined( '_JEXEC' ) or die; // $doc = JFactory::getDocument(); // , $tpath = $this->baseurl.'/templates/'.$this->template; // // css $doc->addStyleSheet($tpath.'/css/template.css.php'); // javasript $doc->addScript($tpath."/js/custom.js"); ?> Next, the standard page header:
<!doctype html> <html lang="<?php echo $this->language; ?>" class="no-js"> <head> <jdoc:include type="head" /> </head> Here <jdoc: include type = "head" /> will add tags typical of the header to the header. Such, for example, as: meta-tags with a description, keywords, some other extensible files, scripts and styles, etc.
In our body tag, we add the color output of our switch to the style value so that site administrators unfamiliar with css can change the background page color from the admin area:
<body style="background-color:<?php echo $this->params->get('templateBGColor', '#FFFFFF'); ?>"> Further we can type up our template on a div.
The output of the position inside the HTML5 div or semantic block will be as follows:
<div> <?php if ($this->countModules( 'footer' )) : ?> <jdoc:include type="modules" name="footer" /> <?php endif; ?> </div> This code checks whether any module should be displayed at the given position of the footer, and if it should be, displays the contents of the module. Of course, you can not make a check, but simply display in any case:
<jdoc:include type="modules" name="footer" /> To display a different position, you only need to replace the footer with the name of a different position.
To display the main content of the page tags are used:
<jdoc:include type="message" /> <jdoc:include type="component" /> Also put them inside the desired div.
As an example of the design of the template I will give a couple of examples:
If you have not forgotten (and if you have forgotten, then go back a couple of paragraphs) - we have 2 folders en-GB and ru-RU with the translation files. In them, we have introduced for example the text in two languages. This text is marked with the code word DEMOTEXT. We can display this text using php code:
<?php echo JText::_( 'DEMOTEXT' ) ?> Moreover, this text can be inserted into the values of the parameter (for example, title or alt) and as the contents of paragraphs, and even in the url links.
The pictures in the template are usually in the images directory. In order to display a picture, we will also use a small php code that will display the path to the folder in which our template is located.
<?php echo $tpath; ?> The variable $ tpath we declared at the very beginning of the page, and in what subfolder of the template is the picture we know.
Example of displaying logo images:
<img src="<?php echo $tpath; ?>/images/logo.png" alt="Logo" onclick="sayHelloHabr()"> Here onclick = “sayHelloHabr ()” will launch the function from the custom.js file that we connected as an external script file.
The full code of our simple template:
<?php defined( '_JEXEC' ) or die; // $doc = JFactory::getDocument(); // , $tpath = $this->baseurl.'/templates/'.$this->template; // // css $doc->addStyleSheet($tpath.'/css/template.css.php'); // javasript $doc->addScript($tpath."/js/custom.js"); ?> <!doctype html> <html lang="<?php echo $this->language; ?>" class="no-js"> <head> <jdoc:include type="head" /> </head> <body style="background-color:<?php echo $this->params->get('templateBGColor', '#FFFFFF'); ?>"> <p><?php echo JText::_( 'DEMOTEXT' ) ?></p> <header class="header"> <img src="<?php echo $tpath; ?>/images/logo.png" alt="Logo" onclick="sayHelloHabr()"> <nav class="navtop" role="navigation"> <?php if ($this->countModules( 'top' )) : ?> <div class="top"> <jdoc:include type="modules" name="top" /> </div> <?php endif; ?> </nav> </header> <main class="content"> <jdoc:include type="message" /> <jdoc:include type="component" /> </main> <footer class="footer"> <?php if ($this->countModules( 'footer' )) : ?> <jdoc:include type="modules" name="footer" /> <?php endif; ?> </footer> <jdoc:include type="modules" name="debug" /> </body> </html> What happened in the end you can download the link - a simple template .
Make a beautiful design, even for the coder, not to mention the front-end developer is not a problem.
The site template, in fact, is a view from the MVC pattern (model-view-controller = model-view-controller). That is, this is the part that is responsible for information output and design. Most modules and components follow the same principle.
If you need to change the appearance of any module, you can take its presentation and change the HTML code to your needs.
Often, the module code is updated. Any errors are eliminated. In order to not change the view of the view after each update of the module, you can create an override. This is a file or files that will be located in the template folder and will determine the appearance of the module.
This can be done in the administrative panel along the way:
Extensions - Template manager - Templates (Extensions - Template Manager - Templates)
- click on our template (we get into the online editor of our template) and go to the Create Overrides tab (Create override)
Having created the override, we will be able to see that files or even folders will be added to the html folder. You can put the html folder with these files right into our zip template and install the ready-made template on the site already having the appearance changes for some modules in it.
Try to create your own template for the site and in case of success you can edit submissions just as easily, and there you’re close to creating different modules or plug-ins!
Source: https://habr.com/ru/post/246061/
All Articles